flume是一个分布式、可靠、和高可用的海量日志采集、聚合和传输的系统。支持在日志系统中定制各类数据发送方,用于收集数据;同时,Flume提供对数据进行简单处理,并写到各种数据接受方(比如文本、HDFS、Hbase等)的能力 。
一、什么是Flume?
flume 作为 cloudera 开发的实时日志收集系统,受到了业界的认可与广泛应用。Flume 初始的发行版本目前被统称为 Flume OG(original generation),属于 cloudera。但随着 FLume 功能的扩展,Flume OG 代码工程臃肿、核心组件设计不合理、核心配置不标准等缺点暴露出来,尤其是在 Flume OG 的最后一个发行版本 0.94.0 中,日志传输不稳定的现象尤为严重,为了解决这些问题,2011 年 10 月 22 号,cloudera 完成了 Flume-728,对 Flume 进行了里程碑式的改动:重构核心组件、核心配置以及代码架构,重构后的版本统称为 Flume NG(next generation);改动的另一原因是将 Flume 纳入 apache 旗下,cloudera Flume 改名为 Apache Flume。
flume的特点:
flume是一个分布式、可靠、和高可用的海量日志采集、聚合和传输的系统。支持在日志系统中定制各类数据发送方,用于收集数据;同时,Flume提供对数据进行简单处理,并写到各种数据接受方(比如文本、HDFS、Hbase等)的能力 。
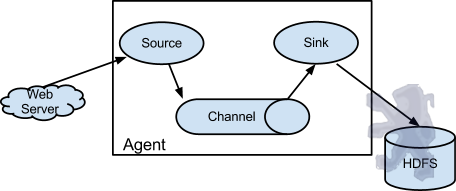
flume的数据流由事件(Event)贯穿始终。事件是Flume的基本数据单位,它携带日志数据(字节数组形式)并且携带有头信息,这些Event由Agent外部的Source生成,当Source捕获事件后会进行特定的格式化,然后Source会把事件推入(单个或多个)Channel中。你可以把Channel看作是一个缓冲区,它将保存事件直到Sink处理完该事件。Sink负责持久化日志或者把事件推向另一个Source。
flume的可靠性
当节点出现故障时,日志能够被传送到其他节点上而不会丢失。Flume提供了三种级别的可靠性保障,从强到弱依次分别为:end-to-end(收到数据agent首先将event写到磁盘上,当数据传送成功后,再删除;如果数据发送失败,可以重新发送。),Store on failure(这也是scribe采用的策略,当数据接收方crash时,将数据写到本地,待恢复后,继续发送),Besteffort(数据发送到接收方后,不会进行确认)。
flume的可恢复性:
还是靠Channel。推荐使用FileChannel,事件持久化在本地文件系统里(性能较差)。
flume的一些核心概念:
Agent使用JVM 运行Flume。每台机器运行一个agent,但是可以在一个agent中包含多个sources和sinks。
Client生产数据,运行在一个独立的线程。
Source从Client收集数据,传递给Channel。
Sink从Channel收集数据,运行在一个独立线程。
Channel连接 sources 和 sinks ,这个有点像一个队列。
Events可以是日志记录、 avro 对象等。
Flume以agent为最小的独立运行单位。一个agent就是一个JVM。单agent由Source、Sink和Channel三大组件构成,如下图:
值得注意的是,Flume提供了大量内置的Source、Channel和Sink类型。不同类型的Source,Channel和Sink可以自由组合。组合方式基于用户设置的配置文件,非常灵活。比如:Channel可以把事件暂存在内存里,也可以持久化到本地硬盘上。Sink可以把日志写入HDFS, HBase,甚至是另外一个Source等等。Flume支持用户建立多级流,也就是说,多个agent可以协同工作,并且支持Fan-in、Fan-out、Contextual Routing、Backup Routes,这也正是NB之处。如下图所示:

二、flume的官方网站在哪里?
http://flume.apache.org/
三、在哪里下载?
http://www.apache.org/dyn/closer.cgi/flume/1.5.0/apache-flume-1.5.0-bin.tar.gz
四、如何安装?
1)将下载的flume包,解压到/home/hadoop目录中,你就已经完成了50%:)简单吧
2)修改 flume-env.sh 配置文件,主要是JAVA_HOME变量设置
|
1
2
3
4
5
6
7
8
9
10
11
12
13
14
15
16
17
18
19
20
21
22
23
24
25
26
27
28
29
30
31
|
root@m1:/home/hadoop/flume-1.5.0-bin# cp conf/flume-env.sh.template conf/flume-env.shroot@m1:/home/hadoop/flume-1.5.0-bin# vi conf/flume-env.sh# Licensed to the Apache Software Foundation (ASF) under one# or more contributor license agreements. See the NOTICE file# distributed with this work for additional information# regarding copyright ownership. The ASF licenses this file# to you under the Apache License, Version 2.0 (the# "License"); you may not use this file except in compliance# with the License. You may obtain a copy of the License at### Unless required by applicable law or agreed to in writing, software# distributed under the License is distributed on an "AS IS" BASIS,# WITHOUT WARRANTIES OR CONDITIONS OF ANY KIND, either express or implied.# See the License for the specific language governing permissions and# limitations under the License. # If this file is placed at FLUME_CONF_DIR/flume-env.sh, it will be sourced# during Flume startup. # Enviroment variables can be set here. JAVA_HOME=/usr/lib/jvm/java-7-oracle # Give Flume more memory and pre-allocate, enable remote monitoring via JMX#JAVA_OPTS="-Xms100m -Xmx200m -Dcom.sun.management.jmxremote" # Note that the Flume conf directory is always included in the classpath.#FLUME_CLASSPATH="" |
3)验证是否安装成功
|
1
2
3
4
5
6
7
|
root@m1:/home/hadoop# /home/hadoop/flume-1.5.0-bin/bin/flume-ng versionFlume 1.5.0Source code repository: https://git-wip-us.apache.org/repos/asf/flume.gitRevision: 8633220df808c4cd0c13d1cf0320454a94f1ea97Compiled by hshreedharan on Wed May 7 14:49:18 PDT 2014From source with checksum a01fe726e4380ba0c9f7a7d222db961froot@m1:/home/hadoop# |
出现上面的信息,表示安装成功了
五、flume的案例
1)案例1:Avro
Avro可以发送一个给定的文件给Flume,Avro 源使用AVRO RPC机制。
a)创建agent配置文件
|
1
2
3
4
5
6
7
8
9
10
11
12
13
14
15
16
17
18
19
20
21
22
23
|
root@m1:/home/hadoop#vi /home/hadoop/flume-1.5.0-bin/conf/avro.conf a1.sources = r1a1.sinks = k1a1.channels = c1 # Describe/configure the sourcea1.sources.r1.type = avroa1.sources.r1.channels = c1a1.sources.r1.bind = 0.0.0.0a1.sources.r1.port = 4141 # Describe the sinka1.sinks.k1.type = logger # Use a channel which buffers events in memorya1.channels.c1.type = memorya1.channels.c1.capacity = 1000a1.channels.c1.transactionCapacity = 100 # Bind the source and sink to the channela1.sources.r1.channels = c1a1.sinks.k1.channel = c1 |
b)启动flume agent a1
|
1
|
root@m1:/home/hadoop# /home/hadoop/flume-1.5.0-bin/bin/flume-ng agent -c . -f /home/hadoop/flume-1.5.0-bin/conf/avro.conf -n a1 -Dflume.root.logger=INFO,console |
c)创建指定文件
|
1
|
root@m1:/home/hadoop# echo "hello world" > /home/hadoop/flume-1.5.0-bin/log.00 |
d)使用avro-client发送文件
|
1
|
root@m1:/home/hadoop# /home/hadoop/flume-1.5.0-bin/bin/flume-ng avro-client -c . -H m1 -p 4141 -F /home/hadoop/flume-1.5.0-bin/log.00 |
f)在m1的控制台,可以看到以下信息,注意最后一行:
|
1
2
3
4
5
6
7
8
9
10
|
root@m1:/home/hadoop/flume-1.5.0-bin/conf# /home/hadoop/flume-1.5.0-bin/bin/flume-ng agent -c . -f /home/hadoop/flume-1.5.0-bin/conf/avro.conf -n a1 -Dflume.root.logger=INFO,consoleInfo: Sourcing environment configuration script /home/hadoop/flume-1.5.0-bin/conf/flume-env.shInfo: Including Hadoop libraries found via (/home/hadoop/hadoop-2.2.0/bin/hadoop) for HDFS accessInfo: Excluding /home/hadoop/hadoop-2.2.0/share/hadoop/common/lib/slf4j-api-1.7.5.jar from classpathInfo: Excluding /home/hadoop/hadoop-2.2.0/share/hadoop/common/lib/slf4j-log4j12-1.7.5.jar from classpath...-08-10 10:43:25,112 (New I/O worker #1) [INFO - org.apache.avro.ipc.NettyServer$NettyServerAvroHandler.handleUpstream(NettyServer.java:171)] [id: 0x92464c4f, /192.168.1.50:59850 :> /192.168.1.50:4141] UNBOUND-08-10 10:43:25,112 (New I/O worker #1) [INFO - org.apache.avro.ipc.NettyServer$NettyServerAvroHandler.handleUpstream(NettyServer.java:171)] [id: 0x92464c4f, /192.168.1.50:59850 :> /192.168.1.50:4141] CLOSED-08-10 10:43:25,112 (New I/O worker #1) [INFO - org.apache.avro.ipc.NettyServer$NettyServerAvroHandler.channelClosed(NettyServer.java:209)] Connection to /192.168.1.50:59850 disconnected.-08-10 10:43:26,718 (SinkRunner-PollingRunner-DefaultSinkProcessor) [INFO - org.apache.flume.sink.LoggerSink.process(LoggerSink.java:70)] Event: { headers:{} body: 68 65 6C 6C 6F 20 77 6F 72 6C 64 hello world } |
2)案例2:Spool
Spool监测配置的目录下新增的文件,并将文件中的数据读取出来。需要注意两点:
1) 拷贝到spool目录下的文件不可以再打开编辑。
2) spool目录下不可包含相应的子目录
a)创建agent配置文件
|
1
2
3
4
5
6
7
8
9
10
11
12
13
14
15
16
17
18
|
root@m1:/home/hadoop# vi /home/hadoop/flume-1.5.0-bin/conf/spool.confa1.sources = r1a1.sinks = k1a1.channels = c1# Describe/configure the sourcea1.sources.r1.type = spooldira1.sources.r1.channels = c1a1.sources.r1.spoolDir = /home/hadoop/flume-1.5.0-bin/logsa1.sources.r1.fileHeader = true# Describe the sinka1.sinks.k1.type = logger# Use a channel which buffers events in memorya1.channels.c1.type = memorya1.channels.c1.capacity = 1000a1.channels.c1.transactionCapacity = 100# Bind the source and sink to the channela1.sources.r1.channels = c1a1.sinks.k1.channel = c1 |
b)启动flume agent a1
|
1
|
root@m1:/home/hadoop# /home/hadoop/flume-1.5.0-bin/bin/flume-ng agent -c . -f /home/hadoop/flume-1.5.0-bin/conf/spool.conf -n a1 -Dflume.root.logger=INFO,console |
c)追加文件到/home/hadoop/flume-1.5.0-bin/logs目录
|
1
|
root@m1:/home/hadoop# echo "spool test1" > /home/hadoop/flume-1.5.0-bin/logs/spool_text.log |
d)在m1的控制台,可以看到以下相关信息:
|
1
2
3
4
5
6
7
8
9
10
11
|
/08/10 11:37:13 INFO source.SpoolDirectorySource: Spooling Directory Source runner has shutdown./08/10 11:37:13 INFO source.SpoolDirectorySource: Spooling Directory Source runner has shutdown./08/10 11:37:14 INFO avro.ReliableSpoolingFileEventReader: Preparing to move file /home/hadoop/flume-1.5.0-bin/logs/spool_text.log to /home/hadoop/flume-1.5.0-bin/logs/spool_text.log.COMPLETED/08/10 11:37:14 INFO source.SpoolDirectorySource: Spooling Directory Source runner has shutdown./08/10 11:37:14 INFO source.SpoolDirectorySource: Spooling Directory Source runner has shutdown./08/10 11:37:14 INFO sink.LoggerSink: Event: { headers:{file=/home/hadoop/flume-1.5.0-bin/logs/spool_text.log} body: 73 70 6F 6F 6C 20 74 65 73 74 31 spool test1 }/08/10 11:37:15 INFO source.SpoolDirectorySource: Spooling Directory Source runner has shutdown./08/10 11:37:15 INFO source.SpoolDirectorySource: Spooling Directory Source runner has shutdown./08/10 11:37:16 INFO source.SpoolDirectorySource: Spooling Directory Source runner has shutdown./08/10 11:37:16 INFO source.SpoolDirectorySource: Spooling Directory Source runner has shutdown./08/10 11:37:17 INFO source.SpoolDirectorySource: Spooling Directory Source runner has shutdown. |
3)案例3:Exec
EXEC执行一个给定的命令获得输出的源,如果要使用tail命令,必选使得file足够大才能看到输出内容
a)创建agent配置文件
|
1
2
3
4
5
6
7
8
9
10
11
12
13
14
15
16
17
|
root@m1:/home/hadoop# vi /home/hadoop/flume-1.5.0-bin/conf/exec_tail.confa1.sources = r1a1.sinks = k1a1.channels = c1# Describe/configure the sourcea1.sources.r1.type = execa1.sources.r1.channels = c1a1.sources.r1.command = tail -F /home/hadoop/flume-1.5.0-bin/log_exec_tail# Describe the sinka1.sinks.k1.type = logger# Use a channel which buffers events in memorya1.channels.c1.type = memorya1.channels.c1.capacity = 1000a1.channels.c1.transactionCapacity = 100# Bind the source and sink to the channela1.sources.r1.channels = c1a1.sinks.k1.channel = c1 |
b)启动flume agent a1
|
1
|
root@m1:/home/hadoop# /home/hadoop/flume-1.5.0-bin/bin/flume-ng agent -c . -f /home/hadoop/flume-1.5.0-bin/conf/exec_tail.conf -n a1 -Dflume.root.logger=INFO,console |
c)生成足够多的内容在文件里
|
1
|
root@m1:/home/hadoop# for i in {1..100};do echo "exec tail$i" >> /home/hadoop/flume-1.5.0-bin/log_exec_tail;echo $i;sleep 0.1;done |
e)在m1的控制台,可以看到以下信息:
|
1
2
3
4
5
6
7
8
9
10
11
12
13
14
15
16
|
-08-10 10:59:25,513 (SinkRunner-PollingRunner-DefaultSinkProcessor) [INFO - org.apache.flume.sink.LoggerSink.process(LoggerSink.java:70)] Event: { headers:{} body: 65 78 65 63 20 74 61 69 6C 20 74 65 73 74 exec tail test }-08-10 10:59:34,535 (SinkRunner-PollingRunner-DefaultSinkProcessor) [INFO - org.apache.flume.sink.LoggerSink.process(LoggerSink.java:70)] Event: { headers:{} body: 65 78 65 63 20 74 61 69 6C 20 74 65 73 74 exec tail test }-08-10 11:01:40,557 (SinkRunner-PollingRunner-DefaultSinkProcessor) [INFO - org.apache.flume.sink.LoggerSink.process(LoggerSink.java:70)] Event: { headers:{} body: 65 78 65 63 20 74 61 69 6C 31 exec tail1 }-08-10 11:01:41,180 (SinkRunner-PollingRunner-DefaultSinkProcessor) [INFO - org.apache.flume.sink.LoggerSink.process(LoggerSink.java:70)] Event: { headers:{} body: 65 78 65 63 20 74 61 69 6C 32 exec tail2 }-08-10 11:01:41,180 (SinkRunner-PollingRunner-DefaultSinkProcessor) [INFO - org.apache.flume.sink.LoggerSink.process(LoggerSink.java:70)] Event: { headers:{} body: 65 78 65 63 20 74 61 69 6C 33 exec tail3 }-08-10 11:01:41,181 (SinkRunner-PollingRunner-DefaultSinkProcessor) [INFO - org.apache.flume.sink.LoggerSink.process(LoggerSink.java:70)] Event: { headers:{} body: 65 78 65 63 20 74 61 69 6C 34 exec tail4 }-08-10 11:01:41,181 (SinkRunner-PollingRunner-DefaultSinkProcessor) [INFO - org.apache.flume.sink.LoggerSink.process(LoggerSink.java:70)] Event: { headers:{} body: 65 78 65 63 20 74 61 69 6C 35 exec tail5 }-08-10 11:01:41,181 (SinkRunner-PollingRunner-DefaultSinkProcessor) [INFO - org.apache.flume.sink.LoggerSink.process(LoggerSink.java:70)] Event: { headers:{} body: 65 78 65 63 20 74 61 69 6C 36 exec tail6 }............-08-10 11:01:51,550 (SinkRunner-PollingRunner-DefaultSinkProcessor) [INFO - org.apache.flume.sink.LoggerSink.process(LoggerSink.java:70)] Event: { headers:{} body: 65 78 65 63 20 74 61 69 6C 39 36 exec tail96 }-08-10 11:01:51,550 (SinkRunner-PollingRunner-DefaultSinkProcessor) [INFO - org.apache.flume.sink.LoggerSink.process(LoggerSink.java:70)] Event: { headers:{} body: 65 78 65 63 20 74 61 69 6C 39 37 exec tail97 }-08-10 11:01:51,551 (SinkRunner-PollingRunner-DefaultSinkProcessor) [INFO - org.apache.flume.sink.LoggerSink.process(LoggerSink.java:70)] Event: { headers:{} body: 65 78 65 63 20 74 61 69 6C 39 38 exec tail98 }-08-10 11:01:51,551 (SinkRunner-PollingRunner-DefaultSinkProcessor) [INFO - org.apache.flume.sink.LoggerSink.process(LoggerSink.java:70)] Event: { headers:{} body: 65 78 65 63 20 74 61 69 6C 39 39 exec tail99 }-08-10 11:01:51,551 (SinkRunner-PollingRunner-DefaultSinkProcessor) [INFO - org.apache.flume.sink.LoggerSink.process(LoggerSink.java:70)] Event: { headers:{} body: 65 78 65 63 20 74 61 69 6C 31 30 30 exec tail100 } |
4)案例4:Syslogtcp
Syslogtcp监听TCP的端口做为数据源
a)创建agent配置文件
|
1
2
3
4
5
6
7
8
9
10
11
12
13
14
15
16
17
18
|
root@m1:/home/hadoop# vi /home/hadoop/flume-1.5.0-bin/conf/syslog_tcp.confa1.sources = r1a1.sinks = k1a1.channels = c1# Describe/configure the sourcea1.sources.r1.type = syslogtcpa1.sources.r1.port = 5140a1.sources.r1.host = localhosta1.sources.r1.channels = c1# Describe the sinka1.sinks.k1.type = logger# Use a channel which buffers events in memorya1.channels.c1.type = memorya1.channels.c1.capacity = 1000a1.channels.c1.transactionCapacity = 100# Bind the source and sink to the channela1.sources.r1.channels = c1a1.sinks.k1.channel = c1 |
b)启动flume agent a1
|
1
|
root@m1:/home/hadoop# /home/hadoop/flume-1.5.0-bin/bin/flume-ng agent -c . -f /home/hadoop/flume-1.5.0-bin/conf/syslog_tcp.conf -n a1 -Dflume.root.logger=INFO,console |
c)测试产生syslog
|
1
|
root@m1:/home/hadoop# echo "hello idoall.org syslog" | nc localhost 5140 |
d)在m1的控制台,可以看到以下信息:
|
1
2
3
4
5
6
7
8
9
10
11
12
13
14
15
16
17
18
19
20
|
/08/10 11:41:45 INFO node.PollingPropertiesFileConfigurationProvider: Reloading configuration file:/home/hadoop/flume-1.5.0-bin/conf/syslog_tcp.conf/08/10 11:41:45 INFO conf.FlumeConfiguration: Added sinks: k1 Agent: a1/08/10 11:41:45 INFO conf.FlumeConfiguration: Processing:k1/08/10 11:41:45 INFO conf.FlumeConfiguration: Processing:k1/08/10 11:41:45 INFO conf.FlumeConfiguration: Post-validation flume configuration contains configuration for agents: [a1]/08/10 11:41:45 INFO node.AbstractConfigurationProvider: Creating channels/08/10 11:41:45 INFO channel.DefaultChannelFactory: Creating instance of channel c1 type memory/08/10 11:41:45 INFO node.AbstractConfigurationProvider: Created channel c1/08/10 11:41:45 INFO source.DefaultSourceFactory: Creating instance of source r1, type syslogtcp/08/10 11:41:45 INFO sink.DefaultSinkFactory: Creating instance of sink: k1, type: logger/08/10 11:41:45 INFO node.AbstractConfigurationProvider: Channel c1 connected to [r1, k1]/08/10 11:41:45 INFO node.Application: Starting new configuration:{ sourceRunners:{r1=EventDrivenSourceRunner: { source:org.apache.flume.source.SyslogTcpSource{name:r1,state:IDLE} }} sinkRunners:{k1=SinkRunner: { policy:org.apache.flume.sink.DefaultSinkProcessor@6538b14 counterGroup:{ name:null counters:{} } }} channels:{c1=org.apache.flume.channel.MemoryChannel{name: c1}} }/08/10 11:41:45 INFO node.Application: Starting Channel c1/08/10 11:41:45 INFO instrumentation.MonitoredCounterGroup: Monitored counter group for type: CHANNEL, name: c1: Successfully registered new MBean./08/10 11:41:45 INFO instrumentation.MonitoredCounterGroup: Component type: CHANNEL, name: c1 started/08/10 11:41:45 INFO node.Application: Starting Sink k1/08/10 11:41:45 INFO node.Application: Starting Source r1/08/10 11:41:45 INFO source.SyslogTcpSource: Syslog TCP Source starting.../08/10 11:42:15 WARN source.SyslogUtils: Event created from Invalid Syslog data./08/10 11:42:15 INFO sink.LoggerSink: Event: { headers:{Severity=0, flume.syslog.status=Invalid, Facility=0} body: 68 65 6C 6C 6F 20 69 64 6F 61 6C 6C 2E 6F 72 67 hello idoall.org } |
5)案例5:JSONHandler
a)创建agent配置文件
|
1
2
3
4
5
6
7
8
9
10
11
12
13
14
15
16
17
|
root@m1:/home/hadoop# vi /home/hadoop/flume-1.5.0-bin/conf/post_json.confa1.sources = r1a1.sinks = k1a1.channels = c1# Describe/configure the sourcea1.sources.r1.type = org.apache.flume.source.http.HTTPSourcea1.sources.r1.port = 8888a1.sources.r1.channels = c1# Describe the sinka1.sinks.k1.type = logger# Use a channel which buffers events in memorya1.channels.c1.type = memorya1.channels.c1.capacity = 1000a1.channels.c1.transactionCapacity = 100# Bind the source and sink to the channela1.sources.r1.channels = c1a1.sinks.k1.channel = c1 |
b)启动flume agent a1
|
1
|
root@m1:/home/hadoop# /home/hadoop/flume-1.5.0-bin/bin/flume-ng agent -c . -f /home/hadoop/flume-1.5.0-bin/conf/post_json.conf -n a1 -Dflume.root.logger=INFO,console |
c)生成JSON 格式的POST request
|
1
|
root@m1:/home/hadoop# curl -X POST -d '[{ "headers" :{"a" : "a1","b" : "b1"},"body" : "idoall.org_body"}]' http://localhost:8888 |
d)在m1的控制台,可以看到以下信息:
/
|
1
2
3
4
5
6
7
8
9
10
11
|
08/10 11:49:59 INFO node.Application: Starting Channel c1/08/10 11:49:59 INFO instrumentation.MonitoredCounterGroup: Monitored counter group for type: CHANNEL, name: c1: Successfully registered new MBean./08/10 11:49:59 INFO instrumentation.MonitoredCounterGroup: Component type: CHANNEL, name: c1 started/08/10 11:49:59 INFO node.Application: Starting Sink k1/08/10 11:49:59 INFO node.Application: Starting Source r1/08/10 11:49:59 INFO mortbay.log: Logging to org.slf4j.impl.Log4jLoggerAdapter(org.mortbay.log) via org.mortbay.log.Slf4jLog/08/10 11:49:59 INFO mortbay.log: jetty-6.1.26/08/10 11:50:00 INFO mortbay.log: Started SelectChannelConnector@0.0.0.0:8888/08/10 11:50:00 INFO instrumentation.MonitoredCounterGroup: Monitored counter group for type: SOURCE, name: r1: Successfully registered new MBean./08/10 11:50:00 INFO instrumentation.MonitoredCounterGroup: Component type: SOURCE, name: r1 started/08/10 12:14:32 INFO sink.LoggerSink: Event: { headers:{b=b1, a=a1} body: 69 64 6F 61 6C 6C 2E 6F 72 67 5F 62 6F 64 79 idoall.org_body } |
6)案例6:Hadoop sink
其中关于hadoop2.2.0部分的安装部署,请参考文章《ubuntu12.04+hadoop2.2.0+zookeeper3.4.5+hbase0.96.2+hive0.13.1分布式环境部署》
a)创建agent配置文件
|
1
2
3
4
5
6
7
8
9
10
11
12
13
14
15
16
17
18
19
20
21
22
23
24
|
root@m1:/home/hadoop# vi /home/hadoop/flume-1.5.0-bin/conf/hdfs_sink.confa1.sources = r1a1.sinks = k1a1.channels = c1# Describe/configure the sourcea1.sources.r1.type = syslogtcpa1.sources.r1.port = 5140a1.sources.r1.host = localhosta1.sources.r1.channels = c1# Describe the sinka1.sinks.k1.type = hdfsa1.sinks.k1.channel = c1a1.sinks.k1.hdfs.path = hdfs://m1:9000/user/flume/syslogtcpa1.sinks.k1.hdfs.filePrefix = Sysloga1.sinks.k1.hdfs.round = truea1.sinks.k1.hdfs.roundValue = 10a1.sinks.k1.hdfs.roundUnit = minute# Use a channel which buffers events in memorya1.channels.c1.type = memorya1.channels.c1.capacity = 1000a1.channels.c1.transactionCapacity = 100# Bind the source and sink to the channela1.sources.r1.channels = c1a1.sinks.k1.channel = c1 |
b)启动flume agent a1
|
1
|
root@m1:/home/hadoop# /home/hadoop/flume-1.5.0-bin/bin/flume-ng agent -c . -f /home/hadoop/flume-1.5.0-bin/conf/hdfs_sink.conf -n a1 -Dflume.root.logger=INFO,console |
c)测试产生syslog
|
1
|
root@m1:/home/hadoop# echo "hello idoall flume -> hadoop testing one" | nc localhost 5140 |
d)在m1的控制台,可以看到以下信息:
|
1
2
3
4
5
6
7
8
9
10
11
12
13
14
|
/08/10 12:20:39 INFO instrumentation.MonitoredCounterGroup: Monitored counter group for type: CHANNEL, name: c1: Successfully registered new MBean./08/10 12:20:39 INFO instrumentation.MonitoredCounterGroup: Component type: CHANNEL, name: c1 started/08/10 12:20:39 INFO node.Application: Starting Sink k1/08/10 12:20:39 INFO node.Application: Starting Source r1/08/10 12:20:39 INFO instrumentation.MonitoredCounterGroup: Monitored counter group for type: SINK, name: k1: Successfully registered new MBean./08/10 12:20:39 INFO instrumentation.MonitoredCounterGroup: Component type: SINK, name: k1 started/08/10 12:20:39 INFO source.SyslogTcpSource: Syslog TCP Source starting.../08/10 12:21:46 WARN source.SyslogUtils: Event created from Invalid Syslog data./08/10 12:21:49 INFO hdfs.HDFSSequenceFile: writeFormat = Writable, UseRawLocalFileSystem = false/08/10 12:21:49 INFO hdfs.BucketWriter: Creating hdfs://m1:9000/user/flume/syslogtcp//Syslog.1407644509504.tmp/08/10 12:22:20 INFO hdfs.BucketWriter: Closing hdfs://m1:9000/user/flume/syslogtcp//Syslog.1407644509504.tmp/08/10 12:22:20 INFO hdfs.BucketWriter: Close tries incremented/08/10 12:22:20 INFO hdfs.BucketWriter: Renaming hdfs://m1:9000/user/flume/syslogtcp/Syslog.1407644509504.tmp to hdfs://m1:9000/user/flume/syslogtcp/Syslog.1407644509504/08/10 12:22:20 INFO hdfs.HDFSEventSink: Writer callback called. |
e)在m1上再打开一个窗口,去hadoop上检查文件是否生成
|
1
2
3
4
5
|
root@m1:/home/hadoop# /home/hadoop/hadoop-2.2.0/bin/hadoop fs -ls /user/flume/syslogtcpFound 1 items-rw-r--r-- 3 root supergroup 155 2014-08-10 12:22 /user/flume/syslogtcp/Syslog.1407644509504root@m1:/home/hadoop# /home/hadoop/hadoop-2.2.0/bin/hadoop fs -cat /user/flume/syslogtcp/Syslog.1407644509504SEQ!org.apache.hadoop.io.LongWritable"org.apache.hadoop.io.BytesWritable^;>Gv$hello idoall flume -> hadoop testing one |
7)案例7:File Roll Sink
a)创建agent配置文件
|
1
2
3
4
5
6
7
8
9
10
11
12
13
14
15
16
17
18
19
|
root@m1:/home/hadoop# vi /home/hadoop/flume-1.5.0-bin/conf/file_roll.confa1.sources = r1a1.sinks = k1a1.channels = c1# Describe/configure the sourcea1.sources.r1.type = syslogtcpa1.sources.r1.port = 5555a1.sources.r1.host = localhosta1.sources.r1.channels = c1# Describe the sinka1.sinks.k1.type = file_rolla1.sinks.k1.sink.directory = /home/hadoop/flume-1.5.0-bin/logs# Use a channel which buffers events in memorya1.channels.c1.type = memorya1.channels.c1.capacity = 1000a1.channels.c1.transactionCapacity = 100# Bind the source and sink to the channela1.sources.r1.channels = c1a1.sinks.k1.channel = c1 |
b)启动flume agent a1
|
1
|
root@m1:/home/hadoop# /home/hadoop/flume-1.5.0-bin/bin/flume-ng agent -c . -f /home/hadoop/flume-1.5.0-bin/conf/file_roll.conf -n a1 -Dflume.root.logger=INFO,console |
c)测试产生log
|
1
2
|
root@m1:/home/hadoop# echo "hello idoall.org syslog" | nc localhost 5555root@m1:/home/hadoop# echo "hello idoall.org syslog 2" | nc localhost 5555 |
d)查看/home/hadoop/flume-1.5.0-bin/logs下是否生成文件,默认每30秒生成一个新文件
|
1
2
3
4
5
6
7
8
9
10
|
root@m1:/home/hadoop# ll /home/hadoop/flume-1.5.0-bin/logs总用量 272drwxr-xr-x 3 root root 4096 Aug 10 12:50 ./drwxr-xr-x 9 root root 4096 Aug 10 10:59 ../-rw-r--r-- 1 root root 50 Aug 10 12:49 1407646164782-1-rw-r--r-- 1 root root 0 Aug 10 12:49 1407646164782-2-rw-r--r-- 1 root root 0 Aug 10 12:50 1407646164782-3root@m1:/home/hadoop# cat /home/hadoop/flume-1.5.0-bin/logs/1407646164782-1 /home/hadoop/flume-1.5.0-bin/logs/1407646164782-2hello idoall.org sysloghello idoall.org syslog 2 |
8)案例8:Replicating Channel Selector
Flume支持Fan out流从一个源到多个通道。有两种模式的Fan out,分别是复制和复用。在复制的情况下,流的事件被发送到所有的配置通道。在复用的情况下,事件被发送到可用的渠道中的一个子集。Fan out流需要指定源和Fan out通道的规则。
这次我们需要用到m1,m2两台机器
a)在m1创建replicating_Channel_Selector配置文件
|
1
2
3
4
5
6
7
8
9
10
11
12
13
14
15
16
17
18
19
20
21
22
23
24
25
26
|
root@m1:/home/hadoop# vi /home/hadoop/flume-1.5.0-bin/conf/replicating_Channel_Selector.confa1.sources = r1a1.sinks = k1 k2a1.channels = c1 c2# Describe/configure the sourcea1.sources.r1.type = syslogtcpa1.sources.r1.port = 5140a1.sources.r1.host = localhosta1.sources.r1.channels = c1 c2a1.sources.r1.selector.type = replicating# Describe the sinka1.sinks.k1.type = avroa1.sinks.k1.channel = c1a1.sinks.k1.hostname = m1a1.sinks.k1.port = 5555a1.sinks.k2.type = avroa1.sinks.k2.channel = c2a1.sinks.k2.hostname = m2a1.sinks.k2.port = 5555# Use a channel which buffers events in memorya1.channels.c1.type = memorya1.channels.c1.capacity = 1000a1.channels.c1.transactionCapacity = 100a1.channels.c2.type = memorya1.channels.c2.capacity = 1000a1.channels.c2.transactionCapacity = 100 |
b)在m1创建replicating_Channel_Selector_avro配置文件
|
1
2
3
4
5
6
7
8
9
10
11
12
13
14
15
16
17
18
|
root@m1:/home/hadoop# vi /home/hadoop/flume-1.5.0-bin/conf/replicating_Channel_Selector_avro.confa1.sources = r1a1.sinks = k1a1.channels = c1# Describe/configure the sourcea1.sources.r1.type = avroa1.sources.r1.channels = c1a1.sources.r1.bind = 0.0.0.0a1.sources.r1.port = 5555# Describe the sinka1.sinks.k1.type = logger# Use a channel which buffers events in memorya1.channels.c1.type = memorya1.channels.c1.capacity = 1000a1.channels.c1.transactionCapacity = 100# Bind the source and sink to the channela1.sources.r1.channels = c1a1.sinks.k1.channel = c1 |
c)在m1上将2个配置文件复制到m2上一份
|
1
2
|
root@m1:/home/hadoop/flume-1.5.0-bin# scp -r /home/hadoop/flume-1.5.0-bin/conf/replicating_Channel_Selector.conf root@m2:/home/hadoop/flume-1.5.0-bin/conf/replicating_Channel_Selector.confroot@m1:/home/hadoop/flume-1.5.0-bin# scp -r /home/hadoop/flume-1.5.0-bin/conf/replicating_Channel_Selector_avro.conf root@m2:/home/hadoop/flume-1.5.0-bin/conf/replicating_Channel_Selector_avro.conf<br> |
d)打开4个窗口,在m1和m2上同时启动两个flume agent
|
1
2
|
root@m1:/home/hadoop# /home/hadoop/flume-1.5.0-bin/bin/flume-ng agent -c . -f /home/hadoop/flume-1.5.0-bin/conf/replicating_Channel_Selector_avro.conf -n a1 -Dflume.root.logger=INFO,consoleroot@m1:/home/hadoop# /home/hadoop/flume-1.5.0-bin/bin/flume-ng agent -c . -f /home/hadoop/flume-1.5.0-bin/conf/replicating_Channel_Selector.conf -n a1 -Dflume.root.logger=INFO,console |
e)然后在m1或m2的任意一台机器上,测试产生syslog
|
1
|
root@m1:/home/hadoop# echo "hello idoall.org syslog" | nc localhost 5140 |
f)在m1和m2的sink窗口,分别可以看到以下信息,这说明信息得到了同步:
|
1
2
3
4
5
6
7
8
|
/08/10 14:08:18 INFO ipc.NettyServer: Connection to /192.168.1.51:46844 disconnected./08/10 14:08:52 INFO ipc.NettyServer: [id: 0x90f8fe1f, /192.168.1.50:35873 => /192.168.1.50:5555] OPEN/08/10 14:08:52 INFO ipc.NettyServer: [id: 0x90f8fe1f, /192.168.1.50:35873 => /192.168.1.50:5555] BOUND: /192.168.1.50:5555/08/10 14:08:52 INFO ipc.NettyServer: [id: 0x90f8fe1f, /192.168.1.50:35873 => /192.168.1.50:5555] CONNECTED: /192.168.1.50:35873/08/10 14:08:59 INFO ipc.NettyServer: [id: 0xd6318635, /192.168.1.51:46858 => /192.168.1.50:5555] OPEN/08/10 14:08:59 INFO ipc.NettyServer: [id: 0xd6318635, /192.168.1.51:46858 => /192.168.1.50:5555] BOUND: /192.168.1.50:5555/08/10 14:08:59 INFO ipc.NettyServer: [id: 0xd6318635, /192.168.1.51:46858 => /192.168.1.50:5555] CONNECTED: /192.168.1.51:46858/08/10 14:09:20 INFO sink.LoggerSink: Event: { headers:{Severity=0, flume.syslog.status=Invalid, Facility=0} body: 68 65 6C 6C 6F 20 69 64 6F 61 6C 6C 2E 6F 72 67 hello idoall.org } |
9)案例9:Multiplexing Channel Selector
a)在m1创建Multiplexing_Channel_Selector配置文件
|
1
2
3
4
5
6
7
8
9
10
11
12
13
14
15
16
17
18
19
20
21
22
23
24
25
26
27
28
29
30
|
root@m1:/home/hadoop# vi /home/hadoop/flume-1.5.0-bin/conf/Multiplexing_Channel_Selector.confa1.sources = r1a1.sinks = k1 k2a1.channels = c1 c2# Describe/configure the sourcea1.sources.r1.type = org.apache.flume.source.http.HTTPSourcea1.sources.r1.port = 5140a1.sources.r1.channels = c1 c2a1.sources.r1.selector.type = multiplexinga1.sources.r1.selector.header = type#映射允许每个值通道可以重叠。默认值可以包含任意数量的通道。a1.sources.r1.selector.mapping.baidu = c1a1.sources.r1.selector.mapping.ali = c2a1.sources.r1.selector.default = c1# Describe the sinka1.sinks.k1.type = avroa1.sinks.k1.channel = c1a1.sinks.k1.hostname = m1a1.sinks.k1.port = 5555a1.sinks.k2.type = avroa1.sinks.k2.channel = c2a1.sinks.k2.hostname = m2a1.sinks.k2.port = 5555# Use a channel which buffers events in memorya1.channels.c1.type = memorya1.channels.c1.capacity = 1000a1.channels.c1.transactionCapacity = 100a1.channels.c2.type = memorya1.channels.c2.capacity = 1000a1.channels.c2.transactionCapacity = 100 |
b)在m1创建Multiplexing_Channel_Selector_avro配置文件
|
1
2
3
4
5
6
7
8
9
10
11
12
13
14
15
16
17
18
|
root@m1:/home/hadoop# vi /home/hadoop/flume-1.5.0-bin/conf/Multiplexing_Channel_Selector_avro.confa1.sources = r1a1.sinks = k1a1.channels = c1# Describe/configure the sourcea1.sources.r1.type = avroa1.sources.r1.channels = c1a1.sources.r1.bind = 0.0.0.0a1.sources.r1.port = 5555# Describe the sinka1.sinks.k1.type = logger# Use a channel which buffers events in memorya1.channels.c1.type = memorya1.channels.c1.capacity = 1000a1.channels.c1.transactionCapacity = 100# Bind the source and sink to the channela1.sources.r1.channels = c1a1.sinks.k1.channel = c1 |
c)将2个配置文件复制到m2上一份
|
1
2
|
root@m1:/home/hadoop/flume-1.5.0-bin# scp -r /home/hadoop/flume-1.5.0-bin/conf/Multiplexing_Channel_Selector.conf root@m2:/home/hadoop/flume-1.5.0-bin/conf/Multiplexing_Channel_Selector.confroot@m1:/home/hadoop/flume-1.5.0-bin# scp -r /home/hadoop/flume-1.5.0-bin/conf/Multiplexing_Channel_Selector_avro.conf root@m2:/home/hadoop/flume-1.5.0-bin/conf/Multiplexing_Channel_Selector_avro.conf |
d)打开4个窗口,在m1和m2上同时启动两个flume agent
|
1
2
|
root@m1:/home/hadoop# /home/hadoop/flume-1.5.0-bin/bin/flume-ng agent -c . -f /home/hadoop/flume-1.5.0-bin/conf/Multiplexing_Channel_Selector_avro.conf -n a1 -Dflume.root.logger=INFO,consoleroot@m1:/home/hadoop# /home/hadoop/flume-1.5.0-bin/bin/flume-ng agent -c . -f /home/hadoop/flume-1.5.0-bin/conf/Multiplexing_Channel_Selector.conf -n a1 -Dflume.root.logger=INFO,console |
e)然后在m1或m2的任意一台机器上,测试产生syslog
|
1
|
root@m1:/home/hadoop# curl -X POST -d '[{ "headers" :{"type" : "baidu"},"body" : "idoall_TEST1"}]' http://localhost:5140 && curl -X POST -d '[{ "headers" :{"type" : "ali"},"body" : "idoall_TEST2"}]' http://localhost:5140 && curl -X POST -d '[{ "headers" :{"type" : "qq"},"body" : "idoall_TEST3"}]' http://localhost:5140 |
f)在m1的sink窗口,可以看到以下信息:
|
1
2
3
4
5
6
7
8
9
10
11
12
13
14
|
14/08/10 14:32:21 INFO node.Application: Starting Sink k114/08/10 14:32:21 INFO node.Application: Starting Source r114/08/10 14:32:21 INFO source.AvroSource: Starting Avro source r1: { bindAddress: 0.0.0.0, port: 5555 }...14/08/10 14:32:21 INFO instrumentation.MonitoredCounterGroup: Monitored counter group for type: SOURCE, name: r1: Successfully registered new MBean.14/08/10 14:32:21 INFO instrumentation.MonitoredCounterGroup: Component type: SOURCE, name: r1 started14/08/10 14:32:21 INFO source.AvroSource: Avro source r1 started.14/08/10 14:32:36 INFO ipc.NettyServer: [id: 0xcf00eea6, /192.168.1.50:35916 => /192.168.1.50:5555] OPEN14/08/10 14:32:36 INFO ipc.NettyServer: [id: 0xcf00eea6, /192.168.1.50:35916 => /192.168.1.50:5555] BOUND: /192.168.1.50:555514/08/10 14:32:36 INFO ipc.NettyServer: [id: 0xcf00eea6, /192.168.1.50:35916 => /192.168.1.50:5555] CONNECTED: /192.168.1.50:3591614/08/10 14:32:44 INFO ipc.NettyServer: [id: 0x432f5468, /192.168.1.51:46945 => /192.168.1.50:5555] OPEN14/08/10 14:32:44 INFO ipc.NettyServer: [id: 0x432f5468, /192.168.1.51:46945 => /192.168.1.50:5555] BOUND: /192.168.1.50:555514/08/10 14:32:44 INFO ipc.NettyServer: [id: 0x432f5468, /192.168.1.51:46945 => /192.168.1.50:5555] CONNECTED: /192.168.1.51:4694514/08/10 14:34:11 INFO sink.LoggerSink: Event: { headers:{type=baidu} body: 69 64 6F 61 6C 6C 5F 54 45 53 54 31 idoall_TEST1 }14/08/10 14:34:57 INFO sink.LoggerSink: Event: { headers:{type=qq} body: 69 64 6F 61 6C 6C 5F 54 45 53 54 33 idoall_TEST3 } |
g)在m2的sink窗口,可以看到以下信息:
|
1
2
3
4
5
6
7
8
9
10
11
12
13
|
14/08/10 14:32:27 INFO node.Application: Starting Sink k114/08/10 14:32:27 INFO node.Application: Starting Source r114/08/10 14:32:27 INFO source.AvroSource: Starting Avro source r1: { bindAddress: 0.0.0.0, port: 5555 }...14/08/10 14:32:27 INFO instrumentation.MonitoredCounterGroup: Monitored counter group for type: SOURCE, name: r1: Successfully registered new MBean.14/08/10 14:32:27 INFO instrumentation.MonitoredCounterGroup: Component type: SOURCE, name: r1 started14/08/10 14:32:27 INFO source.AvroSource: Avro source r1 started.14/08/10 14:32:36 INFO ipc.NettyServer: [id: 0x7c2f0aec, /192.168.1.50:38104 => /192.168.1.51:5555] OPEN14/08/10 14:32:36 INFO ipc.NettyServer: [id: 0x7c2f0aec, /192.168.1.50:38104 => /192.168.1.51:5555] BOUND: /192.168.1.51:555514/08/10 14:32:36 INFO ipc.NettyServer: [id: 0x7c2f0aec, /192.168.1.50:38104 => /192.168.1.51:5555] CONNECTED: /192.168.1.50:3810414/08/10 14:32:44 INFO ipc.NettyServer: [id: 0x3d36f553, /192.168.1.51:48599 => /192.168.1.51:5555] OPEN14/08/10 14:32:44 INFO ipc.NettyServer: [id: 0x3d36f553, /192.168.1.51:48599 => /192.168.1.51:5555] BOUND: /192.168.1.51:555514/08/10 14:32:44 INFO ipc.NettyServer: [id: 0x3d36f553, /192.168.1.51:48599 => /192.168.1.51:5555] CONNECTED: /192.168.1.51:4859914/08/10 14:34:33 INFO sink.LoggerSink: Event: { headers:{type=ali} body: 69 64 6F 61 6C 6C 5F 54 45 53 54 32 idoall_TEST2 } |
可以看到,根据header中不同的条件分布到不同的channel上
10)案例10:Flume Sink Processors
failover的机器是一直发送给其中一个sink,当这个sink不可用的时候,自动发送到下一个sink。
a)在m1创建Flume_Sink_Processors配置文件
|
1
2
3
4
5
6
7
8
9
10
11
12
13
14
15
16
17
18
19
20
21
22
23
24
25
26
27
28
29
30
31
32
33
34
35
36
37
38
39
40
41
42
43
|
root@m1:/home/hadoop# vi /home/hadoop/flume-1.5.0-bin/conf/Flume_Sink_Processors.conf a1.sources = r1a1.sinks = k1 k2a1.channels = c1 c2 #这个是配置failover的关键,需要有一个sink groupa1.sinkgroups = g1a1.sinkgroups.g1.sinks = k1 k2#处理的类型是failovera1.sinkgroups.g1.processor.type = failover#优先级,数字越大优先级越高,每个sink的优先级必须不相同a1.sinkgroups.g1.processor.priority.k1 = 5a1.sinkgroups.g1.processor.priority.k2 = 10#设置为10秒,当然可以根据你的实际状况更改成更快或者很慢a1.sinkgroups.g1.processor.maxpenalty = 10000 # Describe/configure the sourcea1.sources.r1.type = syslogtcpa1.sources.r1.port = 5140a1.sources.r1.channels = c1 c2a1.sources.r1.selector.type = replicating # Describe the sinka1.sinks.k1.type = avroa1.sinks.k1.channel = c1a1.sinks.k1.hostname = m1a1.sinks.k1.port = 5555 a1.sinks.k2.type = avroa1.sinks.k2.channel = c2a1.sinks.k2.hostname = m2a1.sinks.k2.port = 5555 # Use a channel which buffers events in memorya1.channels.c1.type = memorya1.channels.c1.capacity = 1000a1.channels.c1.transactionCapacity = 100 a1.channels.c2.type = memorya1.channels.c2.capacity = 1000a1.channels.c2.transactionCapacity = 100 |
b)在m1创建Flume_Sink_Processors_avro配置文件
|
1
2
3
4
5
6
7
8
9
10
11
12
13
14
15
16
17
18
19
20
21
22
23
|
root@m1:/home/hadoop# vi /home/hadoop/flume-1.5.0-bin/conf/Flume_Sink_Processors_avro.conf a1.sources = r1a1.sinks = k1a1.channels = c1 # Describe/configure the sourcea1.sources.r1.type = avroa1.sources.r1.channels = c1a1.sources.r1.bind = 0.0.0.0a1.sources.r1.port = 5555 # Describe the sinka1.sinks.k1.type = logger # Use a channel which buffers events in memorya1.channels.c1.type = memorya1.channels.c1.capacity = 1000a1.channels.c1.transactionCapacity = 100 # Bind the source and sink to the channela1.sources.r1.channels = c1a1.sinks.k1.channel = c1 |
c)将2个配置文件复制到m2上一份
|
1
2
|
root@m1:/home/hadoop/flume-1.5.0-bin# scp -r /home/hadoop/flume-1.5.0-bin/conf/Flume_Sink_Processors.conf root@m2:/home/hadoop/flume-1.5.0-bin/conf/Flume_Sink_Processors.confroot@m1:/home/hadoop/flume-1.5.0-bin# scp -r /home/hadoop/flume-1.5.0-bin/conf/Flume_Sink_Processors_avro.conf root@m2:/home/hadoop/flume-1.5.0-bin/conf/Flume_Sink_Processors_avro.conf |
d)打开4个窗口,在m1和m2上同时启动两个flume agent
|
1
2
|
root@m1:/home/hadoop# /home/hadoop/flume-1.5.0-bin/bin/flume-ng agent -c . -f /home/hadoop/flume-1.5.0-bin/conf/Flume_Sink_Processors_avro.conf -n a1 -Dflume.root.logger=INFO,consoleroot@m1:/home/hadoop# /home/hadoop/flume-1.5.0-bin/bin/flume-ng agent -c . -f /home/hadoop/flume-1.5.0-bin/conf/Flume_Sink_Processors.conf -n a1 -Dflume.root.logger=INFO,console |
e)然后在m1或m2的任意一台机器上,测试产生log
|
1
|
root@m1:/home/hadoop# echo "idoall.org test1 failover" | nc localhost 5140 |
f)因为m2的优先级高,所以在m2的sink窗口,可以看到以下信息,而m1没有:
|
1
2
3
4
5
|
14/08/10 15:02:46 INFO ipc.NettyServer: Connection to /192.168.1.51:48692 disconnected.14/08/10 15:03:12 INFO ipc.NettyServer: [id: 0x09a14036, /192.168.1.51:48704 => /192.168.1.51:5555] OPEN14/08/10 15:03:12 INFO ipc.NettyServer: [id: 0x09a14036, /192.168.1.51:48704 => /192.168.1.51:5555] BOUND: /192.168.1.51:555514/08/10 15:03:12 INFO ipc.NettyServer: [id: 0x09a14036, /192.168.1.51:48704 => /192.168.1.51:5555] CONNECTED: /192.168.1.51:4870414/08/10 15:03:26 INFO sink.LoggerSink: Event: { headers:{Severity=0, flume.syslog.status=Invalid, Facility=0} body: 69 64 6F 61 6C 6C 2E 6F 72 67 20 74 65 73 74 31 idoall.org test1 } |
g)这时我们停止掉m2机器上的sink(ctrl+c),再次输出测试数据:
|
1
|
root@m1:/home/hadoop# echo "idoall.org test2 failover" | nc localhost 5140 |
h)可以在m1的sink窗口,看到读取到了刚才发送的两条测试数据:
|
1
2
3
4
5
6
|
14/08/10 15:02:46 INFO ipc.NettyServer: Connection to /192.168.1.51:47036 disconnected.14/08/10 15:03:12 INFO ipc.NettyServer: [id: 0xbcf79851, /192.168.1.51:47048 => /192.168.1.50:5555] OPEN14/08/10 15:03:12 INFO ipc.NettyServer: [id: 0xbcf79851, /192.168.1.51:47048 => /192.168.1.50:5555] BOUND: /192.168.1.50:555514/08/10 15:03:12 INFO ipc.NettyServer: [id: 0xbcf79851, /192.168.1.51:47048 => /192.168.1.50:5555] CONNECTED: /192.168.1.51:4704814/08/10 15:07:56 INFO sink.LoggerSink: Event: { headers:{Severity=0, flume.syslog.status=Invalid, Facility=0} body: 69 64 6F 61 6C 6C 2E 6F 72 67 20 74 65 73 74 31 idoall.org test1 }14/08/10 15:07:56 INFO sink.LoggerSink: Event: { headers:{Severity=0, flume.syslog.status=Invalid, Facility=0} body: 69 64 6F 61 6C 6C 2E 6F 72 67 20 74 65 73 74 32 idoall.org test2 } |
i)我们再在m2的sink窗口中,启动sink:
|
1
|
root@m1:/home/hadoop# /home/hadoop/flume-1.5.0-bin/bin/flume-ng agent -c . -f /home/hadoop/flume-1.5.0-bin/conf/Flume_Sink_Processors_avro.conf -n a1 -Dflume.root.logger=INFO,console |
j)输入两批测试数据:
|
1
|
root@m1:/home/hadoop# echo "idoall.org test3 failover" | nc localhost 5140 && echo "idoall.org test4 failover" | nc localhost 5140 |
k)在m2的sink窗口,我们可以看到以下信息,因为优先级的关系,log消息会再次落到m2上:
|
1
2
3
4
5
6
7
8
9
10
11
12
13
14
15
|
14/08/10 15:09:47 INFO node.Application: Starting Sink k114/08/10 15:09:47 INFO node.Application: Starting Source r114/08/10 15:09:47 INFO source.AvroSource: Starting Avro source r1: { bindAddress: 0.0.0.0, port: 5555 }...14/08/10 15:09:47 INFO instrumentation.MonitoredCounterGroup: Monitored counter group for type: SOURCE, name: r1: Successfully registered new MBean.14/08/10 15:09:47 INFO instrumentation.MonitoredCounterGroup: Component type: SOURCE, name: r1 started14/08/10 15:09:47 INFO source.AvroSource: Avro source r1 started.14/08/10 15:09:54 INFO ipc.NettyServer: [id: 0x96615732, /192.168.1.51:48741 => /192.168.1.51:5555] OPEN14/08/10 15:09:54 INFO ipc.NettyServer: [id: 0x96615732, /192.168.1.51:48741 => /192.168.1.51:5555] BOUND: /192.168.1.51:555514/08/10 15:09:54 INFO ipc.NettyServer: [id: 0x96615732, /192.168.1.51:48741 => /192.168.1.51:5555] CONNECTED: /192.168.1.51:4874114/08/10 15:09:57 INFO sink.LoggerSink: Event: { headers:{Severity=0, flume.syslog.status=Invalid, Facility=0} body: 69 64 6F 61 6C 6C 2E 6F 72 67 20 74 65 73 74 32 idoall.org test2 }14/08/10 15:10:43 INFO ipc.NettyServer: [id: 0x12621f9a, /192.168.1.50:38166 => /192.168.1.51:5555] OPEN14/08/10 15:10:43 INFO ipc.NettyServer: [id: 0x12621f9a, /192.168.1.50:38166 => /192.168.1.51:5555] BOUND: /192.168.1.51:555514/08/10 15:10:43 INFO ipc.NettyServer: [id: 0x12621f9a, /192.168.1.50:38166 => /192.168.1.51:5555] CONNECTED: /192.168.1.50:3816614/08/10 15:10:43 INFO sink.LoggerSink: Event: { headers:{Severity=0, flume.syslog.status=Invalid, Facility=0} body: 69 64 6F 61 6C 6C 2E 6F 72 67 20 74 65 73 74 33 idoall.org test3 }14/08/10 15:10:43 INFO sink.LoggerSink: Event: { headers:{Severity=0, flume.syslog.status=Invalid, Facility=0} body: 69 64 6F 61 6C 6C 2E 6F 72 67 20 74 65 73 74 34 idoall.org test4 } |
11)案例11:Load balancing Sink Processor
load balance type和failover不同的地方是,load balance有两个配置,一个是轮询,一个是随机。两种情况下如果被选择的sink不可用,就会自动尝试发送到下一个可用的sink上面。
a)在m1创建Load_balancing_Sink_Processors配置文件
|
1
2
3
4
5
6
7
8
9
10
11
12
13
14
15
16
17
18
19
20
21
22
23
24
25
26
27
28
29
30
31
32
33
34
|
root@m1:/home/hadoop# vi /home/hadoop/flume-1.5.0-bin/conf/Load_balancing_Sink_Processors.conf a1.sources = r1a1.sinks = k1 k2a1.channels = c1 #这个是配置Load balancing的关键,需要有一个sink groupa1.sinkgroups = g1a1.sinkgroups.g1.sinks = k1 k2a1.sinkgroups.g1.processor.type = load_balancea1.sinkgroups.g1.processor.backoff = truea1.sinkgroups.g1.processor.selector = round_robin # Describe/configure the sourcea1.sources.r1.type = syslogtcpa1.sources.r1.port = 5140a1.sources.r1.channels = c1 # Describe the sinka1.sinks.k1.type = avroa1.sinks.k1.channel = c1a1.sinks.k1.hostname = m1a1.sinks.k1.port = 5555 a1.sinks.k2.type = avroa1.sinks.k2.channel = c1a1.sinks.k2.hostname = m2a1.sinks.k2.port = 5555 # Use a channel which buffers events in memorya1.channels.c1.type = memorya1.channels.c1.capacity = 1000a1.channels.c1.transactionCapacity = 100 |
b)在m1创建Load_balancing_Sink_Processors_avro配置文件
|
1
2
3
4
5
6
7
8
9
10
11
12
13
14
15
16
17
18
19
20
21
22
23
|
root@m1:/home/hadoop# vi /home/hadoop/flume-1.5.0-bin/conf/Load_balancing_Sink_Processors_avro.conf a1.sources = r1a1.sinks = k1a1.channels = c1 # Describe/configure the sourcea1.sources.r1.type = avroa1.sources.r1.channels = c1a1.sources.r1.bind = 0.0.0.0a1.sources.r1.port = 5555 # Describe the sinka1.sinks.k1.type = logger # Use a channel which buffers events in memorya1.channels.c1.type = memorya1.channels.c1.capacity = 1000a1.channels.c1.transactionCapacity = 100 # Bind the source and sink to the channela1.sources.r1.channels = c1a1.sinks.k1.channel = c1 |
c)将2个配置文件复制到m2上一份
|
1
2
|
root@m1:/home/hadoop/flume-1.5.0-bin# scp -r /home/hadoop/flume-1.5.0-bin/conf/Load_balancing_Sink_Processors.conf root@m2:/home/hadoop/flume-1.5.0-bin/conf/Load_balancing_Sink_Processors.confroot@m1:/home/hadoop/flume-1.5.0-bin# scp -r /home/hadoop/flume-1.5.0-bin/conf/Load_balancing_Sink_Processors_avro.conf root@m2:/home/hadoop/flume-1.5.0-bin/conf/Load_balancing_Sink_Processors_avro.conf |
d)打开4个窗口,在m1和m2上同时启动两个flume agent
|
1
2
|
root@m1:/home/hadoop# /home/hadoop/flume-1.5.0-bin/bin/flume-ng agent -c . -f /home/hadoop/flume-1.5.0-bin/conf/Load_balancing_Sink_Processors_avro.conf -n a1 -Dflume.root.logger=INFO,consoleroot@m1:/home/hadoop# /home/hadoop/flume-1.5.0-bin/bin/flume-ng agent -c . -f /home/hadoop/flume-1.5.0-bin/conf/Load_balancing_Sink_Processors.conf -n a1 -Dflume.root.logger=INFO,console |
e)然后在m1或m2的任意一台机器上,测试产生log,一行一行输入,输入太快,容易落到一台机器上
|
1
2
3
4
|
root@m1:/home/hadoop# echo "idoall.org test1" | nc localhost 5140root@m1:/home/hadoop# echo "idoall.org test2" | nc localhost 5140root@m1:/home/hadoop# echo "idoall.org test3" | nc localhost 5140root@m1:/home/hadoop# echo "idoall.org test4" | nc localhost 5140 |
f)在m1的sink窗口,可以看到以下信息:
|
1
2
|
14/08/10 15:35:29 INFO sink.LoggerSink: Event: { headers:{Severity=0, flume.syslog.status=Invalid, Facility=0} body: 69 64 6F 61 6C 6C 2E 6F 72 67 20 74 65 73 74 32 idoall.org test2 }14/08/10 15:35:33 INFO sink.LoggerSink: Event: { headers:{Severity=0, flume.syslog.status=Invalid, Facility=0} body: 69 64 6F 61 6C 6C 2E 6F 72 67 20 74 65 73 74 34 idoall.org test4 } |
g)在m2的sink窗口,可以看到以下信息:
|
1
2
|
14/08/10 15:35:27 INFO sink.LoggerSink: Event: { headers:{Severity=0, flume.syslog.status=Invalid, Facility=0} body: 69 64 6F 61 6C 6C 2E 6F 72 67 20 74 65 73 74 31 idoall.org test1 }14/08/10 15:35:29 INFO sink.LoggerSink: Event: { headers:{Severity=0, flume.syslog.status=Invalid, Facility=0} body: 69 64 6F 61 6C 6C 2E 6F 72 67 20 74 65 73 74 33 idoall.org test3 } |
说明轮询模式起到了作用。
12)案例12:Hbase sink
a)在测试之前,请先参考《ubuntu12.04+hadoop2.2.0+zookeeper3.4.5+hbase0.96.2+hive0.13.1分布式环境部署》将hbase启动
b)然后将以下文件复制到flume中:
|
1
2
3
4
5
6
7
8
|
cp /home/hadoop/hbase-0.96.2-hadoop2/lib/protobuf-java-2.5.0.jar /home/hadoop/flume-1.5.0-bin/libcp /home/hadoop/hbase-0.96.2-hadoop2/lib/hbase-client-0.96.2-hadoop2.jar /home/hadoop/flume-1.5.0-bin/libcp /home/hadoop/hbase-0.96.2-hadoop2/lib/hbase-common-0.96.2-hadoop2.jar /home/hadoop/flume-1.5.0-bin/libcp /home/hadoop/hbase-0.96.2-hadoop2/lib/hbase-protocol-0.96.2-hadoop2.jar /home/hadoop/flume-1.5.0-bin/libcp /home/hadoop/hbase-0.96.2-hadoop2/lib/hbase-server-0.96.2-hadoop2.jar /home/hadoop/flume-1.5.0-bin/libcp /home/hadoop/hbase-0.96.2-hadoop2/lib/hbase-hadoop2-compat-0.96.2-hadoop2.jar /home/hadoop/flume-1.5.0-bin/libcp /home/hadoop/hbase-0.96.2-hadoop2/lib/hbase-hadoop-compat-0.96.2-hadoop2.jar /home/hadoop/flume-1.5.0-bin/lib@@@cp /home/hadoop/hbase-0.96.2-hadoop2/lib/htrace-core-2.04.jar /home/hadoop/flume-1.5.0-bin/lib |
c)确保test_idoall_org表在hbase中已经存在,test_idoall_org表的格式以及字段请参考《ubuntu12.04+hadoop2.2.0+zookeeper3.4.5+hbase0.96.2+hive0.13.1分布式环境部署》中关于hbase部分的建表代码。
d)在m1创建hbase_simple配置文件
|
1
2
3
4
5
6
7
8
9
10
11
12
13
14
15
16
17
18
19
20
21
22
23
24
25
26
27
28
29
|
root@m1:/home/hadoop# vi /home/hadoop/flume-1.5.0-bin/conf/hbase_simple.conf a1.sources = r1a1.sinks = k1a1.channels = c1 # Describe/configure the sourcea1.sources.r1.type = syslogtcpa1.sources.r1.port = 5140a1.sources.r1.host = localhosta1.sources.r1.channels = c1 # Describe the sinka1.sinks.k1.type = loggera1.sinks.k1.type = hbasea1.sinks.k1.table = test_idoall_orga1.sinks.k1.columnFamily = namea1.sinks.k1.column = idoalla1.sinks.k1.serializer = org.apache.flume.sink.hbase.RegexHbaseEventSerializera1.sinks.k1.channel = memoryChannel # Use a channel which buffers events in memorya1.channels.c1.type = memorya1.channels.c1.capacity = 1000a1.channels.c1.transactionCapacity = 100 # Bind the source and sink to the channela1.sources.r1.channels = c1a1.sinks.k1.channel = c1 |
e)启动flume agent
|
1
|
/home/hadoop/flume-1.5.0-bin/bin/flume-ng agent -c . -f /home/hadoop/flume-1.5.0-bin/conf/hbase_simple.conf -n a1 -Dflume.root.logger=INFO,console |
f)测试产生syslog
|
1
|
root@m1:/home/hadoop# echo "hello idoall.org from flume" | nc localhost 5140 |
g)这时登录到hbase中,可以发现新数据已经插入
|
1
2
3
4
5
6
7
8
9
10
11
12
13
14
15
16
17
18
19
20
21
22
23
24
25
26
27
28
29
30
|
root@m1:/home/hadoop# /home/hadoop/hbase-0.96.2-hadoop2/bin/hbase shell2014-08-10 16:09:48,984 INFO [main] Configuration.deprecation: hadoop.native.lib is deprecated. Instead, use io.native.lib.availableHBase Shell; enter 'help<RETURN>' for list of supported commands.Type "exit<RETURN>" to leave the HBase ShellVersion 0.96.2-hadoop2, r1581096, Mon Mar 24 16:03:18 PDT 2014 hbase(main):001:0> listTABLE SLF4J: Class path contains multiple SLF4J bindings.SLF4J: Found binding in [jar:file:/home/hadoop/hbase-0.96.2-hadoop2/lib/slf4j-log4j12-1.6.4.jar!/org/slf4j/impl/StaticLoggerBinder.class]SLF4J: Found binding in [jar:file:/home/hadoop/hadoop-2.2.0/share/hadoop/common/lib/slf4j-log4j12-1.7.5.jar!/org/slf4j/impl/StaticLoggerBinder.class]SLF4J: See http://www.slf4j.org/codes.html#multiple_bindings for an explanation.hbase2hive_idoall hive2hbase_idoall test_idoall_org 3 row(s) in 2.6880 seconds => ["hbase2hive_idoall", "hive2hbase_idoall", "test_idoall_org"]hbase(main):002:0> scan "test_idoall_org"ROW COLUMN+CELL 10086 column=name:idoall, timestamp=1406424831473, value=idoallvalue 1 row(s) in 0.0550 seconds hbase(main):003:0> scan "test_idoall_org"ROW COLUMN+CELL 10086 column=name:idoall, timestamp=1406424831473, value=idoallvalue 1407658495588-XbQCOZrKK8-0 column=name:payload, timestamp=1407658498203, value=hello idoall.org from flume 2 row(s) in 0.0200 seconds hbase(main):004:0> quit |
经过这么多flume的例子测试,如果你全部做完后,会发现flume的功能真的很强大,可以进行各种搭配来完成你想要的工作,俗话说师傅领进门,修行在个人,如何能够结合你的产品业务,将flume更好的应用起来,快去动手实践吧。
这篇文章做为一个笔记,希望能够对刚入门的同学起到帮助作用。