1. 启动
要运行该应用程序,您可以使用flask命令或-m将Flask与python 一起使用。在执行此操作之前,您需要通过导出FLASK_APP环境变量来告诉终端应用程序可以使用 :
$ export FLASK_APP=hello.py
$ flask run
 * Running on http://127.0.0.1:5000/
-
外部可见服务器:
--host=0.0.0.0 -
调试模式:
$ export FLASK_ENV=development
$ flask run
您还可以通过导出与环境分开控制调试模式FLASK_DEBUG=1。
-
更改端口:
--port=8000
2. Flask Shell
3. 架构组件
3.1. app.route
-
为视图绑定多个URL
@app.route('/hi') @app.route('/hello') def say_hello(): return '<h1>Hello, Flask!</h1>' -
动态URL
@app.route('/greet/<name>')
def greeting(name):
    return '<h1>Hello, %s!</h1>' % name
支持指定参数的类型,如:
@app.route('goback/<int:year>')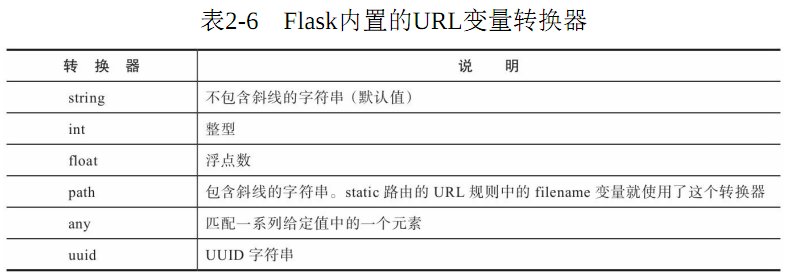
@app.route('/colors/<any(blue, white, red):color>') -
URL参数的默认值
@app.route('/greet', defaults={'name': 'Programmer'})
4. HTTP请求
4.1. 请求报文
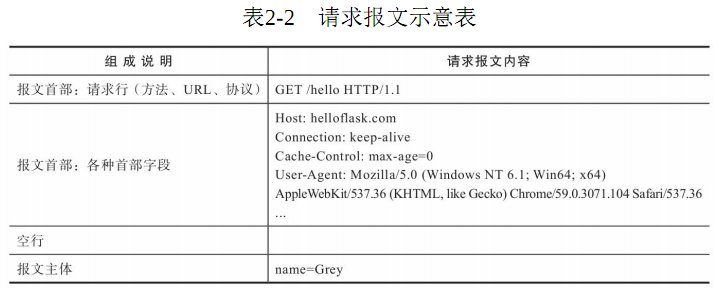

4.2. 获取请求:Request对象
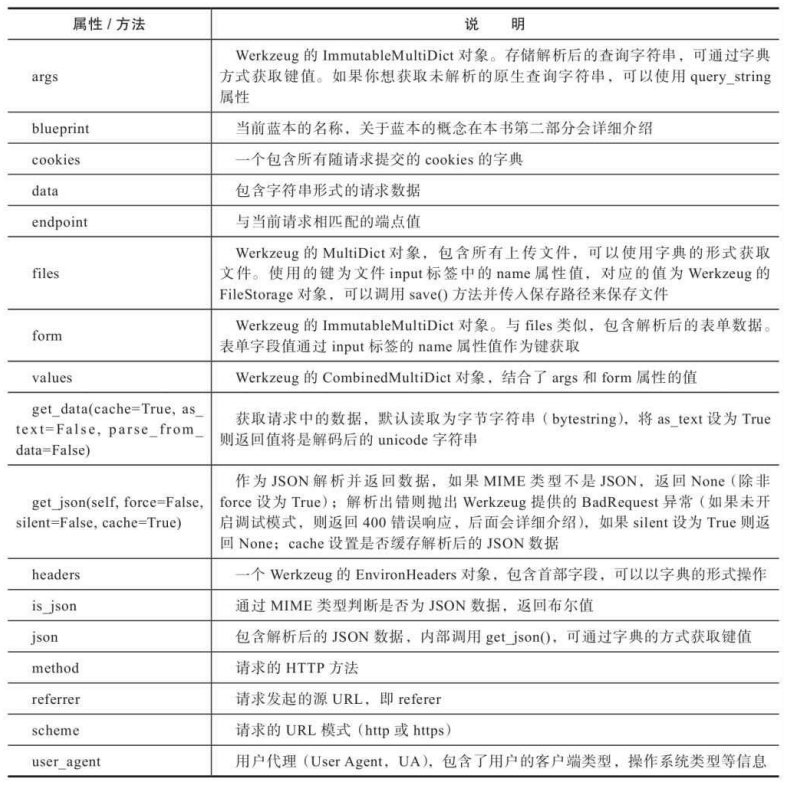
使用request的属性获取请求URL

request对象常用的属性和方法
from flask import Flask, request
app = Flask(__name__)
@app.route('/hello')
def hello():
    name = request.args.get('name', 'Flask')  # 获取查询参数name的值
    return '<h1>Hello, %s!<h1>' % name  # 插入到返回值中
4.3. 在Flask中处理请求
4.3.1. 路由匹配
为了便于将请求分发到对应的视图函数,程序实例中存储了一个路由表 app.url_map ,其中定义了URL规则和视图函数的映射关系。
4.3.2. 设置监听的HTTP方法
@app.route('/hello', methods=['GET', 'POST'])
def hello():
    return '<h1>Hello, Flask!</h1>'
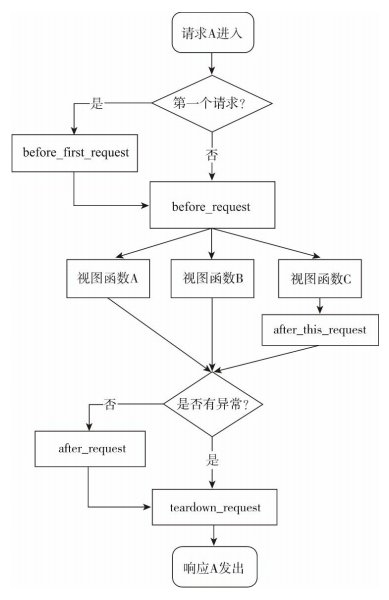
4.3.3. 请求钩子

@app.before_request
def do_something():
    pass # 这里的代码会在每个请求处理前执行
4.4. HTTP响应
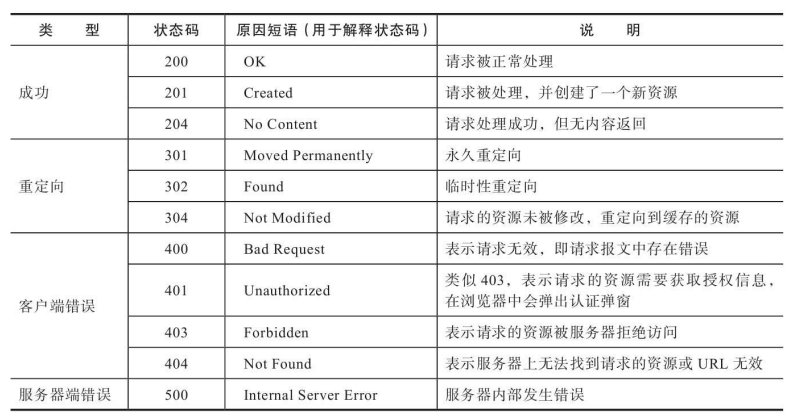
常见的HTTP状态码
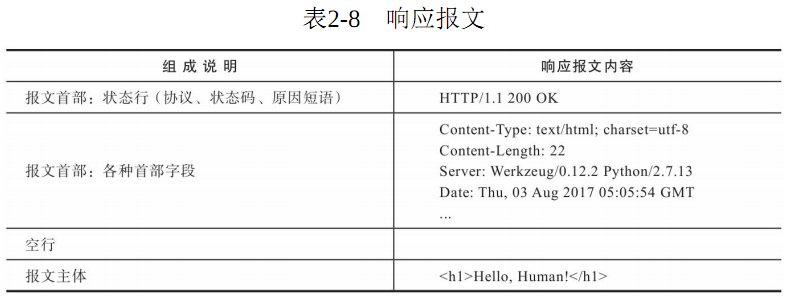
通过URL路由,将请求对应到视图函数,视图函数的返回值构成了响应报文的主体内容,正确返回时状态码默认为200。Flask会调用 make_response() 方法将视图函数返回值转换为响应对象。
- If a response object of the correct type is returned it’s directly returned from the view.
- If it’s a string, a response object is created with that data and the default parameters.
- If it’s a dict, a response object is created using
jsonify. - If a tuple is returned the items in the tuple can provide extra information. Such tuples have to be in the form
(response, status),(response, headers), or(response, status, headers). Thestatusvalue will override the status code andheaderscan be a list or dictionary of additional header values. - If none of that works, Flask will assume the return value is a valid WSGI application and convert that into a response object.
完整地说,视图函数可以返回最多由三个元素组成的元组:响应主体、状态码、首部字段。其中首部字段可以为字典,或是两元素元组组成的列表。
比如,普通的响应可以只包含主体内容:
@app.route('/hello')
def hello():
    ...
    return '<h1>Hello, Flask!</h1>'
默认的状态码为200,下面指定了不同的状态码:
@app.route('/hello')
def hello():
    ...
    return '<h1>Hello, Flask!</h1>', 201
有时你会想附加或修改某个首部字段。比如,要生成状态码为3XX
的重定向响应,需要将首部中的Location字段设置为重定向的目标
URL:
@app.route('/hello')
def hello():
    ...
    return '', 302, {'Location', 'http://www.example.com'}
几种特殊情况的说明:
-
重定向
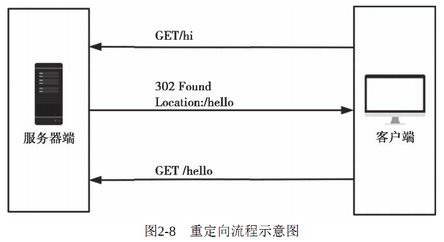
在Web程序中,我们经常需要进行重定向。比如,当某个用户在没有经过认证的情况下访问需要登录后才能访问的资源,程序通常会重定向到登录页面。
from flask import Flask, redirect @app.route('/hello') def hello(): return redirect('http://www.example.com') -
重定向到其他视图
如果要在程序内重定向到其他视图,那么只需在
redirect()函数中使用url_for()函数生成目标URL即可,如下所示。from flask import Flask, redirect, url_for ... @app.route('/hi') def hi(): ... return redierct(url_for('hello')) # 重定向到/hello @app.route('/hello') def hello(): ... -
错误响应
from flask import Flask, abort
...
@app.route('/404')
def not_found():
    abort(404)
4.4.1. 响应格式
MIME类型在首部的Content-Type字段中定义,以默认的HTML类型为例:
Content-Type: text/html; charset=utf-8
from flask import make_response
@app.route('/foo')
def foo():
    response = make_response('Hello, World!')
    response.mimetype = 'text/plain'
    return response
- text/html
- text/plain
- application/xml
- application/json
from  flask import Flask, make_response, json
...
@app.route('/foo')
def foo():
    data = {
        'name':'Grey Li',
        'gender':'male'
    }
    response = make_response(json.dumps(data))
    response.mimetype = 'application/json'
    return response
不过我们一般并不直接使用json模块的dumps()、load()等方法,因为Flask通过包装这些方法提供了更方便的jsonify()函数。
from flask import jsonify
@app.route('/foo')
def foo():
    return jsonify(name='Grey Li', gender='male')
    # return jsonify({name: 'Grey Li', gender: 'male'})
另外,jsonify()函数默认生成200响应,你也可以通过附加状态
码来自定义响应类型,比如:
@app.route('/foo')
def foo():
    return jsonify(message='Error!'), 500
4.5. Cookie

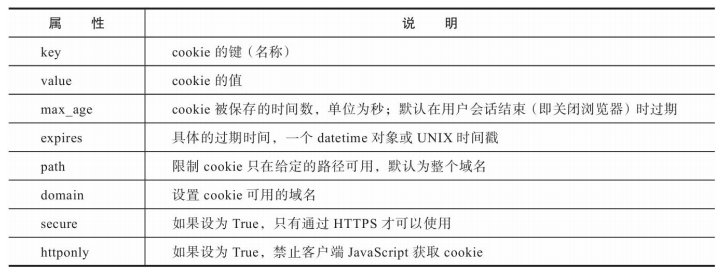
set_cookie()方法的参数
from flask import Flask, make_response
...
@app.route('/set/<name>')
def set_cookie(name):
    response = make_response(redirect(url_for('hello')))
    response.set_cookie('name', name)
    return response
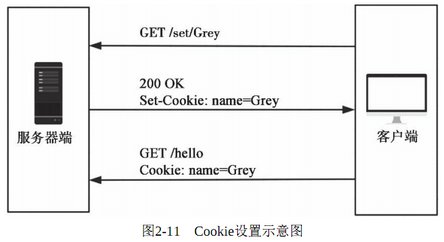
在这个make_response()函数中,我们传入的是使用redirect()函数生成的重定向响应。set_cookie视图会在生成的响应报文首部中创建一个Set-Cookie字段,即“Set-Cookie:name=Grey;Path=/”。
from flask import Flask, request
@app.route('/')
@app.route('/hello')
def hello():
    name = request.args.get('name')
    if name is None:
        name = request.cookies.get('name', 'Human')  # 从Cookie中获取name值
    return '<h1>Hello, %s</h1>' % name
4.5.1. session:安全的Cookie
- 设置程序密钥
- 模拟用户认证
4.6. Flask上下文
我们可以把编程中的上下文理解为当前环境(environment)的快照
(snapshot)。

另外,g也支持使用类似字典的get()、pop()以及setdefault()方法进行操作。
4.6.1. 上下文钩子
5. HTTP实践 - 示例
5.1. 重定向回上一个页面
# return redirect(request.referrer)  # 可能为空
return redirect(request.referrer or url_for('hello'))
除了自动从referrer获取,另一种更常见的方式是在URL中手动加入包含当前页面URL的查询参数,这个查询参数一般命名为next。
from flask import request, url_for, redirect

@app.route("/")
@app.route("/index")
def hello():
    return "<h1>Index Page</h1>"

@app.route("/todo")
def do_something():
    # print(">>>", request.args)
    return redirect(request.args.get('next', url_for('hello')))

@app.route('/foo')
def foo():
    """ href会被do_something()重定向到hello """
    return '<h1>Foo page </h1><a href="%s">Do something</a>' % url_for('do_something')

@app.route('/bar')
def bar():
    """ href会被do_something()重定向到自身 """
    # print("request.full_path:",request.full_path)
    return '<h1>Bar page</h1><a href="%s">Do something</a>' % url_for('do_something', next=request.full_path)
对上述方法进行整理:
def redirect_back(default='hello', **kwargs):
    for target in request.args.get('next'), request.referrer:
        if target:
            return redirect(target)
    return redirect(url_for(default, **kwargs))
```
5.1.1. 对URL进行安全验证
from urllib.parse import urlparse, urljoin
from flask import request
def is_safe_url(target):
    ref_url = urlparse(request.host_url)
    test_url = urlparse(urljoin(request.host_url, target))
    return test_url.scheme in ('http', 'https') and
           ref_url.netloc == test_url.netloc
我们使用is_safe_url()验证next和referer的值:
def redirect_back(default='hello', **kwargs):
    for target in request.args.get('next'), request.referrer:
        if not target:
            continue
        if is_safe_url(target):
            return redirect(target)
    return redirect(url_for(default, **kwargs))
5.2. 使用AJAX技术发送异步请求
5.3. HTTP服务器端主动推送
实现服务器端推送的一系列技术被合称为HTTP Server Push(HTTP服务器端推送),目前常用的推送技术如表所示。
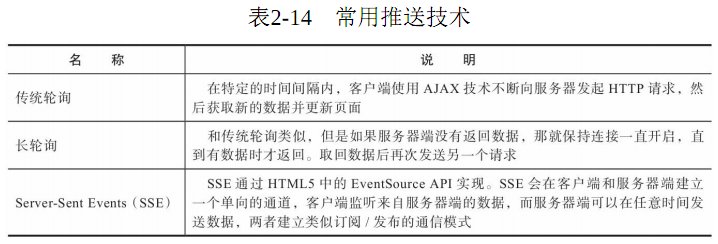
除了这些推送技术,在HTML5的API中还包含了一个WebSocket协议,和HTTP不同,它是一种基于TCP协议的全双工通信协议(full-duplex communication protocol)。和前面介绍的服务器端推送技术相比,WebSocket实时性更强,而且可以实现双向通信(bidirectional communication)。另外,WebSocket的浏览器兼容性要强于SSE。
5.4. Web安全防范
- 注入攻击
- XSS攻击
- CSRF攻击