最早的时候App Service被定义为一种后台服务,类似于极简版的Windows Service。App Service作为Background Task在宿主UWP APP中运行,向其他UWP APP提供服务,可用于UWP APP间通讯及交换数据。
早期的App Service应用场景较为单一,但随着Win10 1607版本对In Process AppService的支持,以及从Visual Studio2017开始支持的Desktop Extension和MSIX Package等一系列技术的应用,如今的App Service可以用于UWP和非UWP程序间的直接通讯,达到无限接近传统桌面程序的能力。我们今天就先来看一下In Process App Service。
In Process,顾名思义我们不需要额外创建专门的Project用来写App Service的代码。而是直接包含在主UWP工程。首先我们创建空的UWP工程FrontUWPApp,然后添加一个简单的帮助类AppServiceHandler:

class AppServiceHandler
    {
        private AppServiceConnection AppServiceConnection { get; set; }
        private BackgroundTaskDeferral AppServiceDeferral { get; set; }

        public event EventHandler<string> MessageReceivedEvent;

        private static AppServiceHandler instance;
        public static AppServiceHandler Instance
        {
            get
            {
                if (instance == null)
                {
                    instance = new AppServiceHandler();
                }

                return instance;
            }
        }

        private AppServiceHandler()
        {

        }

        public void BackgroundActivated(IBackgroundTaskInstance taskInstance)
        {
            AppServiceTriggerDetails appService = taskInstance.TriggerDetails as AppServiceTriggerDetails;
            AppServiceDeferral = taskInstance.GetDeferral();
            AppServiceConnection = appService.AppServiceConnection;
            AppServiceConnection.RequestReceived += OnAppServiceRequestReceived;
            AppServiceConnection.ServiceClosed += AppServiceConnection_ServiceClosed;
        }

        private void OnAppServiceRequestReceived(AppServiceConnection sender, AppServiceRequestReceivedEventArgs args)
        {
            AppServiceDeferral messageDeferral = args.GetDeferral();
            var message = args.Request.Message;
            string text = message["response"] as string;

            MessageReceivedEvent?.Invoke(this, text);
            messageDeferral.Complete();
        }

        private void AppServiceConnection_ServiceClosed(AppServiceConnection sender, AppServiceClosedEventArgs args)
        {
            AppServiceDeferral.Complete();
        }

        public async Task<AppServiceResponse> SendRequestAsync(string message)
        {
            var valueSet = new ValueSet();
            valueSet.Add("request", message);
            return await AppServiceConnection.SendMessageAsync(valueSet);
        }
    }
这其中最重要的方法是
public void BackgroundActivated(IBackgroundTaskInstance taskInstance)
该方法将在App.xaml.cs通过
protected override void OnBackgroundActivated(BackgroundActivatedEventArgs args)
        {
            base.OnBackgroundActivated(args);
            AppServiceHandler.Instance.BackgroundActivated(args.TaskInstance);
        }
将BackgroundTask的实例传递进来。再保存这个Instance中AppService的AppServiceConnection对象。在取得AppServiceConnection对象后,即可以通过事件
public event TypedEventHandler<AppServiceConnection, AppServiceRequestReceivedEventArgs> RequestReceived;
来监听消息,同时又可以通过方法
public IAsyncOperation<AppServiceResponse> SendMessageAsync(ValueSet message);
来发送消息。实现一个双向的通讯过程。
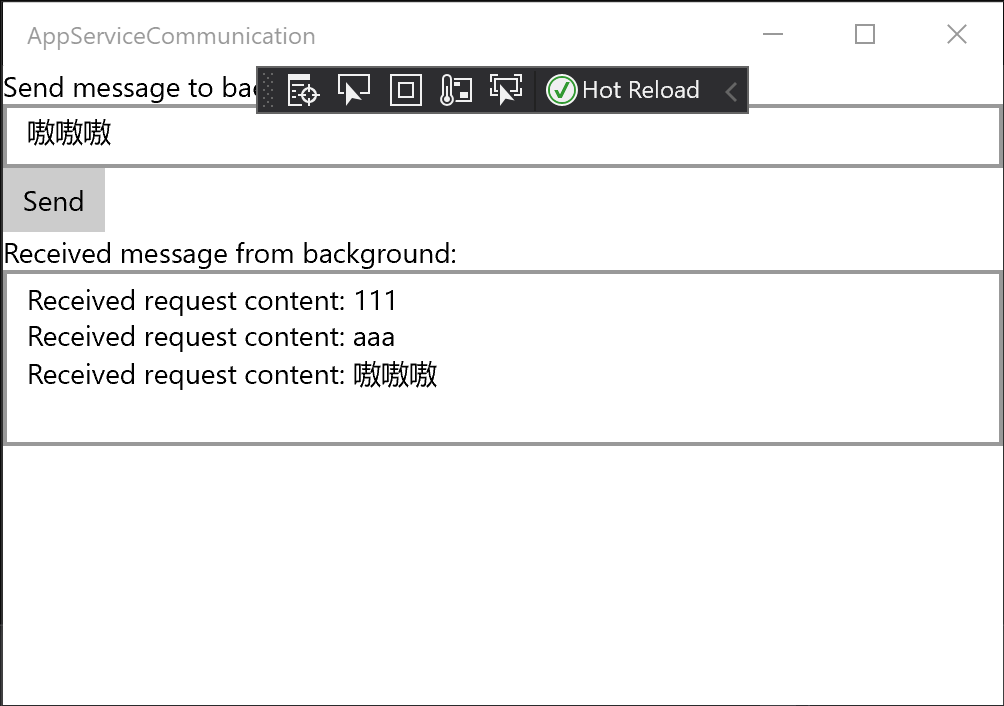
仅通过代码也许难以想象要做的事情,不妨由界面来推导出逻辑,下图是UWP工程FrontUWPApp的界面,我们希望发送文字消息给非UWP工程BackgroundNetProcess。再由BackgroundNetProcess处理消息后,主动经AppService推给FrontUWPApp。
首先我们在MainPage的OnNavigatedTo方法中通过desktop extension的方式,来启动.NET Framework的Console程序BackgroundNetProcess(如果对UWP如何使用desktop extension不够了解,请参考这篇《迁移桌面程序到MS Store(9)——APPX With Desktop Extension》)。同时给AppServiceHandler订阅MessageReceivedEvent。
protected async override void OnNavigatedTo(NavigationEventArgs e)
        {
            base.OnNavigatedTo(e);

            if (ApiInformation.IsApiContractPresent("Windows.ApplicationModel.FullTrustAppContract", 1, 0))
            {
                await FullTrustProcessLauncher.LaunchFullTrustProcessForCurrentAppAsync();
                AppServiceHandler.Instance.MessageReceivedEvent += Instance_MessageReceivedEvent;
            }
        }
Instance_MesssageReceivedEvent就是简单的把从BackgroundNetProcess中返回的消息显示在界面上。
        private async void Instance_MessageReceivedEvent(object sender, string e)
        {
            await Dispatcher.RunAsync(Windows.UI.Core.CoreDispatcherPriority.Normal, () =>
             {
                 textBoxResponses.Text += e + "\r\n";
             });
        }
同时MainPage上的Button按钮会通过AppServiceHandler实例中保存的AppServiceConnection对象来发送request给BackgroundNetProcess进程。
        private async void Button_Click(object sender, RoutedEventArgs e)
        {
            var response = await AppServiceHandler.Instance.SendRequestAsync(textBoxRequest.Text);
        }
我们转到BackgroundNetProcess工程,在Main方法中仅仅是创建类BackgroundProcess的实例,并且让Console保持运行。
        static void Main(string[] args)
        {
            var backgroundProcess = new BackgroundProcess();
            Console.ReadKey();
        }
而在BackgroundProcess类中,我们通过InitializeAsync方法来创建AppServiceConnection对象,在成功打开Connection的情况下,订阅ReqeustReceived事件。这是为了能接受到上文提到的,UWP APP发送过来的request。
    public class BackgroundProcess
    {
        private AppServiceConnection Connection { get;  set; }

        public Task InitializeTask { get; private set; }

        public BackgroundProcess()
        {
            InitializeTask = InitializeAsync();
        }

        public async Task InitializeAsync()
        {
            Connection = new AppServiceConnection();
            Connection.PackageFamilyName = Package.Current.Id.FamilyName;
            Connection.AppServiceName = "NotificationAppService";
            AppServiceConnectionStatus status = await Connection.OpenAsync();
            if (status != AppServiceConnectionStatus.Success)
            {
                Console.WriteLine(status);
            }
            else
            {
                Console.WriteLine(status);
                Connection.RequestReceived += Connection_RequestReceived;
            }
        }

        private async void Connection_RequestReceived(AppServiceConnection sender, AppServiceRequestReceivedEventArgs args)
        {
            var deferral = args.GetDeferral();
            var content = args.Request.Message["request"];
            var message = new ValueSet();
            message.Add("response", $"Received request content: {content}");
            await Connection.SendMessageAsync(message);
            deferral.Complete();
        }
    }
这里需要注意的是,Connection.AppServiceName需要和最终Package.appmanifest文件中配置的ServiceName一致(appmanifest文件的修改我们后面一点再介绍)。
在BackgroundProcess类中,一旦我们收到了UWP APP发来的request,就会触发Connection_RequestReceived方法。在该方法里,我们对收到的字符串做了简单处理,然后通过SendMessageAsync方法反向给UWP APP发送消息。
当然,并没有规定收到request就一定要立即返回消息。我们可以在BackgroundProcess这样的desktop extension进程中,实现一些UWP限制的功能,诸如查询注册表,启动其他exe程序等等。甚至可以挂个键盘钩子,在捕捉到热键时,通知UWP APP。
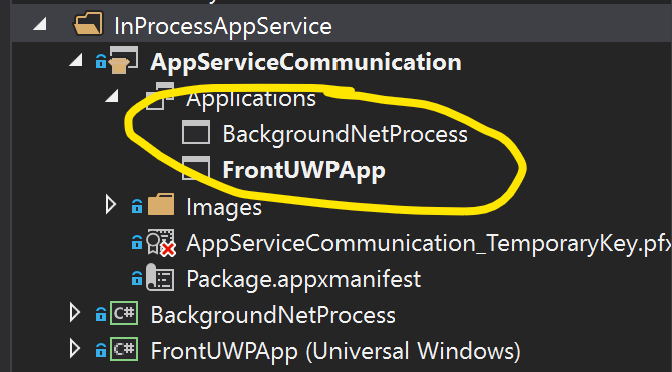
前后端的FrontUWP和BackgroundNetProcess都介绍完了,接着就是通过Packaging工程将它们整合打包成MSIX package。

记得在Package工程的Applications中,添加对FrontUWPApp和BackgroundNetProcess的引用。同时设置FrontUWPApp为入口点。
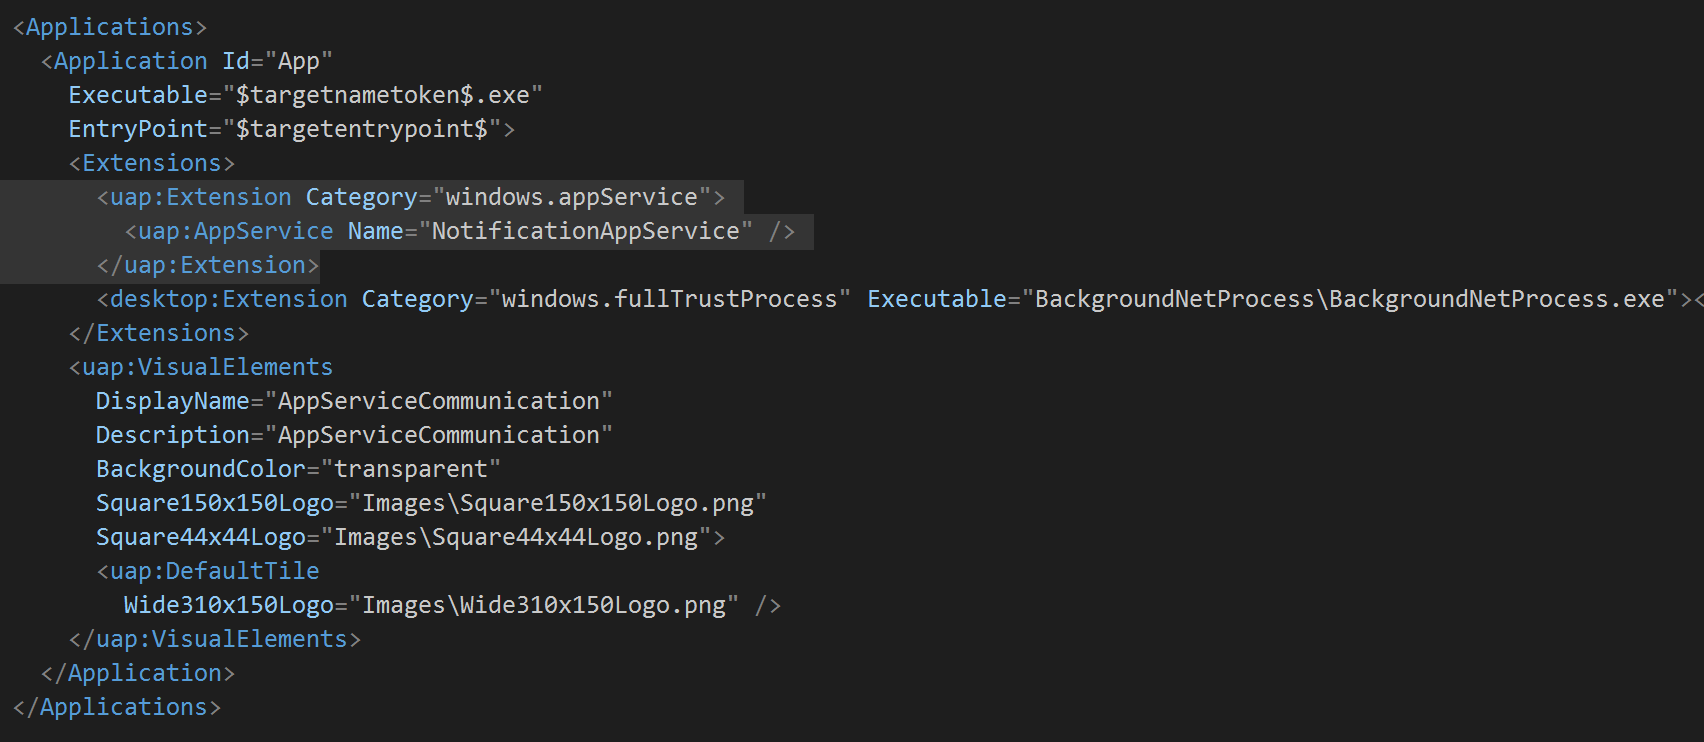
最后我们来编辑Package工程的appxmanifest文件,主要就是添加Extensions节点。
      <Extensions>
        <uap:Extension Category="windows.appService">
          <uap:AppService Name="NotificationAppService" />
        </uap:Extension>
        <desktop:Extension Category="windows.fullTrustProcess" Executable="BackgroundNetProcess\BackgroundNetProcess.exe"></desktop:Extension>
      </Extensions>
在完成以上操作之后,我们的AppServiceCommunicaton工程就编写完毕了。在Visual Studio 2019中按F5运行的话,应该可以实现FrontUWPApp和BackgroundNetProcess之间的消息传递了。
本篇的示例代码依然放在这个Repository中,Clone后通过VS打开,找到InProcessAppService文件夹即可。
https://github.com/manupstairs/UWPSamples