前言
其实好多项目中,做一些数据拦截、数据缓存都有Aop的概念,只是实现方式不一样;之前大家可能都会利用过滤器来实现Aop的功能,如果是Asp.NetCore的话,也可能会使用中间件; 而这种实现方式都是在请求过程中进行拦截,如果我们想在服务层中做切面的话,那种方式显然不好使了,需要用到“真正的Aop”。
直接开始
其实我们常说的“真正的Aop”其实就是动态代理,理论知识我这里就不记录了,自己也写不好,大家自行找度娘,我们这直接上代码:
正常搭建一个控制台项目,目录结构如下:
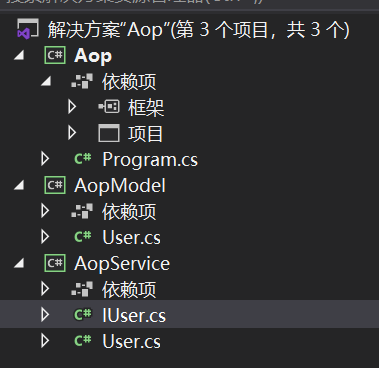
这里就是模拟一个简单的用户维护,代码内容如下:
定义Model
|
1
2
3
4
5
|
public class User { public string Name { get; set; } public int Age { get; set; } } |
定义接口
|
1
2
3
4
|
public interface IUserService { bool AddUser(User user); } |
实现接口
|
1
2
3
4
5
6
7
8
|
public class UserService : IUserService { public bool AddUser(User user) { Console.WriteLine("用户添加成功"); return true; } } |
main方法
|
1
2
3
4
5
6
7
8
9
10
11
|
class Program { static void Main(string[] args) { User user = new User {Name="Zoe", Age=18 }; IUserService userService = new UserService(); userService.AddUser(user); //Console.ReadLine(); } } |
项目很简单,正常运行就行;
新需求,如果我们想在用户增加前和增加后都做点其他事,怎么做呢?
解决方案:
1. 直接修改服务层代码,执行存储前后分别处理相关业务就行了;
2. 使用Aop,不修改原有方法。
方案1我们就不说了,肯定大家都知道,功能肯定能实现,但需要原有代码,加入好多接口都要处理类似的事情怎么办? 如果加好了,下个版本针对某些功能不需要了怎么办?显然不是很灵活,而且这样重复改,出Bug的几率很大哦!!!
直接动态代理:
1. 增加一个类,进行业务操作;
|
1
2
3
4
5
6
7
8
9
10
11
12
13
14
15
16
17
18
19
20
21
22
23
24
|
using System;using System.Collections.Generic;using System.Reflection;using System.Text;namespace Aop{ public class MyDecorator : DispatchProxy { //具体类型 public object TargetClass { get; set; } protected override object Invoke(MethodInfo targetMethod, object[] args) { Console.WriteLine("增加用户前执行业务"); //调用原有方法 targetMethod.Invoke(TargetClass, args); Console.WriteLine("增加用户后执行业务"); return true; } }} |
优化 Main()函数的代码
|
1
2
3
4
5
6
7
8
9
10
11
12
13
14
15
16
17
18
|
class Program { static void Main(string[] args) { User user = new User {Name="Zoe", Age=18 }; IUserService userService = new UserService(); userService.AddUser(user); //动态代理 //1. 创建代理对象 IUserService userService1 = DispatchProxy.Create<IUserService, MyDecorator>(); //2. 因为调用的是实例方法,需要传提具体类型 ((MyDecorator)userService1).TargetClass = new UserService(); userService1.AddUser(user); Console.ReadLine(); } } |
看动态代理部分,这样就统一实现了用户维护服务层的Aop编程,看运行结果:
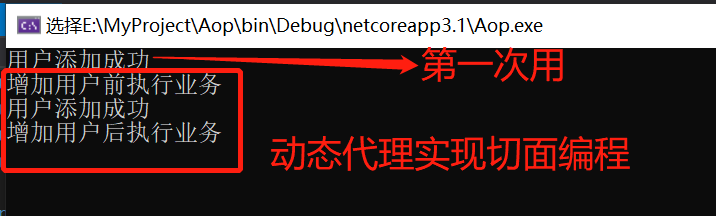
这样是不是比较灵活了,自己不需要在一个个业务层中进行处理,而且取舍也很简单,不要就不适用此类就行了。
引用第三方库
原生的这种方式使用感觉有点麻烦,还有什么强制转换啊,传类型啊等这些,Castle.Core就帮我们把事都做好了,接下来我们看看怎么用。
1. 首先引入Castle.Core;
2. 新增拦截器类,做业务扩展;
|
1
2
3
4
5
6
7
8
9
10
11
12
13
14
15
16
17
18
19
20
21
22
|
using Castle.DynamicProxy;using System;using System.Collections.Generic;using System.Text;namespace Aop{ class MyIntercept : IInterceptor { public void Intercept(IInvocation invocation) { //执行原有方法之前 Console.WriteLine("增加用户前执行业务"); //执行原有方法 invocation.Proceed(); //执行原有方法之后 Console.WriteLine("增加用户后执行业务"); } }} |
3. Main函数增加Castle.Core的用法
|
1
2
3
4
5
6
7
8
9
10
11
12
13
14
15
16
17
18
19
20
21
22
23
24
25
26
27
28
29
30
31
32
33
34
35
36
37
38
|
using AopModel;using AopService;using Castle.DynamicProxy;using System;using System.Reflection;using System.Reflection.Metadata;namespace Aop{ class Program { static void Main(string[] args) { User user = new User {Name="Zoe", Age=18 }; IUserService userService = new UserService(); userService.AddUser(user); Console.WriteLine("=============动态代理=============="); //动态代理 //1. 创建代理对象 IUserService userService1 = DispatchProxy.Create<IUserService, MyDecorator>(); //2. 因为调用的是实例方法,需要传提具体类型 ((MyDecorator)userService1).TargetClass = new UserService(); userService1.AddUser(user); Console.WriteLine("=============Castle.Core=============="); ProxyGenerator generator = new ProxyGenerator(); var u = generator.CreateInterfaceProxyWithTarget<IUserService>(new UserService(),new MyIntercept()); u.AddUser(user); Console.ReadLine(); } }} |
这样就行了,看运行结果:

综上,第三方使用相对简单,而且封装了好多方法,不仅仅以上的使用方式。 以下举例集成Autofac和Castle.Core在Asp.NetCore中的应用(用Asp.NetCore项目,是因为好多真实项目都是API或Web项目,所以比较符合实际),仅供给大家提供思路。如下:
1. 首先我们创建一个Asp.NetCore项目,这里我创建的是API项目,正常运行即可,项目结构如下;

2. 引入三个包,通过Nuget安装,Autofac开头,如下

注: 其中Autofac.Extras.DynamicProxy就是AOP相关组件,其中包含了Castle.Core,所以不用单独安装Castle.Core.
3.模拟编写用户维护相关逻辑,代码如下:
接口:
|
1
2
3
4
|
public interface IUserService { int AddUser(string strName, int nAge); } |
实现:
|
1
2
3
4
5
6
7
8
9
10
11
|
public class UserService : IUserService { /// <summary> /// 模拟新增用户,这里没有写数据处理层 /// </summary> public int AddUser(string strName, int nAge) { Console.WriteLine("新增用户到数据库中"); return 1; } } |
4. 编写拦截器逻辑,即代理:
|
1
2
3
4
5
6
7
8
9
10
11
12
13
14
15
16
17
18
19
20
21
|
using Castle.DynamicProxy;using System;using System.Collections.Generic;using System.Linq;using System.Threading.Tasks;namespace WebAop.Aop{ public class UserAop : IInterceptor { //关键所在,在执行方法前后进行相关逻辑处理 public void Intercept(IInvocation invocation) { Console.WriteLine("新增用户前进行其他处理"); //调用原有方法 invocation.Proceed(); Console.WriteLine("新增用户后进行其他处理"); } }} |
5. 集成Autofac将用户维护服务这块进行注册到容器中:
- 首先在Startup中增加方法,如下:
|
1
2
3
4
5
6
7
8
9
10
11
12
13
14
15
16
17
|
public void ConfigureContainer(ContainerBuilder builder) { //注册用户维护业务层 var basePath = AppContext.BaseDirectory; var serviceDll = Path.Combine(basePath, "AopService.dll"); if(!File.Exists(serviceDll)) { throw new Exception("找不到程序集"); } //注册AOP拦截器 builder.RegisterType(typeof(UserAop)); builder.RegisterAssemblyTypes(Assembly.LoadFrom(serviceDll)) .AsImplementedInterfaces() .EnableInterfaceInterceptors()//开启切面,需要引入Autofac.Extras.DynamicProxy .InterceptedBy(typeof(UserAop));//指定拦截器,可以指定多个 } |
- 然后在program中添加Autofac的工厂,如下:
|
1
2
3
4
5
6
7
8
9
10
11
12
13
14
15
16
17
18
19
20
21
22
23
24
25
26
27
28
29
|
using System;using System.Collections.Generic;using System.Linq;using System.Threading.Tasks;using Autofac.Extensions.DependencyInjection;using Microsoft.AspNetCore.Hosting;using Microsoft.Extensions.Configuration;using Microsoft.Extensions.Hosting;using Microsoft.Extensions.Logging;namespace WebAop{ public class Program { public static void Main(string[] args) { CreateHostBuilder(args).Build().Run(); } public static IHostBuilder CreateHostBuilder(string[] args) => Host.CreateDefaultBuilder(args) //需要引入Autofac.Extensions.DependencyInjection, 这里重要,不然Autofac不管用 .UseServiceProviderFactory(new AutofacServiceProviderFactory()) .ConfigureWebHostDefaults(webBuilder => { webBuilder.UseStartup<Startup>(); }); }} |
6. 增加UserController方法,如下:
|
1
2
3
4
5
6
7
8
9
10
11
12
13
14
15
16
17
18
19
20
21
22
23
24
25
26
27
28
29
30
31
|
using System;using System.Collections.Generic;using System.Linq;using System.Threading.Tasks;using AopService.Interface;using Microsoft.AspNetCore.Http;using Microsoft.AspNetCore.Mvc;namespace WebAop.Controllers{ [Route("api/[controller]")] [ApiController] public class UserController : ControllerBase { private IUserService _userService; <strong> //这里已经通过Autofac 注册过了,直接通过构造函数注入即可 public UserController(IUserService userService) { _userService = userService; }</strong> [HttpGet] [Route("AddUser")] public IActionResult AddUser(string name,int age) { <strong> //正常调用用户新增操作 _userService.AddUser(name, age);</strong> return Ok("Success!!"); } }} |
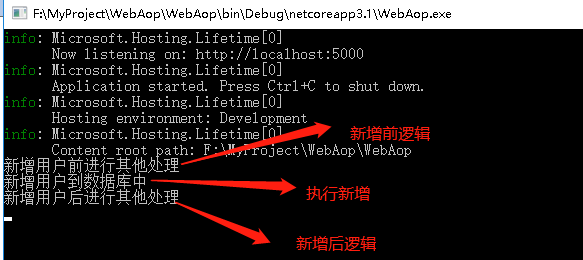
7. 运行走起,为了方便看见控制台打印,用项目启动方式进行运行,结果如下:
直接在浏览器中输入http://localhost:5000/api/User/AddUser?name=sss&age=12,然后回车,然后看控制台打印:
总结:
AOP在做一些业务前置或后置处理上时很有用的,使用比较灵活,无需修改原有代码逻辑,比起修改原有代码维护相对好多啦!!!