spring security简介
spring security是一个提供声明式的安全访问控制解决方案的安全框架。它提供了一组可以在 Spring 应用上下文中配置的 Bean,充分利用了Spring IoC,DI(控制反转 Inversion of Control ,DI:Dependency Injection 依赖注入)和 AOP(面向切面编程)功能,为应用系统提供声明式的安全访问控制功能,减少了为企业系统安全控制编写大量重复代码的工作。
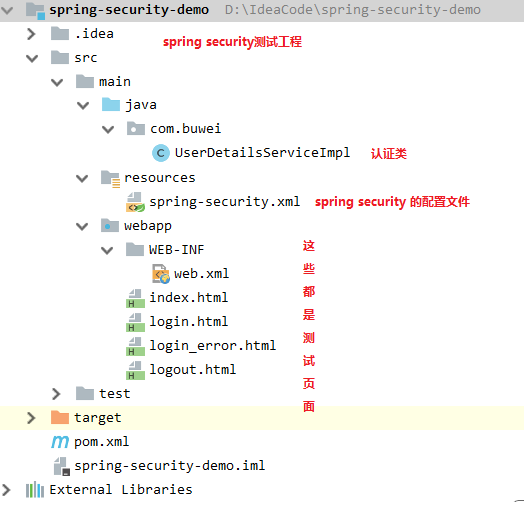
入门demo——第一次不使用认证类,直接在配置文件中将用户和密码写死,后面再讲解使用配置类

- 创建war工程,引入相关依赖

  1 <?xml version="1.0" encoding="UTF-8"?>
  2 <project xmlns="http://maven.apache.org/POM/4.0.0"
  3          xmlns:xsi="http://www.w3.org/2001/XMLSchema-instance"
  4          xsi:schemaLocation="http://maven.apache.org/POM/4.0.0 http://maven.apache.org/xsd/maven-4.0.0.xsd">
  5     <modelVersion>4.0.0</modelVersion>
  6
  7     <groupId>com.buwei</groupId>
  8     <artifactId>spring-security-demo</artifactId>
  9     <version>1.0-SNAPSHOT</version>
 10     <packaging>war</packaging>
 11
 12     <!-- 集中定义依赖版本号 -->
 13     <properties>
 14         <spring.version>4.2.4.RELEASE</spring.version>
 15         <servlet-api.version>2.5</servlet-api.version>
 16         <mysql.version>5.1.32</mysql.version>
 17         <druid.version>1.0.9</druid.version>
 18         <security.version>3.2.3.RELEASE</security.version>
 19     </properties>
 20
 21     <dependencies>
 22
 23         <!--spring security的依赖-->
 24         <dependency>
 25             <groupId>org.springframework.security</groupId>
 26             <artifactId>spring-security-web</artifactId>
 27             <version>4.1.0.RELEASE</version>
 28         </dependency>
 29         <dependency>
 30             <groupId>org.springframework.security</groupId>
 31             <artifactId>spring-security-config</artifactId>
 32             <version>4.1.0.RELEASE</version>
 33         </dependency>
 34         <!-- Spring相关依赖 -->
 35         <dependency>
 36             <groupId>org.springframework</groupId>
 37             <artifactId>spring-context</artifactId>
 38             <version>${spring.version}</version>
 39         </dependency>
 40         <dependency>
 41             <groupId>org.springframework</groupId>
 42             <artifactId>spring-beans</artifactId>
 43             <version>${spring.version}</version>
 44         </dependency>
 45         <dependency>
 46             <groupId>org.springframework</groupId>
 47             <artifactId>spring-webmvc</artifactId>
 48             <version>${spring.version}</version>
 49         </dependency>
 50         <dependency>
 51             <groupId>org.springframework</groupId>
 52             <artifactId>spring-jdbc</artifactId>
 53             <version>${spring.version}</version>
 54         </dependency>
 55         <dependency>
 56             <groupId>org.springframework</groupId>
 57             <artifactId>spring-aspects</artifactId>
 58             <version>${spring.version}</version>
 59         </dependency>
 60         <dependency>
 61             <groupId>org.springframework</groupId>
 62             <artifactId>spring-jms</artifactId>
 63             <version>${spring.version}</version>
 64         </dependency>
 65         <dependency>
 66             <groupId>org.springframework</groupId>
 67             <artifactId>spring-context-support</artifactId>
 68             <version>${spring.version}</version>
 69         </dependency>
 70         <dependency>
 71             <groupId>org.springframework</groupId>
 72             <artifactId>spring-test</artifactId>
 73             <version>${spring.version}</version>
 74         </dependency>
 75
 76     </dependencies>
 77
 78     <build>
 79         <plugins>
 80             <!-- java编译插件 -->
 81             <plugin>
 82                 <groupId>org.apache.maven.plugins</groupId>
 83                 <artifactId>maven-compiler-plugin</artifactId>
 84                 <version>3.2</version>
 85                 <configuration>
 86                     <source>1.8</source>
 87                     <target>1.8</target>
 88                     <encoding>UTF-8</encoding>
 89                 </configuration>
 90             </plugin>
 91             <plugin>
 92                 <groupId>org.apache.tomcat.maven</groupId>
 93                 <artifactId>tomcat7-maven-plugin</artifactId>
 94                 <configuration>
 95                     <!--指定端口号-->
 96                     <port>8080</port>
 97                     <!--制定路径-->
 98                     <path>/</path>
 99                 </configuration>
100             </plugin>
101         </plugins>
102     </build>
103 </project>
- 创建web.xml文件
 1 <?xml version="1.0" encoding="UTF-8"?>
 2 <web-app xmlns:xsi="http://www.w3.org/2001/XMLSchema-instance"
 3          xmlns="http://java.sun.com/xml/ns/javaee"
 4          xsi:schemaLocation="http://java.sun.com/xml/ns/javaee http://java.sun.com/xml/ns/javaee/web-app_2_5.xsd"
 5          version="2.5">
 6
 7     <!-- 配置监听扫描spring-security的文件 -->
 8     <context-param>
 9         <param-name>contextConfigLocation</param-name>
10         <param-value>classpath:spring-security.xml</param-value>
11     </context-param>
12     <listener>
13         <listener-class>
14             org.springframework.web.context.ContextLoaderListener
15         </listener-class>
16     </listener>
17     <!--配置过滤器,过滤根目录下所有资源,springSecurityFilterChain这个名字不能改变-->
18     <filter>
19         <filter-name>springSecurityFilterChain</filter-name>
20         <filter-class>
21             org.springframework.web.filter.DelegatingFilterProxy
22         </filter-class>
23     </filter>
24     <filter-mapping>
25         <filter-name>springSecurityFilterChain</filter-name>
26         <url-pattern>/*</url-pattern>
27     </filter-mapping>
28 </web-app>
- spring-security.xml
 1 <?xml version="1.0" encoding="UTF-8"?>
 2 <beans:beans
 3         xmlns="http://www.springframework.org/schema/security"
 4         xmlns:beans="http://www.springframework.org/schema/beans"
 5         xmlns:xsi="http://www.w3.org/2001/XMLSchema-instance"
 6         xsi:schemaLocation="http://www.springframework.org/schema/beans http://www.springframework.org/schema/beans/spring-beans.xsd
 7                         http://www.springframework.org/schema/security http://www.springframework.org/schema/security/spring-security.xsd">
 8
 9     <!--设置不拦截页面-->
10     <http pattern="/login.html" security="none"/>
11     <http pattern="/login_error.html" security="none"/>
12
13     <!-- use-expressions:设置是否启动SpEL表达式,默认值是true。
14      启动的时候access设置为access="hasRole('ROLE_USER')"-->
15     <http use-expressions="false">
16         <!--
17             配置SpringSecurity的拦截路径(拦截规则)
18             * pattern:配置拦截规则。   /* 代表的是根路径下的所有资源(不包含子路径) /**代表的是根路径下所有的资源(包含子路径)
19             * access:设置角色  角色命名 ROLE_角色名称  如:ROLE_USER
20         -->
21         <intercept-url pattern="/**" access="ROLE_USER"/>
22         <!--
23         开启表单验证
24             login-processing-url:提交的路径的设置 默认值"/login" 可以修改
25             username-parameter="username"
26             password-parameter="password"
27             login-page            :登录页面名称  以 / 开始
28             default-target-url    :登录成功后跳转的页面
29             authentication-failure-url:登录失败后跳转的页面
30         -->
31         <form-login login-page="/login.html" default-target-url="/index.html"
32                     always-use-default-target="true" authentication-failure-url="/login_error.html"/>
33         <!-- 不使用csrf的校验 -->
34         <csrf disabled="true"/>
35         <!-- 注销的配置 -->
36         <logout logout-url="/logout" logout-success-url="/logout.html" />
37     </http>
38
39     <!-- 配置认证管理器 -->
40     <authentication-manager>
41         <!-- 认证的提供者,这里配置固定写死,项目中使用的时候可以配置单独的bean来作为认证的提供者 -->
42         <authentication-provider>
43             <user-service>
44                 <user name="buwei" password="123456" authorities="ROLE_USER"/>
45             </user-service>
46         </authentication-provider>
47     </authentication-manager>
48
49 </beans:beans>
- index.html
 1 <!DOCTYPE html>
 2 <html lang="en">
 3 <head>
 4     <meta charset="UTF-8">
 5     <title>首页</title>
 6 </head>
 7 <body>
 8     <h1>恭喜你,登录成功</h1>
 9     <!--"/logout"为spring security默认提供的登出路径-->
10     <a href="/logout">退出登录</a>
11 </body>
12 </html>
- login.html
 1 <!DOCTYPE html>
 2 <html lang="en">
 3 <head>
 4     <meta charset="UTF-8">
 5     <title>登录界面</title>
 6 </head>
 7 <body>
 8
 9     <h1>spring security登录测试页面</h1>
10     <!--action默认配置提交到"/login",提交形式必须为post-->
11     <form action="/login" method="post">
12         用户名:<input type="text" name="username"><br>
13         密码:<input type="password" name="password"><br>
14         <button type="submit" name="submit">登录</button>
15     </form>
16 </body>
17 </html>
- login_error.html
 1 <!DOCTYPE html>
 2 <html lang="en">
 3 <head>
 4     <meta charset="UTF-8">
 5     <title>登录失败界面</title>
 6 </head>
 7 <body>
 8     <h1>用户名或密码错误</h1>
 9 </body>
10 </html>
- logout.html
 1 <!DOCTYPE html>
 2 <html lang="en">
 3 <head>
 4     <meta charset="UTF-8">
 5     <title>首页</title>
 6 </head>
 7 <body>
 8     <h1>退出成功</h1>
 9 </body>
10 </html>
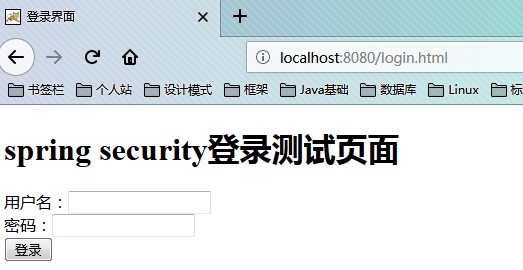
启动项目,浏览器中输入地址:http://localhost:8080/index.html,会自动跳转到login.html

尝试着输入正确的用户名和密码以及错误的用户名和密码来做测试。
- 但是我们在正常的使用中,用户的信息验证是需要从数据库中查询出来的,这时候的权限验证就需要引入我们的认证类类,下面是认证类:
 1 package com.buwei;
 2
 3 import org.springframework.security.core.GrantedAuthority;
 4 import org.springframework.security.core.authority.SimpleGrantedAuthority;
 5 import org.springframework.security.core.userdetails.User;
 6 import org.springframework.security.core.userdetails.UserDetails;
 7 import org.springframework.security.core.userdetails.UserDetailsService;
 8 import org.springframework.security.core.userdetails.UsernameNotFoundException;
 9
10 import java.util.ArrayList;
11 import java.util.List;
12
13 /**
14  * 认证类
15  *
16  * @author buwei
17  * @date 2018/12/11 9:13
18  */
19 public class UserDetailsServiceImpl implements UserDetailsService {
20     @Override
21     public UserDetails loadUserByUsername(String s) throws UsernameNotFoundException {
22         System.out.println("经过了认证类");
23         // 构建角色列表,实际的验证过程中我们的角色列表是要从数据库中查出来的,这里直接设置了
24         List<GrantedAuthority> grandAuths = new ArrayList<GrantedAuthority>();
25         // 设置一个访问权限需要的角色名称
26         grandAuths.add(new SimpleGrantedAuthority("ROLE_USER"));
27         // 在设置一个不是访问权限需要的角色名称
28         grandAuths.add(new SimpleGrantedAuthority("ROLE_TEST"));
29         // 下面的参数也是假的参数,只是为了简单测试
30         return new User("buwei", "123456", grandAuths);
31     }
32 }
- 然后需要修改spring security的配置文件,来使用认证类来验证用户的权限
 1 <?xml version="1.0" encoding="UTF-8"?>
 2 <beans:beans
 3         xmlns="http://www.springframework.org/schema/security"
 4         xmlns:beans="http://www.springframework.org/schema/beans"
 5         xmlns:xsi="http://www.w3.org/2001/XMLSchema-instance"
 6         xsi:schemaLocation="http://www.springframework.org/schema/beans http://www.springframework.org/schema/beans/spring-beans.xsd
 7                         http://www.springframework.org/schema/security http://www.springframework.org/schema/security/spring-security.xsd">
 8
 9     <!--设置不拦截页面-->
10     <http pattern="/login.html" security="none"/>
11     <http pattern="/login_error.html" security="none"/>
12
13     <!-- use-expressions:设置是否启动SpEL表达式,默认值是true。
14      启动的时候access设置为access="hasRole('ROLE_USER')"-->
15     <http use-expressions="false">
16         <!--
17             配置SpringSecurity的拦截路径(拦截规则)
18             * pattern:配置拦截规则。   /* 代表的是根路径下的所有资源(不包含子路径) /**代表的是根路径下所有的资源(包含子路径)
19             * access:设置角色  角色命名 ROLE_角色名称  如:  ROLE_USER
20         -->
21         <intercept-url pattern="/**" access="ROLE_USER"/>
22         <!--
23         开启表单验证
24             login-processing-url:提交的路径的设置 默认值"/login" 可以修改
25             username-parameter="username"
26             password-parameter="password"
27             login-page            :登录页面名称  以 / 开始
28             default-target-url    :登录成功后跳转的页面
29             authentication-failure-url:登录失败后跳转的页面
30         -->
31         <form-login login-page="/login.html" default-target-url="/index.html"
32                     always-use-default-target="true" authentication-failure-url="/login_error.html"/>
33         <!-- 不使用csrf的校验 -->
34         <csrf disabled="true"/>
35         <!-- 注销的配置 -->
36         <logout logout-url="/logout" logout-success-url="/logout.html" />
37     </http>
38
39     <!-- 配置认证管理器 -->
40     <authentication-manager>
41         <!-- 认证的提供者 -->
42         <authentication-provider user-service-ref="userDetailsService">
43             <!--<user-service>
44                 <user name="buwei" password="123456" authorities="ROLE_USER"/>
45             </user-service>-->
46         </authentication-provider>
47     </authentication-manager>
48
49     <!--配置认证类-->
50     <beans:bean id="userDetailsService" class="com.buwei.UserDetailsServiceImpl">
51     </beans:bean>
52
53 </beans:beans>
- 主要也就在于配置认证类的bean和在认证管理器中修改认证的提供者了。输入正确的用户名和密码,可以实现同样的效果。
