asyncio之Coroutines,Tasks and Future
Coroutines and Tasks属于High-level APIs,也就是高级层的api。
本节概述用于协程和任务的高级异步api。
Coroutines
Coroutines翻译过来意思是协程,
使用async/await语法声明的协程是编写asyncio应用程序的首选方法。
import asyncio


async def main():
    print("hello")
    await asyncio.sleep(1)
    print("world")


if __name__ == '__main__':
    # asyncio.run(main())  # 3.7的用法
    # 阻塞直到hello world()协程结束时返回
    loop = asyncio.get_event_loop()
    loop.run_until_complete(main())
第一个异步函数是通过创建loop循环去调用,其他异步函数之间通过await进行调用。
像下面的一个例子
import asyncio
import time


async def say_after(delay, what):
    await asyncio.sleep(delay)
    print(what)


async def main():
    print(f"started at {time.strftime('%X')}")

    await say_after(1, 'hello')
    await say_after(2, 'world')

    print(f"finished at {time.strftime('%X')}")


if __name__ == '__main__':
    loop = asyncio.get_event_loop()
    # 阻塞直到hello world()协程结束时返回
    loop.run_until_complete(main())
    loop.close()
或者我们可以通过asyncio.create_task()将协程say_after封装任务去调用就像下面这样。
async def main():
    task1 = asyncio.create_task(
        say_after(1, 'hello'))

    task2 = asyncio.create_task(
        say_after(2, 'world'))

    print(f"started at {time.strftime('%X')}")

    # 等待两个子任务完成
    await task1
    await task2
    print(f"finished at {time.strftime('%X')}")
Awaitables
我们说,如果一个对象可以用在await表达式中,那么它就是Awaitables的对象。
可等待对象主要有三种类型:coroutines, Tasks, and Futures.
Coroutines
前面的代码中演示了协程的运作方式,这里主要强调两点。
- 协程函数:asyc def定义的函数;
- 协程对象:通过调用协程函数返回的对象。
Tasks
任务对协程进一步封装,其中包含任务的各种状态。
协程对象不能直接运行,在注册事件循环的时候,其实是run_until_complete方法将协程包装成为了一个任务(task)对象。
import asyncio


async def nested():
    await asyncio.sleep(2)
    print("等待2s")


async def main():
    # 将协程包装成任务含有状态
    # task = asyncio.create_task(nested())
    task = asyncio.ensure_future(nested())
    print(task)
    # "task" can now be used to cancel "nested()", or
    # can simply be awaited to wait until it is complete:
    await task
    print(task)
    print(task.done())


if __name__ == '__main__':
    loop = asyncio.get_event_loop()
    try:
        loop.run_until_complete(main())
    except KeyboardInterrupt as e:
        for task in asyncio.Task.all_tasks():
            print(task)
            task.cancel()
            print(task)
        loop.run_forever()  # restart loop
    finally:
        loop.close()
可以看到
<Task pending coro=<nested() running at /Users/chennan/pythonproject/asyncproject/asyncio-cn/1-2-1.py:9>>
等待2s
<Task finished coro=<nested() done, defined at /Users/chennan/pythonproject/asyncproject/asyncio-cn/1-2-1.py:9> result=None>
True
创建task后,task在加入事件循环之前是pending状态然后调用nested函数等待2s之后打印task为finished状态。asyncio.ensure_future(coroutine) 和 loop.create_task(coroutine)都可以创建一个task,python3.7增加了asyncio.create_task(coro)。其中task是Future的一个子类
Future
future:代表将来执行或没有执行的任务的结果。它和task上没有本质的区别
通常不需要在应用程序级别代码中创建Future对象。
future对象有几个状态:
- Pending
- Running
- Done
- Cancelled
通过上面的代码可以知道创建future的时候,task为pending,事件循环调用执行的时候是running,调用完毕自然就是done于是调用task.done()打印了true。
如果在命令行中运行上述代码,ctrl+c后会发现
输出以下内容
<Task pending coro=<nested() running at 1-2-1.py:9>>
^C<Task pending coro=<main() running at 1-2-1.py:21> wait_for=<Task pending coro=<nested() running at 1-2-1.py:10> wait_for=<Future pending cb=[<TaskWakeupMethWrapper object at 0x10d342978>()]> cb=[<TaskWakeupMethWrapper object at 0x10d342918>()]>>
<Task pending coro=<main() running at 1-2-1.py:21> wait_for=<Task pending coro=<nested() running at 1-2-1.py:10> wait_for=<Future cancelled> cb=[<TaskWakeupMethWrapper object at 0x10d342918>()]>>
<Task pending coro=<nested() running at 1-2-1.py:10> wait_for=<Future cancelled> cb=[<TaskWakeupMethWrapper object at 0x10d342918>()]>
<Task cancelling coro=<nested() running at 1-2-1.py:10> wait_for=<Future cancelled> cb=[<TaskWakeupMethWrapper object at 0x10d342918>()]>
因为我们调用了task.cancel() 所以可以看到此时的任务状态为取消状态。
并发的执行任务
通过使用await+asyncio.gather可以完成并发的操作。
asyncio.gather用法如下。
asyncio.gather(*aws, loop=None, return_exceptions=False)
**aws是一系列协程,协程都成功完成,就返回值一个结果列表。结果值的顺序与aws中添加协程的顺序相对应。
return_exceptions=False,其实就是如果有一个任务失败了,就直接抛出异常。如果等于True就把错误信息作为结果返回回来。
首先来一个正常情况不出错的例子:
import asyncio


async def factorial(name, number):
    f = 1
    for i in range(2, number + 1):
        print(f"Task {name}: Compute factorial({i})...")
        if number == 2:
            1 / 0
        await asyncio.sleep(1)
        f *= i
    print(f"Task {name}: factorial({number}) = {f}")


async def main():
    # Schedule three calls *concurrently*:
    res = await asyncio.gather(
        *[factorial("A", 2),
          factorial("B", 3),
          factorial("C", 4)]
        , return_exceptions=True)
    for item in res:
        print(item)


if __name__ == '__main__':
    loop = asyncio.get_event_loop()
    try:
        loop.run_until_complete(main())
    except KeyboardInterrupt as e:
        for task in asyncio.Task.all_tasks():
            print(task)
            task.cancel()
            print(task)
        loop.run_forever()  # restart loop
    finally:
        loop.close()
输入以下内容:
Task A: Compute factorial(2)...
Task B: Compute factorial(2)...
Task C: Compute factorial(2)...
Task B: Compute factorial(3)...
Task C: Compute factorial(3)...
Task B: factorial(3) = 6
Task C: Compute factorial(4)...
Task C: factorial(4) = 24
division by zero
None
None
可以发现async.gather最后会返回一系列的结果,如果出现了错误就把错误信息作为返回结果,这里我当数字为2时人为加了异常操作1/0,于是返回了结果division by zero,对于其他的任务因为没有返回值所以是None。这里return_exceptions=True来保证了如果其中一个任务出现异常,其他任务不会受其影响会执行到结束。
asyncio.wait
coroutine asyncio.wait(aws, *, loop=None, timeout=None, return_when=ALL_COMPLETED)
asyncio.wait和async.gather用法差不多只是async.wait接收的是个列表。
第三个参数和async.gather有点区别.
| 参数名 | 含义 |
|---|---|
| FIRST_COMPLETED | 任何一个future完成或取消时返回 |
| FIRST_EXCEPTION | 任何一个future出现错误将返回,如果出现异常等价于ALL_COMPLETED |
| ALL_COMPLETED | 当所有任务完成或者被取消时返回结果,默认值。 |
Timeouts
通过使用asyncio.wait_for来完成一个超时函数回调操作,如果函数规定时间内未完成则报错。
*asyncio.wait_for(aw, timeout, , loop=None)
aw代表一个协程,timeout单位秒。
async def eternity():
    # Sleep for one hour
    await asyncio.sleep(3600)
    print('yay!')

async def main():
    # Wait for at most 1 second
    try:
        await asyncio.wait_for(eternity(), timeout=1.0)
    except asyncio.TimeoutError:
        print('timeout!')

asyncio.run(main())

# Expected output:
#
#     timeout!
1秒内eternity没有完成就报错了。
python3.7中发生更改:当aw由于超时而被取消时,不再显示异常而是等待aw被取消。
说到timeout的,如果仅仅是对一个代码块做timeout操作而不是等待某个协程此时推荐第三方模块async_timeout
async_timeout
安装
pip installa async_timeout
使用方法很简单如下
async with async_timeout.timeout(1.5) as cm:
    await inner()
print(cm.expired)
如果1.5s可以运行完打印true,否则打印false,表示超时。
asyncio.as_completed
*asyncio.as_completed(aws, , loop=None, timeout=None)
使用as_completed会返回一个可以迭代的future对象,同样可以获取协程的运行结果,使用方法如下:
async def main():
    coroutine1 = do_some_work(1)
    coroutine2 = do_some_work(2)
    coroutine3 = do_some_work(4)

    tasks = [
        asyncio.ensure_future(coroutine1),
        asyncio.ensure_future(coroutine2),
        asyncio.ensure_future(coroutine3)
    ]
    for task in asyncio.as_completed(tasks):
        result = await task
        print('Task ret: {}'.format(result))

start = now()

loop = asyncio.get_event_loop()
done = loop.run_until_complete(main())
print('TIME: ', now() - start)
协程嵌套
使用async可以定义协程,协程用于耗时的io操作,我们也可以封装更多的io操作过程,这样就实现了嵌套的协程,即一个协程中await了另外一个协程,如此连接起来
官网实例:

图解:
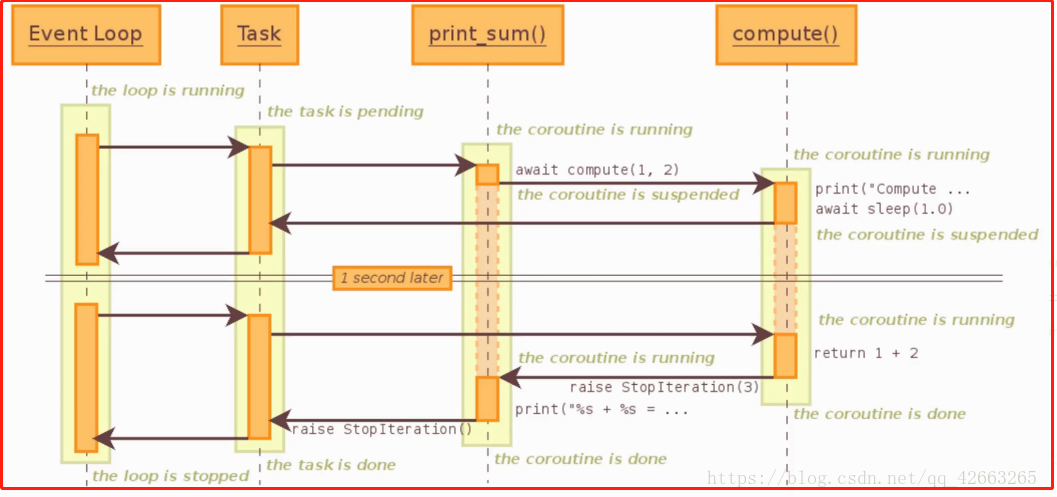
1、run_until_complete运行,会注册task(协程:print_sum)并开启事件循环 →
2、print_sum协程中嵌套了子协程,此时print_sum协程暂停(类似委托生成器),转到子协程(协程:compute)中运行代码,期间子协程需sleep1秒钟,直接将结果反馈到event loop中,即将控制权转回调用方,而中间的print_sum暂停不操作 →
3、1秒后,调用方将控制权给到子协程(调用方与子协程直接通信),子协程执行接下来的代码,直到再遇到wait(此实例没有)→
4、 最后执行到return语句,子协程向上级协程(print_sum抛出异常:StopIteration),同时将return返回的值返回给上级协程(print_sum中的result接收值),print_sum继续执行暂时时后续的代码,直到遇到return语句 →
5、向 event loop 抛出StopIteration异常,此时协程任务都已经执行完毕,事件循环执行完成(event loop :the loop is stopped),close事件循环。
调度线程
asyncio.run_coroutine_threadsafe(coro, loop)
等待其他线程返回一个concurrent.futures.Future对象,这是一个线程安全的方法。
这个函数应该从不同的OS线程调用,而不是从事件循环所在的线程调用。
def start_loop(loop):
    asyncio.set_event_loop(loop)
    loop.run_forever()

async def do_some_work(x):
    print('Waiting {}'.format(x))
    await asyncio.sleep(x)
    print('Done after {}s'.format(x))

def more_work(x):
    print('More work {}'.format(x))
    time.sleep(x)
    print('Finished more work {}'.format(x))

start = now()
new_loop = asyncio.new_event_loop()
t = Thread(target=start_loop, args=(new_loop,))
t.start()
print('TIME: {}'.format(time.time() - start))

asyncio.run_coroutine_threadsafe(do_some_work(6), new_loop)
asyncio.run_coroutine_threadsafe(do_some_work(4), new_loop)
上述的例子,主线程中创建一个new_loop,然后在另外的子线程中开启一个无限事件循环。主线程通过run_coroutine_threadsafe新注册协程对象。这样就能在子线程中进行事件循环的并发操作,同时主线程又不会被block。一共执行的时间大概在6s左右。
run_in_executor
import time
import asyncio


async def main():
    print(f'{time.ctime()} Hello')
    await asyncio.sleep(1.0)
    print(f'{time.ctime()} Goodbye')
    loop.stop()


def blocking():  # 1
    time.sleep(0.5)  # 2
    print(f'{time.ctime()} Hello from a thread!')


loop = asyncio.get_event_loop()
loop.create_task(main())
loop.run_in_executor(None, blocking)  # 3

loop.run_forever()
pending = asyncio.Task.all_tasks(loop=loop)  # 4
group = asyncio.gather(*pending)
loop.run_until_complete(group)
loop.close()
输出
Fri Jan  4 15:32:03 2019 Hello
Fri Jan  4 15:32:04 2019 Hello from a thread!
Fri Jan  4 15:32:04 2019 Goodbye
下面对上面的函数的序号进行讲解:
1 这个函数调用了常规的sleep(),这会阻塞主线程并阻止loop运行,我们不能使这个函数变成协程,更糟糕的是不能在主线程运行loop时调用它,解决办法是用一个executor来运行它;
2 注意一点,这个sleep运行时间比协程中的sleep运行时间要短,后文再讨论如果长的话会发生什么;
3 该方法帮助我们在事件loop里用额外的线程或进程执行函数,这个方法的返回值是一个Future对象,意味着可以用await来切换它;
4 挂起的task中不包含前面的阻塞函数,并且这个方法只返回task对象,绝对不会返回Future对象。
绑定回调
绑定回调,在task执行完毕的时候可以获取执行的结果,回调的最后一个参数是future对象,通过该对象可以获取协程返回值。如果回调需要多个参数,可以通过偏函数导入
import time
import asyncio

now = lambda : time.time()

async def do_some_work(x):
    print('Waiting: ', x)
    return 'Done after {}s'.format(x)

def callback(future):  # 回调函数
    print('Callback: ', future.result())

start = now()

coroutine = do_some_work(2)
loop = asyncio.get_event_loop()
get_future = asyncio.ensure_future(coroutine)
task.add_done_callback(callback)  # 添加回调函数
loop.run_until_complete(get_future)

print('TIME: ', now() - start)
回调函数需要多个参数时,future参数要放最后。执行完成,我们可以通过参数future获取协程的执行结果:future.result()
import functools   # functools.partial:偏函数,能将带参数的函数包装成一个新的函数
def callback(t, future): # 回调函数 ,future放最后
    print('Callback:', t, future.result())

task.add_done_callback(functools.partial(callback, 2)
asyncio.iscoroutine(obj)
Return True if obj is a coroutine object.
判断是否为coroutine对象,如果是返回True
asyncio.iscoroutinefunction(func)
判断是否为coroutine函数,如果是返回True
参考资料
https://docs.python.org/3.7/library/asyncio-task.html
https://www.jianshu.com/p/b5e347b3a17c
微信公众号:python学习开发 加微信italocxa 入群。