1.前言
习惯了spring注解风格,方便好用,现在用vert.x框架,怎么使用spring注解呢?
2.maven安装依赖包
<!--spring注解依赖包-->
    <dependency>
      <groupId>org.springframework</groupId>
      <artifactId>spring-context</artifactId>
      <version>5.1.5.RELEASE</version>
    </dependency>
3.注册bean有两个方法:xml注册,注解注册
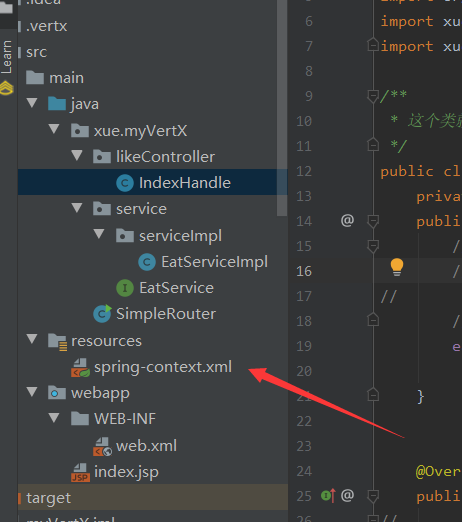
方法1:xml注册
新建一个xml配置文件


<?xml version="1.0" encoding="UTF-8"?>
<beans xmlns="http://www.springframework.org/schema/beans"
       xmlns:xsi="http://www.w3.org/2001/XMLSchema-instance"
       xmlns:p="http://www.springframework.org/schema/p"
       xmlns:context="http://www.springframework.org/schema/context"
       xmlns:aop="http://www.springframework.org/schema/aop"
       xsi:schemaLocation="http://www.springframework.org/schema/beans
       http://www.springframework.org/schema/beans/spring-beans.xsd
       http://www.springframework.org/schema/context
       http://www.springframework.org/schema/context/spring-context.xsd http://www.springframework.org/schema/aop http://www.springframework.org/schema/aop/spring-aop.xsd">
    <!--    默认单例,,加上scope="prototype"为多例-->
        <bean name="eatService" class="xue.myVertX.service.serviceImpl.EatServiceImpl" scope="prototype"/>


</beans>
接口和他的实现类在springMVC里该怎么写还是怎么写,不变,这里旧省略了
使用方法:

package xue.myVertX;

import io.vertx.core.AbstractVerticle;
import io.vertx.core.Vertx;
import io.vertx.core.http.HttpMethod;
import io.vertx.core.http.HttpServer;
import io.vertx.ext.web.Router;
import org.springframework.context.ApplicationContext;
import org.springframework.context.annotation.AnnotationConfigApplicationContext;
import org.springframework.context.support.ClassPathXmlApplicationContext;
import xue.myVertX.likeController.IndexHandle;
import xue.myVertX.service.serviceImpl.EatServiceImpl;

/**
 *  简单的路由使用
 */
public class SimpleRouter extends AbstractVerticle {
    @Override
    public void start() throws Exception {
        //读取bean配置文件,注册所有bean,获取上下文对象
        //方法1:
        //xml文件手动注册bean方法
        ApplicationContext context = new ClassPathXmlApplicationContext("spring-context.xml");


        // 创建HttpServer
        HttpServer server = vertx.createHttpServer();
        // 创建路由对象
        Router router = Router.router(vertx);

        // 监听/index地址  ,就像spring注解@RequestMapping注册虚拟路径,然后调用controller方法
        router.route("/index").handler(new IndexHandle(context));


        // 把请求交给路由处理--------------------(1)
        //旧版写法
        server.requestHandler(router::accept);
        //新版写法,需要版本在4以上才可以
//        server.requestHandler(router);
        server.listen(8080);
    }

    public static void main(String[] args) {
        Vertx.vertx().deployVerticle(new SimpleRouter());
    }
}

package xue.myVertX.likeController;

import io.vertx.core.Handler;
import io.vertx.ext.web.RoutingContext;
import org.springframework.context.ApplicationContext;
import xue.myVertX.service.EatService;
import xue.myVertX.service.serviceImpl.EatServiceImpl;

/**
 * 这个类就像spring注解controller,
 */
public class IndexHandle implements Handler<RoutingContext> {
    private EatService eatService;
    public IndexHandle(final ApplicationContext context) {
        //读取全局bean配置文件,实例bean对象
        //方法1,配合xml手动注册,可不写注解
        eatService = (EatService) context.getBean("eatService");

    }


    @Override
    public void handle(RoutingContext routingContext) {
//        //获取参数,其实就是类似于request
//        String user = routingContext.request().getParam("user");
//        String pass = routingContext.request().getParam("pass");
//            routingContext.response()
//                    .putHeader("Content-type", "text/html;charset=utf-8")
//                    .end("接收到的用户名为:" + user + " 接收到的密码为:" + pass);
//
        //
        String str =eatService.eatApply();
        System.out.println("可以吃啥?"+str);
        routingContext.response().putHeader("Content-type", "text/html;charset=utf-8").end(str);
    }
}
方法2:注解注册
在实现类添加注解

使用方法

package xue.myVertX;

import io.vertx.core.AbstractVerticle;
import io.vertx.core.Vertx;
import io.vertx.core.http.HttpMethod;
import io.vertx.core.http.HttpServer;
import io.vertx.ext.web.Router;
import org.springframework.context.ApplicationContext;
import org.springframework.context.annotation.AnnotationConfigApplicationContext;
import org.springframework.context.support.ClassPathXmlApplicationContext;
import xue.myVertX.likeController.IndexHandle;
import xue.myVertX.service.serviceImpl.EatServiceImpl;

/**
 *  简单的路由使用
 */
public class SimpleRouter extends AbstractVerticle {
    @Override
    public void start() throws Exception {
        //读取bean配置文件,注册所有bean,获取上下文对象
        //方法1:
        //xml文件手动注册bean方法
//        ApplicationContext context = new ClassPathXmlApplicationContext("spring-context.xml");
        //
        //方法2:
        //使用注解自动注册
        ApplicationContext context = new AnnotationConfigApplicationContext(EatServiceImpl.class);


        // 创建HttpServer
        HttpServer server = vertx.createHttpServer();
        // 创建路由对象
        Router router = Router.router(vertx);


        // 监听/index地址  ,就像spring注解@RequestMapping注册虚拟路径,然后调用controller方法
        router.route("/index").handler(new IndexHandle(context));


        // 把请求交给路由处理--------------------(1)
        //旧版写法
        server.requestHandler(router::accept);
        //新版写法,需要版本在4以上才可以
//        server.requestHandler(router);
        server.listen(8080);
    }

    public static void main(String[] args) {
        Vertx.vertx().deployVerticle(new SimpleRouter());
    }
}

package xue.myVertX.likeController;

import io.vertx.core.Handler;
import io.vertx.ext.web.RoutingContext;
import org.springframework.context.ApplicationContext;
import xue.myVertX.service.EatService;
import xue.myVertX.service.serviceImpl.EatServiceImpl;

/**
 * 这个类就像spring注解controller,
 */
public class IndexHandle implements Handler<RoutingContext> {
    private EatService eatService;
    public IndexHandle(final ApplicationContext context) {
        //读取全局bean配置文件,实例bean对象
        //方法1,配合xml手动注册,可不写注解
//        eatService = (EatService) context.getBean("eatService");
        //方法2,使用注解,需要在实现类加@Service才可以被调用,参数为实现类的名字
        eatService =  context.getBean(EatServiceImpl.class);

    }


    @Override
    public void handle(RoutingContext routingContext) {
//        //获取参数,其实就是类似于request
//        String user = routingContext.request().getParam("user");
//        String pass = routingContext.request().getParam("pass");
//            routingContext.response()
//                    .putHeader("Content-type", "text/html;charset=utf-8")
//                    .end("接收到的用户名为:" + user + " 接收到的密码为:" + pass);
//
        //
        String str =eatService.eatApply();
        System.out.println("可以吃啥?"+str);
        routingContext.response().putHeader("Content-type", "text/html;charset=utf-8").end(str);
    }
}
3.测试结果
网页

控制台打印

