1.前言
分布式微服务想要热更新配置文件,还需要 消息中间件 配合使用 ,一般使用 rabbitMQ 或 Kafka ,这里不解释 。
这篇随笔 只讲解 底层的 单机热更新配置文件
2.环境
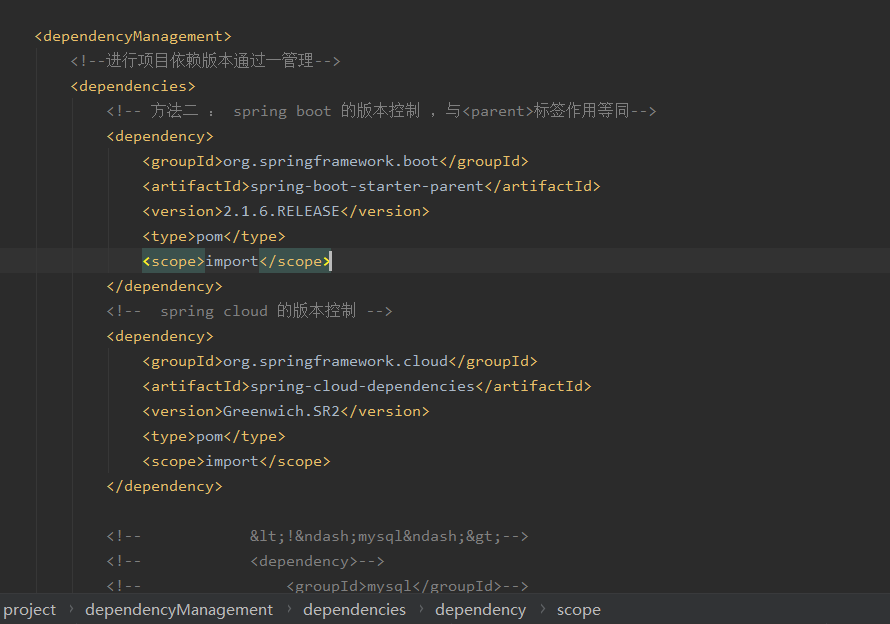
spring boot : 2.1.6.RELEASE
spring cloud : Greenwich.SR2
jdk 1.8
3.配置中心服务端 ,端口6001
目录结构

pom.xml


# 设置本机服务名称
spring.application.name=config-server-6001
# 设置本机服务端口
server.port=6001

#注册中心地址
eureka.client.serviceUrl.defaultZone=http://localhost:7001/eureka/
#
#
##本地配置文件,默认获取在resources路径下的文件
#spring.profiles.active=native
#指定本地文件路径
#spring.cloud.config.server.native.search-locations=classpath:properties/   或者写 D:/common/ 都是文件夹路径,只获取改文件夹内的文件
#
#
#配置的Git仓库的地址
spring.cloud.config.server.git.uri=https://github.com/cen-xi/test
#分支
spring.cloud.config.label=master
#git仓库地址下的相对地址 多个用逗号","分割。
spring.cloud.config.server.git.search-paths=/blob/master/gittest.properties,/blob/master/README.md,/blob/master/gittest2.yml
#git仓库的账户
spring.cloud.config.server.git.username=
#git仓库的密码
spring.cloud.config.server.git.password=
application.properties
# 设置本机服务名称
spring.application.name=config-server-6001
# 设置本机服务端口
server.port=6001

#注册中心地址
eureka.client.serviceUrl.defaultZone=http://localhost:7001/eureka/
#
#
##本地配置文件,默认获取在resources路径下的文件
#spring.profiles.active=native
#指定本地文件路径
#spring.cloud.config.server.native.search-locations=classpath:properties/   或者写 D:/common/ 都是文件夹路径,只获取改文件夹内的文件
#
#
#配置的Git仓库的地址
spring.cloud.config.server.git.uri=https://github.com/cen-xi/test
#分支
spring.cloud.config.label=master
#git仓库地址下的相对地址 多个用逗号","分割。
spring.cloud.config.server.git.search-paths=/blob/master/gittest.properties,/blob/master/README.md,/blob/master/gittest2.yml
#git仓库的账户
spring.cloud.config.server.git.username=cen-xi
#git仓库的密码
spring.cloud.config.server.git.password=c853396015
#http://localhost:100/master/gittest-1.properties
#http://localhost:100/master/README-1.md
#http://localhost:100/master/gittest2-1.yml
#
## spring cloud bus 刷新配置
#spring.rabbitmq.host=localhost
##127.0.0.1
##默认端口
#spring.rabbitmq.port=5672
##spring.rabbitmq.password=guest
##spring.rabbitmq.username=guest
#spring.rabbitmq.password=
#spring.rabbitmq.username=
##
#spring.cloud.bus.enabled=true
#spring.cloud.bus.trace.enabled=true
###消息总线设置  , , , ,开启rabbit mq 暴露的服务端口 ,用于 执行 bus ,更新接口
##management.endpoints.web.exposure.include=bus-refresh
#management.endpoints.web.exposure.include="*"
#management.endpoints.bus-refresh.enabled=true
启动类
package com.example.configserver6001;

import org.springframework.boot.SpringApplication;
import org.springframework.boot.autoconfigure.SpringBootApplication;
import org.springframework.cloud.client.discovery.EnableDiscoveryClient;
import org.springframework.cloud.config.server.EnableConfigServer;

@SpringBootApplication
//开启发现服务  ,,也可以使用 EnableEurekaClient
@EnableDiscoveryClient
//开启配置中心服务端
@EnableConfigServer
public class ConfigServer6001Application {

    public static void main(String[] args) {
        SpringApplication.run(ConfigServer6001Application.class, args);
    }

}
4.获取远程配置的客户端 ,端口6080
目录结构

pom.xml
<?xml version="1.0" encoding="UTF-8"?>
<project xmlns="http://maven.apache.org/POM/4.0.0" xmlns:xsi="http://www.w3.org/2001/XMLSchema-instance"
         xsi:schemaLocation="http://maven.apache.org/POM/4.0.0 https://maven.apache.org/xsd/maven-4.0.0.xsd">
    <modelVersion>4.0.0</modelVersion>
    <parent>
        <groupId>cen.cloud</groupId>
        <artifactId>cen-mycloud</artifactId>
        <version>0.0.1-SNAPSHOT</version>
        <relativePath/> <!-- lookup parent from repository -->
    </parent>
    <groupId>com.example</groupId>
    <artifactId>config-client-6080</artifactId>
    <version>0.0.1-SNAPSHOT</version>
    <name>config-client-6080</name>
    <description>Demo project for Spring Boot</description>

    <properties>
        <java.version>1.8</java.version>
    </properties>

    <dependencies>
        <dependency>
            <groupId>org.springframework.boot</groupId>
            <artifactId>spring-boot-starter-web</artifactId>
        </dependency>

        <dependency>
            <groupId>org.springframework.boot</groupId>
            <artifactId>spring-boot-starter-test</artifactId>
            <scope>test</scope>
            <exclusions>
                <exclusion>
                    <groupId>org.junit.vintage</groupId>
                    <artifactId>junit-vintage-engine</artifactId>
                </exclusion>
            </exclusions>
        </dependency>

        <!--eureka 注册中心依赖包 -->
        <dependency>
            <groupId>org.springframework.cloud</groupId>
            <artifactId>spring-cloud-starter-netflix-eureka-server</artifactId>
        </dependency>

        <!--配置中心-客户端依赖包-->
        <dependency>
            <groupId>org.springframework.cloud</groupId>
            <artifactId>spring-cloud-starter-config</artifactId>
        </dependency>


        <!--健康检测管理中心 ,可刷新配置文件-->
        <dependency>
            <groupId>org.springframework.boot</groupId>
            <artifactId>spring-boot-starter-actuator</artifactId>
        </dependency>


    </dependencies>

    <build>
        <plugins>
            <plugin>
                <groupId>org.springframework.boot</groupId>
                <artifactId>spring-boot-maven-plugin</artifactId>
            </plugin>
        </plugins>
    </build>

</project>
新建文件 bootstrap.properties 【 优先级 bootstrap.properties > application.properties > xxx.yml 】
#心得:
#需要提前知道远程配置中心的服务名称 和 远程配置文件名
#
#
#
#工程名/项目名/应用名/服务名
spring.application.name=config-client-6080
#端口号
server.port=6080
#获取指定配置文件名称 ,多个则以英文符号 , 隔开,不可有空格
spring.cloud.config.name=gittest
#  ,configText ,gittest2
#经过测试发现,在不同文件【可能是properties或者yml】,如果其中有相同的字段,那么左边的文件的这个字段的值会被右边文件的覆盖,不区分properties和yml优先级
#
#
#获取配置信息,客户端不需要管这个文件是从git来的还是在服务端的本地文件
#
#获取配置的策略 , 读取文件:dev开发环境、test测试、pro生产
spring.cloud.config.profile=dev
#spring.cloud.config.profile.active=dev
#获取配置文件的分支,默认是master。如果是是本地获取的话,则无用,
spring.cloud.config.label=master
#开启配置信息发现
spring.cloud.config.discovery.enabled=true
#
#指定配置中心的service-id,便于扩展为高可用配置集群,不区分大小写
spring.cloud.config.discovery.serviceId=config-server-6001
#使用这个写法也一样,至于为啥有两种写法,还不清除
#spring.cloud.config.discovery.service-id=config-service
#
#是否启动快速失败功能,功能开启则优先判断config server是否正常,可开可不开
#spring.cloud.config.fail-fast=true
#
#
#这个是设置与Eureka Server交互的地址,客户端的查询服务和注册服务都需要依赖这个地址。
eureka.client.serviceUrl.defaultZone=http://localhost:7001/eureka/
#
#springboot 1.5.X 以上默认开通了安全认证,这里可加可不加,不影响
#management.security.enabled=false
#springboot 2.x 默认只开启了info、health的访问接口,*代表开启所有访问接口
management.endpoints.web.exposure.include=*
#
#可以使用 window指令框 发送post请求 刷新配置文件  ,curl -X POST http://localhost:200/actuator/refresh
#
#
启动类
package com.example.configclient6080;

import org.springframework.boot.SpringApplication;
import org.springframework.boot.autoconfigure.SpringBootApplication;
import org.springframework.cloud.client.discovery.EnableDiscoveryClient;


@SpringBootApplication

//开启发现服务 ,也可以使用 EnableEurekaClient
@EnableDiscoveryClient
public class ConfigClient6080Application {

    public static void main(String[] args) {
        SpringApplication.run(ConfigClient6080Application.class, args);
    }

}
Controller层接口
package com.example.configclient6080.controller;

import org.springframework.beans.factory.annotation.Value;
import org.springframework.cloud.context.config.annotation.RefreshScope;
import org.springframework.web.bind.annotation.RequestMapping;
import org.springframework.web.bind.annotation.RequestMethod;
import org.springframework.web.bind.annotation.RestController;

import java.util.Date;


@RefreshScope
@RestController
public class GetController {

    @Value("${yourname}")
    private String namestr;


    @RequestMapping(value = "/getname", method = RequestMethod.GET)
    public String getConfig() {

        String str = "获取远程配置文件信息:" + namestr + "===" + new Date();
        System.out.println(str);
        return str;
    }

//    http://localhost:6080/getname
}
5.其他准备
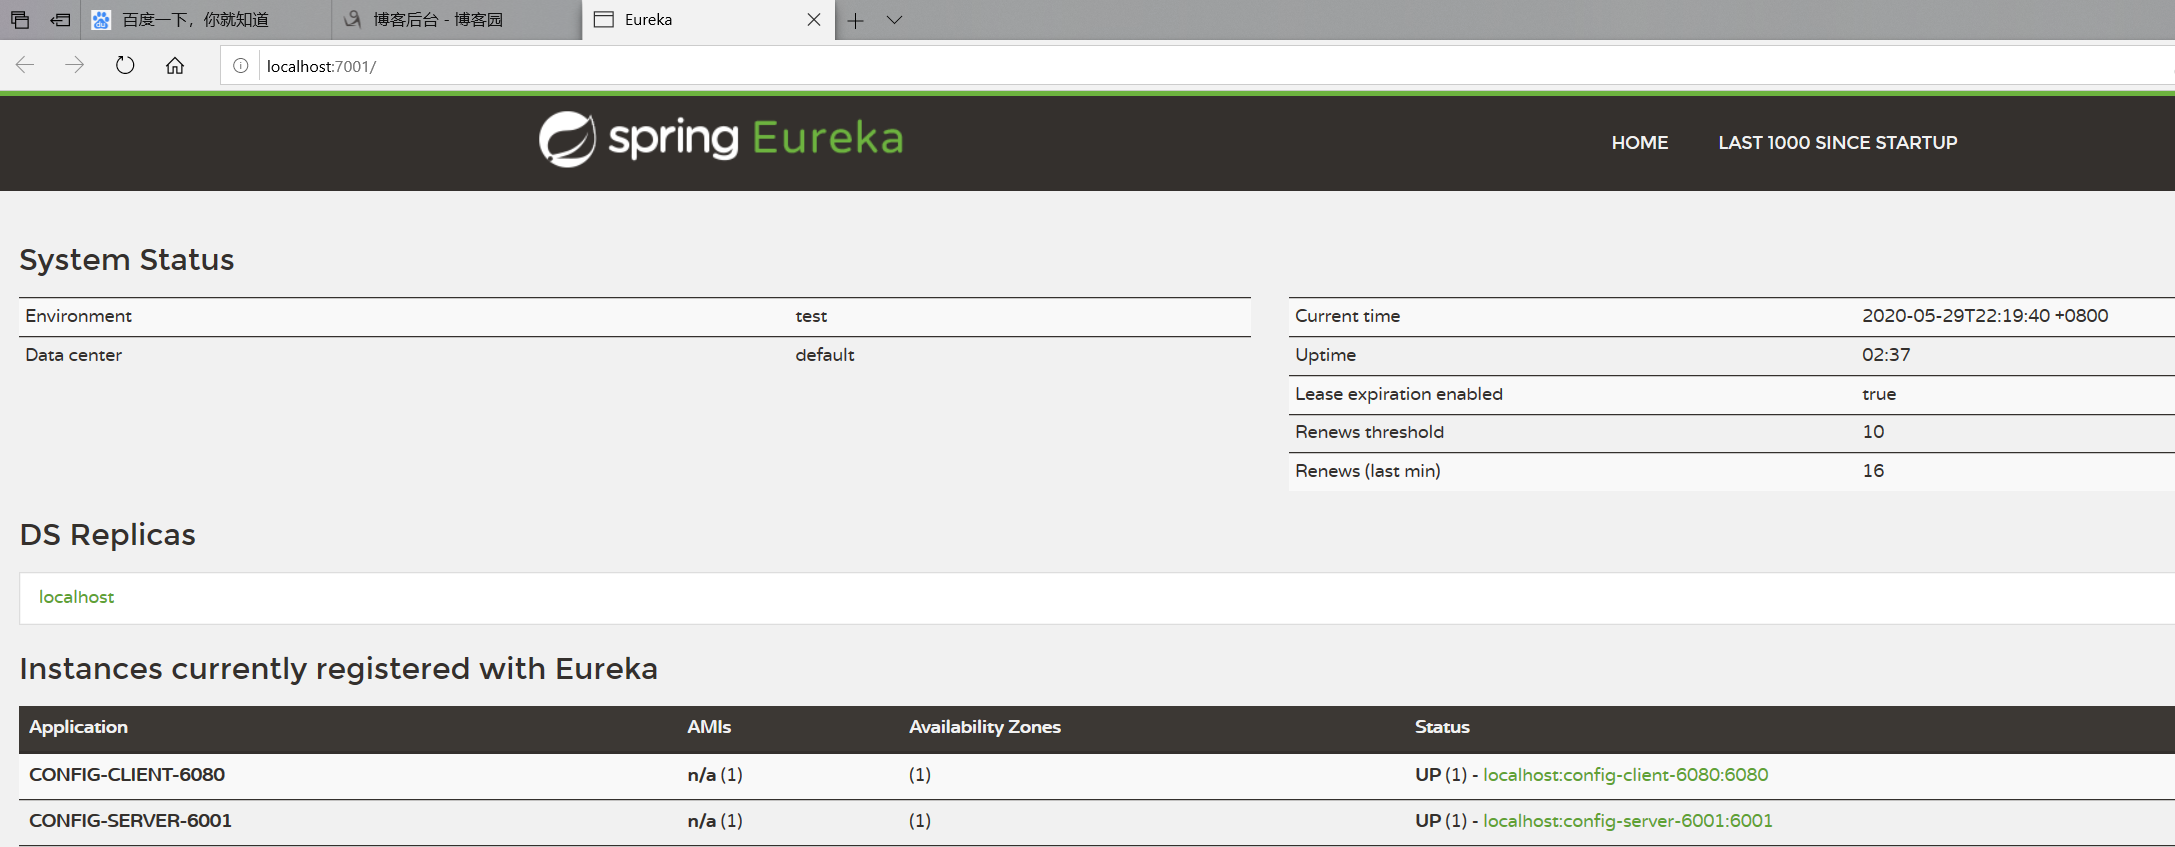
(1).提前准备配置 一个 端口为7001 的服务注册中心
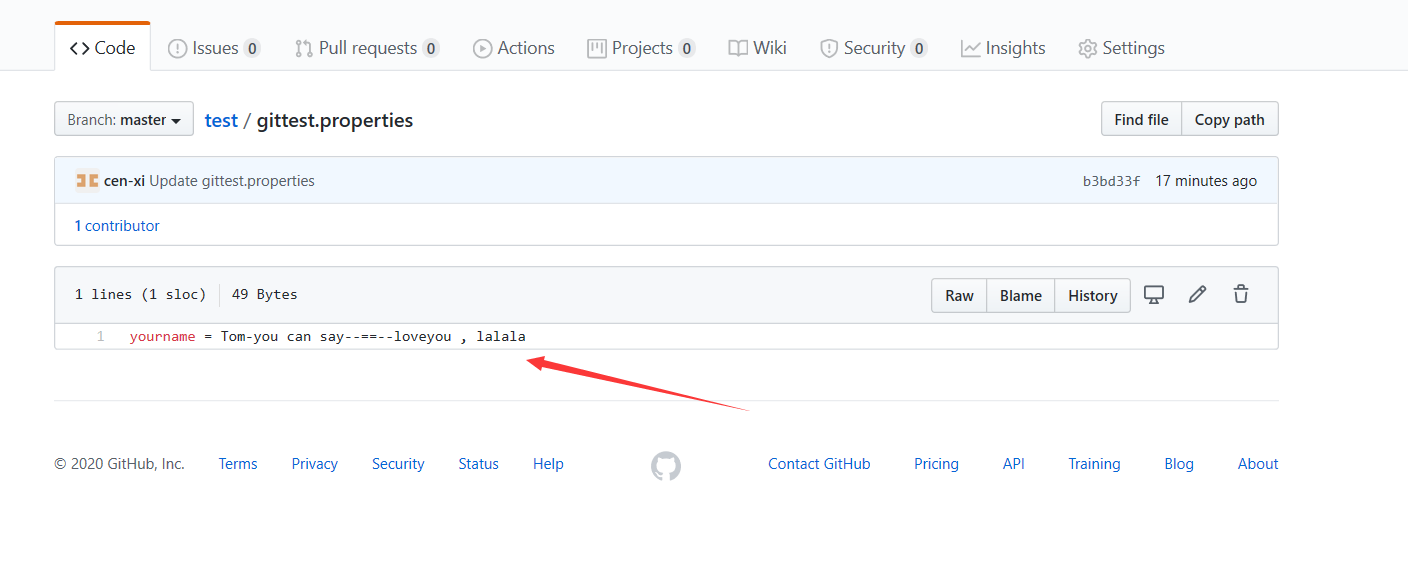
(2). GitHub仓库准备文件
6.测试
网址访问 端口 6080 , http://localhost:6080/getname

修改GitHub仓库 gittest.properties 文件

再次 网址访问 端口 6080 , http://localhost:6080/getname ,发现配置文件没有更新

访问请求刷新配置文件接口, ,需要以post方式请求 http://localhost:6080/actuator/refresh
在window 系统 可以 cmd 打开指令框 执行 curl -X POST http://localhost:6080/actuator/refresh
也可以使用软件 postman ,

返回结果 显示 更新的字段内容 ,
如果是 【】则表示远程配置文件没有变化 ,但是仍然刷新成功了
现在 再次 网址访问 端口 6080 , http://localhost:6080/getname ,发现配置文件已经 更新
