环境
虚拟机:VMware 10
Linux版本:CentOS-6.5-x86_64
客户端:Xshell4
FTP:Xftp4
jdk8
hadoop-3.1.1
hbase-2.1.3
一、单机模式搭建
不依赖HDFS 使用本地文件系统。
1、解压HBase,配置HBase环境变量
[root@PCS102 local]# tar -zxvf hbase-2.1.3-bin.tar.gz -C /usr/local/
[root@PCS102 local]# vi /etc/profile
[root@PCS102 local]# source /etc/profile
2、hbase-env.sh中配置JAVA_HOME
export JAVA_HOME=/usr/local/jdk1.8.0_65
3、配置hbase-site.xml
<configuration>
  <property>
  <name>hbase.rootdir</name>
  <value>file:///home/testuser/hbase</value>
  </property>
  <property>
  <name>hbase.zookeeper.property.dataDir</name>
  <value>/home/testuser/zookeeper</value>
  </property>
  <property>
  <name>hbase.unsafe.stream.capability.enforce</name>
  <value>false</value>
  </property>
</configuration>
4、启动
[root@PCS102 bin]# /usr/local/hbase-2.1.3/bin/start-hbase.sh
[root@PCS102 bin]# jps
20437 Jps
20055 HMaster

#进入控制台 HBASE SHELL 表的相关操作
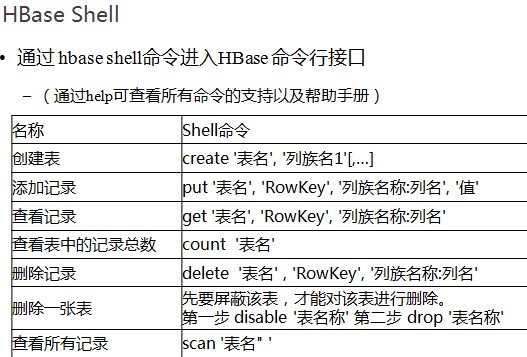
[root@PCS102 bin]# hbase shell SLF4J: Class path contains multiple SLF4J bindings. SLF4J: Found binding in [jar:file:/usr/local/hadoop-3.1.1/share/hadoop/common/lib/slf4j-log4j12-1.7.25.jar!/org/slf4j/impl/StaticLoggerBinder.class] SLF4J: Found binding in [jar:file:/usr/local/hbase-2.1.3/lib/client-facing-thirdparty/slf4j-log4j12-1.7.25.jar!/org/slf4j/impl/StaticLoggerBinder.class] SLF4J: See http://www.slf4j.org/codes.html#multiple_bindings for an explanation. SLF4J: Actual binding is of type [org.slf4j.impl.Log4jLoggerFactory] HBase Shell Use "help" to get list of supported commands. Use "exit" to quit this interactive shell. For Reference, please visit: http://hbase.apache.org/2.0/book.html#shell Version 2.1.3, rda5ec9e4c06c537213883cca8f3cc9a7c19daf67, Mon Feb 11 15:45:33 CST 2019 Took 0.1818 seconds #help命令:查看所有命令清单 hbase(main):001:0> help HBase Shell, version 2.1.3, rda5ec9e4c06c537213883cca8f3cc9a7c19daf67, Mon Feb 11 15:45:33 CST 2019 Type 'help "COMMAND"', (e.g. 'help "get"' -- the quotes are necessary) for help on a specific command. Commands are grouped. Type 'help "COMMAND_GROUP"', (e.g. 'help "general"') for help on a command group. COMMAND GROUPS: Group name: general Commands: processlist, status, table_help, version, whoami Group name: ddl Commands: alter, alter_async, alter_status, clone_table_schema, create, describe, disable, disable_all, drop, drop_all, enable, enable_all, exists, get_table, is_disabled, is_enabled, list, list_regions, locate_region, show_filters Group name: namespace Commands: alter_namespace, create_namespace, describe_namespace, drop_namespace, list_namespace, list_namespace_tables Group name: dml Commands: append, count, delete, deleteall, get, get_counter, get_splits, incr, put, scan, truncate, truncate_preserve Group name: tools Commands: assign, balance_switch, balancer, balancer_enabled, catalogjanitor_enabled, catalogjanitor_run, catalogjanitor_switch, cleaner_chore_enabled, cleaner_chore_run, cleaner_chore_switch, clear_block_cache, clear_compaction_queues, clear_deadservers, close_region, compact, compact_rs, compaction_state, flush, is_in_maintenance_mode, list_deadservers, major_compact, merge_region, move, normalize, normalizer_enabled, normalizer_switch, split, splitormerge_enabled, splitormerge_switch, stop_master, stop_regionserver, trace, unassign, wal_roll, zk_dump Group name: replication Commands: add_peer, append_peer_exclude_namespaces, append_peer_exclude_tableCFs, append_peer_namespaces, append_peer_tableCFs, disable_peer, disable_table_replication, enable_peer, enable_table_replication, get_peer_config, list_peer_configs, list_peers, list_replicated_tables, remove_peer, remove_peer_exclude_namespaces, remove_peer_exclude_tableCFs, remove_peer_namespaces, remove_peer_tableCFs, set_peer_bandwidth, set_peer_exclude_namespaces, set_peer_exclude_tableCFs, set_peer_namespaces, set_peer_replicate_all, set_peer_serial, set_peer_tableCFs, show_peer_tableCFs, update_peer_config Group name: snapshots Commands: clone_snapshot, delete_all_snapshot, delete_snapshot, delete_table_snapshots, list_snapshots, list_table_snapshots, restore_snapshot, snapshot Group name: configuration Commands: update_all_config, update_config Group name: quotas Commands: list_quota_snapshots, list_quota_table_sizes, list_quotas, list_snapshot_sizes, set_quota Group name: security Commands: grant, list_security_capabilities, revoke, user_permission Group name: procedures Commands: list_locks, list_procedures Group name: visibility labels Commands: add_labels, clear_auths, get_auths, list_labels, set_auths, set_visibility Group name: rsgroup Commands: add_rsgroup, balance_rsgroup, get_rsgroup, get_server_rsgroup, get_table_rsgroup, list_rsgroups, move_namespaces_rsgroup, move_servers_namespaces_rsgroup, move_servers_rsgroup, move_servers_tables_rsgroup, move_tables_rsgroup, remove_rsgroup, remove_servers_rsgroup SHELL USAGE: Quote all names in HBase Shell such as table and column names. Commas delimit command parameters. Type <RETURN> after entering a command to run it. Dictionaries of configuration used in the creation and alteration of tables are Ruby Hashes. They look like this: {'key1' => 'value1', 'key2' => 'value2', ...} and are opened and closed with curley-braces. Key/values are delimited by the '=>' character combination. Usually keys are predefined constants such as NAME, VERSIONS, COMPRESSION, etc. Constants do not need to be quoted. Type 'Object.constants' to see a (messy) list of all constants in the environment. If you are using binary keys or values and need to enter them in the shell, use double-quote'd hexadecimal representation. For example: hbase> get 't1', "keyx03x3fxcd" hbase> get 't1', "key�03�23�11" hbase> put 't1', "testxefxff", 'f1:', "x01x33x40" The HBase shell is the (J)Ruby IRB with the above HBase-specific commands added. For more on the HBase Shell, see http://hbase.apache.org/book.html #version查看版本 hbase(main):002:0> version 2.1.3, rda5ec9e4c06c537213883cca8f3cc9a7c19daf67, Mon Feb 11 15:45:33 CST 2019 Took 0.0005 seconds #whoami查看当前用户 hbase(main):003:0> whoami root (auth:SIMPLE) groups: root Took 0.0175 seconds #create建表 hbase(main):004:0> create 'test','cf' Created table test Took 0.7281 seconds => Hbase::Table - test #describe查看 表详情 hbase(main):005:0> describe 'test' Table test is ENABLED test COLUMN FAMILIES DESCRIPTION {NAME => 'cf', VERSIONS => '1', EVICT_BLOCKS_ON_CLOSE => 'false', NEW_VERSION_BEHAVIOR => 'false', KEEP_DELETED_CELLS => 'FALSE', CACHE_DATA_ON_WRITE => 'false', DATA_BLOCK_ENCODING => 'NONE', TTL => 'FOREVER', MIN_VERSIONS => '0', REPLICATIO N_SCOPE => '0', BLOOMFILTER => 'ROW', CACHE_INDEX_ON_WRITE => 'false', IN_MEMORY => 'false', CACHE_BLOOMS_ON_WRITE => 'fa lse', PREFETCH_BLOCKS_ON_OPEN => 'false', COMPRESSION => 'NONE', BLOCKCACHE => 'true', BLOCKSIZE => '65536'} 1 row(s) Took 0.0490 seconds #list查找表 hbase(main):006:0> list 'test' TABLE test 1 row(s) Took 0.0055 seconds => ["test"] #插入表数据 hbase(main):007:0> put 'test', 'row1', 'cf:a', 'value1' Took 0.1268 seconds hbase(main):008:0> put 'test', 'row2', 'cf:b', 'value2' Took 0.0074 seconds hbase(main):009:0> put 'test', 'row3', 'cf:c', 'value3' Took 0.0049 seconds #scan查看所有表数据 hbase(main):010:0> scan 'test' ROW COLUMN+CELL row1 column=cf:a, timestamp=1551083605745, value=value1 row2 column=cf:b, timestamp=1551083616355, value=value2 row3 column=cf:c, timestamp=1551083629088, value=value3 3 row(s) Took 0.0257 seconds #get查找指定数据 hbase(main):011:0> get 'test','row1' COLUMN CELL cf:a timestamp=1551083605745, value=value1 1 row(s) Took 0.0318 seconds #disable 表失效 enable 表生效 hbase(main):012:0> disable 'test' Took 0.4667 seconds hbase(main):013:0> enable 'test' Took 0.7440 seconds #drop删除表 hbase(main):014:0> disable 'test' Took 0.4310 seconds hbase(main):015:0> drop 'test' Took 0.2304 seconds #exit退出 hbase(main):016:0> exit [root@PCS102 bin]#
5、关闭
[root@PCS102 bin]# /usr/local/hbase-2.1.3/bin/stop-hbase.sh
6、查看表文件
#先强制把表数据刷出到文件
hbase(main):005:0> flush 'psn'
Took 0.2759 seconds


#使用命令查看hbase -hfile -p -f
[root@PCS102 cf]# pwd
/home/testuser/hbase/data/default/psn/d00b0b3a2ca0a14caacff17f315f1127/cf
[root@PCS102 cf]# ls
2fd8197c6ea747a1b0b1f6ca63fee0b4
[root@PCS102 cf]# hbase -hfile -p -f 2fd8197c6ea747a1b0b1f6ca63fee0b4
注意:hbase-env.sh配置:HBASE_MANAGERS_ZK=true 默认值true
HBase伪分布式默认使用内置zookeeper
*************
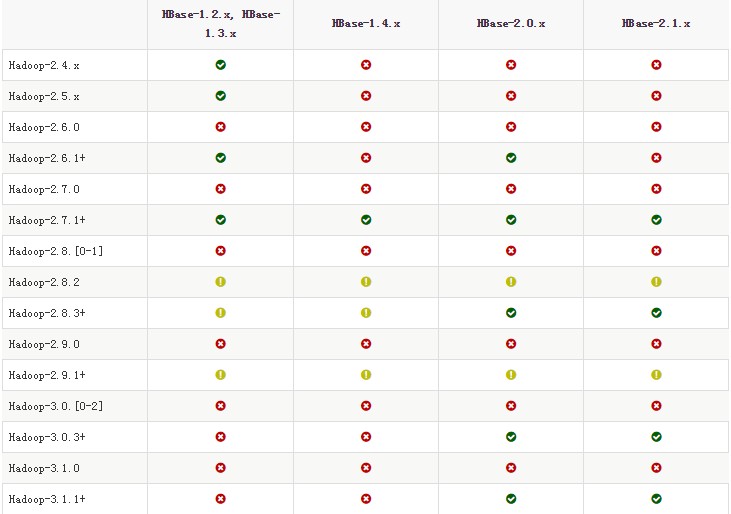
伪分布式和完全分布式依赖HDFS,但是Hadoop和HBase的版本直接不一定支持,搭建之前需要明确支持关系
可以参考:http://hbase.apache.org/book.html 进去搜索:Hadoop version support matrix
************
二、伪分布式搭建
1> 所有进程运行在同一个节点上,不同进程运行在不同的JVM当中
2> 比较适合实验测试
3> 伪分布式的ZK可以使用外部ZK,也可以使用内置ZK
1、配置hbase-site.xml(内置ZK配置)
<configuration>
<!-- 设置HRegionServers共享目录,用来持久化 HBase
注意:hbase.rootdir里面的HDFS地址是要跟 Hadoop的core-site.xml
里面的 fs.defaultFS 的 HDFS 的 IP 地址或者域名、端口必须一致
-->
  <property>
  <name>hbase.rootdir</name>
  <value>hdfs://PCS102:9820/hbase</value>
</property>
<property>
  <name>hbase.zookeeper.property.dataDir</name>
  <value>/home/testuser/zookeeper</value>
  </property>
<property>
  <name>hbase.cluster.distributed</name>
  <value>true</value>
</property>
</configuration>
2、配置regionservers
[root@PCS102 conf]# vi /usr/local/hbase-2.1.3/conf/regionservers
该配置列出regionserver节点清单,默认为localhost,这里改成PCS102 当前节点域名
3、启动HBase(注意Hbase和hadoop版本 否则启动不成功)
[root@PCS102 bin]# hbase-daemon.sh start zookeeper
localhost: running zookeeper, logging to /usr/local/hbase-2.1.3/bin/../logs/hbase-root-zookeeper-PCS102.out
[root@PCS102 bin]# hbase-daemon.sh start master
running master, logging to /usr/local/hbase-2.1.3/logs/hbase-root-master-PCS102.out
[root@PCS102 bin]# hbase-daemon.sh start regionserver
PCS102: running regionserver, logging to /usr/local/hbase-2.1.3/bin/../logs/hbase-root-regionserver-PCS102.out
[root@PCS102 bin]# jps
24657 RunJar
26645 HRegionServer
18534 NameNode
20743 NodeManager
18712 DataNode
23609 JobHistoryServer
20523 ResourceManager
19020 SecondaryNameNode
26814 Jps
26271 HQuorumPeer
20055 HMaster
可以在/usr/local/hbase-2.1.3/logs下查看日志
查看HDFS
hdfs dfs -ls /hbase
三、完全分布式搭建
搭建方案:
| 节点 | NN | DN | ZK | Master | Backup-Master | RegionServer |
| node1 | 1 | 1 | 1 | |||
| node2 | 1 | 1 | 1 | 1 | ||
| node3 | 1 | 1 | 1 | |||
| node4 | 1 | 1 | ||||
| node5 | 1 |
1、保证各个节点时间date同步
(1)安装ntp服务
yum install -y ntp
(2)所有节点使用ntp进行时间同步(使用阿里的NTP服务器)
ntpdate 120.25.108.11
2、搭建、启动hadoop集群
参考:https://www.cnblogs.com/cac2020/p/10212607.html
3、配置hbase-env.sh
配置JAVA环境变量:export JAVA_HOME=/usr/local/jdk1.8.0_65
配置使用外部ZK:HBASE_MANAGERS_ZK=true
4、配置hbase.site.xml
<configuration>
  <property>
  <name>hbase.rootdir</name>
  <value>hdfs://hdfscluster:9820/hbase</value>
  </property>
  <property>
  <name>hbase.cluster.distributed</name>
  <value>true</value>
  </property>
  #ZK清单
  <property>
  <name>hbase.zookeeper.quorum</name>
  <value>node1,node2,node3</value>
  </property>
</configuration>
5、配置regionservers
根据规划,配置regionserver节点清单
node2
node3
node4
6、配置backup-masters(/usr/local/hbase-2.1.3/conf没有这个文件 需要新建一个)
根据规划,配置Backup-Master节点清单
node5
7、拷贝hadoop配置hdfs-site.xml(强调:hadoop版本和hbase版本对应问题)
[root@node1 conf]# cp /usr/local/hadoop-3.1.1/etc/hadoop/hdfs-site.xml ./
8、分发hbase目录到所有节点
[root@node1 local]# scp -r ./hbase-2.1.3 node2:`pwd`
[root@node1 local]# scp -r ./hbase-2.1.3 node3:`pwd`
[root@node1 local]# scp -r ./hbase-2.1.3 node4:`pwd`
[root@node1 local]# scp -r ./hbase-2.1.3 node5:`pwd`
9、启动HBase
[root@node1 local]# start-hbase.sh
10、Hbase shell进行表相关操作
[root@node5 local]# hbase shell
11、停止
[root@node1 local]# stop-hbase.sh
参考: