Google-Guice入门介绍(较为清晰的说明了流程):
http://blog.csdn.net/derekjiang/article/details/7231490
使用Guice,需要添加第三方的包(guice-3.0.jar和javax.inject.jar)
链接:https://pan.baidu.com/s/1vU9zwrklTPS-YTwsAQzwXA 密码:rdd8
将包导入MyEclipse或eclipse的方法:http://jingyan.baidu.com/article/6079ad0e7e4de128fe86db40.html
Google Guice 是一个轻量级的依赖注入框架。
Guice是由Google大牛Bob lee开发的一款绝对轻量级的java IoC容器。其优势在于:
1. 速度快,号称比spring快100倍。
2. 无外部配置(如需要使用外部可以可以选用Guice的扩展包),完全基于annotation特性,支持重构,代码静态检查。
3. 简单,快速,基本没有学习成本。
Guice更适合与嵌入式或者高性能但项目简单方案,如OSGI容器,spring更适合大型项目组织。
(作为一个初学者对于上述两点没有太多的体会,所以此方面没有独特而详细的见解,我也是抱着学习的心态在接触这些东西。)
注入方式:构造、属性以及函数注入,guice的实现只要在构造函数,字段,或者注入函数上标注@Inject
(此部分完整学习网址:http://www.cnblogs.com/whitewolf/p/4185908.html )
构造注入
public class ServiceImpl implements Service {
  private PeopleService people;
  private GoodsService goods;

  @Inject
  public ServiceImpl(PeopleService people, GoodsService goods) {
    this.people = people;
    this.goods = goods;
  }
}
属性注入
public class ServiceImpl implements Service {
  private PeopleService people;
  private GoodsService goods;

  @Inject
  public init(PeopleService people, GoodsService goods) {
    this.people = people;
    this.goods = goods;
  }
}
函数注入
public public class ServiceImpl implements Service {
  private PeopleService people;
  private GoodsService goods;

  @Inject
  public setPeopleService(PeopleService people) {
    this.people = people;
  }

  @Inject
  public setGoodsService(GoodsService goods) {
    this.goods = goods;
  }
}
Module依赖注册
Guice提供依赖配置类,需要继承至AbstractModule,实现configure方法。在configure方法中我们可以用Binder配置依赖。
Binder利用链式形成一套独具语义的DSL,如:
• 基本配置:binder.bind(serviceClass).to(implClass).in(Scopes.[SINGLETON | NO_SCOPE]);
• 无base类、接口配置:binder.bind(implClass).in(Scopes.[SINGLETON | NO_SCOPE]);
• service实例配置:binder.bind(serviceClass).toInstance(servieInstance).in(Scopes.[SINGLETON | NO_SCOPE]);
• 多个实例按名注入:binder.bind(serviceClass).annotatedWith(Names.named(“name”)).to(implClass).in(Scopes.[SINGLETON | NO_SCOPE]);
• 运行时注入:利用@Provides标注注入方法,相当于spring的@Bean。
• @ImplementedBy:或者在实现接口之上标注@ImplementedBy指定其实现类。这种方式有点反OO设计,抽象不该知道其实现类。
对于上面的配置在注入的方式仅仅需要@Inject标注,但对于按名注入需要在参数前边加入@Named标注,如下
public void configure(Binder binder) {  binder.bind(NamedService.class).annotatedWith(Names.named("impl1")).to(NamedServiceImpl1.class);
  binder.bind(NamedService.class).annotatedWith(Names.named("impl2")).to(NamedServiceImpl2.class);
}

@Inject
public List<NamedService> getAllItemServices(@Named("impl1") NamedService nameService1,
@Named("impl2") NamedService nameService2) {
}
Guice也可以利用@Provides标注注入方法来运行时注入:如
@Provides
public List<NamedService> getAllItemServices(@Named("impl1") NamedService nameService1,
@Named("impl2") NamedService nameService2) {
final ArrayList<NamedService> list = new ArrayList<NamedService>();
list.add(nameService1);
list.add(nameService2);
return list;
}
Google Guice 系列教程 - 基础实践
原文:http://www.cnblogs.com/youngC/archive/2012/12/21/2828419.html?utm_source=tuicool&utm_medium=referral
(本部分均转自上面的网址,详看原文)
Google Guice 是一个轻量级的依赖注入框架,它支持Java 5或者更高版本的JDK,得利于Java 5中提供的泛型 (Generics) 和注释 (Annotations) ,它可以使得代码类型安全 (type-safe) 。那么何时使用在代码中使用 Guice 进行注入呢?一般来说,如果在你的应用代码中业务对象 (Business Objects) 之间的关系或者依赖需要手动维护的话,你就可以使用Guice 进行注入。
该文章中,首先我将通过一些例子来初步的认识一下 Guice 框架,然后我将介绍下 依赖注入框架的理论知识 以及在应用程序中使用依赖注入的好处,同样我也会和大家探讨一下 Guice 提供的用于简化代码的 API (包括Annotations) 。最后通过大量使用 Guice API的例子来使大家更好地理解这些API。
依赖注入(Dependency Injection)
由于Gucie 是一个依赖注入框架 (Dependency Injection Framework) ,因此我们首先要很清楚依赖注入 (Dependency Injection) 是什么概念。这些年来,依赖注入变得越来越流行,变得越来越重要,在很多典型的应用中它甚至变成了一个必需的机制,比如 J2EE 5.0, Spring, JBoss Seam就是使用依赖注入的很好的例子。现在我们来使用一个简单的例子来说明使用依赖注入框架的必要性。
请看以下代码:
public interface Storage {
    public void store(String uniqueId, Data data);

    public Data retrieve(String uniqueId);
}
上面的接口 Storage 提供了存储 (store) 和获取 (retrieve) 数据的机制,由于数据可以存储在数据库中也可以存储在一个文件中,因此上面接口 Storage 的实现可以如下。
public class FileStorage implements Storage {

    @Override
    public void store(String uniqueId, Data data) {
        // Store the object in a file using Java Serialization mechanism.
    }

    @Override
    public Data retrieve(String uniqueId) {
        // Code to retrieve the object.
 }
}
实现类 FileStorage 可以将数据存储到硬盘文件中,同样也可以从硬盘文件中获取存储数据。接下来是 Storage 接口的另一种实现,它用于将数据存储到数据库中。
public class DatabaseStorage implements Storage {

    @Override
    public void store(String uniqueId, Data data) {
        // Open a connection and store the data.

    }

    @Override
    public Data retrieve(String uniqueId) {
        // Get the data from the Database.
    }
}
现在,我们来看一个 Storage 应用客户端的例子。下面的 StorageClient 代码片段中,首先初始化一个 FileSorage,然后在转向 DatabaseStorage 实现。(new Data()报错,所以我注释掉了)
public class StorageClient {

    /**
     * @param one-bird
     */
    public static void main(String[] args) {
        //Making use of the File
        Storage storage=new FileStorage();
        //storage.store("123", new Data());

        // Making use of the database.
        storage = new DatabaseStorage();
        //storage.store("456", new Data());
    }

}
仔细看下 StorageClient 模块中的代码,尽管接口 (Storage) 和实现类 (FileStorage/DatabaseStorage) 松耦合,但是 客户端 (StorageClient) 模块需要手动地去创建实现类的实例对象 (instance) ,同样接口和实现类之间的关系 (Relationship) 是直接在客户端代码中写死的,然而在大多数情况下,在代码编译的时候,客户端应用程序已经知道需要绑定哪一种接口实现类,如果只绑定某一个具体的实现类,肯定比上面的代码中同时实现两个类 (某一个是没必要的) 更有用。Google Guice 就是干这个工作的,它在应用程序的客户端代码中创建不同形式服务 (Services) 实例, 而且客户端和服务之间的依赖是通过一些简单的配置机制 (Configuration Mechanism) 自动注入的。
接下来我将提供一个简单使用 Guice Framework 的例子。
一个简单的 Guice 例子
在这个简单的例子中,让我们看一下 Guice 在维护不同对象之间的关系/依赖时如何简化开发的。让我们看一下下面的代码片段,我们创建了一个 Add 接口,并且在里面定义了一个 add() 方法。
public interface Add {
    public int add(int a, int b);
}
下面是接口 Add 的一个实现类
public class SimpleAdd implements Add {

    @Override
    public int add(int a, int b) {
        return a + b;
    }
}
接着我们定义一个 Module 类,这个类用于使用 Guice API 在一个应用程序中创建 Bindings。Module 和 Bindings 理论方面的详细介绍在后面章节。现在,你只需要明白通过 Binder 类,你可以将一些 Bindings 配置到某个 Module中。在 Guice 条目中,Binding 提供了一种方式将接口 (interface) 和实现类相关联。
import com.google.inject.Binder;
import com.google.inject.Module;

public class AddModule implements Module {

    @Override
    public void configure(Binder binder) {
        binder.bind(Add.class).to(SimpleAdd.class);
    }
}
在上面的代码中,我们告诉 Guice 将 SimpleAdd 实现类绑定到 Add 接口上,也就是说在客户端调用Add.add() 方法时,实际会去执行 SimpleAdd.add() 方法。下面给出了一个客户端例子用户使用 Add 接口。
import com.google.inject.Guice;
import com.google.inject.Injector;

public class AddClient {

    /**
     * @param one-bird
     */
    public static void main(String[] args) {
        Injector injector=Guice.createInjector(new AddModule());
        Add add=injector.getInstance(Add.class);
        System.out.println(add.add(2016, 1119));
    }

}
运行结果:
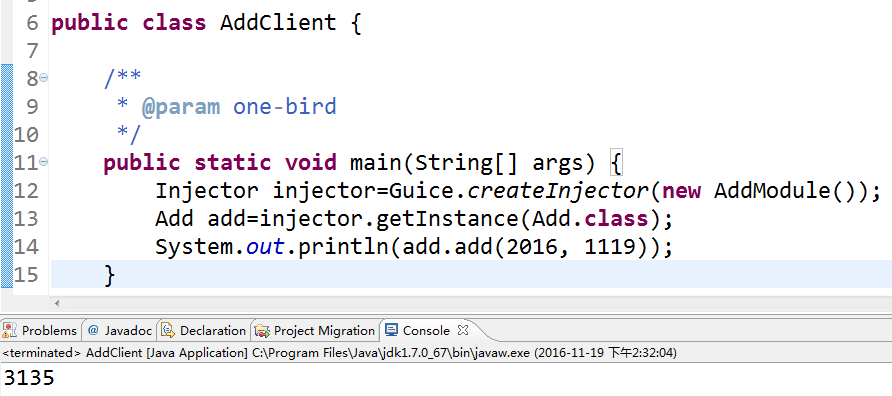
更多关于 Injector, Guice 的理论知识将会在后面的章节介绍。injector.getInstance(Add.class) 将会创建并返回一个 SimpleAdd 类型的实例。实际上是通过 AddModule.configure() 方法来获取具体的绑定信息的。
Guice API 探讨
让我们探讨一下实现 Guice 依赖注入不同的 API。特别会涉及以下的 接口/实现类。
- Binder
- Injector
- Module
- Guice
1.Binder
Binder 接口主要是由与 Bindings 相关的信息组成的。一个 Binding 其实就是一个接口和其相应的实现类的映射关系。例如,回想一下上面的例子,我们创建了一个由接口 Add 指向 实现类 SimpleAdd 的映射关系。
从程序角度来说,可以通过以下代码方式实现。注意的是无论是接口 (interface) 还是实现类 (implementation classes),都是通过 bind() 和 to()方法实现映射的。
binder.bind(Add.class).to(SimpleAdd.class)
同样也可以将一个接口直接映射到一个具体的实例对象,代码如下。
binder.bind(Add.class).to(new SimpleAdd())
第三种方式是将一个接口绑定到一个相应的 Provider 类。默认情况下,Guice 框架会创建并返回应用程序需要的实例对象。但是,如果需要定制化一个对象创建流程(Object Creation Process),该怎么办? Providers 可以很简单的实现这种定制化。 你只需要遵循传统的工厂模式(Factory Pattern)创建对象的方式使用 Providers,例如下面的代码。
binder.bind(Add.class).to(new AddProvider<Add>())
后面我将会通过一些例子讲解如何创建 Provider 对象。不过现在,你只需要知道在 AddProvider 类中提供了一种工厂方法,它会返回具体的 Add 实现类的实例对象。后面我同样会讲解到如何将一个接口绑定到多个具体实现上。
2. Injector
Injectors 通常会在客户端 (Clients) 使用,它只关心如何创建 (Creating)和维护 (Maintaining) 对象(生命周期)。Injectors 会去维护一组默认的 Bindings (Default Bindings),这里我们可以获取创建和维护不同对象间关系的配置信息 (Configuration information)。以下代码将会返回 Add 的实现类对象。
Add addObject = injector.getInstance(Add.class)
你可以简单地通过 Injector.getBindings() 方法获取与 Injector 相关的 Bindings信息,getBindings() 方法会返回一个 Map。
Map<Key, Binding> allBindings = injector.getBindings()
这里需要注意的是每一个 Binding 通常有一个对应的 Key 对象,该对象是由 Guice 自动创建并维护的。如果你想要获取于Injector相关的 Providers 的话,你可以通过以下方法获取。
Provider<SomeType> provider = injector.getProvider(SomeType.class)
3. Module
Module 对象会去维护一组 Bindings。在一个应用中可以有多个 Module 。反过来 Injectors 会通过 Module 来获取可能的 Bindings。Module 是通过一个包含需要被重写 override 的 Module.configure() 方法的接口去管理 Bindings。 简单地说,就是你要继承一个叫做 AbstractModule的类,这个类实现了 Module 接口,并且重写 configure() 方法, 代码如下。
class MyModule extends AbstractModule{

    public void configure(Binder binder){

        // Code that binds information using the various
        // flavours of bind method.
    }
}
4. Guice
客户端 (Clients) 是通过 Guice 类直接和其他 Objects 进行交互的。Injector 和不同的 Modules 之间的联系是通过 Guice 建立的。例如下面的代码。
MyModule module = new MyModule();
Injector injector = Guice.createInjector(module);
这里需要注意的是 Guice.createInjector() ,该方法接受一个 Module 对象作为参数。 Module 类必需要重写 configure() 方法, 该方法是用于传递一个 默认 Binder 对象, 该 Binder 对象为应用程序用于填充特定的 Bindings (to Classes, Objects and Providers)。 当客户端调用 Injector 类的 getInstance() 方法创建一个实例的时候,Injector 会从 Binder 对象维护的各种 Bindings 中获取原来的对象。
Guice 注解 (Annotations)
Guice 提供了一些十分有用的 Annotations ,这些 Annotations 可以用来在应用程序中添加 元数据 (meta-data)。 这一章节我将要讲以下几个注解。
- Implemented By
- Inject
- Provided By
- Singleton
1. Implemented By
该 Annotation 用于指向接口的实现类。例如,如果 Add 接口有多个实现类,但是我们希望 SimpleAdd 是 Add 的默认实现类,于是我们可以像下面一样处理。
@ImplementedBy(SimpleAdd.class)
interface Add{

    public int add(int a, int b);

}
2. Inject
我们可以使用 Inject Annotation 来直接将实例注入到客户端的代码中。该注释可以用于某个类的构造方法上,代码如下。
class Client{

    @Inject
    public Client(MyService service){
    }
}
上面的代码,我们是基于构造方法层次 (Constrcctor-level)的 注入,并且假设 MyService 接口的具体实现已经在应用程序的 Module 中定义映射好了。同样你也可以在方法层次 (Method-level) 和 字段层次 (Field-level) 使用注解。
3. Provided By
假设我们想要为一些接口定制化对象创建的流程 (Object creation process),那么我们需要依赖 Guice Provider 机制, 对于接口 Add 来说,我们需要使用 AddProvider 来创建并返回 SimpleAdd 对象。在这个案例中,我们可以直接在接口声明处使用 ProvidedBy 注解来指定该接口的 Provider 类型, 代码如下。
@ProvidedBy(AddProvider.class)
public interface Add{
 }
4. Singleton
默认情况下,客户端可以多次使用 Injector.getInstance() 来调用对象,每一个都会返回一个新创建的对象。如果我们想要使用单例模式(Singleton Pattern)来获取对象,即 One Instance in the application,你可以在实现类上使用 Singleton 注释去标记。
@Singleton
public class MyConnection{

    public void connect(){
    }

    public void disconnect(){
    }
}
例子 (Samples)
这一章节将会提过更多的例子帮助你理解和使用 Guice API ,我将会更加详细的解析。
1. 简单的例子
在这个简单的例子中我们没有使用接口编程,即将接口和实现分离。我们只有一个实现类 Player 和一个依赖它的客户端 PlayerTest, 这里 Guice 没有做什么,只是提供了一个映射。
首先来看一下 Player 类。
public class Player {
    public String name;

    public Player() {
    }

    public String toString() {
        return name;
    }
}
下面是客户端代码的例子,用于使用 Player 类。这里需要注意的是我们没有在 Guice.createInjector() 方法里面传递 Module ,因为我们不需要在程序代码中绑定对象。
import com.google.inject.Guice;
import com.google.inject.Injector;

public class PlayerTest {

    /**
     * @param one-bird
     */
    public static void main(String[] args) {
        Injector injector = Guice.createInjector();
        Player player = injector.getInstance(Player.class);
        player.name = "live";
        System.out.println(player);
    }
}
2. 处理多个依赖 (Multiple Dependencies)
这一小节里面,我们将探讨如何使用 @Inject 注释来处理多个依赖。 比方说有一个对象直接依赖其它两个或者多个对象。这里我们创建一个简单的 Case ,一个人有一台笔记和一个手机。
首先我们给出 Mobile 类和 Laptop 类。
public class Laptop {
    private String model;
    private String price;

    public Laptop() {
        this.model = "HP 20161119";
        this.price = "$1119";
    }

    public String toString() {
        return "[Laptop: " + model + "," + price + "]";
    }
}
public class Mobile {
    private String number;

    public Mobile() {
        this.number = "20161114";
    }

    public String toString() {
        return "[Mobile: " + number + "]";
    }
}
接下来我们将会在 Person 类中使用 @Inject 注释来直接引用 Laptop 和 Mobile 对象。注意我们这儿使用的是构造方法层次上的注入。
import com.google.inject.Inject;

public class Person {
    private Mobile mobile;
    private Laptop laptop;

    @Inject
    public Person(Mobile mobile, Laptop laptop) {
        this.mobile = mobile;
        this.laptop = laptop;
    }

    public void displayInfo() {
        System.out.println("Mobile:" + mobile);
        System.out.println("Laptop:" + laptop);
    }
}
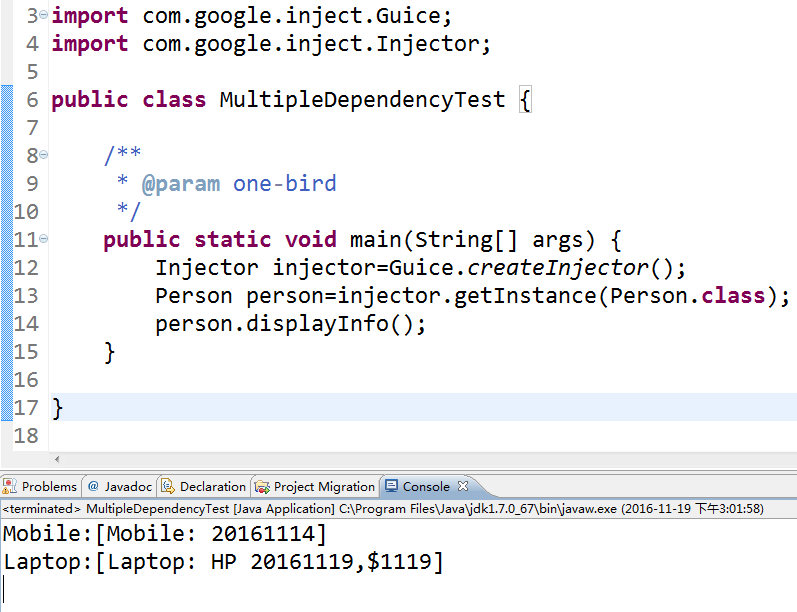
最后是客户端的代码,这段代码用于使用这个例子。由于我们没有使用到 Bindings, 我们没有在 Guice.createInject() 方法中传递 Module 对象。
import com.google.inject.Guice;
import com.google.inject.Injector;

public class MultipleDependencyTest {

    /**
     * @param one-bird
     */
    public static void main(String[] args) {
        Injector injector=Guice.createInjector();
        Person person=injector.getInstance(Person.class);
        person.displayInfo();
    }

}
运行结果:
3. 使用 Binding 注释
在 Guice 中,一个类型不能绑定多个实现,如下,代码会抛 Runtime Error.
binderObject.bind(SomeType.class).to(ImplemenationOne.class);
binderObject.bind(SomeType.class).to(ImplemenationTwo.class);
由于 Guice 并不知道客户端究竟要绑定哪一个实现类,因此抛出了异常。但是在类似 Java 的语言中,一个类可以实现多个接口,基于这个思想,Guice 提供了一种依赖 Binding 注释的方式来实现一个类型绑定多个实现。例如,接口 Player 定义如下,
public interface Player {
    public void bat();

    public void bowl();
}
接着我们提供了 Player 的两种实现类, GoodPlayer 和 BadPlayer。
public class GoodPlayer implements Player {

    @Override
    public void bat() {
        System.out.println("I can hit any ball");
    }

    @Override
    public void bowl() {
        System.out.println("I can also bowl");
    }

}
public class BadPlayer implements Player {

    @Override
    public void bat() {
        System.out.println("I think i can face the ball");
    }

    @Override
    public void bowl() {
        System.out.println("I don't know bowling");
    }

}
现在我们开始介绍 Guice ,对于接口 Player 而言,有两个实现类 GoodPlayer 和 BadPlayer。无论如何,最终客户端只会使用其中一个具体的实现类,无论它使用GoodPlayer 实现类还是 BadPlayer 实现类,通过一些注释机制 (Annotaion mechanisms) 我们可以指示 Guice 使用不同的实现。代码实现如下。
 1 import com.google.inject.Binder;
 2 import com.google.inject.Module;
 3
 4 public class PlayerModule implements Module {
 5
 6     @Override
 7     public void configure(Binder binder) {
 8         binder.bind(Player.class).annotatedWith(Good.class)
 9                 .to(GoodPlayer.class);
10         binder.bind(Player.class).annotatedWith(Bad.class).to(BadPlayer.class);
11     }
12
13 }
注意第8行和第10行代码,我们分别使用了.annotatedWith(Good.class) 和 .annotatedWith(Bad.class), 这两处代码指明了如果使用Good注释,那么就绑定GoodPlayer实现类,如果使用了Bad注释,那么就绑定BadPlayer实现类。
上面的代码中我们使用了两个自定义的 Annotation,Good 和 Bad。下面我们给出 Good annotation 和 Bad annotation 的代码。
import java.lang.annotation.ElementType;
import java.lang.annotation.Retention;
import java.lang.annotation.RetentionPolicy;
import java.lang.annotation.Target;

import com.google.inject.BindingAnnotation;

@Retention(RetentionPolicy.RUNTIME)
@BindingAnnotation
@Target(ElementType.LOCAL_VARIABLE)
public @interface Good {
}
import java.lang.annotation.ElementType;
import java.lang.annotation.Retention;
import java.lang.annotation.RetentionPolicy;
import java.lang.annotation.Target;

import com.google.inject.BindingAnnotation;

@Retention(RetentionPolicy.RUNTIME)
@BindingAnnotation
@Target(ElementType.LOCAL_VARIABLE)
public @interface Bad {
}
接下来是上面程序的客户端代码。这里需要注意的是当在客户端代码中请求某一个接口的具体实现的时候,可以直接通过指定不同的 Annotation 来指定返回不同的实现类。
 1 import com.google.inject.Injector;
 2 import com.google.inject.Module;
 3
 4 public class PlayerClient {
 5
 6     /**
 7      * @param one-bird
 8      */
 9     public static void main(String[] args) {
10         PlayerModule module = new PlayerModule();
11         Injector injector = Guice.createInjector(new Module[] { module });
12
13         @Bad Player player = injector.getInstance(Player.class);
14         player.bat();
15         player.bowl();
16     }
17
18 }
此处注意第11行和第13行。 第13行代码 @Good 告诉 Guice 去 Playe Moduler 中获取一个 GoodPlayer实例对象。
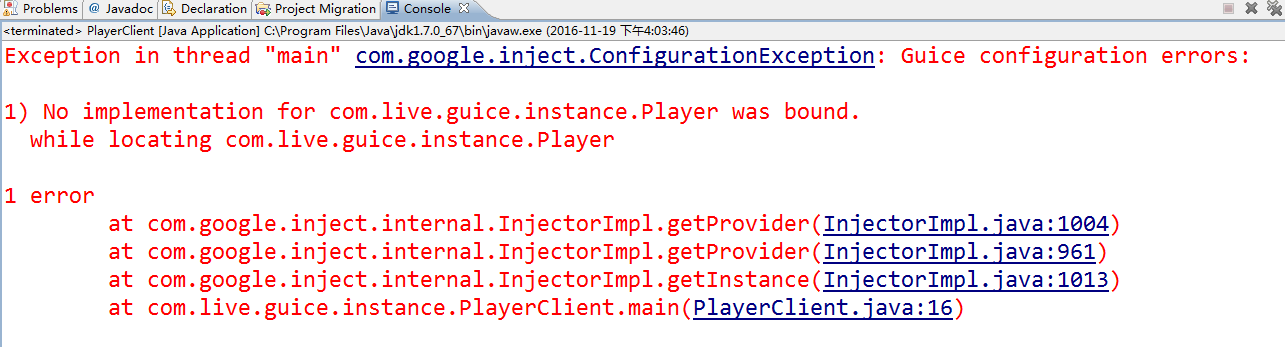
注意:报错,我根据错误,修改了一些代码,发现没有完成。(希望其他学友指正)
批注:原文中这种方法说可以多个实现,我在测试时发现会报一个错误,所以想要了解的去看原文,因为有错所以这里提醒。
4. Named 注释
像上面例子中,如果只是为了标记实现类以便于客户端使用,而为每一个实现类创建新的 Annotation ,那么是完全没有必要的。我们可以使用 @Named 注释来命名这些 entities。这儿有一个工具方法 - Names.named() ,当你给它一个命名,它会返回好一个命名好的 Annotation。例如上面的例子中,在 Player Module 中可以使用 Names.named() 来完成一些相同的事情。
import com.google.inject.Binder;
import com.google.inject.Module;
import com.google.inject.name.Names;

public class PlayerModule implements Module {

    @Override
    public void configure(Binder binder) {
        binder.bind(Player.class).annotatedWith(Names.named("Good"))
                .to(GoodPlayer.class);
        binder.bind(Player.class).annotatedWith(Names.named("Bad"))
                .to(BadPlayer.class);
    }

}
现在在客户端代码中,我们将使用 @Named() annotation来获取注释。
@Named("Good") Player goodPlayer = (Player)injector.getInstance(Player.class);

@Named("Bad") Player badPlayer = (Player)injector.getInstance(Player.class);
注意:这里也报错
Exception in thread "main" java.lang.Error: Unresolved compilation problem:
The annotation @Named is disallowed for this location
5. 一个简单的 Provider
在 Guice 中 Providers 就像 Factories 一样创建和返回对象。在大部分情况下,客户端可以直接依赖 Guice 框架来为服务(Services)创建依赖的对象。但是少数情况下,应用程序代码需要为一个特定的类型定制对象创建流程(Object creation process),这样可以控制对象创建的数量,提供缓存(Cache)机制等,这样的话我们就要依赖 Guice 的 Provider 类。
例如,我们需要为 MockConnection 创建一个对象创建和销毁的流程,代码如下。
public class MockConnection {
    public void connect() {
        System.out.println("Connecting to the mock database");
    }

    public void disConnect() {
        System.out.println("Dis-connecting from the mock database");
    }
}
现在我们来写一个简单的 Provider 类来实现 Guice 的 Provider 接口,使用它创建并返 MockConnection对象,代码如下。
import com.google.inject.Provider;

public class ConnectionProvider implements Provider<MockConnection> {
    @Override
    public MockConnection get() {
        // Do some customization mechanism here.
        MockConnection connection = new MockConnection();
        // Do some customization mechanism here too.
        return connection;
    }
}
需要注意的是,所有的自定义 Provider 类必需实现 Provider 接口,并且重写里面的 get() 方法。现在 Module 需要留意这个自定义的 Provider 类,它需要请求 ConnectionProvider 来创建对象,而不是直接创建对象,实现的代码如下。
 1 import com.google.inject.Binder;
 2 import com.google.inject.Guice;
 3 import com.google.inject.Injector;
 4 import com.google.inject.Module;
 5
 6 public class ConnectionTest {
 7
 8     /**
 9      * @param one-bird
10      */
11     public static void main(String[] args) {
12         Injector injector = Guice.createInjector(new Module() {
13
14             @Override
15             public void configure(Binder binder) {
16                 binder.bind(MockConnection.class).toProvider(
17                         ConnectionProvider.class);
18             }
19         });
20
21         MockConnection connection=injector.getInstance(MockConnection.class);
22         connection.connect();
23         connection.disConnect();
24     }
25
26 }
运行结果:

注意第16行,我们使用 toProvider() 方法将 MockConnection.class 绑定到一个 Provider 上。
小结
这篇文章简要的讲解了一些 Guice 相关的内容,有时间我将讲讲Guice的一些高级应用,还有 Robo Guice的使用。
本文参考链接
http://code.google.com/p/google-guice/
http://www.javabeat.net/2007/08/introduction-to-google-guice/
/**********************************************************
* Author: Canice Hu
* QQ : 540678976
* 版权归本人所有,转载请声明出处
**********************************************************/