SpringBoot上传下载文件及在线预览
今天大概就说说如何使用SpringBoot进行上传和下载以及在线预览文件
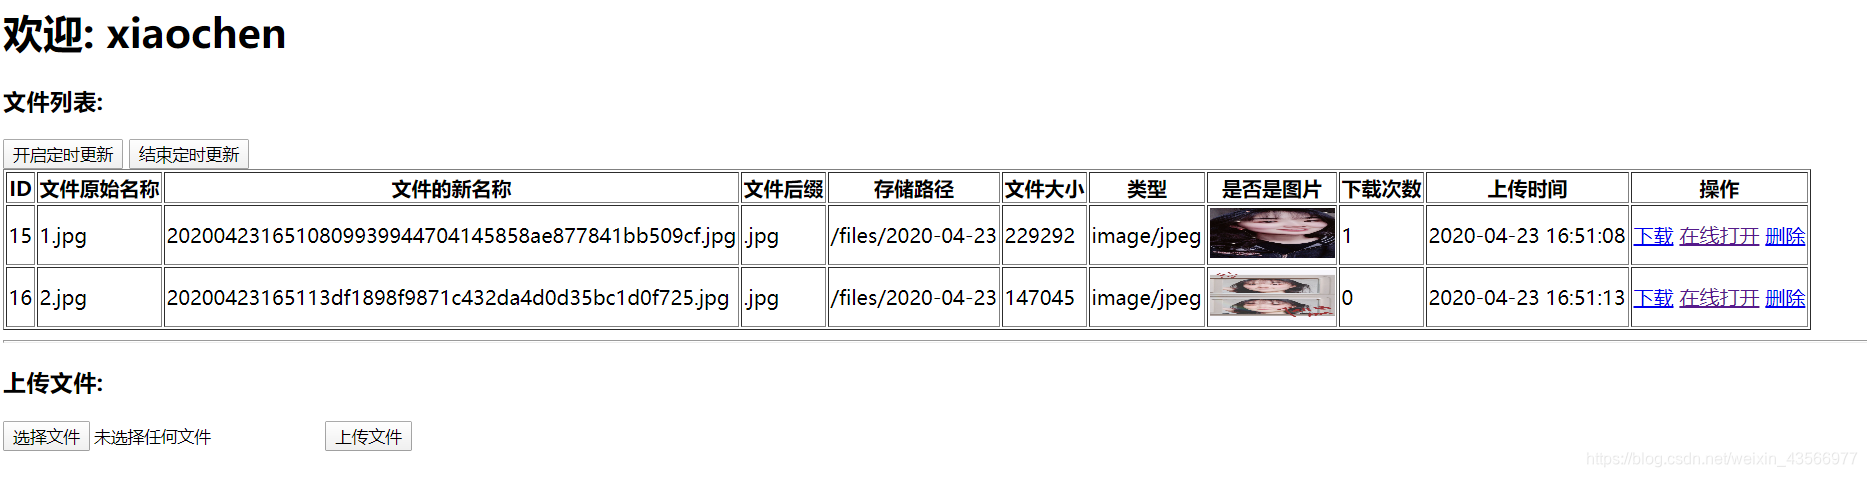
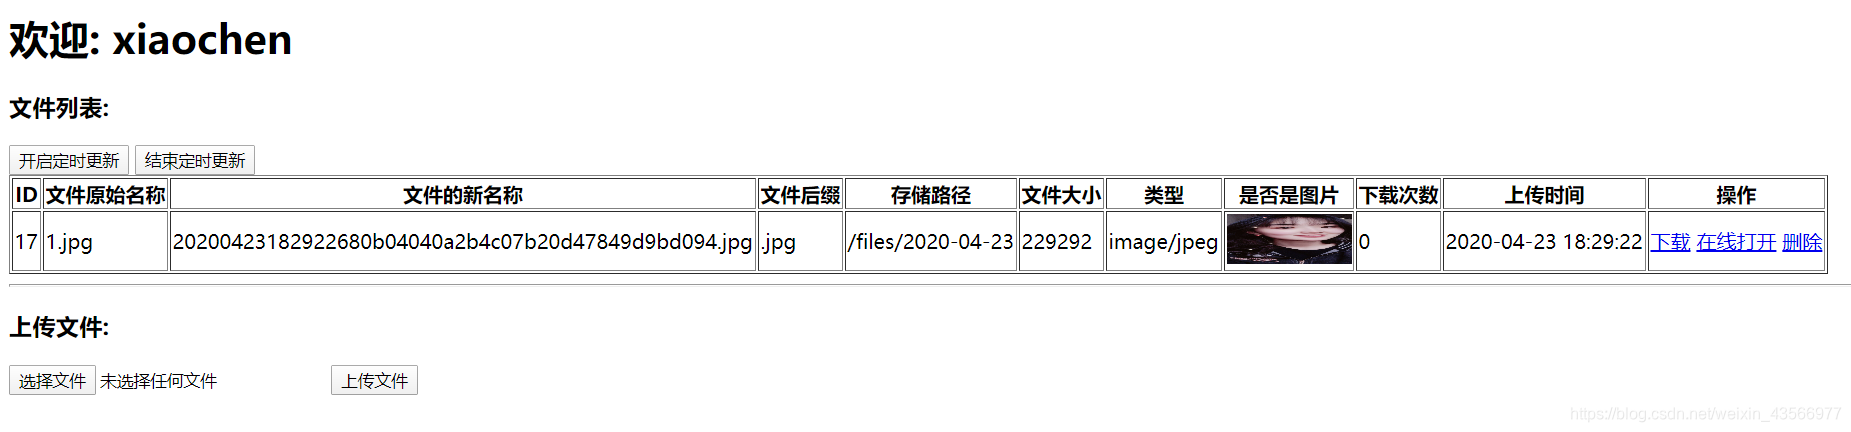
本篇主要介绍上传下载的功能,对于界面就简单一点,大致如下:
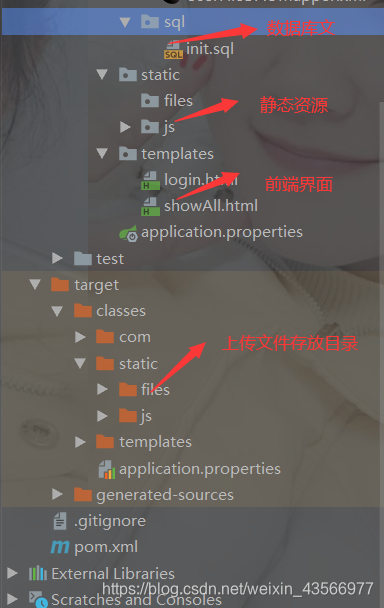
一、老规矩还是先看看小项目的目录结构:

二、添加对应的pom依赖
<dependencies>
        <dependency>
            <groupId>org.springframework.boot</groupId>
            <artifactId>spring-boot-starter-thymeleaf</artifactId>
        </dependency>
        <dependency>
            <groupId>org.springframework.boot</groupId>
            <artifactId>spring-boot-starter-web</artifactId>
        </dependency>
        <dependency>
            <groupId>org.mybatis.spring.boot</groupId>
            <artifactId>mybatis-spring-boot-starter</artifactId>
            <version>2.1.1</version>
        </dependency>

        <dependency>
            <groupId>org.springframework.boot</groupId>
            <artifactId>spring-boot-devtools</artifactId>
            <scope>runtime</scope>
            <optional>true</optional>
        </dependency>
        <dependency>
            <groupId>mysql</groupId>
            <artifactId>mysql-connector-java</artifactId>
            <version>5.1.47</version>
        </dependency>
        <dependency>
            <groupId>org.projectlombok</groupId>
            <artifactId>lombok</artifactId>
            <version>1.18.12</version>
        </dependency>
        <dependency>
            <groupId>com.alibaba</groupId>
            <artifactId>druid</artifactId>
            <version>1.1.21</version>
        </dependency>

        <dependency>
            <groupId>commons-fileupload</groupId>
            <artifactId>commons-fileupload</artifactId>
            <version>1.3.3</version>
        </dependency>
三、创建相应的配置
spring.application.name=files
server.port=8080
server.servlet.context-path=/files

spring.thymeleaf.cache=false
spring.thymeleaf.suffix=.html
spring.thymeleaf.encoding=UTF-8
spring.thymeleaf.prefix=classpath:/templates/
spring.resources.static-locations=classpath:/templates/,classpath:/static/,file:${upload.dir}


spring.datasource.type=com.alibaba.druid.pool.DruidDataSource
spring.datasource.driver-class-name=com.mysql.jdbc.Driver
spring.datasource.url=jdbc:mysql://localhost:3306/files?characterEncoding=UTF-8
spring.datasource.username=root
spring.datasource.password=root

mybatis.mapper-locations=classpath:/com/baizhi/mapper/*.xml
mybatis.type-aliases-package=com.baizhi.entity

#控制台进行打印日志
logging.level.root=info
logging.level.com.baizhi.dao=debug

#上传和下载文件的路径
upload.dir=D:/idea_project/java/files/target/classes/static
四、先准备登陆界面的工作
1、创建实体类
@Data
@AllArgsConstructor
@NoArgsConstructor
@ToString
@Accessors(chain=true)
public class User {
    private Integer id;
    private String username;
    private String password;

}
2、创建对应的dao层
public interface UserDAO {

    User login(User user);
}
3、创建对应的mapper映射文件
<!DOCTYPE mapper PUBLIC "-//mybatis.org//DTD Mapper 3.0//EN" "http://mybatis.org/dtd/mybatis-3-mapper.dtd">
<mapper namespace="com.baizhi.dao.UserDAO">

    <!--login-->
    <select id="login" parameterType="User" resultType="com.baizhi.entity.User">
        select id,username,password
        from t_user
        where username=#{username}
        and password = #{password}
    </select>

</mapper>
4、创建业务层接口及实现类
public interface UserService {

    User login(User user);
}
@Service
@Transactional
public class UserServciceImpl  implements  UserService{

    @Autowired
    private UserDAO userDAO;

    @Override
    @Transactional(propagation = Propagation.SUPPORTS)
    public User login(User user) {
        return userDAO.login(user);
    }
}
5、创建控制器
@Controller
@RequestMapping("user")
@Slf4j
public class UserController {
    @Autowired
    private UserService userService;

    /**
     * 登录方法
     */
    @PostMapping("login")
    public String login(User user, HttpSession session){
        User userDB = userService.login(user);
        if(userDB!=null){
            session.setAttribute("user",userDB);
            return "redirect:/file/showAll";
        }else{
            return "redirect:/index";
        }
    }

}
6、创建登陆界面
<!DOCTYPE html>
<html lang="en" xmlns:th="http://www.thymeleaf.org">
<head>
    <meta charset="UTF-8">
    <title>用户登录</title>
</head>
<body>

<h1>欢迎访问用户文件管理系统</h1>

<form th:action="@{/user/login}" method="post">
    username: <input type="text" name="username"/> <br>
    password: <input type="text" name="password"/> <br>
    <input type="submit" value="登录">
</form>

</body>
</html>
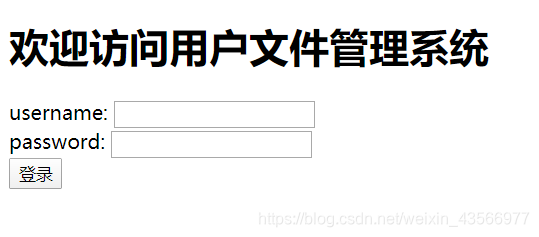
7、查看运行后对应的界面
五、进行主界面的操作
1、创建实体类
@Data
@AllArgsConstructor
@NoArgsConstructor
@ToString
@Accessors(chain=true)
public class UserFile {
    private Integer id;
    private String oldFileName;
    private String newFileName;
    private String ext;
    private String path;
    private String size;
    private String type;
    private String isImg;
    private Integer downcounts;
    private Date uploadTime;
    private Integer userId; //用户外键
}
2、创建对应的dao层
public interface UserFileDAO {

    //根据登录用户id获取用户的文件列表
    List<UserFile> findByUserId(Integer id);

    //保存用户的文件记录
    void save(UserFile userFile);

    //根据文件id获取文件信息
    UserFile findById(String id);

    //根据id更新下载次数
    void update(UserFile userFile);

    //根据id删除记录
    void delete(String id);
}
3、创建dao层对应的mapper映射文件
<!DOCTYPE mapper PUBLIC "-//mybatis.org//DTD Mapper 3.0//EN" "http://mybatis.org/dtd/mybatis-3-mapper.dtd">
<mapper namespace="com.baizhi.dao.UserFileDAO">

    <!--根据用户id查询当前用户的文件信息-->
    <select id="findByUserId" parameterType="Integer" resultType="com.baizhi.entity.UserFile">
        select  id,oldFileName,newFileName,ext,path,size,type,isImg,downcounts,uploadTime,userId
        from t_files
        where userId=#{id}
    </select>


    <!--保存文件信息-->
    <insert id="save" parameterType="com.baizhi.entity.UserFile" useGeneratedKeys="true" keyProperty="id">
      insert into t_files
        values (#{id},#{oldFileName},#{newFileName},
                #{ext},	#{path},#{size},#{type},
                #{isImg},#{downcounts},	#{uploadTime},#{userId})
    </insert>


    <!--根据id获取文件信息-->
    <select id="findById" parameterType="String" resultType="com.baizhi.entity.UserFile">
        select id,oldFileName,newFileName,ext,path,size,type,isImg,downcounts,uploadTime,userId
        from t_files
        where id = #{id}
    </select>

    <!--更新下载次数-->
    <update id="update" parameterType="com.baizhi.entity.UserFile" >
        update t_files set downcounts=#{downcounts} where id=#{id}
    </update>

    <!--根据id删除记录-->
    <delete id="delete" parameterType="String">
        delete from t_files where id=#{id}
    </delete>

</mapper>
4、创建对应的业务层接口及实现类
public interface UserFileService {

    List<UserFile> findByUserId(Integer id);

    void save(UserFile userFile);

    UserFile findById(String id);

    void update(UserFile userFile);

    void delete(String id);
}
@Service
@Transactional
public class UserFileServiceImpl implements  UserFileService {

    @Autowired
    private UserFileDAO userFileDAO;

    @Override
    public List<UserFile> findByUserId(Integer id) {
        return userFileDAO.findByUserId(id);
    }

    @Override
    public void delete(String id) {
        userFileDAO.delete(id);
    }

    @Override
    public void update(UserFile userFile) {
        userFileDAO.update(userFile);
    }

    @Override
    public UserFile findById(String id) {
        return userFileDAO.findById(id);
    }

    @Override
    public void save(UserFile userFile) {
        //userFile.setIsImg()?  //是否是图片 解决方案: 当类型中含有image时说明当前类型一定为图片类型
        String isImg = userFile.getType().startsWith("image")?"是":"否";
        userFile.setIsImg(isImg);
        userFile.setDowncounts(0);
        userFile.setUploadTime(new Date());
        userFileDAO.save(userFile);
    }
}
5、创建控制器(重点)
- 上传文件(且保存到i数据库中)
@PostMapping("upload")
    public String upload(MultipartFile aaa, HttpSession session) throws IOException {
        //获取上传文件用户id
        User user = (User) session.getAttribute("user");
        //获取文件原始名称
        String oldFileName = aaa.getOriginalFilename();
        //获取文件后缀
        String extension = "." + FilenameUtils.getExtension(aaa.getOriginalFilename());
        //生成新的文件名称
        String newFileName = new SimpleDateFormat("yyyyMMddHHmmss").format(new Date()) + UUID.randomUUID().toString().replace("-", "") + extension;
        //文件大小
        Long size = aaa.getSize();
        //文件类型
        String type = aaa.getContentType();
        //处理根据日期生成目录
        //String realPath = ResourceUtils.getURL("classpath:").getPath() + "/static/files";
        String dateFormat = new SimpleDateFormat("yyyy-MM-dd").format(new Date());
        String dateDirPath = uploadPath + "/files/" + dateFormat;
        File dateDir = new File(dateDirPath);
        if (!dateDir.exists()) dateDir.mkdirs();
        //处理文件上传
        aaa.transferTo(new File(dateDir, newFileName));
        //将文件信息放入数据库保存
        UserFile userFile = new UserFile();
        userFile.setOldFileName(oldFileName).setNewFileName(newFileName).setExt(extension).setSize(String.valueOf(size))
                .setType(type).setPath("/files/" + dateFormat).setUserId(user.getId());
        userFileService.save(userFile);
        return "redirect:/file/showAll";
    }
- 下载文件(在线预览)
@GetMapping("download")
    public void download(String openStyle, String id, HttpServletResponse response) throws IOException {
        //获取打开方式
        openStyle = openStyle == null ? "attachment" : openStyle;
        //获取文件信息
        UserFile userFile = userFileService.findById(id);
        //点击下载链接更新下载次数
        if ("attachment".equals(openStyle)) {
            userFile.setDowncounts(userFile.getDowncounts() + 1);
            userFileService.update(userFile);
        }
        //根据文件信息中文件名字 和 文件存储路径获取文件输入流
        String realpath = ResourceUtils.getURL("classpath:").getPath() + "/static" + userFile.getPath();
        //获取文件输入流
        FileInputStream is = new FileInputStream(new File(realpath, userFile.getNewFileName()));
        //附件下载
        response.setHeader("content-disposition", openStyle + ";fileName=" + URLEncoder.encode(userFile.getOldFileName(), "UTF-8"));
        //获取响应输出流
        ServletOutputStream os = response.getOutputStream();
        //文件拷贝
        IOUtils.copy(is, os);
        IOUtils.closeQuietly(is);
        IOUtils.closeQuietly(os);
    }
- 展示所有文件信息
@GetMapping("showAll")
    public String findAll(HttpSession session, Model model) {
        //在登录的session中获取用户的id
        User user = (User) session.getAttribute("user");

        //根据用户id查询有的文件信息
        List<UserFile> userFiles = userFileService.findByUserId(user.getId());
        //存入作用域中
        model.addAttribute("files", userFiles);
        return "showAll";
    }
- 删除文件(及数据库中的)
@GetMapping("delete")
    public String delete(String id) throws FileNotFoundException {

        //根据id查询信息
        UserFile userFile = userFileService.findById(id);

        //删除文件
        String realPath = ResourceUtils.getURL("classpath:").getPath() + "/static" + userFile.getPath();
        File file = new File(realPath, userFile.getNewFileName());
        if(file.exists())file.delete();//立即删除

        //删除数据库中记录
        userFileService.delete(id);

        return "redirect:/file/showAll";
    }
- 返回当前的文件列表(json格式数据)
@GetMapping("findAllJSON")
    @ResponseBody
    public List<UserFile> findAllJSON(HttpSession session, Model model) {
        //在登录的session中获取用户的id
        User user = (User) session.getAttribute("user");
        //根据用户id查询有的文件信息
        List<UserFile> userFiles = userFileService.findByUserId(user.getId());
        return userFiles;
    }
6、创建对应的界面
<!DOCTYPE html>
<html lang="en" xmlns:th="http://www.thymeleaf.org">
<head>
    <meta charset="UTF-8">
    <title>用户文件列表页面</title>
    <script th:src="@{/js/jquery-3.4.1.min.js}"></script>
    <script>
        $(function(){


            var time;
            $("#start").click(function(){
                console.log("开启定时更新.........");
                time = setInterval(function () {
                    $.get("[[@{/file/findAllJSON}]]", function (res) {
                        //遍历
                        $.each(res, function (index, file) {
                            $("#" + file.id).text(file.downcounts);
                        })
                    });
                }, 3000);
            });

            $("#stop").click(function () {
                console.log("关闭定时更新");
                clearInterval(time);
            });

        });
    </script>
</head>
<body>

<h1>欢迎: <span th:if="${session.user!=null}" th:text="${session.user.username}"/></h1>
<h3>文件列表:</h3>
<button id="start">开启定时更新</button>
<button id="stop">结束定时更新</button>
<table border="1px">
    <tr>
        <th>ID</th>
        <th>文件原始名称</th>
        <th>文件的新名称</th>
        <th>文件后缀</th>
        <th>存储路径</th>
        <th>文件大小</th>
        <th>类型</th>
        <th>是否是图片</th>
        <th>下载次数</th>
        <th>上传时间</th>
        <th>操作</th>
    </tr>
    <tr th:each="file,fileStat:${files}">
        <td><span th:text="${file.id}"/></td>
        <td><span th:text="${file.oldFileName}"/></td>
        <td><span th:text="${file.newFileName}"/></td>
        <td><span th:text="${file.ext}"/></td>
        <td><span th:text="${file.path}"/></td>
        <td><span th:text="${file.size}"/></td>
        <td><span th:text="${file.type}"/></td>
        <td>
            <img th:if="${file.isImg}=='是'" style=" 100px;height: 40px;" th:src="${#servletContext.contextPath}+${file.path}+'/'+${file.newFileName}" alt="">
            <span th:if="${file.isImg}!='是'" th:text="${file.isImg}"/>
        </td>
        <td th:id="${file.id}"><span th:text="${file.downcounts}"/></td>
        <td><span th:text="${#dates.format(file.uploadTime,'yyyy-MM-dd HH:mm:ss')}"/></td>
        <td>
            <a th:href="@{/file/download(id=${file.id})}">下载</a>
            <a th:href="@{/file/download(id=${file.id},openStyle='inline')}">在线打开</a>
            <a th:href="@{/file/delete(id=${file.id})}">删除</a>
        </td>
    </tr>
</table>
<hr>

<h3>上传文件:</h3>

<form th:action="@{/file/upload}" method="post" enctype="multipart/form-data">
    <input type="file" name="aaa"> <input type="submit" value="上传文件">
</form>

</body>
</html>
六、创建拦截器
public class LoginInterceptor  implements HandlerInterceptor {

    @Override
    public boolean preHandle(HttpServletRequest request, HttpServletResponse response, Object handler) throws Exception {
        HttpSession session = request.getSession();
        Object user = session.getAttribute("user");
        if(user!=null) return true;
        response.sendRedirect(request.getContextPath()+"/index");
        return false;
    }
}
七、创建过滤器
@Configuration
public class InterceptorConfig extends WebMvcConfigurationSupport {

    @Value("${upload.dir}")
    private String upload;

    @Override
    protected void addInterceptors(InterceptorRegistry registry) {
        registry.addInterceptor(new LoginInterceptor())
                .addPathPatterns("/file/**")
                .excludePathPatterns("/css/**")
                .excludePathPatterns("/js/**");//放行静态资源 静态资源被认为是一个控制器请求
    }

    @Override
    protected void addResourceHandlers(ResourceHandlerRegistry registry) {
        registry.addResourceHandler("/**") //代表以什么样的请求路径访问静态资源
                .addResourceLocations("classpath:/static/")
                .addResourceLocations("classpath:/templates/")
                .addResourceLocations("file:"+upload);//本地资源路径必须放在最上面

    }
}
八、进行测试
-
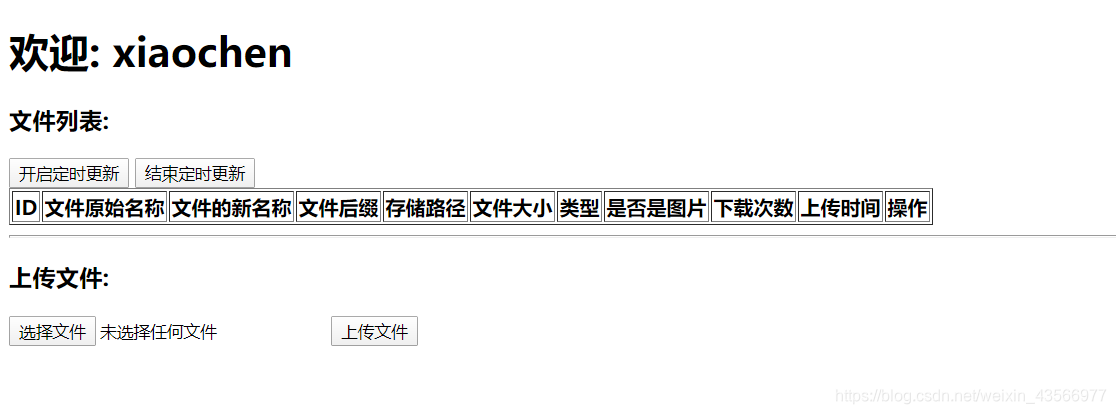
初始化
-
上传后
-
下载

-
在线预览

-
删除
变为初始化的样子
有需要源码的可以联系我!