Ansible概述
本次实验环境
关闭防火墙和slinux
systemctl stop firewalld
iptables -F
setenforce 0
所有机器修改hostname和hosts文件
[root@ansible ~]# hostname ansible
[root@ansible ~]# bash
[root@client1 ~]# hostname client1^C
[root@client1 ~]# bash^C
[root@client2 ~]# hostname client2^C
[root@client2 ~]# bash^C
hosts文件
192.168.36.128 ansible
192.168.36.130 client1
192.168.36.129 client2
ansible server端安装
安装:Ansible
下载阿里云镜像
wget http://mirrors.aliyun.com/repo/Centos-7.repo
把镜像放入repo源
yum clean all
yum -y install ansible
ansible --version
ansible 通过ssh协议来对设备管理,需要免交互,免交互的方式有几种。
1.通过ssh-keygen 密钥对方式
创建密钥对
[root@ansible ~]# ssh-keygen -t rsa -P "" -f .ssh/id_rsa
查看
[root@ansible ~]# ls .ssh/
id_rsa id_rsa.pub known_hosts
发送公钥
[root@ansible ~]# ssh-copy-id root@192.168.36.129
[root@ansible ~]# ssh-copy-id root@192.168.36.130
检查是否无密码登录client
[root@ansible ~]# ssh 192.168.36.130
Last login: Sat Oct 26 11:26:47 2019 from 192.168.36.128
[root@client1 ~]#
Ansible配置
修改配置文件
[root@ansible ~]# vim /etc/ansible/hosts
在文件最低端加入:这个是定义组,可以用组名crushlinux操作client
[crushlinux]
192.168.36.130
192.168.36.129
[root@ansible ~]# ansible crushlinux -m ping 测试ansible连接client
[root@ansible ~]# ansible crushlinux -a "df -h" //指定组,-a 指定执行的命令
基于sshpass 分发密钥
删除两台client的公钥
[root@client1 ~]# rm -rf .ssh/authorized_keys
[root@client2 ~]# rm -rf .ssh/authorized_keys
现在需要密码登录
[root@ansible ~]# ssh root@192.168.36.130
root@192.168.36.130's password:
然后拿sshpass命令登录:可以不输入密码登录了
[root@ansible ~]# sshpass -p root ssh root@192.168.36.130
Last login: Sat Oct 26 11:35:25 2019 from 192.168.36.128
[root@client1 ~]#
然后再发公钥过去:需要密码
[root@ansible ~]# ssh-copy-id root@192.168.36.130
root@192.168.36.130 password:
使用sshpass发送公钥过去,就不用密码。
[root@ansible ~]# sshpass -p root ssh-copy-id root@192.168.36.130
/usr/bin/ssh-copy-id: INFO: Source of key(s) to be installed: "/root/.ssh/id_rsa.pub"
第一次连接对方主机,需要yes,这个sshpass不能解决。
所以需要以下命令加上-o ... 然后就不用输入yes
[root@ansible ~]# sshpass -p root ssh -o StrictHostKeyChecking=no root@192.168.36.130
Last login: Sat Oct 26 11:45:39 2019 from 192.168.36.128
[root@client1 ~]#
或者去ansible 主机 的配置文件修改
把以下行改为no就行
[root@ansible ~]# vim /etc/ssh/ssh_config
到第35行:StrictHostKeyChecking no
然后直接能发送过去
[root@ansible ~]# vim /etc/ssh/ssh_config
[root@ansible ~]# ssh-copy-id root@192.168.36.129
/usr/bin/ssh-copy-id: INFO: Source of key(s) to be installed: "/root/.ssh/id_rsa.pub"
给配置文件加入 nokey组以及ip
[root@ansible ~]# vim /etc/ansible/hosts
[nokey]
client2 ansible_ssh_host=192.168.36.129 ansible_ssh_port=22 ansible_ssh_user=root ansible_ssh_pass=root
[root@ansible ~]# ansible nokey -m ping //然后用ansible服务的命令连接nokey组内的ip
client2 | SUCCESS => {
"changed": false,
"ping": "pong"
}
参数:-i: 指定ansible的配置文件 crushlinux:hosts文件定义的机器组
-m:指定的模块 -a:要执行的命令
[root@ansible ~]# ansible -i /etc/ansible/hosts crushlinux -m command -a "free -m"
只指定一台主机执行命令
[root@ansible ~]# ansible -i /etc/ansible/hosts crushlinux -m command -a "free -m" --limit 192.168.36.130
指定一个执行
[root@ansible ~]# ansible 192.168.36.130 -a "free -m"
[root@ansible ~]# ansible 192.168.36.* -a "free -m" //所有ip执行
[root@ansible ~]# ansible all -m ping //所有组
[root@ansible ~]# ansible client1:client2 -m ping //指定两个组
[root@ansible ~]# ansible client:!client1 -m ping //除了client1以外其他都应用
[root@ansible ~]# ansible all -f 5 -m ping //-f 指定并发线程
[root@ansible ~]# ansible crushlinux --list //查看组ip多少
Ansible模块:
1.command模块
command 模块在远程主机执行命令,不支持管道,重定向等shell的特性,常用参数如下
1. chdir:在远程主机上运行命令前要提前进入的目录
2. creates: 在命令运行时创建一个文件,如果文件已经存在,则不会创建任务
3. removes:在命令运行时移除一个文件,如果文件不存在,则不会执行移除任务
4. executeble : 指明运行命令的shell程序
ansible操作:
ansible all -m command -a "chdir=/home ls ./" //指定ansible 配置的所有主机,调用command模块,用chdir参数到home目录下面,再执行ls ./
2.shll 模块 :通过python调用实现
[root@ansible ~]# ansible crushlinux -m shell -a 'echo "crushlinux" > /tmp/test.txt' //指定crushlinux组,指定shell模块,执行命令。
[root@ansible /]# ansible crushlinux -m shell -a 'ifconfig ens33 | awk "/ether/{print $2}"' //管道查看mac地址
3.raw 模块:通过ssh实现,不经过python
[root@ansible /]# ansible all -m raw -a 'yum clean all' //把所有主机调用 raw模块,清除yum缓存
4.copy模块
copy模块用于复制指定主机文件到远程主机的指定位置,常见参数如下
1. dest : 指出复制文件的目标目录位置,使用绝对路径,如果源是目录,指目录也要是目录,如果目标文件存在则覆盖
2.src: 指出源文件的路径,可以使用相对路径或绝对路径,支持直接指定目录,如果源是目录则目标也要是目录
3. mode : 指出复制时,目标文件的权限
4.owner:指出复制时,目标文件的属主
5.group:指出复制时,目标文件的属组
6.content: 指出复制到目标主机上的内容,不能与src一起使用,相当于复制 content指明的数据到目标文件中
特别提示:
参数:backup=yes ===>意思是,如果目标路径下,有与我同名但不能内容的文件时,在覆盖前,对目标文件先进行备份
[root@ansible /]# ansible crushlinux -m copy -a "src=/etc/hosts dest=/tmp/ mode=777 owner=root group=root" // 将crushlinux组的文件用copy模块,把hosts文件复制到tmp目录下面 ,权限为777,属组为root
5.hostname 模块
hostname 模块用于管理远程主机上的主机名,常用参数如下
1 . name :指明主机名
[root@ansible /]# ansible 192.168.36.130 -m hostname -a "name=crushlinux" //将ip地址的hostname名称改为 crushlinux
[root@ansible /]# ansible crushlinux -m hostname -a "name=crushlinux" //也可以改为组
6.yum模块
yum 模块基于yum机制,对远程主机管理程序包,常用参数如下
1. name: 程序包的名字,可以带上版本号,如不指定版本默认安装最新版本
2. state=present | latest | absent :指明对程序包执行的操作,pressent 表示安装程序包,latest表示安装最新版本的程序包,absent表示卸载程序包
3.disablerepo:在用yum安装时禁用某个仓库的id
4.enablerrepo:在用yum安装时启动某个参考的id
5.conf_file : yum 运行时的配置文件而表示使用默认的配置文件
6. diable_gpg_check = yes | no : 是否启用完整性校验功能
[root@ansible /]# ansible crushlinux -m yum -a "name=httpd state=present" //在组ip安装httpd程序包
7.server 模块
Service 模块用来管理远程主机上的服务的模块,常见参数如下
1.name:被管理的服务名称
2.state= started | stopped | restarted:动作包含启动关闭或重启
3.enabled= yes | no : 表示是否设置该=服务开机自启动
4. runlevel:如果设定了enabled 开机自启,则要定义在哪些运行目录下自启动
[root@ansible /]# ansible crushlinux -m service -a "name=httpd state=started enabled=yes" //将crushlinux组成员ip,调用service模块,开启httpd服务,且开机自启。
8.user模块
User模块用于管理远程主机上的用户账户,常见参数如下
1.name :必选参数 账号名称
2.state=present | absent: 创建账号或者删除账号,present 表示创建,absent表示删除
3.system=yes | no :是否为系统账号
4. uid : 用户 UID
5. group: 用户的基本组
6. groups : 用户的附加组
7. shell : 默认使用的shell
8. home :用户的家目录
9. move_home=yes | no :如果设置的家目录以及存在,是否将已经存在的家目录进行移动
10. password : 用户的密码,建议使用加密后的字符串
11. comment:用户的注释信息
12. remove=yes | no :当state=absent 时,是否删除用户的家目录
[root@ansible /]# ansible crushlinux -m user -a 'name=user1 system=yes uid=502 group=root groups=sshd shell=/sbin/nologin home=/home/user1 password=user1 comment="test_user"'/sbin/nologin home=/home/user1 //创建user1用户
[root@ansible /]# ansible crushlinux -m user -a 'name=user1 state=absent remove=yes' //删除user1目录,所有信息都删除
9.script 模块
远程服务器批量执行本地shell 脚本
创建脚本:这个脚本是一个简单的安装nginx脚本
[root@ansible /]# cat /opt/auto_nginx.sh

创建发送nginx包和安装nginx程序的脚本
[root@ansible /]# vim /opt/fabu.sh

chmod +x *.sh //加执行权限
先执行:
[root@ansible /]# sh fabu.sh
然后就开始执行安装脚本
1.playbook 脚本配置与使用
在ansiblehosts文件加入以下组
[root@ansible /]# vim /etc/ansible/hosts
[test01]
192.168.36.130
[test02]
192.168.36.129
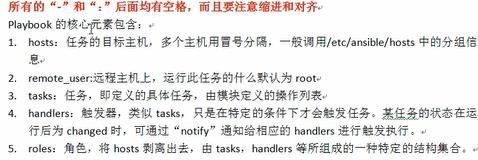
定义一个palybook剧本:注意符号右边都有空格
[root@ansible /]# vim /etc/ansible/test.yml
---
- hosts: test01 #指定要操作的组
remote_user: root #在对方机器以什么身份运行
tasks: #定义任务
- name: adduser #任务名称
user: name=user2 state=present #用user模块
register: print_result #将之前命令输出的结果保存在变量
tags: #标签 为testaaa
- testaaa
- debug: var=print_result #将变量的值作为debug输出
- name: addgroup #指定任务名称,
group: name=root system=yes #指定模块
tags: #指定标签testbbb
- testbbb
- hosts: test02
remote_user: root
tasks:
- name: xxx
copy: src=/etc/passwd dest=/home
tags:
- testccc
...
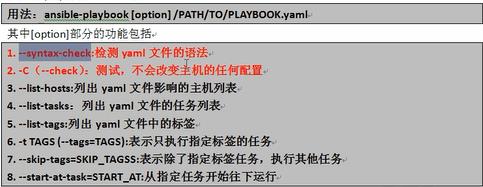
ansible-playbook命令的使用

[root@ansible /]# ansible-playbook --syntax-check /etc/ansible/test.yml
playbook: /etc/ansible/test.yml //检查yml脚本语法
[root@ansible /]# ansible-playbook -C /etc/ansible/test.yml //脚本预执行
[root@ansible /]# ansible-playbook /etc/ansible/test.yml //去掉-C就是脚本真正执行
大概是这样,没有红色就没错
[root@ansible /]# ansible-playbook --list-hosts /etc/ansible/test.yml //列出受影响的主机
[root@ansible /]# ansible-playbook --list-tasks /etc/ansible/test.yml //列出任务
2.ansible-playbook触发器
[root@ansible /]# ansible-playbook /etc/ansible/httpd.yml //执行脚本
启动htpd的脚本
---
- hosts: test02
remote_user: root
tasks:
- name: change port
command: sed -i 's/Listen 80/Listen 8080/g' /etc/httpd/conf/httpd.conf
notify: #通知器
- restart httpd
handlers: #处理通知消息的模块
- name: restart httpd
service: name=httpd state=started
3.角色.
ansible目录下执行的tree命令
├── mariadb.yml
├── roles
│ └── mariadb
│ ├── files
│ │ └── my.cnf
│ ├── handlers #触发器
│ │ └── main.yml
│ └── tasks
│ └── main.yml
/etc/ansible/roles/ 为角色集合,该目录下有自定义的各个子目录
1.mariadb:mysql角色
2.apache:httpd角色
3.nginx:nginx角色
每个角色的定义,以特定的层级目录结构进行,以mariadb角色为例
1.files:存放copy或script等模块调用文件
2.templates:存放template模块查找所需要的模板文件的目录
3.tasks:存放任务目录
4.handlers:存放template模块查找模板文件,比如mysql配置文件等模板
5.vars:变量存放的目录
6.mata:用于存放此角色元数据
7.default:默认变量存放目录,文件中定义了此角色的默认变量
yum 安装mysql
1.配置数据库角色
[root@ansible /]# mkdir -pv /etc/ansible/roles/mariadb/{files,tasks,handlers} //创建角色需要的目录
mkdir: 已创建目录 "/etc/ansible/roles/mariadb"
mkdir: 已创建目录 "/etc/ansible/roles/mariadb/files"
mkdir: 已创建目录 "/etc/ansible/roles/mariadb/tasks"
mkdir: 已创建目录 "/etc/ansible/roles/mariadb/handlers"
[root@ansible /]# vim /etc/ansible/mariadb.yml
2.[root@ansible /]# vim /etc/ansible/mariadb.yml //创建mysql角色启动脚本
先执行roles下面的mariadb角色脚本 》》 mariadb角色脚本调用其他脚本
- hosts: cushlinux #指定调用的组
remote_user: root
roles: #指定调用的角色,角色会调用它目录下面的其他脚本
- mariadb
3.[root@ansible mariadb]# vim tasks/main.yml //任务脚本
- name: install mariadb
yum: name=mariadb-server state=present
- name: move config file
shell: "[ -e /etc/my.cnf ] && mv /etc/my.cnf /etc/my.cnf.bak"
- name : provide a new config file
copy: src=my.cnf dest=/etc/my.cnf #文件必须放在创建的目录下面 /etc/ansible/roles/mariadb/files 目录。
- name: reload mariadb
shell: systemctl restart mariadb
- name: create database testdb
shell: mysql -u root -p 123456 -e "create database testdb;grant all privileges on testdb.* to 'test'@'192.168.36.%' dientified by 'test123';flush privileges;"
notify: #通知触发器
restart mariadb
4.[root@ansible mariadb]# vim handlers/main.yml //定义触发器,重启mariadb
- name: restart mariadb
service: name=mariadb state=restarted
5.[root@ansible mariadb]# cp /etc/my.cnf files/ //把my.cnf的配置文件放入files目录
[root@ansible ansible]# tree //当前mysql角色的目录结构
.mariadb.yml 会调用 roles下面的mariadb下面的三个脚本
├── ansible.cfg
├── hosts
├── httpd.retry
├── httpd.yml
├── mariadb.yml
├── roles
│ └── mariadb
│ ├── files
│ │ └── my.cnf
│ ├── handlers #触发器
│ │ └── main.yml
│ └── tasks
│ └── main.yml
└── test.yml
4.变量
4.1 自定义变量
root@ansible ~]# vim /etc/ansible/test_vars.yml //脚本
vars: #定义变量
- names: "cloud" #第一个names 变量(变量名称和值可以自定义)
age: "3" #第二个age 变量 (变量名称和值可以自定义)
tasks: # 定义任务
- name: "{{ names }}" #这个name 是定义引用哪个变量,可以引用names或者age
shell: echo "myname {{ names }},myage{{ age }}" #这个是打印变量的值,通过shell模块。
register: var_result #ansible里面定义打印变量的值
- debug: var=var_result #引用ansible的自定义变量的值
#注意变量冲突定义变量的和定义任务的变量名称注意是不是冲突。
比如:- names 和 - name 一个是定义一个是引用变量。
[root@ansible ~]# ansible-playbook /etc/ansible/test_vars.yml //执行
4.2 playbook中使用ansible 内置变量
[root@ansible ~]# ansible all -m setup | more //查看ansible内置变量
[root@ansible ~]# vim /etc/ansible/test_setupvare.yml //定义playbook脚本
- hosts: crushlinux
gather_facts: True #指定启用playbook内置变量
tasks:
- name: setup var #指定任务名称
shell: echo "ip {{ ansible_all_ipv4_addresses }} cpu {{ansible_processor_count }} date {{ ansible_bios_date }} cmdline {{ ansible_cmdline }}"
register: var_result
- debug: var=var_result
[root@ansible ~]# ansible-playbook /etc/ansible/test_setupvare.yml //执行脚本
5.Template 模板
5.1 如果使用copy模块的话,所有配置文件都是一样,不能根据实际情况修改;template模板就是根据机器情况来动态修改配置文件。
[root@ansible ~]# vim /tmp/test //定义一个查看ip的脚本
my name is {{ myname }}
my ip is {{ ansible_all_ipv4_addresses[0] }}
[root@ansible ~]# vim /etc/ansible/filevars.yml //定义一个template 模块
- hosts: crushlinux
gather_facts: True
vars:
- myname: "cloud"
tasks:
- name: template test
template: src=/tmp/test dest=/root/test //意思是把本机的 /tmp/test 脚本放在crushlinux组机器执行,并把结果放在crushlinux组机器的 /root/test 目录下面
[root@ansible ~]# ansible-playbook /etc/ansible/filevars.yml //执行脚本
crushlinux机器组结果
[root@client1 ~]# cat /root/test
my name is cloud
my ip is 192.168.36.128
[root@client2 ~]# cat /root/test
my name is cloud
my ip is 192.168.36.129
5.2 在下发配置文件里面使用判断语法
[root@ansible ~]# cat /tmp/if.j2 //定义一个脚本
内容大概是:if {{ PORT }} 引用变量有值的话,就打印引用值的ip
否则就默认打印:ip=0.0.0.0:80
{% if PORT %}
ip=0.0.0.0:{{ PORT }}
{% else %}
ip=0.0.0.0:80
{% endif %} //结束符
[root@ansible ~]# cat /etc/ansible/test_ifvars.yml //定义一个template模块脚本
- hosts: crushlinux
gather_facts: True
vars:
- PORT: 90 // 这个值是一个变量,跟/tmp/if.j2 第一个脚本引用这个值
tasks:
- name: jinja2 if test
template: src=/tmp/if.j2 dest=/root/test1
[root@ansible ~]# ansible-playbook /etc/ansible/test_ifvars.ym //执行
[root@client1 ~]# cat /root/test1 //client1结果
ip=0.0.0.0:90
[root@client2 ~]# cat /root/test1 //client2 结果
ip=0.0.0.0:90
6.基于 Playbook 部署 Nginx
6.1 创建目录结构
[root@ansible ~]# mkdir -pv/etc/ansible/roles/nginx/{files,handlers,tasks,templates,vars}
mkdir: 已创建目录 "/etc/ansible/roles/nginx"
mkdir: 已创建目录 "/etc/ansible/roles/nginx/files"
mkdir: 已创建目录 "/etc/ansible/roles/nginx/handlers"
mkdir: 已创建目录 "/etc/ansible/roles/nginx/tasks"
mkdir: 已创建目录 "/etc/ansible/roles/nginx/templates"
mkdir: 已创建目录 "/etc/ansible/roles/nginx/vars"
6.2 tree 查看目录
[root@ansible files]# tree /etc/ansible/
/etc/ansible/
├── ansible.cfg
├── filevars.retry
├── filevars.yml
├── hosts
├── nginx.yml
├── roles
│ └── nginx
│ ├── files
│ │ └── nginx-1.16.0.tar.gz
│ ├── handlers
│ │ └── main.yml
│ ├── tasks
│ │ └── main.yml
│ ├── templates
│ │ └── nginx.conf
│ └── vars
│ └── main.yml
└── test_ifvars.yml
6.3 首先定义一个nginx主启动脚本
[root@ansible ansible]# vim /etc/ansible/nginx.yml
#####
- hosts: crushlinux
gather_facts: True #开启系统内置变量
remote_user: root #以root用户身份执行
roles: #启用roles目录下面的nginx 角色
- nginx
6.4 files目录 //存储由copy 或 script 等模块调用的文件:
[root@ansible files]# ls -l /etc/ansible/roles/nginx/files/nginx-1.16.0.tar.gz
-rw-r--r--. 1 root root 1032345 4月 24 2019 /etc/ansible/roles/nginx/files/nginx-1.16.0.tar.gz
6.5 handlers //此目录中至少有一个名为main.yml 的脚本,用于定义各handlers:
其他文件需要main.yml 进行包含调用;
[root@ansible files]# vim /etc/ansible/roles/nginx/handlers/main.yml
####
- name: start nginx
raw: /usr/local/nginx/sbin/nginx
6.6 tasks 目录至少应该有一个名为main.yml的文件,用于定义各task;其他的文件需要由main.yml 进行包含调用。
[root@ansible files]# vim /etc/ansible/roles/nginx/tasks/main.yml
- name: yum install
yum: name={{ item }} state=latest
with_items:
- openssl-devel
- pcre-devel
- zlib-devel
- gcc
- gcc-c++
- make
- name: user nginx
shell: useradd -M -s /sbin/nologin nginx
- name: package
copy: src=nginx-1.16.0.tar.gz dest=/usr/src
- name: install nginx
shell: cd /usr/src ; tar xf nginx-1.16.0.tar.gz -C /usr/src ; cd /usr/src/nginx-1.16.0 ; ./configure --prefix=/usr/local/nginx --user=nginx --group=nginx --with-http_ssl_module --with-http_flv_module --with-http_stub_status_module --with-http_gzip_static_module --with-pcre && make && make install
- name: copy conf file
template: src=nginx.conf dest=/usr/local/nginx/conf/nginx.conf
notify:
start nginx
6.7 templates 存储由template 模块调用的模板文件 //配置文件配置
[root@ansible files]# vim /etc/ansible/roles/nginx/templates/nginx.conf
user nginx nginx;
worker_processes {{ ansible_processor_vcpus }};
{% if ansible_processor_vcpus == 1 %}
worker_cpu_affinity 10;
{% elif ansible_processor_vcpus == 2 %}
worker_cpu_affinity 01 10;
{% elif ansible_processor_vcpus == 4 %}
worker_cpu_affinity 0001 0010 0100 1000;
{% elif ansible_processor_vcpus == 8 %}
worker_cpu_affinity 00000001 00000010 00000100 00001000 00010000 00100000 01000000 10000000;
{% else %}
worker_cpu_affinity 0001 0010 0100 1000;
{% endif %}
error_log logs/error.log;
pid logs/nginx.pid;
events {
use epoll;
worker_connections 65535;
}
http {
include mime.types;
default_type application/octet-stream;
log_format main '$remote_addr - $remote_user [$time_local] "$request" '
'$status $body_bytes_sent "$http_referer" '
'"$http_user_agent" "$http_x_forwarded_for"';
access_log logs/access.log main;
sendfile on;
keepalive_timeout 65;
gzip on;
server {
listen {{ nginxport }};
server_name {{ server_name}};
location / {
root html;
index index.html index.htm;
}
error_page 500 502 503 504 /50x.html;
location = /50x.html {
root html;
}
}
}
6.8 vars //此目录中至少有一个名为main.yml 的文件,用于定义varia ble;其他文件需要有main.yml 进行包含调用;
[root@ansible nginx]# vim vars/main.yml //定义动态参数变量
nginxport: "80"
server_name: "www.crushlinux.com"
7.基于 Playbook 部署 Php
php角色结构图
├── nginx.yml
├── php.retry
├── php.yml
├── roles
│ ├── nginx
│ │ ├── files
│ │ │ └── nginx-1.16.0.tar.gz
│ │ ├── handlers
│ │ │ └── main.yml
│ │ ├── tasks
│ │ │ └── main.yml
│ │ ├── templates
│ │ │ └── nginx.conf
│ │ └── vars
│ │ └── main.yml
│ └── php
│ ├── files
│ │ └── php-5.6.39.tar.gz
│ ├── handlers
│ │ └── main.yml
│ ├── tasks
│ │ └── main.yml
│ ├── templates
│ │ ├── php-fpm.conf
│ │ ├── php-fpm.conf.bak
│ │ └── php.ini-production
│ └── vars
7.1 定义php启动文件
[root@ansible ansible]# vim php.yml
- hosts: crushlinux
gather_facts: True
remote_user: root
roles:
- php
7.2 files目录 //存储由copy 或 script 等模块调用的文件:
[root@ansible roles]# ls -l php/files/
总用量 18852
-rw-r--r--. 1 root root 19301205 12月 8 2018 php-5.6.39.tar.gz
7.3 定义php-fpm启动文件
[root@ansible roles]# vim php/handlers/main.yml
####
- name: start php
raw: /usr/local/sbin/php-fpm
7.4 定义php工作目录
[root@ansible roles]# vim php/tasks/main.yml
- name: yum install
yum: name={{ item }} state=latest
with_items:
- libjpeg-devel
- libpng-devel
- name: user nginx
shell: useradd -M -s /sbin/nologin php
- name: package
copy: src=php-5.6.39.tar.gz dest=/usr/src
- name: install php
shell: cd /usr/src ; tar xf php-5.6.39.tar.gz -C /usr/src ;cd /usr/src/php-5.6.39; ./configure --prefix=/usr/local/php5 --with-gd --with-zlib --with-mysql=/usr/local/mysql --with-mysqli=/usr/local/mysql/bin/mysql_config --with-config-file-path=/usr/local/php5 --enable-mbstring --enable-fpm --with-jpeg-dir=/usr/lib && make && make install
- name: copy php config
copy: src=/etc/ansible/roles/php/templates/php.ini-production dest=/usr/local/php5/php.ini
- name: shell php1
shell: ln -s /usr/local/php5/bin/* /usr/local/bin/
- name: shell php2
shell: ln -s /usr/local/php5/sbin/* /usr/local/sbin
#加载PHP加速模块
#- name: php jiasu1
# copy: src=zend-loader-php5.6-linux-x86_64_update1.tar.gz dest=/usr/src/
#
#- name: php jiasu2
# shell: cd /usr/src ; tar xf zend-loader-php5.6-linux-x86_64_update1.tar.gz -C /usr/src/ ; cd /usr/src/zend-loader-php5.6-linux-x86_64;
#- name: php cp
# copy: src=/usr/src/zend-loader-php5.6-linux-x86_64/ZendGuardLoader.so dest=/usr/local/php5/lib/php/
#
#- name: copy conf file
# template: src=php.ini dest=/usr/local/php5/php.ini
#
#
#配置nginx支持php
- name: php-fpm1
shell: cd /usr/local/php5/etc/;
- name: php-fpm2
copy: src=/etc/ansible/roles/php/templates/php-fpm.conf.bak dest=/usr/local/php5/etc/php-fpm.conf
- name: copy conf file
template: src=php-fpm.conf dest=/usr/local/php5/etc/php-fpm.conf
notify: //指定通知器 与php/handlers/main.yml 文件对应
start php
7.5 定义php配置文件目录
[root@ansible roles]# ls -l php/templates/
总用量 120
-rw-r--r--. 1 root root 23061 10月 28 20:02 php-fpm.conf
-rw-r--r--. 1 root root 23061 10月 28 20:21 php-fpm.conf.bak
-rw-r--r--. 1 root root 73685 10月 28 20:13 php.ini-production
7.6 定义php变量目录
[root@ansible roles]# ls -l php/vars/
//此目录一般在需要用到动态修改参数的使用,比如ip,根据核心数给指定的配置
