Mybatis源码分析-解析器模块
原创-转载请说明出处
1. 解析器模块的作用
- 对XPath进行封装,为mybatis-config.xml配置文件以及映射文件提供支持
- 为处理动态 SQL 语句中的占位符提供支持
2. 解析器模块parsing包

3. 解析器模块parsing包
- GenericTokenParser
- package-info.java
- ParsingException
- PropertyParser
- TokenHandler
- XNode
- XPathParser
mybati-config.xml文件
<!DOCTYPE configuration
        PUBLIC "-//mybatis.org//DTD Config 3.0//EN"
        "http://mybatis.org/dtd/mybatis-3-config.dtd">
<configuration>

    <!-- autoMappingBehavior should be set in each test case -->
    <environments default="development">
        <environment id="development">
            <transactionManager type="JDBC">
                <property name="" value=""/>
            </transactionManager>
            <dataSource type="UNPOOLED">
                <property name="driver" value="org.hsqldb.jdbcDriver"/>
                <property name="url" value="jdbc:hsqldb:mem:automapping"/>
                <property name="username" value="sa"/>
            </dataSource>
        </environment>
    </environments>

    <mappers>
        <mapper resource="org/apache/ibatis/autoconstructor/AutoConstructorMapper.xml"/>
    </mappers>

</configuration>
4. mybatis 解析mybatis-config.xml过程
4.1 分析步骤
- 打开mybatis源码项目;
- 进入单元测试目录下:org.apache.ibatis.autoconstructor.AutoConstructorTest,方法:fullyPopulatedSubject();
- 调试模式下运行测试方法fullyPopulatedSubject(),断点观察,mybatis是如何对mybatis-config.xml配置文件进行解析的。
4.2 代码过程解析

第一步:创建SqlSessionFactory的整体过程
try (Reader reader = Resources.getResourceAsReader("org/apache/ibatis/autoconstructor/mybatis-config.xml")) {
      sqlSessionFactory = new SqlSessionFactoryBuilder().build(reader);
}
上面代码中,mybatis通过提供一个Resources的工具类来加载配置文件,获取输入流。然后再通过SqlSessionFactoryBuilder的builder方法来构建SqlSessionFactory对象,其中builder方法里的实现就是对mybatis-config.xml配置文件进行解析的入口。下面的代码就是builder方法的具体实现:
1.调用builder方法
public SqlSessionFactory build(Reader reader) {
   return build(reader, null, null);
}

2.调用builder重载方法
public SqlSessionFactory build(Reader reader, String environment, Properties properties) {
    try {
      //2.1> 创建配置文件解析器
      XMLConfigBuilder parser = new XMLConfigBuilder(reader, environment, properties);
      //2.2> 调用parse方法解析配置文件,将对应的属性存入并生成Configuration对象
      return build(parser.parse());
    } catch (Exception e) {
      throw ExceptionFactory.wrapException("Error building SqlSession.", e);
    } finally {
      ErrorContext.instance().reset();
      try {
        reader.close();
      } catch (IOException e) {
        // Intentionally ignore. Prefer previous error.
      }
    }
  }

3.通过Configuration创建SqlSessionFactory
public SqlSessionFactory build(Configuration config) {
  //创建DefaultSqlSessionFactory对象
  return new DefaultSqlSessionFactory(config);
}
上面代码中展示了创建SqlSessionFactory 的整体流程,其中最重要的是2.1:创建配置文件解析器和2.2:调用parse方法解析配置文件,将对应的属性存入并生成Configuration对象
第二步:创建配置文件解析器XMLConfigBuilder
XMLConfigBuilder.class
/**
 * 构造XMLConfigBuilder
 * @param inputStream 输入流
 * @param environment environment环境
 * @param props Properties properties对象
 */
public XMLConfigBuilder(InputStream inputStream, String environment, Properties props) {
 this(new XPathParser(inputStream, true, props, new XMLMapperEntityResolver()), environment, props);
}
/**
 * 构造XMLConfigBuilder
 * @param parser XPathParser
 * @param environment environment环境
 * @param props properties对象
 */
private XMLConfigBuilder(XPathParser parser, String environment, Properties props) {
  //调用父类(BaseBuilder)构造函数,创建Configuration:会进行别名注册
  super(new Configuration());
  ErrorContext.instance().resource("SQL Mapper Configuration");
  //Configuration设置properties
  this.configuration.setVariables(props);
  this.parsed = false;
  this.environment = environment;
  this.parser = parser;
}
上面的代码就是构建XMLConfigBuilder的整体过程,该过程会构建XPathParser,XPathParser主要用来解析XML封装了Document、EntityResolver 和XPath等对象,提供了一系列的解析XML的方法。
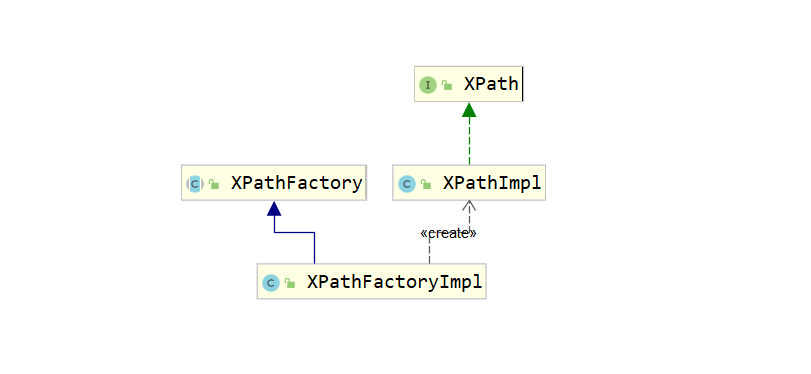
下面的代码是XPathParser构建的代码,使用到了工程模式去创建XPath对象。
XPathParser.class
/**
 * 构造 XPathParser 对象
 *
 * @param inputStream inputStream 输入流
 * @param validation 是否校验 XML
 * @param variables 变量 Properties 对象
 * @param entityResolver XML 实体解析器
 */
public XPathParser(InputStream inputStream, boolean validation, Properties variables, EntityResolver entityResolver) {
  commonConstructor(validation, variables, entityResolver);
  this.document = createDocument(new InputSource(inputStream));
}
private void commonConstructor(boolean validation, Properties variables, EntityResolver entityResolver) {
  this.validation = validation;
  this.entityResolver = entityResolver;
  this.variables = variables;
  XPathFactory factory = XPathFactory.newInstance();
  this.xpath = factory.newXPath();
}
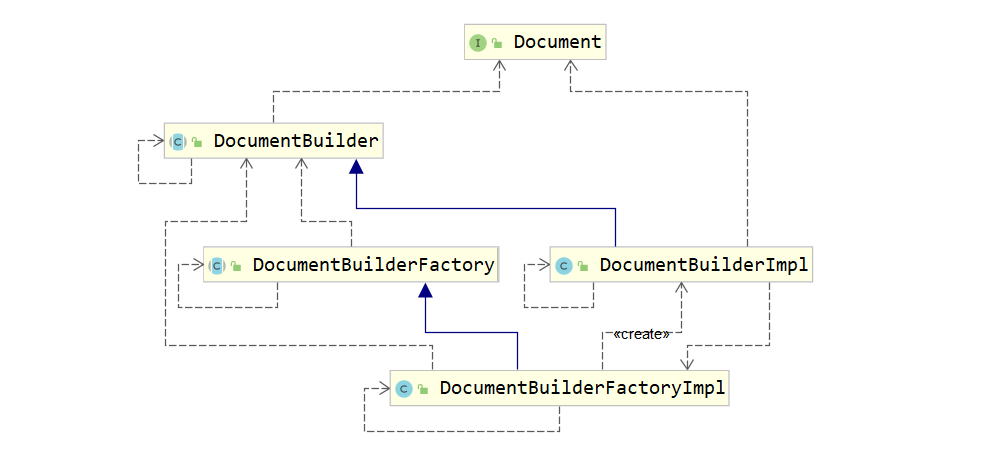
- 创建 Document 对象,Document 对象代表整个 XML 文档。这里会解析XML输入源得到Document对象。
/**
* 创建 Document 对象
*
* @param inputSource XML 的 InputSource 对象
* @return Document 对象
*/
private Document createDocument(InputSource inputSource) {
 // important: this must only be called AFTER common constructor
 try {
   // 1> 创建DocumentBuilderFactory对象
   DocumentBuilderFactory factory = DocumentBuilderFactory.newInstance();
   factory.setValidating(validation);// 设置是否检验XML

   factory.setNamespaceAware(false);
   factory.setIgnoringComments(true);
   factory.setIgnoringElementContentWhitespace(false);
   factory.setCoalescing(false);
   factory.setExpandEntityReferences(true);

   //2> 创建DocumentBuilder对象
   DocumentBuilder builder = factory.newDocumentBuilder();
   builder.setEntityResolver(entityResolver);// 设置实体解析器
   builder.setErrorHandler(new ErrorHandler() {// 实现都是空的
     @Override
     public void error(SAXParseException exception) throws SAXException {
       throw exception;
     }

     @Override
     public void fatalError(SAXParseException exception) throws SAXException {
       throw exception;
     }

     @Override
     public void warning(SAXParseException exception) throws SAXException {
     }
   });
   //3> 解析XML文件 返回Document对象
   return builder.parse(inputSource);
 } catch (Exception e) {
   throw new BuilderException("Error creating document instance.  Cause: " + e, e);
 }
}
第三步:创建配置文件解析器XMLConfigBuilder
通过XMLConfigBuilder的parse()去解析mybatis-config.xml配置文件并返回Configuration对象。
XMLConfigBuilder.class
//1> 创建配置文件解析器
XMLConfigBuilder parser = new XMLConfigBuilder(reader, environment, properties);
//2> 调用parse方法解析配置文件,将对应的属性存入并生成Configuration对象
return build(parser.parse());
/**
 * 解析mybatis-config.xml
 * @return configuration
 */
public Configuration parse() {
  if (parsed) {
    throw new BuilderException("Each XMLConfigBuilder can only be used once.");
  }
  parsed = true;
  //解析configuration节点<configuration></configuration>
  parseConfiguration(parser.evalNode("/configuration"));
  return configuration;
}
XPathParser是解析xml的核心
XPathParser.class
/**
 * 获取Document中符合xpath表达式:expression的XNODE对象
 * @param expression xpath表达式
 * @return XNode
 */
public XNode evalNode(String expression) {
  return evalNode(document, expression);
}
/**
 * 获取XNode对象
 * @param root Document xml 对象
 * @param expression xpath表达式
 * @return XNode
 */
public XNode evalNode(Object root, String expression) {
  //1> 获得Node对象
  Node node = (Node) evaluate(expression, root, XPathConstants.NODE);
  if (node == null) {
    return null;
  }
  //2> 封装成XNode对象
  return new XNode(this, node, variables);
}
/**
 * 获得指定元素或节点的值
 * 并返回指定类型的结果
 *
 * @param expression 表达式
 * @param root 指定节点
 * @param returnType 返回类型
 * @return 值
 */
private Object evaluate(String expression, Object root, QName returnType) {
  try {
    // 获取指定上下文中的 XPath 表达式并返回指定类型的结果。
    return xpath.evaluate(expression, root, returnType);
  } catch (Exception e) {
    throw new BuilderException("Error evaluating XPath.  Cause: " + e, e);
  }
}
第四步:解析mybatis-config.xml中configuration节点下配置信息
主要代码:parseConfiguration(parser.evalNode("/configuration"));
XMLConfigBuilder.class
/**
 * 解析mybatis-config.xml
 * @return configuration
 */
public Configuration parse() {
  if (parsed) {
    throw new BuilderException("Each XMLConfigBuilder can only be used once.");
  }
  parsed = true;
  //解析configuration节点<configuration></configuration>
  parseConfiguration(parser.evalNode("/configuration"));
  return configuration;
}
/**
 * 解析configuration下子节点的属性
 * @param root configuration节点
 */
private void parseConfiguration(XNode root) {
  try {
    //issue #117 read properties first
    // 1> 解析properties节点信息
    propertiesElement(root.evalNode("properties"));
    //2> 解析settings节点信息
    Properties settings = settingsAsProperties(root.evalNode("settings"));
    //2.1> 指定 VFS 的实现
    loadCustomVfs(settings);
    //2.2> 加载setting logImpl配置, 指定MyBatis 所用日志的具体实现
    loadCustomLogImpl(settings);
    //2.3> 解析并注册别名
    typeAliasesElement(root.evalNode("typeAliases"));
    //2.4 解析并加载插件到拦截器
    pluginElement(root.evalNode("plugins"));
    //2.5 解析并加载对象工厂objectFactory
    objectFactoryElement(root.evalNode("objectFactory"));
    //2.6 解析并加载objectWrapperFactory
    objectWrapperFactoryElement(root.evalNode("objectWrapperFactory"));
    //2.7 解析并加载reflectorFactory
    reflectorFactoryElement(root.evalNode("reflectorFactory"));
    //2.8设置settings属性值
    settingsElement(settings);
    // read it after objectFactory and objectWrapperFactory issue #631
    //2.9解析environments节点信息,并设置environment属性
    environmentsElement(root.evalNode("environments"));
    //2.10解析databaseIdProvider节点(数据库厂商信息)
    databaseIdProviderElement(root.evalNode("databaseIdProvider"));
    //2.11解析typeHandlers节点
    typeHandlerElement(root.evalNode("typeHandlers"));
    //2.12 解析mappers节点
    mapperElement(root.evalNode("mappers"));
  } catch (Exception e) {
    throw new BuilderException("Error parsing SQL Mapper Configuration. Cause: " + e, e);
  }
}
4.3 代码过程解析
4.3.1 解析properties节点信息
<properties resource="config.properties">
    <property name="username" value="cmj"/>
</properties>
propertiesElement(root.evalNode("properties"));
解析<properties>的整体步骤如下:
- 解析各个子节点
获取name和value属性值,存入Properties对象中 - 获取
节点的resource和url属性值,不能两个同时有值,否则报错 - 从resource或url的输入流中读取配置信息,存入Properties对象中
- 获取configuration对象中的Properties属性,存入Properties对象中
- XPathParser对象和configuration对象设置最新的Properties属性
- 注:由于解析
<properties>的时候是先解析其子节点<property>中的属性,然后再读取resource或者url中的属性,所以这回导致同名属性覆盖的问题,resource或url中的属性会覆<property>中的属性。
/**
* 解析properties节点
* Properties 是一个Hashtable
* @param context propertise节点xnode
*/
private void propertiesElement(XNode context) throws Exception {
  if (context != null) {
    //1.获取propertises下propertise属性
    Properties defaults = context.getChildrenAsProperties();
    //2> 获取resource属性
    String resource = context.getStringAttribute("resource");
    //3> 获取url属性,远程文件
    String url = context.getStringAttribute("url");
    if (resource != null && url != null) {
      throw new BuilderException("The properties element cannot specify both a URL and a resource based property file reference.  Please specify one or the other.");
    }
    if (resource != null) {
      //4> resource存在,则读取resource文件中的配置
      defaults.putAll(Resources.getResourceAsProperties(resource));
    } else if (url != null) {
      //5> url存在,则获取url文件中的配置
      defaults.putAll(Resources.getUrlAsProperties(url));
    }
    //6> 获取configuration中的Properties
    Properties vars = configuration.getVariables();
    if (vars != null) {
      //6.1> Properties的defaults加入从configuration获取的properties
      defaults.putAll(vars);
    }
    //7> XPathParser 设置Properties属性
    parser.setVariables(defaults);
    //8> configuration设置Properties属性
    configuration.setVariables(defaults);
  }
}
1.1获取<properties>子节点的属性值
/**
* 获取子节点的属性值 name 和 value
*/
public Properties getChildrenAsProperties() {
  Properties properties = new Properties();
  for (XNode child : getChildren()) {
    String name = child.getStringAttribute("name");
    String value = child.getStringAttribute("value");
    if (name != null && value != null) {
      properties.setProperty(name, value);
    }
  }
  return properties;
}
2.1获取resource或url属性值: context.getStringAttribute("resource");
/**
 * 获取指定属性的值
 * @param name 属性名称
 * @return 属性值
*/
public String getStringAttribute(String name) {
  return getStringAttribute(name, null);
}

/**
 * 获取指定属性的值
 * @param name 属性名称
 * @param def 默认值
 * @return 属性值
*/
public String getStringAttribute(String name, String def) {
  String value = attributes.getProperty(name);
  if (value == null) {
    return def;
  } else {
    return value;
  }
}
4.1读取resource文件中的配置信息:Resources.getResourceAsProperties(resource)
/**
 * Returns a resource on the classpath as a Properties object
 *
 * @param resource The resource to find
 * @return The resource
 * @throws java.io.IOException If the resource cannot be found or read
 */
public static Properties getResourceAsProperties(String resource) throws IOException {
  Properties props = new Properties();
  //1> 获取resource输入流
  try (InputStream in = getResourceAsStream(resource)) {
    //2> 加载输入流中的配置
    props.load(in);
  }
  return props;
}
5.1读取url文件的配置信息:Resources.getUrlAsProperties(url)
/**
 * Gets a URL as a Properties object
 *
 * @param urlString - the URL to get
 * @return A Properties object with the data from the URL
 * @throws java.io.IOException If the resource cannot be found or read
 */
public static Properties getUrlAsProperties(String urlString) throws IOException {
  Properties props = new Properties();
  //1> 通过URLConnection,获取url输入流
  try (InputStream in = getUrlAsStream(urlString)) {
    //2> 加载输入流中的配置
    props.load(in);
  }
  return props;
}
4.3.2 解析settings节点信息
settings中的配置比较多,具体可以看官网。

<settings>
    <setting name="cacheEnabled" value="true"/>
    <setting name="lazyLoadingEnabled" value="true"/>
    <setting name="multipleResultSetsEnabled" value="true"/>
    <setting name="useColumnLabel" value="true"/>
    <setting name="useGeneratedKeys" value="false"/>
    <setting name="autoMappingBehavior" value="PARTIAL"/>
    <setting name="autoMappingUnknownColumnBehavior" value="WARNING"/>
    <setting name="defaultExecutorType" value="SIMPLE"/>
    <setting name="defaultStatementTimeout" value="25"/>
    <setting name="defaultFetchSize" value="100"/>
    <setting name="safeRowBoundsEnabled" value="false"/>
    <setting name="mapUnderscoreToCamelCase" value="true"/>
    <setting name="localCacheScope" value="SESSION"/>
    <setting name="jdbcTypeForNull" value="OTHER"/>
    <setting name="lazyLoadTriggerMethods" value="equals,clone,hashCode,toString"/>
</settings>
settingsAsProperties(root.evalNode("settings"));
解析settings的步骤分为如下几步:
- 1.将settings下的所有子节点获取属性值,并存入Properties对象中
- 2.
loadCustomVfs(settings);获取vfsImpl配置,加载指定的vfs类 - 3.
loadCustomLogImpl(settings);获取logImpl配置,指定MyBatis 所用日志的具体实现 - 4.根据Properties配置信息,设置configuration对应的setting对应的属性值
第一步:获取settings下的所有子节点属性值,这一步比较复杂,获取<settrings>各个子节点的属性,然后接下来通过反射去校验Configuration类中是否有相应的配置属性。
/**
 * 读取settings的子节点属性
 * @param context settings节点
 * @return Properties
 */
private Properties settingsAsProperties(XNode context) {
  if (context == null) {
    return new Properties();
  }
  //1> 获取<settings>下子节点<setting>的属性值
  Properties props = context.getChildrenAsProperties();
  //2> 获取Configuration的元信息
  MetaClass metaConfig = MetaClass.forClass(Configuration.class, localReflectorFactory);
  // Check that all settings are known to the configuration class
  //3> 检查<setting>属性配置在Configuration中是否存在相应的setter方法
  for (Object key : props.keySet()) {
    if (!metaConfig.hasSetter(String.valueOf(key))) {
      throw new BuilderException("The setting " + key + " is not known.  Make sure you spelled it correctly (case sensitive).");
    }
  }
  return props;
}
1.获取子节点下的属性信息context.getChildrenAsProperties()
/**
 * 获取子节点的Properties属性 name 和 value
 */
public Properties getChildrenAsProperties() {
  Properties properties = new Properties();
  for (XNode child : getChildren()) {
    String name = child.getStringAttribute("name");
    String value = child.getStringAttribute("value");
    if (name != null && value != null) {
      properties.setProperty(name, value);
    }
  }
  return properties;
}
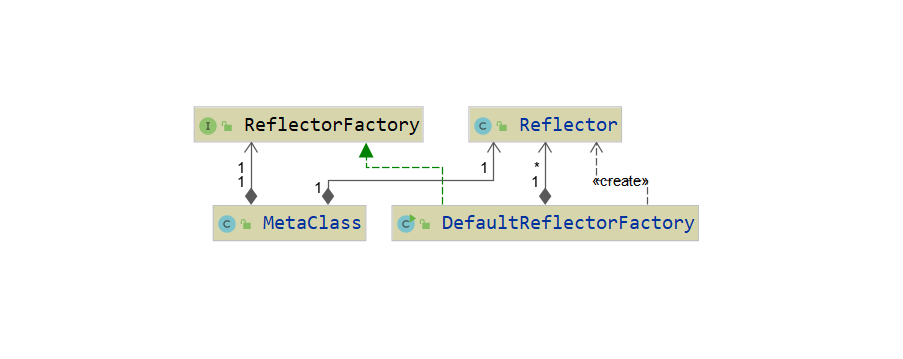
1.获取Configuration的元信息: MetaClass.forClass(Configuration.class, localReflectorFactory)
MetaClass类中含有ReflectorFactory和Reflector,这是mybatis的反射核心类,用于获取目标类的各种属性,ReflectorFactory的实现类是DefaultReflectorFactory,这里也涉及到工厂模式。MetaClass类的构造函数是私有的,所以不能通过构造函数创建,需要通过forClass方法去创建。
MetaClass.class
public static MetaClass forClass(Class<?> type, ReflectorFactory reflectorFactory) {
  return new MetaClass(type, reflectorFactory);
}

private MetaClass(Class<?> type, ReflectorFactory reflectorFactory) {
  this.reflectorFactory = reflectorFactory;
  //根据类型创建 Reflector
  this.reflector = reflectorFactory.findForClass(type);
}
DefaultReflectorFactory.class
@Override
public Reflector findForClass(Class<?> type) {
  if (classCacheEnabled) {
    // synchronized (type) removed see issue #461
    return reflectorMap.computeIfAbsent(type, Reflector::new);
  } else {
    return new Reflector(type);
  }
}
上述代码创建了Reflector 实体类。
在源码上Reflector的注释是这样的,很清晰知道它有什么用了
This class represents a cached set of class definition information that(这个类用于存放类定义的信息)
allows for easy mapping between property names and getter/setter methods.(能够方便映射属性名称和getter和setter方法)
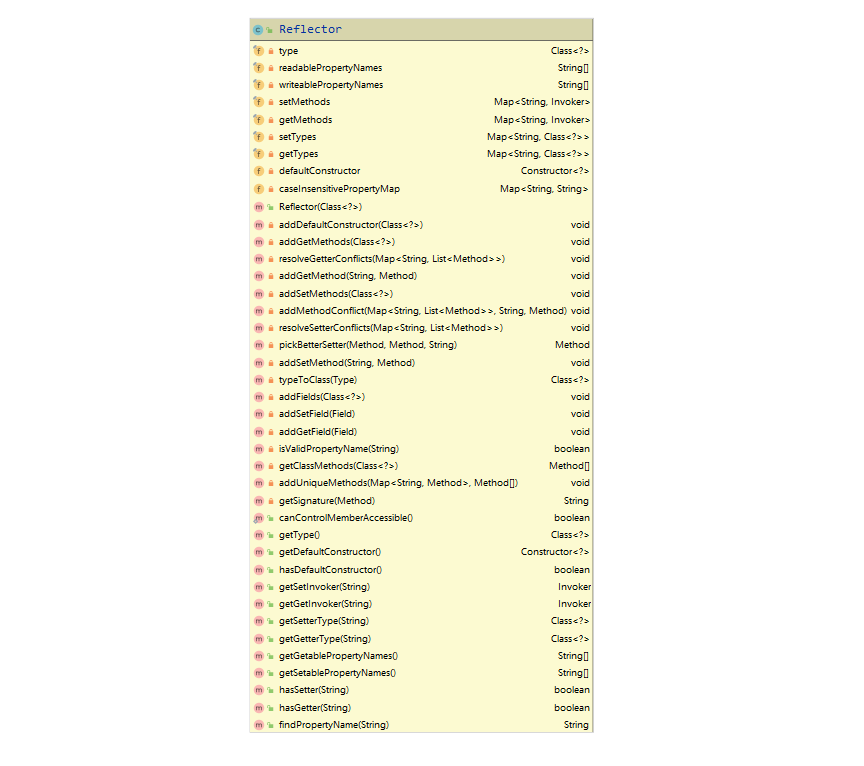
Reflector.class
Reflector 类创建解析,创建Reflector 对象时会对目标类的各个变量和gettersetter方法进行解析,并分为以下几个步骤:
- 解析目标类的无参构造函数,并赋值到defaultConstructor成员变量中
- 解析getter方法,并将解析结果存入getMethods和getTypes中
- 解析setter方法,并将解析结果存入setMethods和setTypes中
- 解析字段属性
/**
 * 初始化Reflector
 * 获取目标类的信息
 * @param clazz 目标类
 */
public Reflector(Class<?> clazz) {
  type = clazz;
  //1> 获取类的构造函数并赋值给defaultConstructor
  addDefaultConstructor(clazz);
  //2> 解析getter方法,并将解析结果存入getMethods和getTypes中
  addGetMethods(clazz);
  //3> 解析setter方法,并将解析结果存入setMethods和setTypes中
  addSetMethods(clazz);
  //4> 解析字段属性,将字段属性信息存入getMethods,setMethods,getTypes,setTypes中
  addFields(clazz);
  //getMethods中key集合(可读属性名称集合)
  readablePropertyNames = getMethods.keySet().toArray(new String[getMethods.keySet().size()]);
  //setMethods中key集合(可写属性名称集合)
  writeablePropertyNames = setMethods.keySet().toArray(new String[setMethods.keySet().size()]);
  for (String propName : readablePropertyNames) {
    caseInsensitivePropertyMap.put(propName.toUpperCase(Locale.ENGLISH), propName);
  }
  for (String propName : writeablePropertyNames) {
    caseInsensitivePropertyMap.put(propName.toUpperCase(Locale.ENGLISH), propName);
  }
}
Reflector:构造函数解析,解析目标类的无参构造函数
private void addDefaultConstructor(Class<?> clazz) {
  Constructor<?>[] consts = clazz.getDeclaredConstructors();
  for (Constructor<?> constructor : consts) {
    if (constructor.getParameterTypes().length == 0) {
        this.defaultConstructor = constructor;
    }
  }
}
Reflector:getter方法解析
getter方法解析主要分为三步
- 获取get / is 开头的无参方法
- 根据规则解决getter方法冲突(具体看下面代码解析)
 /**
  * 添加目标类的getter方法
  * @param cls 目标类
  */
private void addGetMethods(Class<?> cls) {
 Map<String, List<Method>> conflictingGetters = new HashMap<>();
 Method[] methods = getClassMethods(cls);
 for (Method method : methods) {
     //排除有参数的方法
   if (method.getParameterTypes().length > 0) {
     continue;
   }
   String name = method.getName();
   //isXXX()和getXXX()方法都获取
   if ((name.startsWith("get") && name.length() > 3)
       || (name.startsWith("is") && name.length() > 2)) {
       //获取方法名称,并首位转成小写字母。如getAge()或isAge()会获取得到age
     name = PropertyNamer.methodToProperty(name);
     //将方法存入Map<String, List<Method>> conflictingGetters,以待用于解决冲突
     addMethodConflict(conflictingGetters, name, method);
   }
 }
 //解决冲突的方法,并给setMethods和setTypes赋值
 resolveGetterConflicts(conflictingGetters);
}
解决getter方法冲突: resolveGetterConflicts(conflictingGetters),有下面的规则:
1.如果两个getter方法返回类型一样且不是boolean返回类型,则抛出异常
2.如果两个getter方法返回类型一样且是返回类型未boolean的isXXX()方法,则选取该方法
3.如果两个返回类型不一样,选取返回类型是子类的getter方法
 /**
   * 解决Getter冲突,如:isAge()和getAge()便是冲突方法
   * 只有List<Method> > 1 时才需要解决冲突
   * @param conflictingGetters 方法集合
   */
private void resolveGetterConflicts(Map<String, List<Method>> conflictingGetters) {
  for (Entry<String, List<Method>> entry : conflictingGetters.entrySet()) {
    Method winner = null;
    String propName = entry.getKey();
    for (Method candidate : entry.getValue()) {
      if (winner == null) {
        winner = candidate;
        continue;
      }
      Class<?> winnerType = winner.getReturnType();
      Class<?> candidateType = candidate.getReturnType();
      //如果两个方法返回类型一致
      if (candidateType.equals(winnerType)) {
          //如果两个方法返回类型一致,且返回类型都不是boolean类型则抛出异常
        if (!boolean.class.equals(candidateType)) {
          throw new ReflectionException(
              "Illegal overloaded getter method with ambiguous type for property "
                  + propName + " in class " + winner.getDeclaringClass()
                  + ". This breaks the JavaBeans specification and can cause unpredictable results.");
          //如果返回类型为boolean且是isXXX的方法则candidate胜出
        } else if (candidate.getName().startsWith("is")) {
          winner = candidate;
        }
        //如果winnerType是candidateType,则选取winner
      } else if (candidateType.isAssignableFrom(winnerType)) {
        //如果candidateType是winnerType的子类,则选取candidate
      } else if (winnerType.isAssignableFrom(candidateType)) {
        winner = candidate;
      } else {
        throw new ReflectionException(
            "Illegal overloaded getter method with ambiguous type for property "
                + propName + " in class " + winner.getDeclaringClass()
                + ". This breaks the JavaBeans specification and can cause unpredictable results.");
      }
    }
    //将筛选出的方法添加到getMethods并将其返回值添加到getTypes
    addGetMethod(propName, winner);
  }
}
Reflector:setter方法解析
setter方法解析主要分为三步
- 获取set 开头且只有一个入参的方法
- 根据规则解决setter方法冲突(具体看下面代码解析)
/**
 * 添加setter方法到setMethods变量中
 * @param cls 目标类
 */
private void addSetMethods(Class<?> cls) {
  Map<String, List<Method>> conflictingSetters = new HashMap<>();
  Method[] methods = getClassMethods(cls);
  for (Method method : methods) {
    String name = method.getName();
    //1> 获取只有一个参数的setXXX()方法,等到方法名XXX
    if (name.startsWith("set") && name.length() > 3) {
      if (method.getParameterTypes().length == 1) {
        name = PropertyNamer.methodToProperty(name);
        //2> 添加放到到冲突列表:conflictingSetters,待进行冲突处理
        addMethodConflict(conflictingSetters, name, method);
      }
    }
  }
  //3> 解决setter方法冲突
  resolveSetterConflicts(conflictingSetters);
}
解决setter方法冲突:resolveSetterConflicts(conflictingSetters);
1.如果setter方法入参类型与对应的getter方法返回类型一致,则选取
2.如果存在两个setter方法,判断参数类型,取参数类型是子类的方法,若参数类型不是父子类关系,则抛出异常
  /**
   * setter方法冲突筛选,将最终筛选出来的存入setMethods和setTypes变量中
   * @param conflictingSetters setter方法集合
   */
private void resolveSetterConflicts(Map<String, List<Method>> conflictingSetters) {
  for (String propName : conflictingSetters.keySet()) {
    List<Method> setters = conflictingSetters.get(propName);
    Class<?> getterType = getTypes.get(propName);
    Method match = null;
    ReflectionException exception = null;
    for (Method setter : setters) {
      //1> setter方法的参数类型与getter返回值类型一致,则当前setter方法为目标方法
      Class<?> paramType = setter.getParameterTypes()[0];
      if (paramType.equals(getterType)) {
        // should be the best match
        match = setter;
        break;
      }
      //2> 如果存在两个setter方法,判断参数类型,取参数类型是子类的方法,若参数类型不是父子类关系,则抛出异常
      if (exception == null) {
        try {
          match = pickBetterSetter(match, setter, propName);
        } catch (ReflectionException e) {
          // there could still be the 'best match'
          match = null;
          exception = e;
        }
      }
    }
    if (match == null) {
      throw exception;
    } else {
    //3> 排除冲突后的setter方法存入setMethods
      addSetMethod(propName, match);
    }
  }
}
pickBetterSetter(match, setter, propName) 方法用于比较两个setter方法,筛选入参是子类的setter方法
/**
 * 参数类型比较,返回子类
 * 如果类型不是父子类关系,直接报错
 * @param setter1 方法1
 * @param setter2 方法2
 * @param property property
 * @return 返回是子类的方法
 */
private Method pickBetterSetter(Method setter1, Method setter2, String property) {
  if (setter1 == null) {
    return setter2;
  }
  Class<?> paramType1 = setter1.getParameterTypes()[0];
  Class<?> paramType2 = setter2.getParameterTypes()[0];
  //paramType2是paramType1的子类
  if (paramType1.isAssignableFrom(paramType2)) {
    return setter2;
  //paramType1是paramType2的子类
  } else if (paramType2.isAssignableFrom(paramType1)) {
    return setter1;
  }
  throw new ReflectionException("Ambiguous setters defined for property '" + property + "' in class '"
      + setter2.getDeclaringClass() + "' with types '" + paramType1.getName() + "' and '"
      + paramType2.getName() + "'.");
}
4.3.3 解析typeAliases节点信息
用于定义类的别名,可以在xml中的resultType中直接使用别名。
 <typeAliases>
     <package name="com.chen.mybatis.demo2.pojo"/>
     <typeAlias type="com.chen.mybatis.demo2.pojo.BlogTypealiase" alias="blogTypealiase"/>
 </typeAliases>
typeAliasesElement(root.evalNode("typeAliases"));
解析别名,并对别名进行注册的步骤如下
1.解析package节点,将包下所有的类注册别名。
2.解析typeAlias节点,根据type和alias信息注册别名。
方法typeAliasesElement(XNode parent)解析,对package和typeAlias节点信息分别进行解析并注册别名,别名若存在则抛出异常
别名的规则:
1.获取package节点的包下的所有类进行注册
2.获取typeAlias节点type和alias信息注册别名
/**
 * 解析别名typeAliases
 */
private void typeAliasesElement(XNode parent) {
  if (parent != null) {
    for (XNode child : parent.getChildren()) {
      //1> 如果是package节点,则将包下的所有类注册到别名中
      if ("package".equals(child.getName())) {
        String typeAliasPackage = child.getStringAttribute("name");
        configuration.getTypeAliasRegistry().registerAliases(typeAliasPackage);
      } else {
      //2> 如果是typeAlias节点,则将每一个typeAlias节点的信息注册到别名中
        String alias = child.getStringAttribute("alias");
        String type = child.getStringAttribute("type");
        try {
          //2.1> 根据typeAlias节点的type和alias信息注册别名
          Class<?> clazz = Resources.classForName(type);
          if (alias == null) {
            typeAliasRegistry.registerAlias(clazz);
          } else {
            typeAliasRegistry.registerAlias(alias, clazz);
          }
        } catch (ClassNotFoundException e) {
          throw new BuilderException("Error registering typeAlias for '" + alias + "'. Cause: " + e, e);
        }
      }
    }
  }
}
- 4.3.3.1 注册package节点下的包下的所有类的别名
configuration.getTypeAliasRegistry().registerAliases(typeAliasPackage)
public void registerAliases(String packageName){
  registerAliases(packageName, Object.class);
}

/**
 * 注册包下类的别名
 * @param packageName 报名
 * @param superType 父类
 */
public void registerAliases(String packageName, Class<?> superType){
  //获取包下是Object.class的子类的类
  ResolverUtil<Class<?>> resolverUtil = new ResolverUtil<>();
  resolverUtil.find(new ResolverUtil.IsA(superType), packageName);
  Set<Class<? extends Class<?>>> typeSet = resolverUtil.getClasses();
  for(Class<?> type : typeSet){
    // Ignore inner classes and interfaces (including package-info.java)
    // Skip also inner classes. See issue #6
    //如果不是匿名内部类,接口类,称员类
    if (!type.isAnonymousClass() && !type.isInterface() && !type.isMemberClass()) {
      registerAlias(type);
    }
  }
}
registerAlias(Class type)和registerAlias(String alias, Class value)是注册别名的主要方法。
第一步获取类名作为别名
第二步如果类中存在注解@Alias则获取注解的value作为别名
第三步将别名转换为小写后再对该类进行别名注册
/**
 * 注册别名
 * 获取类中@Alias注解作为别名,如果不存在则获取类名
 * @param type 目标类
 */
public void registerAlias(Class<?> type) {
  //1.获取类名
  String alias = type.getSimpleName();
  //2.获取目标类中的@Alias注解信息,value值
  Alias aliasAnnotation = type.getAnnotation(Alias.class);
  if (aliasAnnotation != null) {
    alias = aliasAnnotation.value();
  }
  //3.注册别名
  registerAlias(alias, type);
}

/**
 * 注册别名
 * @param alias 别名
 * @param value 目标类
 */
public void registerAlias(String alias, Class<?> value) {
  if (alias == null) {
    throw new TypeException("The parameter alias cannot be null");
  }
  // issue #748
  //别名转成小写
  String key = alias.toLowerCase(Locale.ENGLISH);
  //判断别名是否已经存在,存在则不予以注册
  if (TYPE_ALIASES.containsKey(key) && TYPE_ALIASES.get(key) != null && !TYPE_ALIASES.get(key).equals(value)) {
    throw new TypeException("The alias '" + alias + "' is already mapped to the value '" + TYPE_ALIASES.get(key).getName() + "'.");
  }
  TYPE_ALIASES.put(key, value);
}
- 4.3.3.2 根据typeAlias节点下type和alias信息注册别名
这部分代码跟包别名注册差不多,,主要还是通过registerAlias(Class type)和registerAlias(String alias, Class value)这两个方法进行别名注册。
 String alias = child.getStringAttribute("alias");
 String type = child.getStringAttribute("type");
 try {
   //2.1> 根据typeAlias节点的type和alias信息注册别名
   Class<?> clazz = Resources.classForName(type);
   if (alias == null) {
     typeAliasRegistry.registerAlias(clazz);
   } else {
     typeAliasRegistry.registerAlias(alias, clazz);
   }
- 4.3 解析并加载plugins插件到拦截器中
 <plugins>
     <plugin interceptor="com.chen.mybatis.demo2.plugins.ExamplePlugin">
         <property name="someProperty" value="101"/>
     </plugin>
 </plugins>
pluginElement(root.evalNode("plugins"))加载插件,其中代码比较清晰就直接放代码了
/**
 *加载plugins插件到拦截器中
 */
private void pluginElement(XNode parent) throws Exception {
  if (parent != null) {
    for (XNode child : parent.getChildren()) {
      //1> 获取拦截器的类全路径
      String interceptor = child.getStringAttribute("interceptor");
      //2> 获取plugin节点下property节点的信息
      Properties properties = child.getChildrenAsProperties();
      //3> 创建拦截器实例
      Interceptor interceptorInstance = (Interceptor) resolveClass(interceptor).newInstance();
      //4> 拦截器设置properties熟悉
      interceptorInstance.setProperties(properties);
      //5> configuration添加拦截器
      configuration.addInterceptor(interceptorInstance);
    }
  }
}
4.3.4 解析并加载对象工厂objectFactory
<objectFactory type="com.chen.mybatis.demo2.objectFactory.ExampleObjectFactory">
    <property name="someProperty" value="100"/>
</objectFactory>
objectFactoryElement(root.evalNode("objectFactory"));设置objectFactory对象。
/**
 * 解析并加载对象工厂objectFactory
 */
private void objectFactoryElement(XNode context) throws Exception {
  if (context != null) {
    //1> 获取type属性的值(类的全路径)
    String type = context.getStringAttribute("type");
    //2> 获取property节点信息name和value值
    Properties properties = context.getChildrenAsProperties();
    //3> 构建ObjectFactory对象
    ObjectFactory factory = (ObjectFactory) resolveClass(type).newInstance();
    //4> ObjectFactory设置property属性
    factory.setProperties(properties);
    //5> configuration设置ObjectFactory
    configuration.setObjectFactory(factory);
  }
}
4.3.5 解析并加载对象加工工厂ObjectWrapperFactory
<objectWrapperFactory type="com.chen.mybatis.demo2.objectFactory.ExampleObjectWrapperFactory"/>
objectWrapperFactoryElement(root.evalNode("objectWrapperFactory"));代码就如下了,比较简单
/**
 * 解析并加载objectWrapperFactory
 */
private void objectWrapperFactoryElement(XNode context) throws Exception {
  if (context != null) {
    //1> 获取type属性的值(类的全路径)
    String type = context.getStringAttribute("type");
    //2> 构建ObjectWrapperFactory对象
    ObjectWrapperFactory factory = (ObjectWrapperFactory) resolveClass(type).newInstance();
    //3> configuration设置ObjectWrapperFactory
    configuration.setObjectWrapperFactory(factory);
  }
}
4.3.6 解析并加载反射工厂ReflectorFactory
<reflectorFactory type="com.chen.mybatis.demo2.objectFactory.ExampleReflectorFactory"/>
reflectorFactoryElement(root.evalNode("reflectorFactory"));
/**
 * 解析并加载reflectorFactory
 */
private void reflectorFactoryElement(XNode context) throws Exception {
  if (context != null) {
    //1> 获取type属性的值(类的全路径)
     String type = context.getStringAttribute("type");
    //2> 构建ReflectorFactory对象
     ReflectorFactory factory = (ReflectorFactory) resolveClass(type).newInstance();
    //3> configuration设置ReflectorFactory
     configuration.setReflectorFactory(factory);
  }
}
4.3.7 设置settings属性值
将之前解析得到的setting属性信息设置到configuration中,其中有一些是会有自己的默认值的。
settingsElement(settings);
  /**
   * 设置setting属性值
   * @param props Properties对象
   */
  private void settingsElement(Properties props) {
    configuration.setAutoMappingBehavior(AutoMappingBehavior.valueOf(props.getProperty("autoMappingBehavior", "PARTIAL")));
    configuration.setAutoMappingUnknownColumnBehavior(AutoMappingUnknownColumnBehavior.valueOf(props.getProperty("autoMappingUnknownColumnBehavior", "NONE")));
    configuration.setCacheEnabled(booleanValueOf(props.getProperty("cacheEnabled"), true));
    configuration.setProxyFactory((ProxyFactory) createInstance(props.getProperty("proxyFactory")));
    configuration.setLazyLoadingEnabled(booleanValueOf(props.getProperty("lazyLoadingEnabled"), false));
    configuration.setAggressiveLazyLoading(booleanValueOf(props.getProperty("aggressiveLazyLoading"), false));
    configuration.setMultipleResultSetsEnabled(booleanValueOf(props.getProperty("multipleResultSetsEnabled"), true));
    configuration.setUseColumnLabel(booleanValueOf(props.getProperty("useColumnLabel"), true));
    configuration.setUseGeneratedKeys(booleanValueOf(props.getProperty("useGeneratedKeys"), false));
    configuration.setDefaultExecutorType(ExecutorType.valueOf(props.getProperty("defaultExecutorType", "SIMPLE")));
    configuration.setDefaultStatementTimeout(integerValueOf(props.getProperty("defaultStatementTimeout"), null));
    configuration.setDefaultFetchSize(integerValueOf(props.getProperty("defaultFetchSize"), null));
    configuration.setMapUnderscoreToCamelCase(booleanValueOf(props.getProperty("mapUnderscoreToCamelCase"), false));
    configuration.setSafeRowBoundsEnabled(booleanValueOf(props.getProperty("safeRowBoundsEnabled"), false));
    configuration.setLocalCacheScope(LocalCacheScope.valueOf(props.getProperty("localCacheScope", "SESSION")));
    configuration.setJdbcTypeForNull(JdbcType.valueOf(props.getProperty("jdbcTypeForNull", "OTHER")));
    configuration.setLazyLoadTriggerMethods(stringSetValueOf(props.getProperty("lazyLoadTriggerMethods"), "equals,clone,hashCode,toString"));
    configuration.setSafeResultHandlerEnabled(booleanValueOf(props.getProperty("safeResultHandlerEnabled"), true));
    configuration.setDefaultScriptingLanguage(resolveClass(props.getProperty("defaultScriptingLanguage")));
    configuration.setDefaultEnumTypeHandler(resolveClass(props.getProperty("defaultEnumTypeHandler")));
    configuration.setCallSettersOnNulls(booleanValueOf(props.getProperty("callSettersOnNulls"), false));
    configuration.setUseActualParamName(booleanValueOf(props.getProperty("useActualParamName"), true));
    configuration.setReturnInstanceForEmptyRow(booleanValueOf(props.getProperty("returnInstanceForEmptyRow"), false));
    configuration.setLogPrefix(props.getProperty("logPrefix"));
    configuration.setConfigurationFactory(resolveClass(props.getProperty("configurationFactory")));
  }
4.3.8 解析environments节点信息,并设置environment属性
事务管理器和数据源都在environments节点下进行配置。transactionManager节点是事务管理器,dataSource节点是数据源。
 <environments default="development">
     <environment id="development">
         <transactionManager type="JDBC"/>
         <dataSource type="POOLED">
             <property name="driver" value="${driver}"/>
             <property name="url" value="${url}"/>
             <property name="username" value="${username}"/>
             <property name="password" value="${password}"/>
         </dataSource>
     </environment>
 </environments>
environmentsElement(root.evalNode("environments"));
/**
 * 解析environments节点信息
 */
private void environmentsElement(XNode context) throws Exception {
  if (context != null) {
    if (environment == null) {
      //1>获取environments节点default属性值
      environment = context.getStringAttribute("default");
    }
    for (XNode child : context.getChildren()) {
      //2>获取environment节点id值
      String id = child.getStringAttribute("id");
      //3> 判断id是否为environments节点的default值
      if (isSpecifiedEnvironment(id)) {
        //4>解析transactionManager节点,创建TransactionFactory对象
        TransactionFactory txFactory = transactionManagerElement(child.evalNode("transactionManager"));
        //5>解析dataSource节点,创建DataSourceFactory对象
        DataSourceFactory dsFactory = dataSourceElement(child.evalNode("dataSource"));
        DataSource dataSource = dsFactory.getDataSource();
        //6.创建Environment.Builder对象,并设置transactionFactory和dataSource
        Environment.Builder environmentBuilder = new Environment.Builder(id)
            .transactionFactory(txFactory)
            .dataSource(dataSource);
        //7.configuration设置environment属性
        configuration.setEnvironment(environmentBuilder.build());
      }
    }
  }
}
4.3.9 解析databaseIdProvider节点(数据库厂商信息)
databaseIdProvider的配置一般如下
 <databaseIdProvider type="DB_VENDOR">
     <property name="MySQL" value="mysql"/>
     <property name="Oracle" value="oracle"/>
 </databaseIdProvider>
databaseIdProviderElement(root.evalNode("databaseIdProvider"));
配置数据库厂商信息,也就是设置DatabaseId值。mybatis会通过数据源获取到数据源中数据库名称,再根据该名称跟所配置的信息进行对比,拿去与数据源名称一致的property 的value值作为DatabaseId,设置到configuration中。
/**
 * 解析databaseIdProvider节点
 */
private void databaseIdProviderElement(XNode context) throws Exception {
  DatabaseIdProvider databaseIdProvider = null;
  if (context != null) {
    //1> 获取type属性值
    String type = context.getStringAttribute("type");
    // awful patch to keep backward compatibility
    if ("VENDOR".equals(type)) {
        type = "DB_VENDOR";
    }
    //2> 获取databaseIdProvider节点下的property节点信息,并创建DatabaseIdProvider对象
    Properties properties = context.getChildrenAsProperties();
    databaseIdProvider = (DatabaseIdProvider) resolveClass(type).newInstance();
    databaseIdProvider.setProperties(properties);
  }
  //3> 获取databaseId,并设置configuration的databaseId
  Environment environment = configuration.getEnvironment();
  if (environment != null && databaseIdProvider != null) {
    String databaseId = databaseIdProvider.getDatabaseId(environment.getDataSource());
    configuration.setDatabaseId(databaseId);
  }
}
先看看第二步:DatabaseIdProvider databaseIdProvider = (DatabaseIdProvider) resolveClass(type).newInstance();
- 当type = “DB_VENDOR” 时,创建的DatabaseIdProvider类实现类实际上是:VendorDatabaseIdProvider类
- 为什么?因为Configuration创建的时候一样注册了别名。
typeAliasRegistry.registerAlias("DB_VENDOR", VendorDatabaseIdProvider.class);
再来看第三步,获取databaseId,并设置configuration的databaseId的代码实现。主要是这段代码
String databaseId = databaseIdProvider.getDatabaseId(environment.getDataSource());
会先通过数据源获取数据的产品名称信息,再跟property的name属性相比较,如果是当前数据库的产品名称则拿去其value值作为DatabaseId。
/**
 * 获取数据库名称
 * @param dataSource 数据源
 */
@Override
public String getDatabaseId(DataSource dataSource) {
    if (dataSource == null) {
        throw new NullPointerException("dataSource cannot be null");
    }
    try {
        return getDatabaseName(dataSource);
    } catch (Exception e) {
        LogHolder.log.error("Could not get a databaseId from dataSource", e);
    }
    return null;
}
/**
 * 获取数据库名称
 * @param dataSource 数据源
 * @return 数据库名称
 */
private String getDatabaseName(DataSource dataSource) throws SQLException {
    //1> 获取数据库产品名称如oracle、mysql
    String productName = getDatabaseProductName(dataSource);
    //2> 如果数据源中数据库产品名称包含databaseIdProvider节点下的property节点name属性值,则返回对应的value值作为数据库名称
    if (this.properties != null) {
        for (Map.Entry<Object, Object> property : properties.entrySet()) {
            if (productName.contains((String) property.getKey())) {
                return (String) property.getValue();
            }
        }
        // no match, return null
        return null;
    }
    return productName;
}

/**
 * 获取数据库产品名称如oracle、mysql
 */
private String getDatabaseProductName(DataSource dataSource) throws SQLException {
    Connection con = null;
    try {
        con = dataSource.getConnection();
        DatabaseMetaData metaData = con.getMetaData();
        return metaData.getDatabaseProductName();
    } finally {
        if (con != null) {
            try {
                con.close();
            } catch (SQLException e) {
                // ignored
            }
        }
    }
}
4.3.10 解析typeHandlers节点
typeHandlers中关于TypeHandlerRegistry类走register()各种重载方法互相调用,一时间有点头晕。
从入口方法中有两种处理,一种是自动映射package下的typehandler,另一种是解析单个节点的typeHandler。
/**
 * 解析typeHandlers节点,并对typehandler进行注册
 */
private void typeHandlerElement(XNode parent) {
  if (parent != null) {
    for (XNode child : parent.getChildren()) {
      //1> 从指定包中注册TypeHandler
      if ("package".equals(child.getName())) {
        String typeHandlerPackage = child.getStringAttribute("name");
        typeHandlerRegistry.register(typeHandlerPackage);
      } else {
        //2>解析typeHandler节点,获取javaType,jdbcType,handler属性值
        String javaTypeName = child.getStringAttribute("javaType");
        String jdbcTypeName = child.getStringAttribute("jdbcType");
        String handlerTypeName = child.getStringAttribute("handler");
        //3> 获取javaTypeName为别名对应的类,如不存在,则返回javaTypeName指定的类
        Class<?> javaTypeClass = resolveClass(javaTypeName);
        //4> 获取jdbcTypeName对应的JdbcType
        JdbcType jdbcType = resolveJdbcType(jdbcTypeName);
        //5> 获取handlerTypeName为别名对应的类,如不存在,则返回handlerTypeName指定的类
        Class<?> typeHandlerClass = resolveClass(handlerTypeName);
        //6> 注册TypeHandler
        if (javaTypeClass != null) {
          if (jdbcType == null) {
            typeHandlerRegistry.register(javaTypeClass, typeHandlerClass);
          } else {
            typeHandlerRegistry.register(javaTypeClass, jdbcType, typeHandlerClass);
          }
        } else {
          typeHandlerRegistry.register(typeHandlerClass);
        }
      }
    }
  }
}
TypeHandlerRegistry类中register重载方法的调用关系图,比较清晰的看到register重载方法的调用
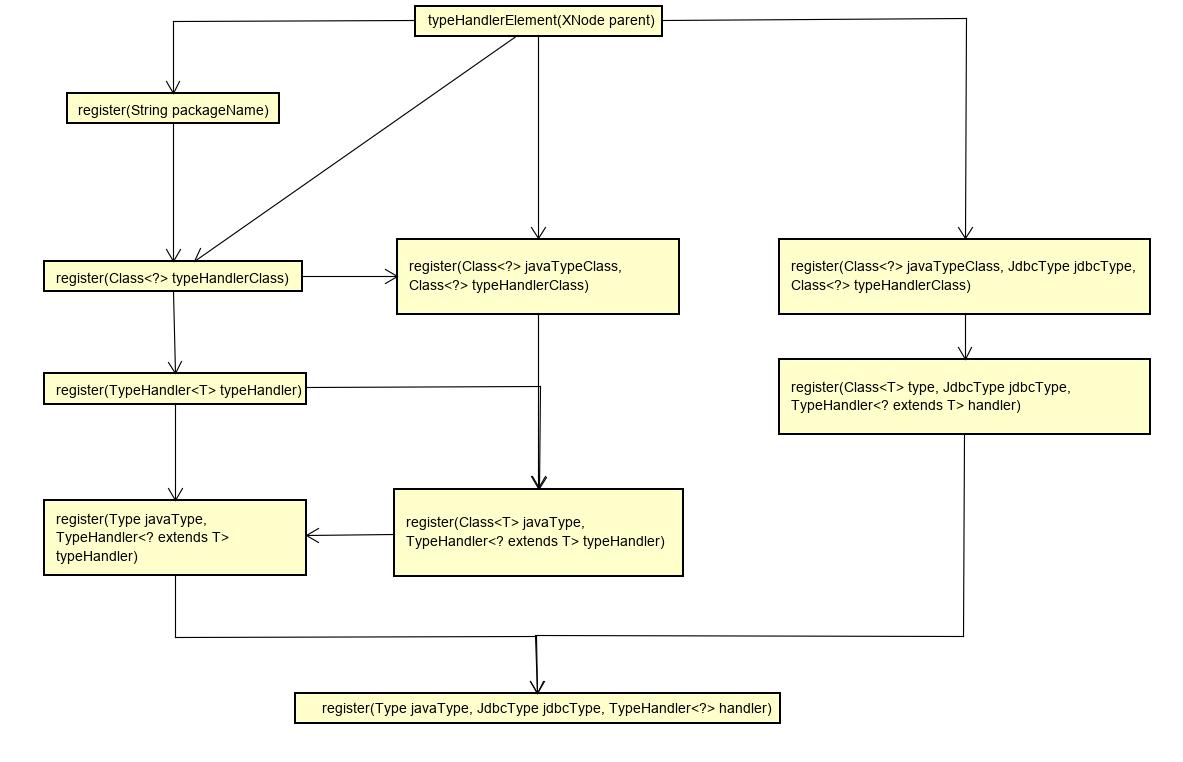
register(String packageName)方法
该方法用于自动扫描包中的typehandler,并进行注册
/**
 * 注册TypeHandler,自动扫描类型处理器
 * @param packageName 包路径
 */
public void register(String packageName) {
  //1> 获取包下的类
  ResolverUtil<Class<?>> resolverUtil = new ResolverUtil<>();
  resolverUtil.find(new ResolverUtil.IsA(TypeHandler.class), packageName);
  Set<Class<? extends Class<?>>> handlerSet = resolverUtil.getClasses();
  //2> 注册TypeHandler,非内部类,接口,抽象类才能注册
  for (Class<?> type : handlerSet) {
    //Ignore inner classes and interfaces (including package-info.java) and abstract classes
    if (!type.isAnonymousClass() && !type.isInterface() && !Modifier.isAbstract(type.getModifiers())) {
      register(type);
    }
  }
}
register(Class<?> typeHandlerClass)方法
该方法主要用于判断typehandler中javaType是否存在,从而调用不同的重载方法
 /**
  * 存在@MappedTypes,且有值,则存在javaType,调用register(Class<?> javaTypeClass, Class<?> typeHandlerClass)重载方法
  * 不存在@MappedTypes或者没有值,则调用register(TypeHandler<T> typeHandler)重载方法
  */
public void register(Class<?> typeHandlerClass) {
 boolean mappedTypeFound = false;
 //1> 获取@MappedTypes注解
 MappedTypes mappedTypes = typeHandlerClass.getAnnotation(MappedTypes.class);
 if (mappedTypes != null) {
     //2> 遍历@MappedTypes注解中value值
   for (Class<?> javaTypeClass : mappedTypes.value()) {
       //3> 调用register重载方法进行注册
     register(javaTypeClass, typeHandlerClass);
     mappedTypeFound = true;
   }
 }
 if (!mappedTypeFound) {
   register(getInstance(null, typeHandlerClass));
 }
}
register(TypeHandler<T> typeHandler)方法
/**
* 只有typeHandler参数的register重载方法
*
*/
public <T> void register(TypeHandler<T> typeHandler) {
  boolean mappedTypeFound = false;
  //1> 获取@MappedTypes注解,存在javaType值,则调用register(Type javaType, TypeHandler<? extends T> typeHandler)方法注册typehandler
  MappedTypes mappedTypes = typeHandler.getClass().getAnnotation(MappedTypes.class);
  if (mappedTypes != null) {
    for (Class<?> handledType : mappedTypes.value()) {
      //调用重载方法register(Type javaType, TypeHandler<? extends T> typeHandler)
      register(handledType, typeHandler);
      mappedTypeFound = true;
    }
  }
  // @since 3.1.0 - try to auto-discover the mapped type
  //自动发现映射类型
  if (!mappedTypeFound && typeHandler instanceof TypeReference) {
    try {
      TypeReference<T> typeReference = (TypeReference<T>) typeHandler;
      //调用重载方法register(Type javaType, TypeHandler<? extends T> typeHandler)
      register(typeReference.getRawType(), typeHandler);
      mappedTypeFound = true;
    } catch (Throwable t) {
      // maybe users define the TypeReference with a different type and are not assignable, so just ignore it
    }
  }
  if (!mappedTypeFound) {
    register((Class<T>) null, typeHandler);
  }
}
register(Type javaType, TypeHandler<? extends T> typeHandler)方法
判断是否存在注解@MappedJdbcTypes(JdbcType)是否存在,再将jdbcType作为入参,调用register重载方法
  private <T> void register(Type javaType, TypeHandler<? extends T> typeHandler) {
 //1> 获取typahandler类中@MappedJdbcTypes注解value值
 MappedJdbcTypes mappedJdbcTypes = typeHandler.getClass().getAnnotation(MappedJdbcTypes.class);
 if (mappedJdbcTypes != null) {
   //2> 遍历MappedJdbcTypes的value值,进行遍历注册TypeHandler
   for (JdbcType handledJdbcType : mappedJdbcTypes.value()) {
     register(javaType, handledJdbcType, typeHandler);
   }
   //3> 如果MappedJdbcTypes注解中includeNullJdbcType=true,则注册jdbcType=null的TypeHandler
   if (mappedJdbcTypes.includeNullJdbcType()) {
     register(javaType, null, typeHandler);
   }
 } else {
   register(javaType, null, typeHandler);
 }
}
register(Type javaType, JdbcType jdbcType, TypeHandler<?> handler)最终调用的方法
实现将typehandler存储到对应的称员变量中(map)
/**
 * 注册TypeHandler
 * @param javaType
 * @param jdbcType
 * @param handler
 */
private void register(Type javaType, JdbcType jdbcType, TypeHandler<?> handler) {
  if (javaType != null) {
    //1> 存储以javaType为key的 Map<JdbcType, TypeHandler<?>>到TYPE_HANDLER_MAP变量中
    Map<JdbcType, TypeHandler<?>> map = TYPE_HANDLER_MAP.get(javaType);
    if (map == null || map == NULL_TYPE_HANDLER_MAP) {
      map = new HashMap<>();
      TYPE_HANDLER_MAP.put(javaType, map);
    }
    map.put(jdbcType, handler);
  }
  //2> 添加TypeHandler到ALL_TYPE_HANDLERS_MAP
  ALL_TYPE_HANDLERS_MAP.put(handler.getClass(), handler);
}
4.3.11 解析mappers节点
解析mappers节点这个放到之后的章节再进行描述。