一 数据库拆分
1.为什么要拆分?
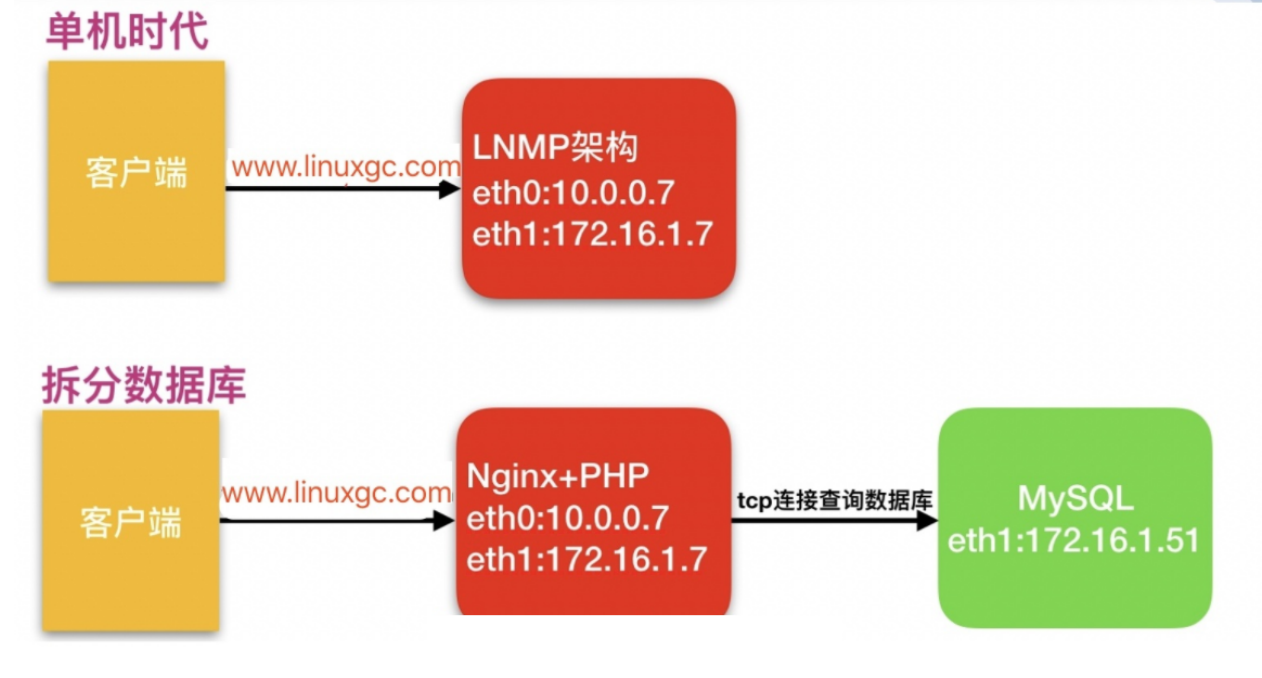
由于单台服务器运行`LNMP`架构会导致网站访问缓慢,当内存被占满时,很容易导致系统出现`oom`,从而kill掉MySQL数据库,所以要将web和数据库进行独立部署。(一般数据占用服务器内存70%-80%)
2.拆分数据库解决什么问题
1、缓解web网站的压力
2、增强数据库读写性能
3、提高用户访问的速度
拆分数据库的案例
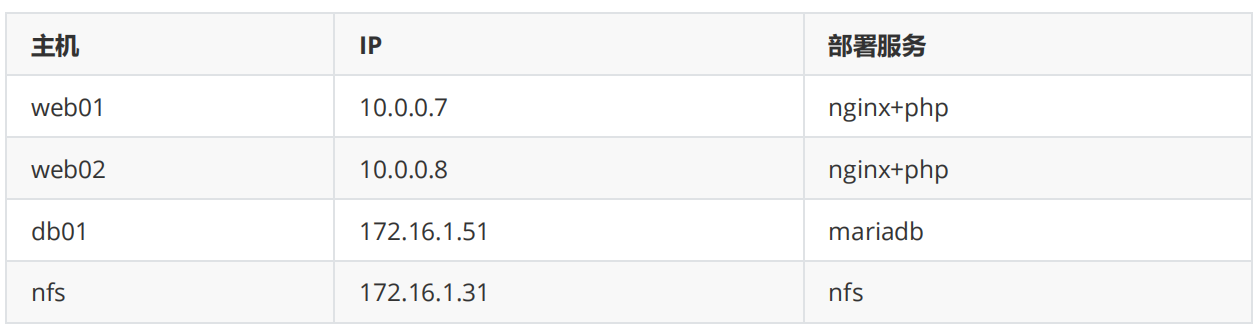
1.环境准备

2.在新的服务器上部署数据库(建新房子)
[root@db01 ~]# yum install -y mariadb-server
3.启动数据库(装修)
[root@db01 ~]# systemctl enable --now mariadb
Created symlink from /etc/systemd/system/multi-user.target.wants/mariadb.service to /usr/lib/systemd/system/mariadb.service.
4.配置数据库密码(换锁)
[root@db01 ~]# mysqladmin -uroot password '123'
5.测试连接数据库(能不能住)
[root@web01 ~]# mysql -uroot -p123 -h172.16.1.51
ERROR 1130 (HY000): Host '172.16.1.7' is not allowed to connect to this MariaDB server
mysql	 	#数据库命令
-u		 	#指定用户
root 	 	#root用户
-p		 	#使用数据库root用户的密码
123 	 	#数据库root用户的密码
-h 		 	#指定数据库的主机
172.16.1.51 #主机IP
6.授权远程连接数据库(想办法进去住)
MariaDB [(none)]> create database wordpress;
Query OK, 1 row affected (0.00 sec)

MariaDB [(none)]> grant all on wordpress.* to wp@'172.16.1.%' identified by '1qaz@WSX';
Query OK, 0 rows affected (0.00 sec)

grant 			#数据库授权命令
all 			#所有权限
on 				#在...上面
*.* 			#所有表 库.表
to 				#给...
wp@'172.16.1.%' #数据库用户
identified 		#设置密码
by 				#密码是...
'1qaz@WSX'; 	#密码内容
7.授权后测试连接(再试试能不能住)
[root@web01 ~]# mysql -uroot -p123 -h172.16.1.51
Welcome to the MariaDB monitor.  Commands end with ; or g.
Your MariaDB connection id is 8
Server version: 5.5.64-MariaDB MariaDB Server
8.导出旧数据库数据(把家具搬出来)
[root@web01 ~]# mysqldump -uroot -pLin123.com -B wordpress > /tmp/wordpress.sql
[root@web01 ~]# mysqldump -uroot -pLin123.com -B zh > /tmp/zh.sql
[root@web01 ~]# mysqldump -uroot -pLin123.com -B edusoho > /tmp/edu.sql
#注意:
1.导出的文件名字与数据库名无关
2.导出的文件后缀无所谓
9.将导出的数据传到新数据库机器(把东西运到新房子门口)
[root@web01 ~]# scp /tmp/wordpress.sql 172.16.1.51:/tmp/
[root@web01 ~]# scp /tmp/*.sql 172.16.1.51:/tmp
10.把数据导入新的数据库(把家具搬进新房子)
#方式一:在房子外面往里搬
[root@db01 ~]# mysql -uroot -p123 < /tmp/wordpress.sql
[root@db01 ~]# mysql -uroot -p123 < /tmp/zh.sql
[root@db01 ~]# mysql -uroot -p123 < /tmp/edu.sql

#方式二:在房子里面往里搬
MariaDB [wordpress]> source /tmp/wordpress.sql;

#方式三:传送门方式
[root@web01 tmp]# mysql -uroot -p123 -h172.16.1.51 < /tmp/wordpress.sql
[root@web01 tmp]# mysql -uroot -p123 -h172.16.1.51
MariaDB [wordpress]> source /tmp/wordpress.sql;
11.查看数据库(查看摆放)
[root@db01 ~]# mysql -uroot -p123
Welcome to the MariaDB monitor.  Commands end with ; or g.
Your MariaDB connection id is 12
Server version: 5.5.64-MariaDB MariaDB Server

Copyright (c) 2000, 2018, Oracle, MariaDB Corporation Ab and others.

Type 'help;' or 'h' for help. Type 'c' to clear the current input statement.

MariaDB [(none)]> show databases;
+--------------------+
| Database           |
+--------------------+
| information_schema |
| mysql              |
| performance_schema |
| test               |
| wordpress          |			#看到这个库就带表导入成功
+--------------------+
5 rows in set (0.00 sec)

MariaDB [(none)]>
12.修改wordpress连接新的数据库(告诉亲戚新的住址)
[root@web01 ~]# vim /code/wordpress/wp-config.php
/** WordPress数据库的名称 */
define('DB_NAME', 'wordpress');

/** MySQL数据库用户名 */
define('DB_USER', 'root');

/** MySQL数据库密码 */
define('DB_PASSWORD', '123456');

/** MySQL主机 */
define('DB_HOST', '172.16.1.51');
13.修改zh连接数据库配置
[root@web01 ~]# vim /code/wecenter/system/config/database.php
$config['master'] = array (
  'charset' => 'utf8',
  'host' => '172.16.1.51',
  'username' => 'root',
  'password' => '123',
  'dbname' => 'zh',
);
14.修改edusoho连接数据库配置
[root@web01 ~]# vim /code/edusoho/app/config/parameters.yml
    database_host: 172.16.1.51
    database_port: 3306
    database_name: edusoho
    database_user: root
    database_password: '1234'

 [root@web01 ~]# rm -rf /code/edusoho/app/cache/*
15.访问页面测试
16.停掉旧的数据库(旧房子拆迁,卖掉)
[root@web01 ~]# systemctl stop mariadb
二 扩展web服务器
1.安装nginx
环境准备

1)配置yum官方源
[root@web02 ~]# vim /etc/yum.repos.d/nginx.repo
[nginx]
name=nginx repo
baseurl=http://nginx.org/packages/centos/7/$basearch/
gpgcheck=0
enabled=1
2)安装nginx
[root@web02 ~]# yum install -y nginx
3)创建用户
[root@web02 ~]# groupadd www -g 666
[root@web02 ~]# useradd www -u 666 -g 666
4)配置nginx
[root@web02 ~]# vim /etc/nginx/nginx.conf
user  www;
5)启动nginx
[root@web02 ~]# systemctl enable --now nginx
2.安装PHP
1)上传php包
[root@web02 ~]# cd /tmp/
[root@web02 tmp]# rz php.tar.gz
2)解压安装php
[root@web02 tmp]# tar xf php.tar.gz
[root@web02 tmp]# yum localinstall -y *.rpm
3)配置php
[root@web02 tmp]# vim /etc/php-fpm.d/www.conf
user = www
group = www
4)启动
[root@web02 tmp]# systemctl enable --now php-fpm
3.同步web01所有内容
1)同步站点目录
[root@web01 code]# tar zcf code.tar.gz /code/wordpress
[root@web01 code]# scp code.tar.gz 172.16.1.8:/code/
2)同步nginx配置文件
[root@web01 code]# scp /etc/nginx/conf.d/* 172.16.1.8:/etc/nginx/conf.d/
3)重启nginx和php服务
[root@web02 ~]# systemctl restart nginx
[root@web02 ~]# systemctl restart hph-fpm
4)授权站点目录
[root@web02 code]# tar xf code.tar.gz
[root@web02 code]# chown -R www.www /code/
5)修改本地hosts访问测试
4.文件共享
1.搭建NFS服务端环境准备
1)安装NFS、rpcbind
[root@nfs ~]# yum install -y nfs-utils rpcbind
2)创建用户和用户组
[root@nfs ~]# groupadd www -g 666
[root@nfs ~]# useradd www -u 666 -g 666
3)创建目录
[root@nfs ~]# mkdir /data/wordpress -p
[root@nfs ~]# chown -R www.www /data/
4)配置nfs
[root@nfs ~]# vim /etc/exports
/data/wordpress 172.16.1.0/24(rw,sync,all_squash,anonuid=666,anongid=666)
5)启动服务
[root@nfs ~]# systemctl enable --now rpcbind nfs
6)查看配置是否正确
[root@nfs ~]# cat /var/lib/nfs/etab
/data/wordpress	172.16.1.0/24(rw,sync,wdelay,hide,nocrossmnt,secure,root_squash,all_squash,no_subtree_check,secure_locks,acl,no_pnfs,anonuid=666,anongid=666,sec=sys,rw,secure,root_squash,all_squash)
2.搭建客户端(web01/web02)
1)安装nfs
[root@web01 ~]# yum install -y nfs-utils rpcbind
[root@web02 ~]# yum install -y nfs-utils rpcbind
2)启动rpcbind
3)查看挂载点
[root@web01 ~]# showmount -e 172.16.1.31
Export list for 172.16.1.31:
/data/wordpress 172.16.1.0/24
4)找到文件目录,先推送数据
[root@web01 ~]# scp -r /code/wordpress/wp-content/uploads/* 172.16.1.31:/data/wordpress/

[root@web02 ~]# scp -r /code/wordpress/wp-content/uploads/* 172.16.1.31:/data/wordpress/
5)挂载
[root@web02 ~]# mount -t nfs 172.16.1.31:/data/wordpress /code/wordpress/wp-content/uploads/

[root@web01 ~]# mount -t nfs 172.16.1.31:/data/wordpress /code/wordpress/wp-content/uploads/
3.使用db02作为新的数据库服务器,数据库从db01迁移至db02
1.db02安装数据库
[root@db02 ~]# yum install -y mariadb-server
2.启动数据库
[root@db02 ~]# systemctl start mariadb
[root@db02 ~]# systemctl enable mariadb
Created symlink from /etc/systemd/system/multi-user.target.wants/mariadb.service to /usr/lib/systemd/system/mariadb.service.
3.配置数据库密码
[root@db02 ~]# mysqladmin -uroot password '123456'
4.测试远程连接
[root@db01 ~]# mysql -uroot -p123456 -h172.16.1.52
5.连接不上时,需要授权
[root@db02 ~]# mysql -uroot -p123456
Welcome to the MariaDB monitor.  Commands end with ; or g.
Your MariaDB connection id is 22
Server version: 5.5.64-MariaDB MariaDB Server

Copyright (c) 2000, 2018, Oracle, MariaDB Corporation Ab and others.

Type 'help;' or 'h' for help. Type 'c' to clear the current input statement.

MariaDB [(none)]> grant all on *.* to root@'172.16.1.%' identified by '123456';
Query OK, 0 rows affected (0.01 sec)

MariaDB [(none)]> grant all on wordpress.* to wp@'172.16.1.%' identified by '123456';
Query OK, 0 rows affected (0.00 sec)

MariaDB [(none)]> grant all on zh.* to zh@'172.16.1.%' identified by '123456';
Query OK, 0 rows affected (0.00 sec)

MariaDB [(none)]> grant all on edusoho.* to edu@'172.16.1.%' identified by '123456';
Query OK, 0 rows affected (0.00 sec)

MariaDB [(none)]>
6.授权完再次测试
7.导出旧数据库数据
[root@db01 ~]# mysqldump -uroot -p123456 -B edusoho > /tmp/edu.sql
[root@db01 ~]# mysqldump -uroot -p123456 -B zh > /tmp/zh.sql
[root@db01 ~]# mysqldump -uroot -p123456 -B wordpress > /tmp/wp.sql
8.把数据导入新库
[root@db01 ~]# mysql -uroot -p123456 -h172.16.1.52 < /tmp/edu.sql
[root@db01 ~]# mysql -uroot -p123456 -h172.16.1.52 < /tmp/wp.sql
[root@db01 ~]# mysql -uroot -p123456 -h172.16.1.52 < /tmp/zh.sql
9.查看新库数据
[root@db02 ~]# mysql -uroot -p123456
Welcome to the MariaDB monitor.  Commands end with ; or g.
Your MariaDB connection id is 110
Server version: 5.5.64-MariaDB MariaDB Server

Copyright (c) 2000, 2018, Oracle, MariaDB Corporation Ab and others.

Type 'help;' or 'h' for help. Type 'c' to clear the current input statement.

MariaDB [(none)]> show databases;
+--------------------+
| Database           |
+--------------------+
| information_schema |
| edusoho            |
| mysql              |
| performance_schema |
| test               |
| wordpress          |
| zh                 |
+--------------------+
7 rows in set (0.00 sec)

MariaDB [(none)]>
10.修改连接数据库代码
#wordpress代码
[root@web01 ~]# vim /code/wordpress/wp-config.php
/** WordPress数据库的名称 */
define('DB_NAME', 'wordpress');

/** MySQL数据库用户名 */
define('DB_USER', 'wp');

/** MySQL数据库密码 */
define('DB_PASSWORD', '123456');

/** MySQL主机 */
define('DB_HOST', '172.16.1.52');
web03扩展
1.安装nginx、PHP
2.同步web01的所有内容
1)同步站点目录
[root@web01 code]# tar zcf code.tar.gz wordpress zh edusoho
[root@web01 code]# scp code.tar.gz 172.16.1.9:/code/
[root@web03 code]# tar xf code.tar.gz
[root@web03 code]# chown -R www.www /code
2)同步NGINX配置文件
[root@web01 code]# scp /etc/nginx/conf.d/* 172.16.1.9:/etc/nginx/conf.d/
3)重启nginx
[root@web01 code]# systemctl restart nginx
web04扩展
1.安装nginx、PHP
2.手动上传代码
[root@web01 code]# scp edusoho-8.3.36.tar.gz WeCenter_3-2-1.zip wordpress-5.0.3-zh_CN.tar.gz 172.16.1.10:/code/

[root@web04 code]# tar xf wordpress-5.0.3-zh_CN.tar.gz
[root@web04 code]# chown -R www.www /code/
3.配置nginx
[root@web01 code]# scp /etc/nginx/conf.d/* 172.16.1.10:/etc/nginx/conf.d/

[root@web04 code]# systemctl restart nginx
4.在页面上配置远端数据库地址
静态资源共享
1.安装nfs服务端
1)安装nfs
yum install -y rpcbin nfs-utils
2)创建用户
groupadd www -g 666
useradd www -u 666 -g 666
3)创建挂在的目录
mkdir /data/{wordprss,zh,edu} -p
4)授权
chown -R www.www /data
5)配置nfs
/data/wordpress 172.16.1.0/24(rw,sync,all_squash,anonuid=666,anongid=666)
/data/zh 172.16.1.0/24(rw,sync,all_squash,anonuid=666,anongid=666)
/data/edusoho 172.16.1.0/24(rw,sync,all_squash,anonuid=666,anongid=666)
6)检查配置
cat /var/lib/nfs/etab
2.安装nfs客户端
1)安装nfs
yum install -y nfs-utils rpcbind
2)查找文件并推送至NFS服务端
[root@web01 code]# ll /code/wecenter/uploads/
[root@web01 code]# ll /code/wecenter/uploads/article/
[root@web01 code]# ll /code/edusoho/web/

scp -r /code/wecenter/uploads/* 172.16.1.31:/data/wordpress
scp -r /code/wecenter/uploads/article/* 172.16.1.31:/data/zh
scp -r /code/edusoho/web/* 172.16.1.31:/data/edu
4)挂载
mount -t nfs 172.16.1.31:/data/wordpress /code/wecenter/uploads/
mount -t nfs 172.16.1.31:/data/zh /code/wecenter/uploads/article/
mount -t nfs 172.16.1.31:/data/edu /code/edusoho/web/
实时同步sersync
1.服务端(backup)
1)安装rsync
2)配置rsync
[root@backup ~]# vim /etc/rsyncd.conf
uid = www
gid = www
port = 873
fake super = yes
use chroot = no
max connections = 200
timeout = 600
ignore errors
read only = false
list = false
auth users = rsync_backup
secrets file = /etc/rsync.password
log file = /var/log/rsyncd.log
#####################################
[data]
path = /data
3)创建data目录
4)创建用户
5)授权目录
6)创建密码文件并授权
7)启动
2.客户端(nfs)
2)安装sersync
3)配置sersync
vim /usr/local/sersync/confxml.xml
<sersync>
        <localpath watch="/data">
            <remote ip="172.16.1.41" name="data"/>
            <!--<remote ip="192.168.8.39" name="tongbu"/>-->
            <!--<remote ip="192.168.8.40" name="tongbu"/>-->
        </localpath>
        <rsync>
            <commonParams params="-az"/>
            <auth start="true" users="rsync_backup" passwordfile="/etc/rsync.passwd"/>
            <userDefinedPort start="false" port="874"/><!-- port=874 -->
            <timeout start="true" time="100"/><!-- timeout=100 -->
            <ssh start="false"/>
        </rsync>
4)创建密码文件并授权
5)启动sersync