概念介绍
Elasticsearch
ElasticSearch是一个基于Lucene的搜索服务器。它提供了一个分布式多用户能力的全文搜索引擎,基于RESTful web接口。Elasticsearch是用Java开发的,并作为Apache许可条款下的开放源码发布,是第二流行的企业搜索引擎。设计用于云计算中,能够达到实时搜索,稳定,可靠,快速,安装使用方便。
在elasticsearch中,所有节点的数据是均等的。
Logstash
Logstash是一个完全开源的工具,他可以对你的日志进行收集、分析,并将其存储供以后使用(如,搜索),您可以使用它。说到搜索,logstash带有一个web界面,搜索和展示所有日志。
Kibana
Kibana是一个基于浏览器页面的Elasticsearch前端展示工具。Kibana全部使用HTML语言和Javascript编写的。
elastic的部署配置文档
https://www.elastic.co/guide/index.html
部署环境
系统: Centos7.1
防火墙: 关闭
Sellinux: 关闭
主机名: 配置规范
主机: 两台
注明: 两台主机同时操作,安装一下软件。
(一)Elasticsearch
基础环境安装
1:下载并安装GPG Key
[root@hadoop-node1 ~]# rpm --import https://packages.elastic.co/GPG-KEY-elasticsearch
2:添加yum仓库
[root@hadoop-node1 ~]# vim /etc/yum.repos.d/elasticsearch.repo
[elasticsearch-2.x]
name=Elasticsearch repository for 2.x packages
baseurl=http://packages.elastic.co/elasticsearch/2.x/centos
gpgcheck=1
gpgkey=http://packages.elastic.co/GPG-KEY-elasticsearch
enabled=1
3:安装elasticsearch
[root@hadoop-node1 ~]# yum install -y elasticsearch
4:安装相关测试软件
#安装Redis
yum install -y redis
#安装Nginx
yum install -y nginx
#安装java
yum install -y java
5:安装完java后,检测
[root@linux-node1 src]# java -version
openjdk version "1.8.0_65"
OpenJDK Runtime Environment (build 1.8.0_65-b17)
OpenJDK 64-Bit Server VM (build 25.65-b01, mixed mode)
配置部署
1:配置修改配置文件
[root@linux-node1 ~]# mkdir -p /data/es-data
[root@linux-node1 src]# vim /etc/elasticsearch/elasticsearch.yml
cluster.name: caoxiaojian                # 组名(同一个组,组名必须一致)
node.name: linux-node1                   # 节点名称,建议和主机名一致
path.data: /data/es-data                 # 数据存放的路径
path.logs: /var/log/elasticsearch/       # 日志存放的路径
bootstrap.mlockall: true                 # 锁住内存,不被使用到交换分区去
network.host: 0.0.0.0                    # 网络设置
http.port: 9200                          # 端口
2:启动并查看
[root@linux-node1 src]# chown  -R elasticsearch.elasticsearch /data/
[root@linux-node1 src]# systemctl  start elasticsearch
[root@linux-node1 src]# systemctl  status elasticsearch
 CGroup: /system.slice/elasticsearch.service
           └─3005 /bin/java -Xms256m -Xmx1g -Djava.awt.headless=true -XX:+UseParNewGC -XX:+UseConcMarkSweepGC -XX:CMSI...
##### 内存最小256m,最大1g
[root@linux-node1 src]# netstat -antlp |egrep "9200|9300"
tcp6       0      0 :::9200                 :::*                    LISTEN      3005/java
tcp6       0      0 :::9300                 :::*                    LISTEN      3005/java
然后通过web访问(我的IP是192.168.56.11)
3:通过命令的方式查看数据
[root@linux-node1 src]# curl -i -XGET 'http://192.168.56.11:9200/_count?pretty' -d '{"query":{"match_all":{}}}'
HTTP/1.1 200 OK
Content-Type: application/json; charset=UTF-8
Content-Length: 95

{
  "count" : 0,
  "_shards" : {
    "total" : 0,
    "successful" : 0,
    "failed" : 0
  }
}
有没有觉得特别的不爽,要用命令来查看。
4:上大招,使用head插件来查看
4.1:安装head插件
[root@linux-node1 src]# /usr/share/elasticsearch/bin/plugin install mobz/elasticsearch-head
4.2:使用head插件后,使用web插件
###插入数据实例:
###查看数据实例
###复合查询实例
5:监控节点
5.1安装
[root@linux-node1 src]# /usr/share/elasticsearch/bin/plugin install lmenezes/elasticsearch-kopf
5.2查看
http://192.168.56.11:9200/_plugin/kopf/#!/cluster
下面进行节点2的配置
注释:其实两个的安装配置基本上是一样的,不同的地方我会红色标记。
# 配置文件的修改
[root@linux-node2 src]# mkdir -p /data/es-data
[root@linux-node2 src]# vim /etc/elasticsearch/elasticsearch.yml
[root@linux-node2 src]# grep "^[a-z]" /etc/elasticsearch/elasticsearch.yml  -n
17:cluster.name: caoxiaojian
23:node.name: linux-node2
33:path.data: /data/es-data
37:path.logs: /var/log/elasticsearch
43:bootstrap.mlockall: true
54:network.host: 0.0.0.0
58:http.port: 9200
79:discovery.zen.ping.multicast.enabled: false
80:discovery.zen.ping.unicast.hosts: ["192.168.56.11", "192.168.56.12"]
# 修改权限配置
[root@linux-node2 src]# chown -R elasticsearch.elasticsearch /data/
# 启动服务
[root@linux-node2 src]# systemctl start elasticsearch
[root@linux-node2 src]# systemctl status elasticsearch
● elasticsearch.service - Elasticsearch
   Loaded: loaded (/usr/lib/systemd/system/elasticsearch.service; disabled; vendor preset: disabled)
   Active: active (running) since Wed 2016-01-13 00:42:19 CST; 5s ago
     Docs: http://www.elastic.co
  Process: 2926 ExecStartPre=/usr/share/elasticsearch/bin/elasticsearch-systemd-pre-exec (code=exited, status=0/SUCCESS)
 Main PID: 2928 (java)
   CGroup: /system.slice/elasticsearch.service
           └─2928 /bin/java -Xms256m -Xmx1g -Djava.awt.headless=true -XX:+UseParNewGC -XX:+UseConcMarkSweepGC -XX:CMSI...

Jan 13 00:42:19 linux-node2.example.com systemd[1]: Starting Elasticsearch...
Jan 13 00:42:19 linux-node2.example.com systemd[1]: Started Elasticsearch.
# 查看端口
[root@linux-node2 src]# netstat -antlp|egrep "9200|9300"
tcp6       0      0 :::9200                 :::*                    LISTEN      2928/java
tcp6       0      0 :::9300                 :::*                    LISTEN      2928/java
tcp6       0      0 127.0.0.1:48200         127.0.0.1:9300          TIME_WAIT   -
tcp6       0      0 ::1:41892               ::1:9300                TIME_WAIT   -
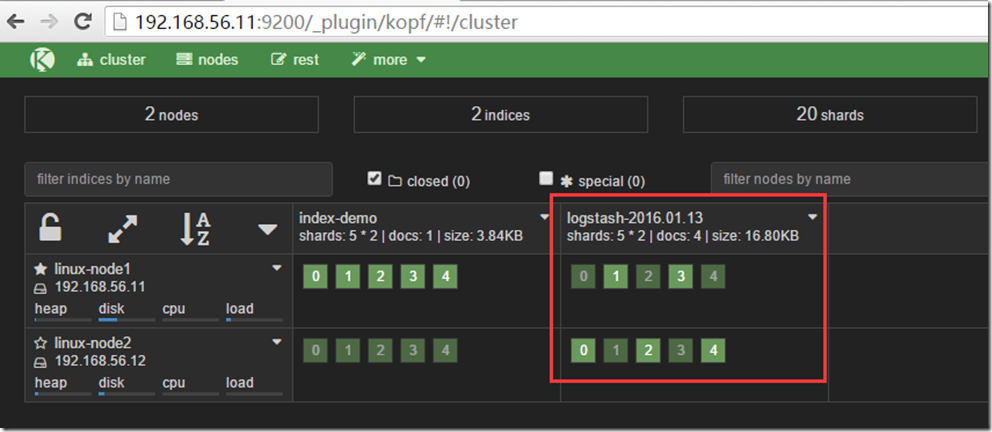
添加了node2后,咱们再来看head页面
原本只有linuxnode1节点,现在出现了node2。星号表示主节点。
在ELK中,它的主从节点没有特殊的地方,他们的数据是相同的。
(二)Logstash
基础环境安装
1:下载并安装GPG Key
[root@hadoop-node1 ~]# rpm --import https://packages.elastic.co/GPG-KEY-elasticsearch
2:添加yum仓库
[root@hadoop-node1 ~]# vim /etc/yum.repos.d/logstash.repo
[logstash-2.1]
name=Logstash repository for 2.1.x packages
baseurl=http://packages.elastic.co/logstash/2.1/centos
gpgcheck=1
gpgkey=http://packages.elastic.co/GPG-KEY-elasticsearch
enabled=1
3:安装logstash
[root@hadoop-node1 ~]# yum install -y logstash
4:logstash启动
[root@linux-node1 src]# systemctl start elasticsearch
数据的测试
1:基本的输入输出
[root@linux-node1 src]# /opt/logstash/bin/logstash -e 'input { stdin{} } output { stdout{} }'
Settings: Default filter workers: 1
Logstash startup completed
hello                                                                                           #  输入hello
2016-01-13T01:40:45.293Z linux-node1.example.com hello                                          #  输出这个
2:使用rubydebug详细输出
[root@linux-node1 src]# /opt/logstash/bin/logstash -e 'input { stdin{} } output { stdout{ codec => rubydebug} }'
Settings: Default filter workers: 1
Logstash startup completed
hello                                                                                    # 输入 hello
{
       "message" => "hello",                                                             # 输入的信息
      "@version" => "1",                                                                  # 版本
    "@timestamp" => "2016-01-13T01:43:19.454Z",                                           # 时间
          "host" => "linux-node1.example.com"                                              # 存放在哪个节点
}
3:把内容写到elasticsearch中
[root@linux-node1 src]# /opt/logstash/bin/logstash -e 'input { stdin{} } output { elasticsearch { hosts => ["192.168.56.11:9200"]} }'
Settings: Default filter workers: 1
Logstash startup completed                                       # 输入一下数据测试
123123
hehehehe
123he123he
qwert
使用rubydebug和写到elasticsearch中的区别:其实就是后面标准输出的区别。一个使用codec;一个使用elasticsearch
写到elasticsearch中在logstash中查看
4:即写到elasticsearch中又写在文件中一份
[root@linux-node1 src]# /opt/logstash/bin/logstash -e 'input { stdin{} } output { elasticsearch { hosts => ["192.168.56.11:9200"]} stdout{ codec => rubydebug}}'
Settings: Default filter workers: 1
Logstash startup completed
nishishui                                                                           # 输入的内容
{
       "message" => "nishishui",
      "@version" => "1",
    "@timestamp" => "2016-01-13T02:22:35.330Z",
          "host" => "linux-node1.example.com"
}
bugaosuni                                                                           # 输入的内容
{
       "message" => "bugaosuni",
      "@version" => "1",
    "@timestamp" => "2016-01-13T02:22:40.497Z",
          "host" => "linux-node1.example.com"
}
文本可以长期保留、操作简单、压缩比大
logstash的配置和文件的编写
1:logstash的配置
简单的配置方式
[root@linux-node1 src]# vim /etc/logstash/conf.d/01-logstash.conf
input { stdin { } }
output {
     elasticsearch { hosts => ["192.168.56.11:9200"]}
     stdout { codec => rubydebug }
}
它的执行:
[root@linux-node1 ~]# /opt/logstash/bin/logstash -f /etc/logstash/conf.d/01-logstash.conf
参考内容
https://www.elastic.co/guide/en/logstash/current/configuration.html
https://www.elastic.co/guide/en/logstash/current/configuration-file-structure.html
2:收集系统日志
[root@linux-node1 ~]# vim  file.conf
input {
    file {
      path => "/var/log/messages"
      type => "system"
      start_position => "beginning"
    }
}

output {
    elasticsearch {
       hosts => ["192.168.56.11:9200"]
       index => "system-%{+YYYY.MM.dd}"
    }
}
[root@linux-node1 ~]# /opt/logstash/bin/logstash -f file.conf
对于文件来说是一行行的收集的,但是对于logstash来说是事件
参考内容
https://www.elastic.co/guide/en/logstash/current/plugins-outputs-elasticsearch.html
3:收集java日志
其中包含上面讲到的日志收集
[root@linux-node1 ~]# cat file.conf
input {
    file {
      path => "/var/log/messages"
      type => "system"
      start_position => "beginning"
    }
}

input {
    file {
       path => "/var/log/elasticsearch/caoxiaojian.log"
       type => "es-error"
       start_position => "beginning"
    }
}


output {

    if [type] == "system"{
        elasticsearch {
           hosts => ["192.168.56.11:9200"]
           index => "system-%{+YYYY.MM.dd}"
        }
    }

    if [type] == "es-error"{
        elasticsearch {
           hosts => ["192.168.56.11:9200"]
           index => "es-error-%{+YYYY.MM.dd}"
        }
    }
}
[root@linux-node1 ~]# /opt/logstash/bin/logstash -f file.conf
如果你的日志中有type字段 那你就不能在conf文件中使用type
不需要输入任何内容,直接查看。
参考内容
https://www.elastic.co/guide/en/logstash/current/event-dependent-configuration.html
有个问题:
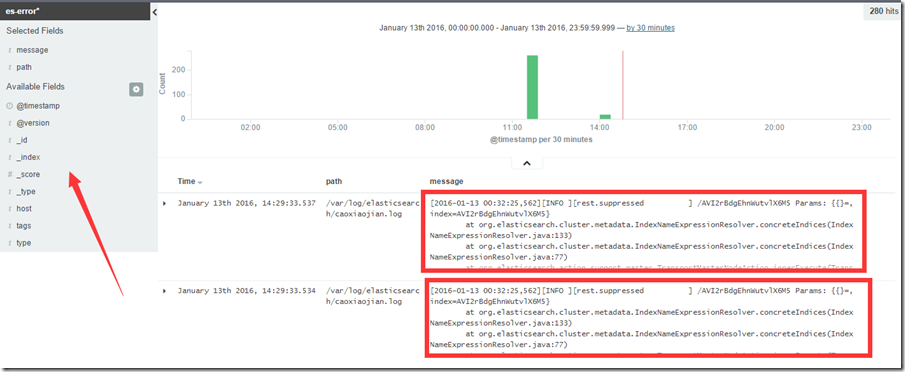
每个报错都给收集成一行了,不是按照一个报错,一个事件模块收集的。
4:将行换成事件的方式展示
[root@linux-node1 ~]# vim multiline.conf
input {
    stdin {
       codec => multiline {
          pattern => "^["
          negate => true
          what => "previous"
        }
    }
}
output {
    stdout {
      codec => "rubydebug"
     }
}
执行命令
[root@linux-node1 ~]# /opt/logstash/bin/logstash -f multiline.conf
Settings: Default filter workers: 1
Logstash startup completed
123
456
[123
{
    "@timestamp" => "2016-01-13T06:17:18.542Z",
       "message" => "123
456",
      "@version" => "1",
          "tags" => [
        [0] "multiline"
    ],
          "host" => "linux-node1.example.com"
}
123]
[456]
{
    "@timestamp" => "2016-01-13T06:17:27.592Z",
       "message" => "[123
123]",
      "@version" => "1",
          "tags" => [
        [0] "multiline"
    ],
          "host" => "linux-node1.example.com"
}
在没有遇到[的时候,系统不会收集,只有遇见[的时候,才算是一个事件,才收集起来。
参考内容
https://www.elastic.co/guide/en/logstash/current/plugins-codecs-multiline.html
(三)Kibana
kibana的安装
[root@hadoop-node1 src]#  cd /usr/local/src
[root@hadoop-node1 src]#  wget https://download.elastic.co/kibana/kibana/kibana-4.3.1-linux-x64.tar.gz
[root@hadoop-node1 src]#  tar zxf kibana-4.3.1-linux-x64.tar.gz
[root@hadoop-node1 src]#  mv kibana-4.3.1-linux-x64 /usr/local/
[root@hadoop-node1 src]#  ln -s /usr/local/kibana-4.3.1-linux-x64/ /usr/local/kibana
修改配置文件
[root@linux-node1 config]# pwd
/usr/local/kibana/config
[root@linux-node1 config]# grep "^[a-z]" kibana.yml  -n
2:server.port: 5601
5:server.host: "0.0.0.0"
12:elasticsearch.url: "http://192.168.56.11:9200"
20:kibana.index: ".kibana"
因为他一直运行在前台,要么选择开一个窗口,要么选择使用screen
安装并使用screen启动kibana
[root@linux-node1 ~]# yum -y install screen
[root@linux-node1 ~]# screen
[root@linux-node1 ~]# /usr/local/kibana/bin/kibana
  log   [14:42:44.057] [info][status][plugin:kibana] Status changed from uninitialized to green - Ready
  log   [14:42:44.081] [info][status][plugin:elasticsearch] Status changed from uninitialized to yellow - Waiting for Elasticsearch
  log   [14:42:44.083] [info][status][plugin:kbn_vislib_vis_types] Status changed from uninitialized to green - Ready
  log   [14:42:44.084] [info][status][plugin:markdown_vis] Status changed from uninitialized to green - Ready
  log   [14:42:44.095] [info][status][plugin:metric_vis] Status changed from uninitialized to green - Ready
  log   [14:42:44.103] [info][status][plugin:spyModes] Status changed from uninitialized to green - Ready
  log   [14:42:44.108] [info][status][plugin:statusPage] Status changed from uninitialized to green - Ready
  log   [14:42:44.124] [info][status][plugin:table_vis] Status changed from uninitialized to green - Ready
  log   [14:42:44.136] [info][listening] Server running at http://0.0.0.0:5601
  log   [14:42:49.135] [info][status][plugin:elasticsearch] Status changed from yellow to yellow - No existing Kibana index found
  log   [14:42:51.800] [info][status][plugin:elasticsearch] Status changed from yellow to green - Kibana index ready

# 然后ctrl+a+d
[root@linux-node1 ~]# screen -ls
There is a screen on:
    7572.pts-1.linux-node1    (Detached)
1 Socket in /var/run/screen/S-root.
访问方式:
然后点击上面的Discover
1:收集nginx的访问日志
修改nginx的配置文件
##### http 标签中
    log_format  json '{"@timestamp":"$time_iso8601",'
               '"@version":"1",'
               '"client":"$remote_addr",'
               '"url":"$uri",'
               '"status":"$status",'
               '"domain":"$host",'
               '"host":"$server_addr",'
               '"size":$body_bytes_sent,'
               '"responsetime":$request_time,'
               '"referer": "$http_referer",'
               '"ua": "$http_user_agent"'
               '}';
##### server标签中
       access_log  /var/log/nginx/access_json.log  json;
启动nginx服务
[root@linux-node1 ~]# systemctl start nginx
[root@linux-node1 ~]# systemctl status nginx
● nginx.service - The nginx HTTP and reverse proxy server
   Loaded: loaded (/usr/lib/systemd/system/nginx.service; disabled; vendor preset: disabled)
   Active: active (running) since Wed 2016-01-13 15:17:19 CST; 4s ago
  Process: 7630 ExecStart=/usr/sbin/nginx (code=exited, status=0/SUCCESS)
  Process: 7626 ExecStartPre=/usr/sbin/nginx -t (code=exited, status=0/SUCCESS)
  Process: 7625 ExecStartPre=/usr/bin/rm -f /run/nginx.pid (code=exited, status=0/SUCCESS)
 Main PID: 7633 (nginx)
   CGroup: /system.slice/nginx.service
           ├─7633 nginx: master process /usr/sbin/nginx
           └─7634 nginx: worker process

[root@linux-node1 ~]# netstat -antlp |grep 80
tcp        0      0 0.0.0.0:80              0.0.0.0:*               LISTEN      7633/nginx: master
tcp        0      0 192.168.56.11:55580     192.168.56.11:9200      TIME_WAIT   -
tcp6       0      0 :::80                   :::*                    LISTEN      7633/nginx: master
编写收集文件
这次使用json的方式收集
[root@linux-node1 ~]# cat json.conf
input {
   file {
      path => "/var/log/nginx/access_json.log"
      codec => "json"
   }
}

output {
   stdout {
      codec => "rubydebug"
   }
}
启动日志收集程序
[root@linux-node1 ~]# /opt/logstash/bin/logstash -f json.conf
访问nginx页面
就会出现以下内容
[root@linux-node1 ~]# /opt/logstash/bin/logstash -f json.conf
Settings: Default filter workers: 1
Logstash startup completed
{
      "@timestamp" => "2016-01-13T07:29:48.000Z",
        "@version" => "1",
          "client" => "192.168.56.1",
             "url" => "/index.html",
          "status" => "304",
          "domain" => "192.168.56.11",
            "host" => "192.168.56.11",
            "size" => 0,
    "responsetime" => 0.0,
         "referer" => "-",
              "ua" => "Mozilla/5.0 (Windows NT 6.3; WOW64) AppleWebKit/537.36 (KHTML, like Gecko) Chrome/46.0.2490.86 Safari/537.36",
            "path" => "/var/log/nginx/access_json.log"
}
在elasticsearch中查看
将其汇总到总文件中
[root@linux-node1 ~]# cat file.conf
input {
    file {
      path => "/var/log/messages"
      type => "system"
      start_position => "beginning"
    }

    file {
       path => "/var/log/elasticsearch/caoxiaojian.log"
       type => "es-error"
       start_position => "beginning"
       codec => multiline {
           pattern => "^["
           negate => true
           what => "previous"
       }
    }
    file {
       path = "/var/log/nginx/access_json.log"
       codec = json
       start_position => "beginning"
       type => "nginx-log"
    }
}


output {

    if [type] == "system"{
        elasticsearch {
           hosts => ["192.168.56.11:9200"]
           index => "system-%{+YYYY.MM.dd}"
        }
    }

    if [type] == "es-error"{
        elasticsearch {
           hosts => ["192.168.56.11:9200"]
           index => "es-error-%{+YYYY.MM.dd}"
        }
    }
    if [type] == "nginx-log"{
        elasticsearch {
           hosts => ["192.168.56.11:9200"]
           index => "nignx-log-%{+YYYY.MM.dd}"
        }
    }
}
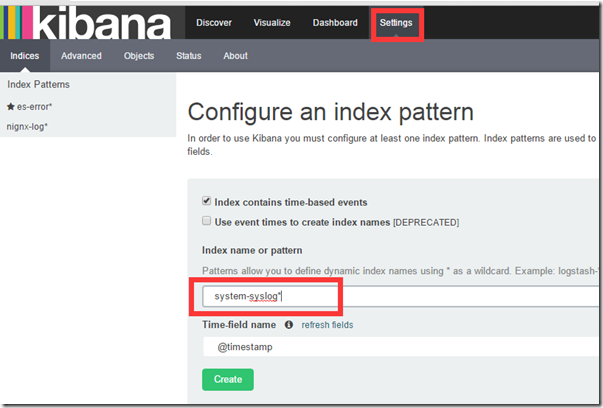
添加到kibana
这里应该写nginx-log*
2:收集系统日志
编写收集文件并执行
[root@linux-node1 ~]# cat syslog.conf
input {
    syslog {
        type => "system-syslog"
        host => "192.168.56.11"
        port => "514"
    }
}

output {
    stdout {
        codec => "rubydebug"
    }
}

[root@linux-node1 ~]# /opt/logstash/bin/logstash -f syslog.conf
重新开启一个窗口,查看服务是否启动
[root@linux-node1 ~]# netstat -ntlp|grep 514
tcp6       0      0 192.168.56.11:514       :::*                    LISTEN      7832/java
[root@linux-node1 ~]# vim /etc/rsyslog.conf
*.* @@192.168.56.11:514
[root@linux-node1 ~]# systemctl  restart rsyslog
回到原来的窗口,就会出现数据
[root@linux-node1 ~]# /opt/logstash/bin/logstash -f syslog.conf
Settings: Default filter workers: 1
Logstash startup completed
{
           "message" => "[origin software="rsyslogd" swVersion="7.4.7" x-pid="7879" x-info="http://www.rsyslog.com"] start
",
          "@version" => "1",
        "@timestamp" => "2016-01-13T08:14:53.000Z",
              "type" => "system-syslog",
              "host" => "192.168.56.11",
          "priority" => 46,
         "timestamp" => "Jan 13 16:14:53",
         "logsource" => "linux-node1",
           "program" => "rsyslogd",
          "severity" => 6,
          "facility" => 5,
    "facility_label" => "syslogd",
    "severity_label" => "Informational"
}
再次添加到总文件中
[root@linux-node1 ~]# cat file.conf
input {
    file {
      path => "/var/log/messages"
      type => "system"
      start_position => "beginning"
    }

    file {
       path => "/var/log/elasticsearch/caoxiaojian.log"
       type => "es-error"
       start_position => "beginning"
       codec => multiline {
           pattern => "^["
           negate => true
           what => "previous"
       }
    }
    file {
       path => "/var/log/nginx/access_json.log"
       codec => json
       start_position => "beginning"
       type => "nginx-log"
    }
    syslog {
        type => "system-syslog"
        host => "192.168.56.11"
        port => "514"
    }

}


output {

    if [type] == "system"{
        elasticsearch {
           hosts => ["192.168.56.11:9200"]
           index => "system-%{+YYYY.MM.dd}"
        }
    }

    if [type] == "es-error"{
        elasticsearch {
           hosts => ["192.168.56.11:9200"]
           index => "es-error-%{+YYYY.MM.dd}"
        }
    }
    if [type] == "nginx-log"{
        elasticsearch {
           hosts => ["192.168.56.11:9200"]
           index => "nignx-log-%{+YYYY.MM.dd}"
        }
    }
    if [type] == "system-syslog"{
        elasticsearch {
           hosts => ["192.168.56.11:9200"]
           index => "system-syslog-%{+YYYY.MM.dd}"
        }
    }
}
执行总文件
[root@linux-node1 ~]# /opt/logstash/bin/logstash -f file.conf
测试:
向日志中添加数据,看elasticsearch和kibana的变化
往系统日志中添加点数据(再开一个窗口)
[root@linux-node1 ~]# logger "hehehehehehe1"
[root@linux-node1 ~]# logger "hehehehehehe2"
[root@linux-node1 ~]# logger "hehehehehehe3"
[root@linux-node1 ~]# logger "hehehehehehe4"
[root@linux-node1 ~]# logger "hehehehehehe5"
出现这个图
添加到kibana中
Discover中查看
3:TCP日志的收集
(不添加到file中了,需要的话可以在添加)
编写收集文件,并启动
[root@linux-node1 ~]# vim tcp.conf
input {
    tcp {
       host => "192.168.56.11"
       port => "6666"
    }
}
output {
    stdout {
       codec => "rubydebug"
    }
}
[root@linux-node1 ~]# /opt/logstash/bin/logstash -f tcp.conf
开启另外一个窗口测试
[root@linux-node1 ~]# netstat -ntlp|grep 6666
tcp6       0      0 192.168.56.11:6666      :::*                    LISTEN      7957/java
[root@linux-node1 ~]# nc 192.168.56.11 6666 </etc/resolv.conf
查看内容
[root@linux-node1 ~]# /opt/logstash/bin/logstash -f tcp.conf
Settings: Default filter workers: 1
Logstash startup completed
{
       "message" => "# Generated by NetworkManager",
      "@version" => "1",
    "@timestamp" => "2016-01-13T08:48:17.426Z",
          "host" => "192.168.56.11",
          "port" => 44721
}
{
       "message" => "search example.com",
      "@version" => "1",
    "@timestamp" => "2016-01-13T08:48:17.427Z",
          "host" => "192.168.56.11",
          "port" => 44721
}
{
       "message" => "nameserver 192.168.56.2",
      "@version" => "1",
    "@timestamp" => "2016-01-13T08:48:17.427Z",
          "host" => "192.168.56.11",
          "port" => 44721
}
测试二:
[root@linux-node1 ~]# echo "hehe" | nc 192.168.56.11 6666
[root@linux-node1 ~]# echo "hehe" > /dev/tcp/192.168.56.11/6666   # 伪设备,
在去查看,就会显示出来
[root@linux-node1 ~]# /opt/logstash/bin/logstash -f tcp.conf
Settings: Default filter workers: 1
Logstash startup completed
{
       "message" => "hehe",
      "@version" => "1",
    "@timestamp" => "2016-01-13T08:56:19.635Z",
          "host" => "192.168.56.11",
          "port" => 45490
}
{
       "message" => "hehe",
      "@version" => "1",
    "@timestamp" => "2016-01-13T08:56:54.620Z",
          "host" => "192.168.56.11",
          "port" => 45543
4:使用filter
编写文件
[root@linux-node1 ~]# cat grok.conf
input {
    stdin{}
}
filter {
  grok {
    match => { "message" => "%{IP:client} %{WORD:method} %{URIPATHPARAM:request} %{NUMBER:bytes} %{NUMBER:duration}" }
  }
}
output {
    stdout{
        codec => "rubydebug"
    }
}
执行检测
[root@linux-node1 ~]# /opt/logstash/bin/logstash -f grok.conf
Settings: Default filter workers: 1
Logstash startup completed
55.3.244.1 GET /index.html 15824 0.043  #输入这个,然后下面自动形成字典的方式
{
       "message" => "55.3.244.1 GET /index.html 15824 0.043",
      "@version" => "1",
    "@timestamp" => "2016-01-13T15:02:55.845Z",
          "host" => "linux-node1.example.com",
        "client" => "55.3.244.1",
        "method" => "GET",
       "request" => "/index.html",
         "bytes" => "15824",
      "duration" => "0.043"
}
其实上面使用的那些变量在程序中都有定义
[root@linux-node1 logstash-patterns-core-2.0.2]# cd /opt/logstash/vendor/bundle/jruby/1.9/gems/logstash-patterns-core-2.0.2/patterns/
[root@linux-node1 patterns]# ls
aws     bro   firewalls      haproxy  junos         mcollective           mongodb  postgresql  redis
bacula  exim  grok-patterns  java     linux-syslog  mcollective-patterns  nagios   rails       ruby
[root@linux-node1 patterns]# cat grok-patterns
filter {
      # drop sleep events
    grok {
        match => { "message" =>"SELECT SLEEP" }
        add_tag => [ "sleep_drop" ]
        tag_on_failure => [] # prevent default _grokparsefailure tag on real records
      }
     if "sleep_drop" in [tags] {
        drop {}
     }
     grok {
        match => [ "message", "(?m)^# User@Host: %{USER:user}[[^]]+] @ (?:(?<clienthost>S*) )?[(?:%{IP:clientip})?]s+Id: %{NUMBER:row_id:int}s*# Query_time: %{NUMBER:query_time:float}s+Lock_time: %{NUMBER:lock_time:float}s+Rows_sent: %{NUMBER:rows_sent:int}s+Rows_examined: %{NUMBER:rows_examined:int}s*(?:use %{DATA:database};s*)?SET timestamp=%{NUMBER:timestamp};s*(?<query>(?<action>w+)s+.*)
#s*" ]
      }
      date {
        match => [ "timestamp", "UNIX" ]
        remove_field => [ "timestamp" ]
      }
}
5:mysql慢查询
收集文件
[root@linux-node1 ~]# cat mysql-slow.conf
input {
    file {
        path => "/root/slow.log"
        type => "mysql-slowlog"
        codec => multiline {
            pattern => "^# User@Host"
            negate => true
            what => "previous"
        }
    }
}

filter {
      # drop sleep events
    grok {
        match => { "message" =>"SELECT SLEEP" }
        add_tag => [ "sleep_drop" ]
        tag_on_failure => [] # prevent default _grokparsefailure tag on real records
      }
     if "sleep_drop" in [tags] {
        drop {}
     }
     grok {
        match => [ "message", "(?m)^# User@Host: %{USER:user}[[^]]+] @ (?:(?<clienthost>S*) )?[(?:%{IP:clientip})?]s+Id: %{NUMBER:row_id:int}s*# Query_time: %{NUMBER:query_time:float}s+Lock_time: %{NUMBER:lock_time:float}s+Rows_sent: %{NUMBER:rows_sent:int}s+Rows_examined: %{NUMBER:rows_examined:int}s*(?:use %{DATA:database};s*)?SET timestamp=%{NUMBER:timestamp};s*(?<query>(?<action>w+)s+.*)
#s*" ]
      }
      date {
        match => [ "timestamp", "UNIX" ]
        remove_field => [ "timestamp" ]
      }
}


output {
    stdout {
       codec =>"rubydebug"
    }
}
执行检测.
##### 上面需要的slog.log是自己上传的,然后自己插入数据保存后,会显示
[root@linux-node1 ~]# /opt/logstash/bin/logstash -f mysql-slow.conf
接下来又遇见一个问题,一旦我们的elasticsearch出现问题,就不能进行处理,那怎么办呢?可以这样啊,使用一个中间件,先写到中间件上,然后在从中间件中写到ES中。不就完美的解决了嘛
(四)使用redis作为中间件
1:redis的配置和启动
[root@linux-node1 ~]# vim /etc/redis.conf
daemonize yes
bind 192.168.56.11
[root@linux-node1 ~]# systemctl start redis
[root@linux-node1 ~]# netstat -anltp|grep 6379
tcp        0      0 192.168.56.11:6379      0.0.0.0:*               LISTEN      8453/redis-server 1
[root@linux-node1 ~]# redis-cli -h 192.168.56.11
192.168.56.11:6379> info
2:编写从Client端收集数据的文件
[root@linux-node1 ~]# cat redis-out.conf
input {
   stdin {}
}

output {
   redis {
      host => "192.168.56.11"
      port => "6379"
      db => "6"
      data_type => "list"
      key => "demo"
   }
}
3:执行收集数据的文件,并输入数据hello redis
[root@linux-node1 ~]# /opt/logstash/bin/logstash -f redis-out.conf
Settings: Default filter workers: 1
Logstash startup completed
hello redis
4:在redis中查看数据
[root@linux-node1 ~]# redis-cli -h 192.168.56.11
192.168.56.11:6379> info
### 在最下面
# Keyspace
db6:keys=1,expires=0,avg_ttl=0
### 显示是db6
192.168.56.11:6379> select 6
OK
192.168.56.11:6379[6]> keys *
1) "demo"
192.168.56.11:6379[6]> LINDEX demo -1
"{"message":"hello redis","@version":"1","@timestamp":"2016-01-13T16:23:23.810Z","host":"linux-node1.example.com"}"
5:继续随便写点数据
[root@linux-node1 ~]# /opt/logstash/bin/logstash -f redis-out.conf
Settings: Default filter workers: 1
Logstash startup completed
hello redis
fa
fasd
fasdfwe
tgsdw
ds
f
ag
we
d

ggr
e
qer
gqer
grfdgdf
fdasvf
rwetgqer
gddgdfa
dfagag
4tq
qtrqfds
g3qgfd
fgfdsfgd
gqerngjh
6:在redis中查看
#### 在redis中查看长度
192.168.56.11:6379[6]> LLEN demo
(integer) 25
7:将redis中的内容写到ES中
[root@linux-node1 ~]# cat redis-in.conf
input {
    redis {
      host => "192.168.56.11"
      port => "6379"
      db => "6"
      data_type => "list"
      key => "demo"
   }
}

output {
    elasticsearch {
      hosts => ["192.168.56.11:9200"]
      index => "redis-in-%{+YYYY.MM.dd}"
    }
}
8:在redis中查看,数据被读出
192.168.56.11:6379[6]> LLEN demo
(integer) 25
192.168.56.11:6379[6]> LLEN demo
(integer) 24
192.168.56.11:6379[6]> LLEN demo
^[[A(integer) 11
192.168.56.11:6379[6]>
192.168.56.11:6379[6]> LLEN demo
(integer) 0
9:收集所有的日志到redis中
[root@linux-node1 ~]# cat shipper.conf
input {
    file {
      path => "/var/log/messages"
      type => "system"
      start_position => "beginning"
    }

    file {
       path => "/var/log/elasticsearch/caoxiaojian.log"
       type => "es-error"
       start_position => "beginning"
       codec => multiline {
           pattern => "^["
           negate => true
           what => "previous"
       }
    }
    file {
       path => "/var/log/nginx/access_json.log"
       codec => json
       start_position => "beginning"
       type => "nginx-log"
    }
    syslog {
        type => "system-syslog"
        host => "192.168.56.11"
        port => "514"
    }

}


output {
   if [type] == "system"{
     redis {
        host => "192.168.56.11"
        port => "6379"
        db => "6"
        data_type => "list"
        key => "system"
     }
   }

    if [type] == "es-error"{
      redis {
        host => "192.168.56.11"
        port => "6379"
        db => "6"
        data_type => "list"
        key => "demo"
        }
     }
    if [type] == "nginx-log"{
       redis {
          host => "192.168.56.11"
          port => "6379"
          db => "6"
          data_type => "list"
          key => "nginx-log"
       }
    }
    if [type] == "system-syslog"{
       redis {
          host => "192.168.56.11"
          port => "6379"
          db => "6"
          data_type => "list"
          key => "system-syslog"
       }
     }
}
启动后,在redis中查看
[root@linux-node1 ~]# /opt/logstash/bin/logstash -f shipper.conf
Settings: Default filter workers: 1
Logstash startup completed

[root@linux-node1 ~]# redis-cli -h 192.168.56.11
192.168.56.11:6379> select 6
OK
192.168.56.11:6379[6]> keys *
1) "demo"
2) "system"
192.168.56.11:6379[6]> keys *
1) "nginx-log"
2) "demo"
3) "system"
192.168.56.11:6379[6]> keys *
1) "nginx-log"
2) "demo"
3) "system"
另开一个窗口,添加点日志
[root@linux-node1 ~]# logger "12325423"
[root@linux-node1 ~]# logger "12325423"
[root@linux-node1 ~]# logger "12325423"
[root@linux-node1 ~]# logger "12325423"
[root@linux-node1 ~]# logger "12325423"
[root@linux-node1 ~]# logger "12325423"
[root@linux-node1 ~]# logger "12325423"
又会增加日志
192.168.56.11:6379[6]> keys *
1) "system-syslog"
2) "nginx-log"
3) "demo"
4) "system"
其实可以在任意的一台ES中将数据从redis读取到ES中,下面咱们在node2节点,将数据从redis读取到ES中
[root@linux-node2 ~]# cat file.conf
input {
     redis {
        type => "system"
        host => "192.168.56.11"
        port => "6379"
        db => "6"
        data_type => "list"
        key => "system"
     }

      redis {
        type => "es-error"
        host => "192.168.56.11"
        port => "6379"
        db => "6"
        data_type => "list"
        key => "es-error"
        }
       redis {
          type => "nginx-log"
          host => "192.168.56.11"
          port => "6379"
          db => "6"
          data_type => "list"
          key => "nginx-log"
       }
       redis {
          type => "system-syslog"
          host => "192.168.56.11"
          port => "6379"
          db => "6"
          data_type => "list"
          key => "system-syslog"
       }

}


output {

    if [type] == "system"{
        elasticsearch {
           hosts => ["192.168.56.11:9200"]
           index => "system-%{+YYYY.MM.dd}"
        }
    }

    if [type] == "es-error"{
        elasticsearch {
           hosts => ["192.168.56.11:9200"]
           index => "es-error-%{+YYYY.MM.dd}"
        }
    }
    if [type] == "nginx-log"{
        elasticsearch {
           hosts => ["192.168.56.11:9200"]
           index => "nignx-log-%{+YYYY.MM.dd}"
        }
    }
    if [type] == "system-syslog"{
        elasticsearch {
           hosts => ["192.168.56.11:9200"]
           index => "system-syslog-%{+YYYY.MM.dd}"
        }
    }
}
检查
192.168.56.11:6379[6]> keys *
1) "system-syslog"
2) "nginx-log"
3) "demo"
4) "system"
192.168.56.11:6379[6]> keys *
1) "demo"
192.168.56.11:6379[6]> del demo
(integer) 1
192.168.56.11:6379[6]> keys *
(empty list or set)
同时去kibana看 日志都有了
可以执行这个 去查看nginx日志
[root@linux-node1 ~]# ab -n10000 -c1 http://192.168.56.11/
可以起多个redis写到ES中


