上一次我们简单实现了HTML模拟Vue实现数据渲染,发现还是有很多问题的,这次继续进行优化:
- 代码没有整合
- 只考虑了但属性,而Vue中大量使用了层级( {{ child.name }} )
- Vue使用的是 虚拟DOM
下面将通过这三个内容简单说明Vue的实现
页面节点:
<body>
    <div id="root">
        <div>
            <p>{{ name }} - {{ message }}</p>
        </div>
        <div>{{ name }}</div>
        <div>{{ message }}</div>
    </div>
</body>
一、封装代码
首先,我们先将之前代码进行封装
let rkuuohao = /{{(.+?)}}/g;

function JGVue(options) {
    // 内部数据使用下划线,只读数据使用$开头
    this._data = options.data
    this._el = options.el

    // 准备工作( 准备模版 )
    this._templateDOM = document.querySelector(this._el)
    this._parent = this._templateDOM.parentNode
    // 渲染工作
    this.reder()

}

function compiler(tmpNode, data) {
    let childNodes = tmpNode.childNodes
    for (let i = 0; i < childNodes.length; i++) {
        let type = childNodes[i].nodeType // 1 元素,3文本节点

        if (type === 3) {
            // 文本节点可以判断里面是否含有 {{}} 插值
            let txt = childNodes[i].nodeValue // 该属性只有文本节点才有效
            txt = txt.replace(rkuuohao, (_, g) => {
                let key = g.trim()
                let value = data[key]
                return value
            })
            childNodes[i].nodeValue = txt

        } else if (type === 1) {
            // 元素,考虑有没有子元素
            compiler(childNodes[i], data)
        }
    }
}

// 将模版和数据 => 得到html,加载到页面中
JGVue.prototype.reder = function () {
    this.compiler()
}

// 编译,将模版与数据结合
JGVue.prototype.compiler = function () {
    let realHTMLDOM = this._templateDOM.cloneNode(true) // 用 模版 拷贝得到一个 准DOM
    compiler(realHTMLDOM, this._data)
    this.update(realHTMLDOM)
}

// 将DOM对元素,放入页面中
JGVue.prototype.update = function (real) {
    this._parent.replaceChild(real, document.querySelector("#root"))
}

let app = new JGVue({
    el: '#root',
    data: {
        name: 'zhou',
        message: 'info'
    }
})
二、实现层级访问
所谓层级,就是通过访问对象的形式( 数据为{info:{infoData:{name},txt:'测试'}},调用通过 {{ info.infoData.name }} {{ info.txt }} )来进行调用。
// 使用 ‘xxx.yyy.zzz’ 可以访问某一个对象
function getValueByPath(obj, path) {
    let paths = path.split('.') // ['xxx','yyy','zzz']
    // 先得到 obj.xxx,再得到结果中的 yyy,再得到结果中的zzz
    // let res = null;
    // res = obj[paths[0]]
    // res = obj[paths[1]]
    // res = obj[paths[2]]

    let res = obj;
    let prop;
    while (prop = paths.shift()) {
        res = res[prop]
    }
    return res
}
在封装中调用
function compiler(tmpNode, data) {
    let childNodes = tmpNode.childNodes
    for (let i = 0; i < childNodes.length; i++) {
        let type = childNodes[i].nodeType // 1 元素,3文本节点

        if (type === 3) {
            // 文本节点可以判断里面是否含有 {{}} 插值
            let txt = childNodes[i].nodeValue // 该属性只有文本节点才有效
            txt = txt.replace(rkuuohao, (_, g) => {
                let path = g.trim()
                let value = getValueByPath(data, path) // 深度获取对象值
                return value
            })
            childNodes[i].nodeValue = txt

        } else if (type === 1) {
            // 元素,考虑有没有子元素
            compiler(childNodes[i], data)
        }
    }
}
在 compiler() 中调用 getValueByPath() ,传入数据data和路径path,实现深度取值。
三、使用虚拟DOM
使用虚拟DOM,那么虚拟DOM的结构又是什么样的呢?先简单说几种
<div / > => { tag: 'div' }
文本节点 => { tag: undefined, value: '文本节点' }
<div title="1" class="c" /> => { title: '1', class: 'c' }
<div><div/ ></div> => { tag: 'div', children:[ { tag: 'div' } ] }
下面针对几种情况实现虚拟DOM
首先创建节点类
class VNode {
    constructor(tag, data, value, type) {
        this.tag = tag && tag.toLowerCase()
        this.data = data
        this.value = value
        this.type = type
        this.children = []
    }

    appendChild(vnode) {
        this.children.push(vnode)
    }
}
使用递归遍历DOM元素,生成虚拟DOM
// Vue源码使用栈结构,使用栈存储父元素来实现递归生成
function getVNode(node) {
    let nodeType = node.nodeType
    let _vnode = null
    if (nodeType === 1) {
        // 元素
        let nodeName = node.nodeName
        let attrs = node.attributes
        let _attrObj = {}
        for (let i = 0; i < attrs.length; i++) {
            _attrObj[attrs[i].nodeName] = attrs[i].nodeValue
        }
        _vnode = new VNode(nodeName, _attrObj, undefined, nodeType)

        // 考虑 node 的子元素
        let childNodes = node.childNodes
        for (let i = 0; i < childNodes.length; i++) {
            _vnode.appendChild(getVNode(childNodes[i])) // 递归
        }

    } else if (nodeType === 3) {
        // 文本
        _vnode = new VNode(undefined, undefined, node.nodeValue)
    }
    return _vnode
}
虚拟 DOM 转换为真正的 DOM
function parseVNode(vnode) {
    // 创建真实DOM
    let type = vnode.type
    if (type === 3) {
        return document.createTextNode(vnode.value) // 创建文本节点
    } else if (type === 1) {
        let _node = document.createElement(vnode.tag)

        // 属性
        let data = vnode.data
        Object.keys(data).forEach(key => {
            let attrName = key
            let attrValue = data[key]
            _node.setAttribute(attrName, attrValue)
        })

        // 子元素
        let children = vnode.children
        children.forEach(subvnode => {
            _node.appendChild(parseVNode(subvnode)); // 递归转换子元素 ( 虚拟DOM )

        })

        return _node
    }
}
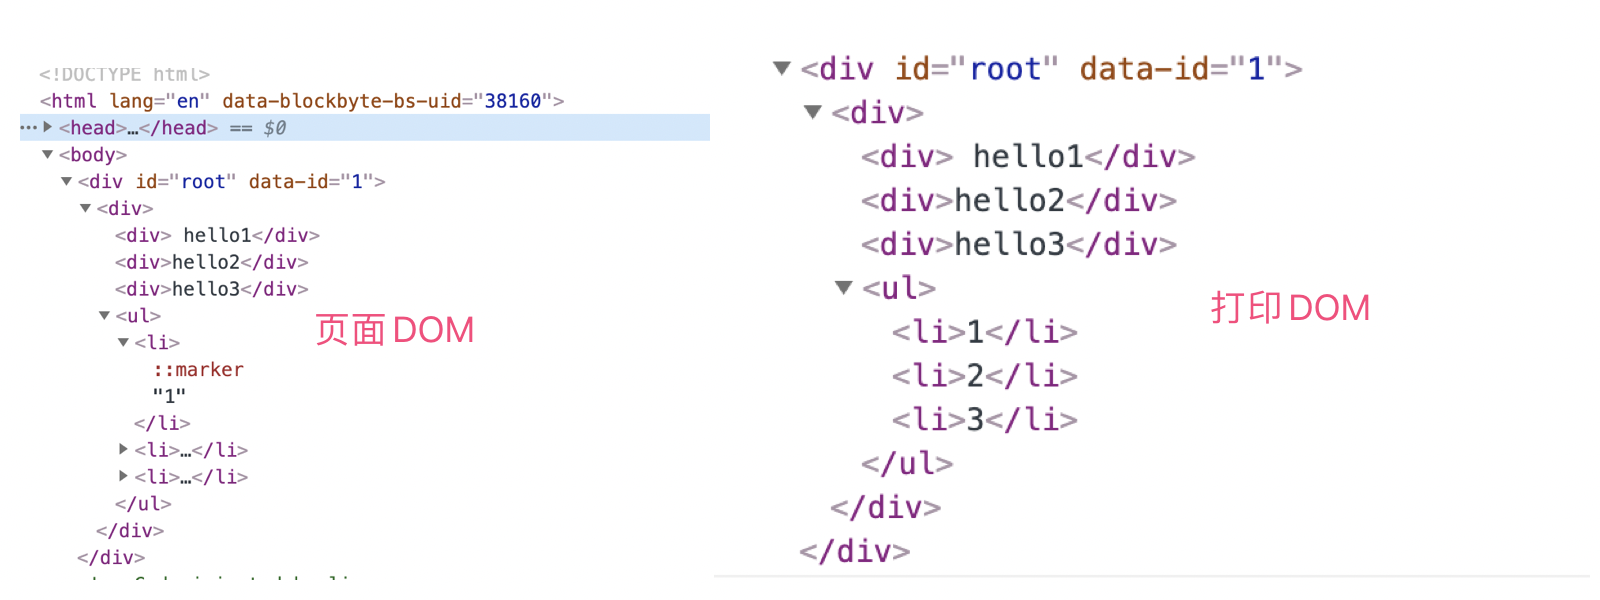
到这里,虚拟DOM已经实现,下面来测试
let root = document.querySelector("#root")
let vroot = getVNode(root)
console.log(vroot, 'vroot');
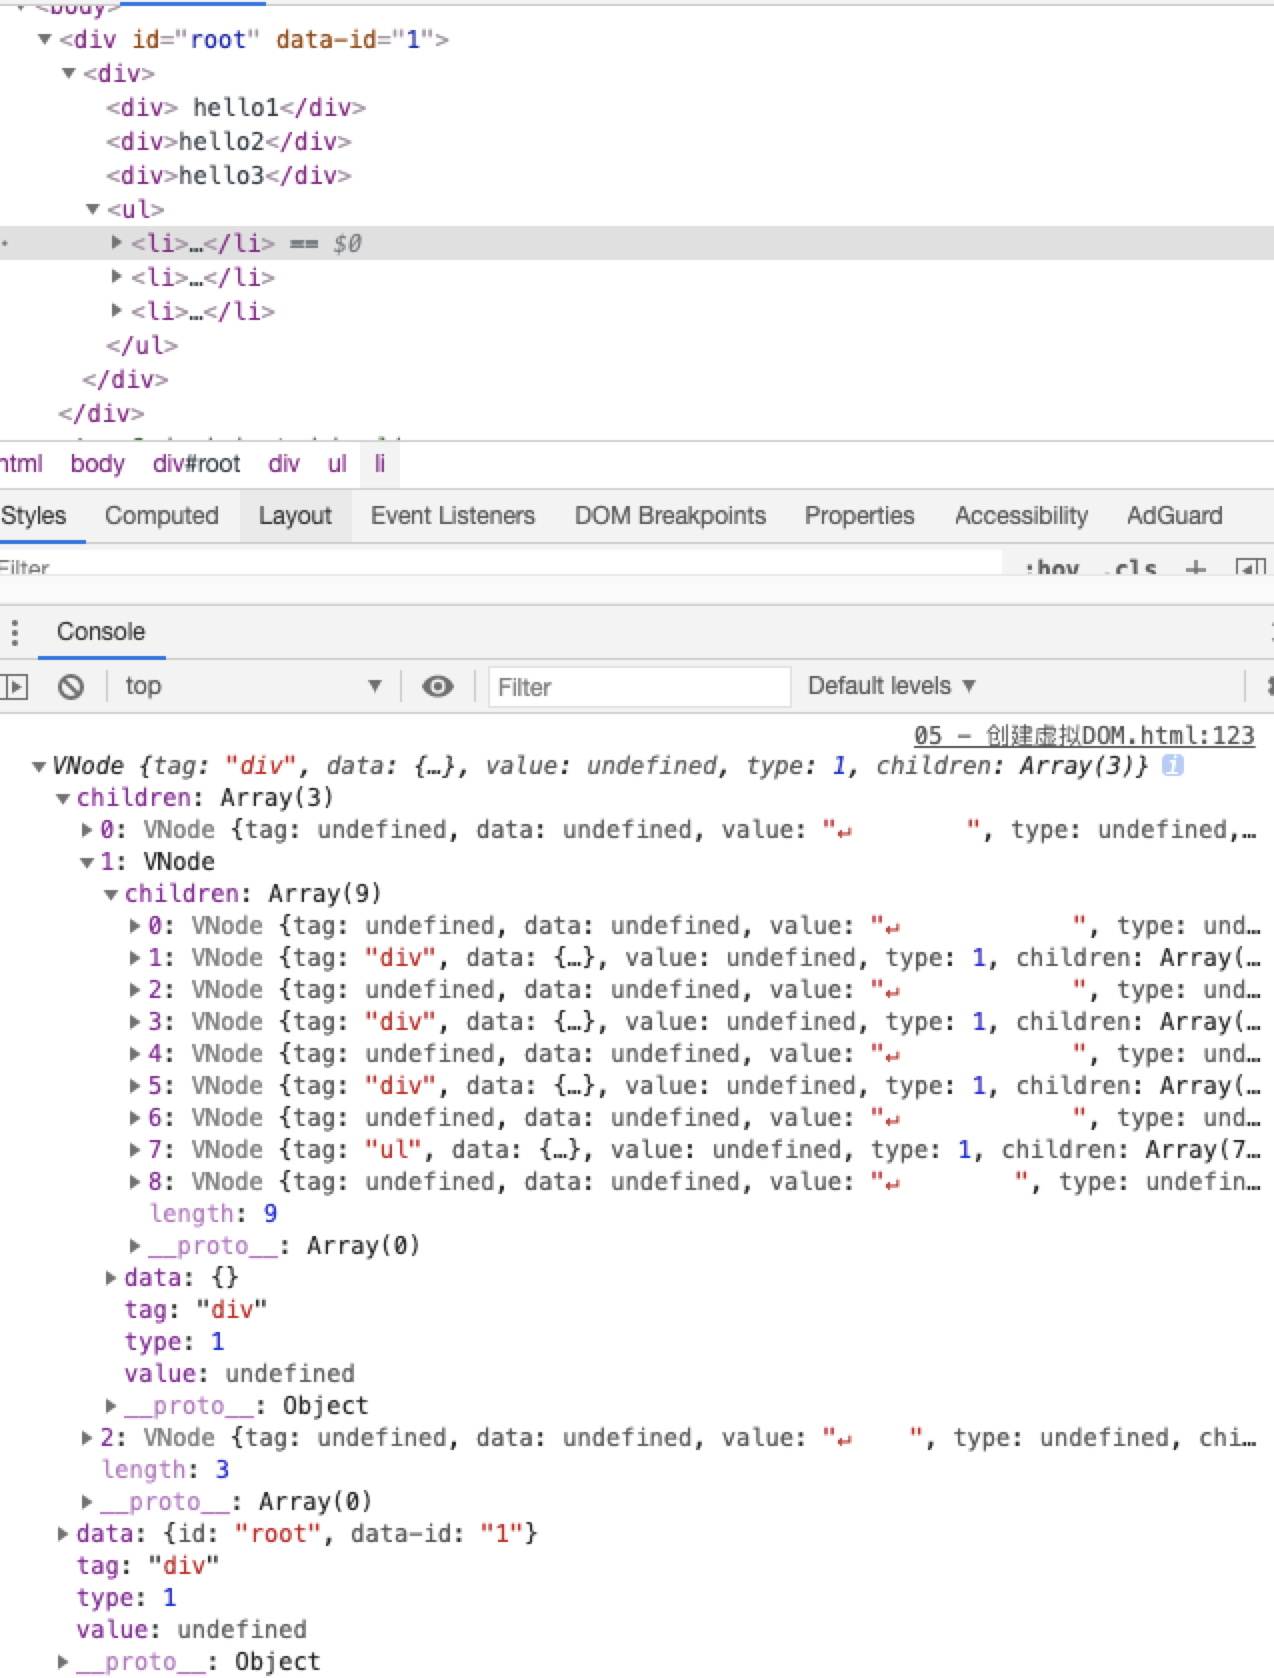
let dom = parseVNode(vroot)
console.log(dom);
现在,我们说的三个问题已经完成了,下面将代码整合,附上完整代码
/********  虚拟DOM - start  *********/
class VNode {
    constructor(tag, data, value, type) {
        this.tag = tag && tag.toLowerCase()
        this.data = data
        this.value = value
        this.type = type
        this.children = []
    }

    appendChild(vnode) {
        this.children.push(vnode)
    }
}

// 使用递归便利DOM元素,生成虚拟DOM
// Vue源码使用栈结构,使用栈存储父元素来实现递归生成
function getVNode(node) {
    let nodeType = node.nodeType
    let _vnode = null
    if (nodeType === 1) {
        // 元素
        let nodeName = node.nodeName
        let attrs = node.attributes
        let _attrObj = {}
        for (let i = 0; i < attrs.length; i++) {
            _attrObj[attrs[i].nodeName] = attrs[i].nodeValue
        }
        _vnode = new VNode(nodeName, _attrObj, undefined, nodeType)

        // 考虑 node 的子元素
        let childNodes = node.childNodes
        for (let i = 0; i < childNodes.length; i++) {
            _vnode.appendChild(getVNode(childNodes[i])) // 递归
        }

    } else if (nodeType === 3) {
        // 文本
        _vnode = new VNode(undefined, undefined, node.nodeValue, nodeType)
    }
    return _vnode
}

// 将 vnode 转换为真正的 DOM
function parseVNode(vnode) {
    // 创建真实DOM
    let type = vnode.type
    if (type === 3) {
        return document.createTextNode(vnode.value) // 创建文本节点
    } else if (type === 1) {
        let _node = document.createElement(vnode.tag)

        // 属性
        let data = vnode.data
        Object.keys(data).forEach(key => {
            let attrName = key
            let attrValue = data[key]
            _node.setAttribute(attrName, attrValue)
        })

        // 子元素
        let children = vnode.children
        children.forEach(subvnode => {
            _node.appendChild(parseVNode(subvnode)); // 递归转换子元素 ( 虚拟DOM )

        })

        return _node
    }
}
/********  虚拟DOM - end  *********/

let rkuohao = /{{(.+?)}}/g;

function JGVue(options) {
    // 内部数据使用下划线,只读数据使用$开头
    this._data = options.data
    this._el = options.el

    // 准备工作( 准备模版 )
    this._templateDOM = document.querySelector(this._el)
    this._parent = this._templateDOM.parentNode
    // 渲染工作
    this.reder()

}
// 根据路径访问对象成员
function getValueByPath(obj, path) {
    let paths = path.split('.')

    let res = obj;
    let prop;
    while (prop = paths.shift()) {
        res = res[prop]
    }
    return res
}

function combine(vnode, data) {
    let _type = vnode.type
    let _data = vnode.data
    let _value = vnode.value
    let _tag = vnode.tag
    let _children = vnode.children

    let _vnode = null
    if (_type === 3) {
        // 文本
        // 对文本处理
        _value = _value.replace(rkuohao, (_, g) => {
            return getValueByPath(data, g.trim())
        })
        _vnode = new VNode(_tag, _data, _value, _type)
    } else if (_type === 1) {
        // 元素
        _vnode = new VNode(_tag, _data, _value, _type)
        _children.forEach(_subvnode => _vnode.appendChild(combine(_subvnode, data)));
    }

    return _vnode
}

// 将模版和数据 => 得到html,加载到页面中
JGVue.prototype.reder = function () {
    this.compiler()

}

// 编译,将模版与数据结合
JGVue.prototype.compiler = function () {
    let ast = getVNode(this._templateDOM)
    let _tmp = combine(ast, this._data)
    this.update(_tmp)
}

// 将DOM对元素,放入页面中
JGVue.prototype.update = function (real) {
    let realDOM = parseVNode(real)
    this._parent.replaceChild(realDOM, document.querySelector("#root"))
}

let app = new JGVue({
    el: '#root',
    data: {
        name: 'zhou',
        message: 'info'
    }
})
注意:这里对“将虚拟DOM与数据结合”方法进行重新封装,并有 compiler 更名为 combine 。