转载:https://sefiks.com/2018/01/01/facial-expression-recognition-with-keras/
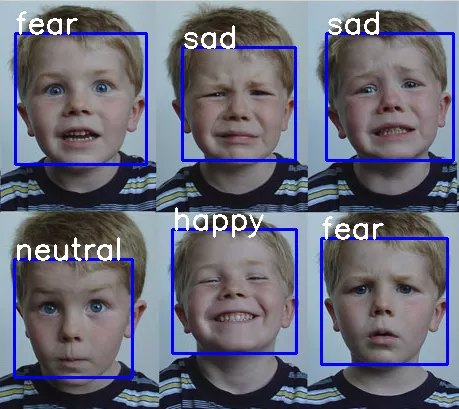
基于上次的内容,这节内容主要介绍如何利用摄像头进行实时的人脸表情识别。
(1)首先实时的检测出人脸,然后把检测出的人脸截取下来送到模型中去做判别。这里检测人脸用到了opencv中自带的人脸检测器
import cv2
face_cascade = cv2.CascadeClassifier('C:/ProgramData/Anaconda3/envs/tensorflow/Library/etc/haarcascades/haarcascade_frontalface_default.xml')
img = cv2.imread('/data/friends.jpg')
gray = cv2.cvtColor(img, cv2.COLOR_BGR2GRAY) #transform image to gray scale
faces = face_cascade.detectMultiScale(gray, 1.3, 5)
for (x,y,w,h) in faces:
#print(faces)
  cv2.rectangle(img,(x,y),(x+w,y+h),(255,0,0),2)
cv2.imshow('img',img)
(2)上边是检测静态图片的,检测实时检测人脸的方式是:
cap = cv2.VideoCapture(0)
while cap.isOpened:
    ret,img = cap.read()
    #转化为灰色图片
    gray = cv2.cvtColor(img,cv2.COLOR_BGR2GRAY)
    #检测人脸
    faces = face_cascade.detectMultiScale(gray,1.3,5)
    #框出人脸
    for (x,y,w,h) in faces:
        cv2.rectangle(img,(x,y),(x+w,y+h),(0,255,0),2)
   cv2.imshow("camera", img)
if cv2.waitKey(30) & 0xFF == ord('q'):
break
cap.release()
cv2.destroyAllWindows()
(3)检测出人脸后,我们能够得到人脸的上下左右坐标,然后根据坐标可截取到人脸。然后把截取到的人脸转变为48*48的大小。
detected_face = img[int(y):int(y+h), int(x):int(x+w)] #crop detected face
detected_face = cv2.cvtColor(detected_face, cv2.COLOR_BGR2GRAY) #transform to gray scale
detected_face = cv2.resize(detected_face, (48, 48)) #resize to 48x48
(4)表情识别,首先加载训练好的模型和权重
from keras.models import model_from_json
model = model_from_json(open("facial_expression_model_structure.json", "r").read())
model.load_weights('facial_expression_model_weights.h5') #load weights
(5) 然后进行识别
img_pixels = image.img_to_array(detected_face)
img_pixels = np.expand_dims(img_pixels, axis = 0)

img_pixels /= 255

predictions = model.predict(img_pixels)

#find max indexed array
max_index = np.argmax(predictions[0])

emotions = ('angry', 'disgust', 'fear', 'happy', 'sad', 'surprise', 'neutral')
emotion = emotions[max_index]

cv2.putText(img, emotion, (int(x), int(y)), cv2.FONT_HERSHEY_SIMPLEX, 1, (255,255,255), 2)
实验结果:
