1. Freight robot

The Fetch and Freight Research Edition Robots are indoor laboratory robots.
Coordinate System
The coordinate frames for all links in the Fetch and Freight are defined with positive z-axis up, positive x-axis forward, and positive y-axis to the robot-left when Fetch is in the home pose. All joint angle conventions are chosen such that from the home pose, positive motion of the joint results in positive motion around a positive axis of a joint coordinate frame (i.e. right handed).
Access Panel
Fetch and Freight both have an access panel with 2 USB, an Ethernet, and an HD Video port. All of these ports are connected directly to the onboard computer. In addition, Fetch has an extra USB port on the head.
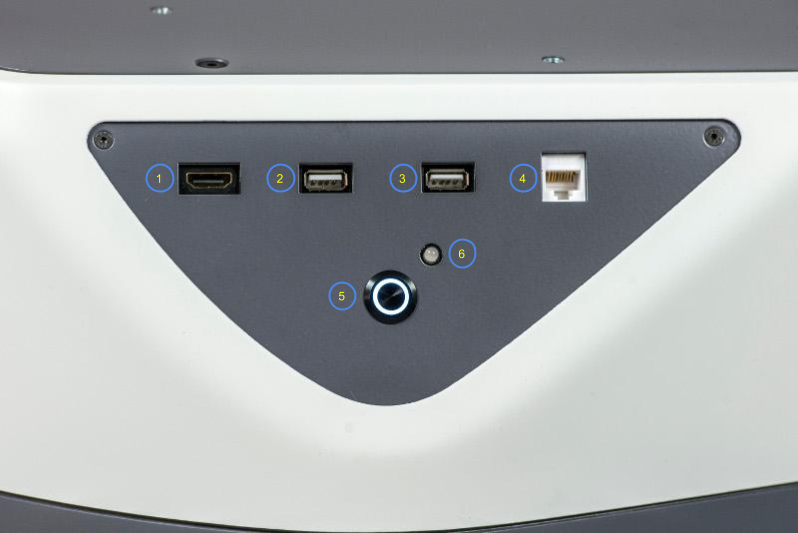
| Item # | Item Name |
|---|---|
| 1 | HD Video Port |
| 2 | USB Port 1 |
| 3 | USB Port 2 |
| 4 | Ethernet Port |
| 5 | Power Button |
| 6 | Charge Indicator Light |
The access panel is also the location of the power button which turns the robot on or off. This switch is connected to the mainboard and will only work if the power disconnect switch (the red one on the lower back of the robot) is in the ON position. Pressing the power button until it lights up with boot the robot, including the computer. To turn the robot off, press and hold the illuminated power button on the access panel until it starts blinking. The button will continue blinking until the computer has successfully shut down, and then power will be disconnected.
Base Laser
Both Fetch and Freight have a SICK TIM571 scanning range finder. The laser has a range of 25m, 220° field of view, 15Hz update rate and angular resolution of 1/3°. The laser publishes both distance and RSSI (Received Signal Strength Indication) to the base_scan topic.
IMU
The mainboard of Fetch and Freight have a 6-axis inertial measurement unit (IMU). The gyroscope within the IMU is capable of measuring +/-2000 degrees per second, while the accelerometers are capable of measuring +/-2g. See IMU Interface for details on the ROS API.
2. Using the Robot Joystick to Teleoperate a Freight robot
Each Fetch and Freight ship with a robot joystick. Whenever the robot drivers are running, so is joystick teleop. The joystick is capable of controlling the movement of the robot base, torso, head and gripper.
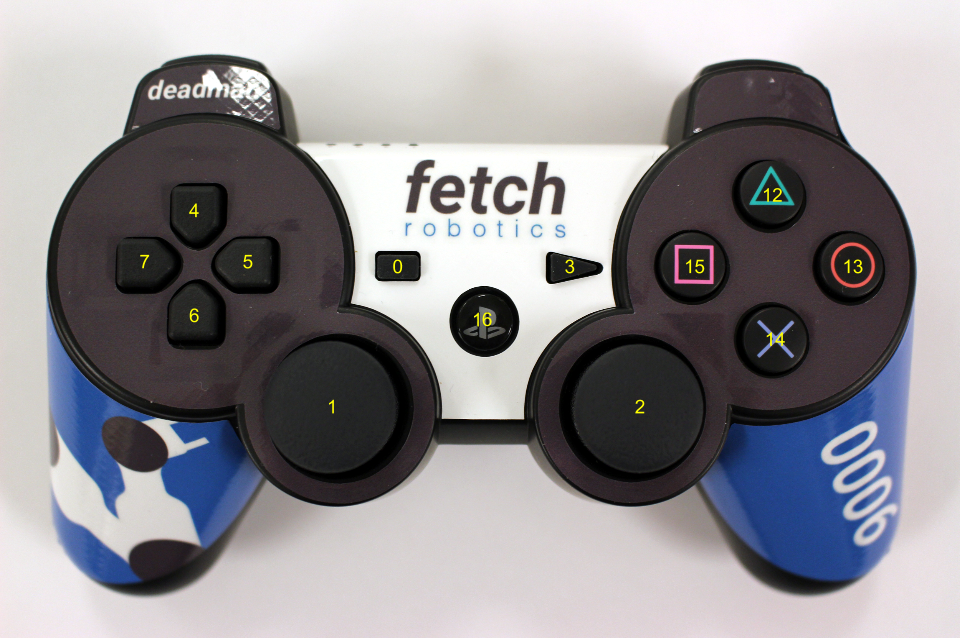
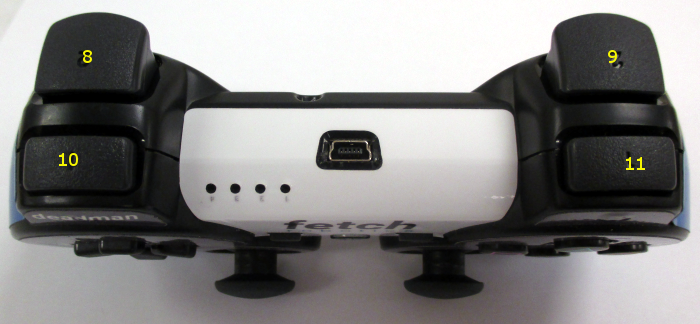
| Button # | Function (details below) |
|---|---|
| 0 | Open gripper |
| 1 | Control robot turning |
| 2 | Control forward/backward driving |
| 3 | Close gripper |
| 4 | Disable motor position holding |
| 5 | Not used |
| 6 | Arm tuck |
| 7 | Not used |
| 8 | Head control deadman |
| 9 | Not used |
| 10 | Primary deadman |
| 11 | Not used |
| 12 | Torso up |
| 13 | Not used |
| 14 | Torso down |
| 15 | Not used |
| 16 | Pair/unpair with robot |
To pair the controller with the robot, press the middle button (16) once the robot has powered on. The controller will vibrate once successful. To unpair, hold the button for 10 s. The LED indicator on top will turn off.
To drive the robot base, hold the primary deadman button (button 10 above) and use the two joysticks. The left joystick controls turning velocity while the right joystick controls forward velocity.