在看这篇文章之前,可以先看看vue:https://cn.vuejs.org/v2/guide/instance.html#生命周期图示
官网主要介绍了beforeCreate、created、beforeMount、mounted、beforeUpdate、update、befpreDestroy、destroyed八个阶段(其实还有active等阶段)。
下面我们通过一个组件的执行输出来搞清楚每个阶段发生了什么。
<template>
<div id="wer">
    <h1 @click="updateData">{{message}}</h1>
    <h2>{{helloCom}}</h2>
</div>
</template>
<script>
export default {
    data() {
      return{
          message: 'Vue的生命周期',
      }
    },
    computed: {
        helloCom(){
            return this.message + ' computed;';
        },
    },
    methods:{
        updateData(){
            this.message = "update message";
        }
    },
    beforeCreate: function() {
      console.group('------beforeCreate创建前状态------');
      console.log( "el     : " + this.$el); //undefined
      console.log("data   : " + this.$data); //undefined
      console.log("message: " + this.message); //undefined
      console.log("computed: " + this.helloCom); //undefined
    },
    created: function() {
      console.group('------created创建完毕状态------');
      console.log("el     : " + this.$el); //undefined
      console.log("data   : " + this.$data); //[object Object]
      console.log("message: " + this.message); //Vue的生命周期
      console.log("computed: " + this.helloCom); // Vue的生命周期 computed
    },
    beforeMount: function() {
      console.group('------beforeMount挂载前状态------');
      console.log("el     : " + (this.$el)); //undefined
      console.log("data   : " + this.$data); //[object Object]
      console.log("message: " + this.message); //Vue的生命周期
      console.log("computed: " + this.helloCom); // Vue的生命周期 computed
    },
    mounted: function() {
      console.group('------mounted 挂载结束状态------');
      console.log("el     : " + this.$el); //[object HTMLDivElement]
      console.log(this.$el);
      console.log("data   : " + this.$data); //[object Object]
      console.log("message: " + this.message); //Vue的生命周期
      console.log("computed: " + this.helloCom); // Vue的生命周期 computed
    },
    beforeUpdate: function () {
      console.group('beforeUpdate 更新前状态===============》');
      console.log("el     : " + this.$el);// [object HTMLDivElement]
      console.log(this.$el);
      console.log("data   : " + this.$data); //[object Object]
      console.log("message: " + this.message); // Vue的生命周期
      console.log("computed: " + this.helloCom);// Vue的生命周期 computed
    },
    updated: function () {
      console.group('updated 更新完成状态===============》');
      console.log("el     : " + this.$el);// [object HTMLDivElement]
      console.log(this.$el);
      console.log("data   : " + this.$data); //[object Object]
      console.log("message: " + this.message); // Vue的生命周期
      console.log("computed: " + this.helloCom);// Vue的生命周期 computed
    },
    beforeDestroy: function () {
      console.group('beforeDestroy 销毁前状态===============》');
      console.log("el     : " + this.$el);
      console.log(this.$el);
      console.log("data   : " + this.$data);
      console.log("message: " + this.message);
      console.log("computed: " + this.helloCom);
    },
    destroyed: function () {
      console.group('destroyed 销毁完成状态===============》');
      console.log("el     : " + this.$el);
      console.log(this.$el);
      console.log("data   : " + this.$data);
      console.log("message: " + this.message)
      console.log("computed: " + this.helloCom);
    }
}
</script>
<style lang="stylus" scoped>

</style>
执行完之后,结果如下:
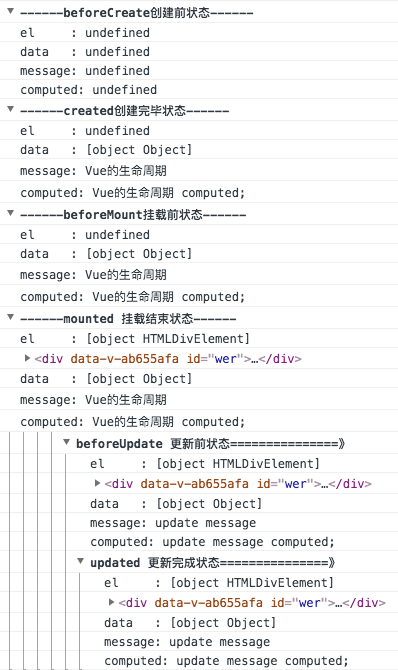
下面我们来一一分析一下:
beforeCreate创建前状态:

如图所示,在该阶段,肉眼可见的变化很少,主要是初始化一些时间。
created创建完毕状态:
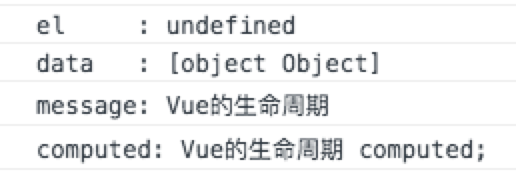
如图所示,在该阶段,除了挂载点之外,其他元素都已准备就绪。
beforeMount挂载前状态:
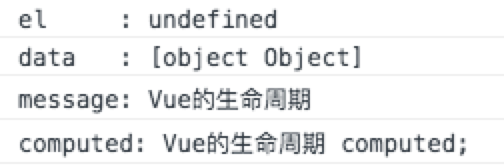
如图所示,在该阶段,准备挂载点,但是挂载元素依然不存在。
mounted 挂载结束状态:

此时所有指令生效,数据变化已经能触发DOM更新,但不能保证$el已经插入文档。
beforeUpdate 更新前状态:

触发了页面的event时间后,也就触发了update阶段,此时DOM尚未更新。
updated 更新完成状态:
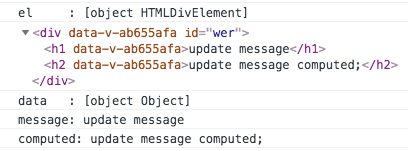
更新DOM结构示例。
beforeDestroy 销毁前状态:
在开始销毁实例时调用,此刻实例仍然有效。
destroyed 销毁完成状态:
实例被销毁之后调用,此刻所有绑定和实例指令都已经解绑,子实例也被销毁。
activated
需要配合动态组件keep-live使用,在动态组件初始化渲染的过程中调用该方法。
deactivated
需要配合动态组件keep-live使用,在动态组件移除的过程中调用该方法。