一、前言
人工智能时代的到来,相信大家已耳濡目染,虹软免费,离线开放的人脸识别 SDK,正推动着全行业进入刷脸时代。为了方便开发者接入,虹软提供了多种语言,多种平台的人脸识别SDK的支持,使用场景广泛。产品主要功能有:人脸检测、追踪、特征提取、特征比对、属性检测,活体检测,图像质量检测等。此外,虹软提供的是基于本地算法特征的离线识别SDK,提供全平台的离线支持。
作为一名刚接触人脸识别的初学者,对于虹软极为简洁,方便的SDK接入充满了好奇,想试图应用到web领域,而如今Java最火的web框架非SpringBoot莫属。但对于Java语言,虹软官网暂时还没有提供基于SpringBoot的集成Demo,因此便尝试写个将Java的人脸识别SDK和SpringBoot进行集成的样例,并写此文章进行记录,向广大初学开发者作分享。
此Demo采用Maven作为项目管理工具,并基于Windows x64,Java 8 以及 SpringBoot 2.1.6,SDK是基于虹软人脸识别 SDK3.0。
二、项目结构
SDK依赖Jar包 可从虹软官网获取 点击”免费获取” , ”登录“后 选择 具体“平台/版本/语言“ 获取。

三、项目依赖
pom.xml 依赖包括
- SpringBoot-Web依赖
- SpringBoot-Devtools热部署依赖
- SpringBoot-Freemarker依赖,
- Hutool,Fastjson, Lombok,Commons-pool2,Guava
- 虹软人脸识别SDK依赖Jar包
- SpringBoot-Maven插件
<dependency>
    <groupId>org.projectlombok</groupId>
    <artifactId>lombok</artifactId>
    <version>1.18.8</version>
</dependency>

<dependency>
    <groupId>org.springframework.boot</groupId>
    <artifactId>spring-boot-starter-web</artifactId>
</dependency>

<dependency>
    <groupId>org.springframework.boot</groupId>
    <artifactId>spring-boot-devtools</artifactId>
    <optional>true</optional>
</dependency>

<dependency>
    <groupId>org.springframework.boot</groupId>
    <artifactId>spring-boot-starter-freemarker</artifactId>
</dependency>

<dependency>
    <groupId>cn.hutool</groupId>
    <artifactId>hutool-all</artifactId>
    <version>4.6.1</version>
</dependency>

<dependency>
    <groupId>com.alibaba</groupId>
    <artifactId>fastjson</artifactId>
    <version>1.2.59</version>
</dependency>

<dependency>
    <groupId>org.apache.commons</groupId>
    <artifactId>commons-pool2</artifactId>
    <version>2.6.0</version>
</dependency>

<dependency>
    <groupId>com.google.guava</groupId>
    <artifactId>guava</artifactId>
    <version>26.0-jre</version>
</dependency>

<dependency>
    <groupId>com.arcsoft.face</groupId>
    <artifactId>arcsoft-sdk-face</artifactId>
    <version>3.0.0.0</version>
    <scope>system</scope>
    <systemPath>${basedir}/lib/arcsoft-sdk-face-3.0.0.0.jar</systemPath>
</dependency>
 <build>
        <plugins>
            <plugin>
                <groupId>org.springframework.boot</groupId>
                <artifactId>spring-boot-maven-plugin</artifactId>
                <configuration>
                    <includeSystemScope>true</includeSystemScope>
                    <fork>true</fork>
                </configuration>
            </plugin>
        </plugins>
    </build>
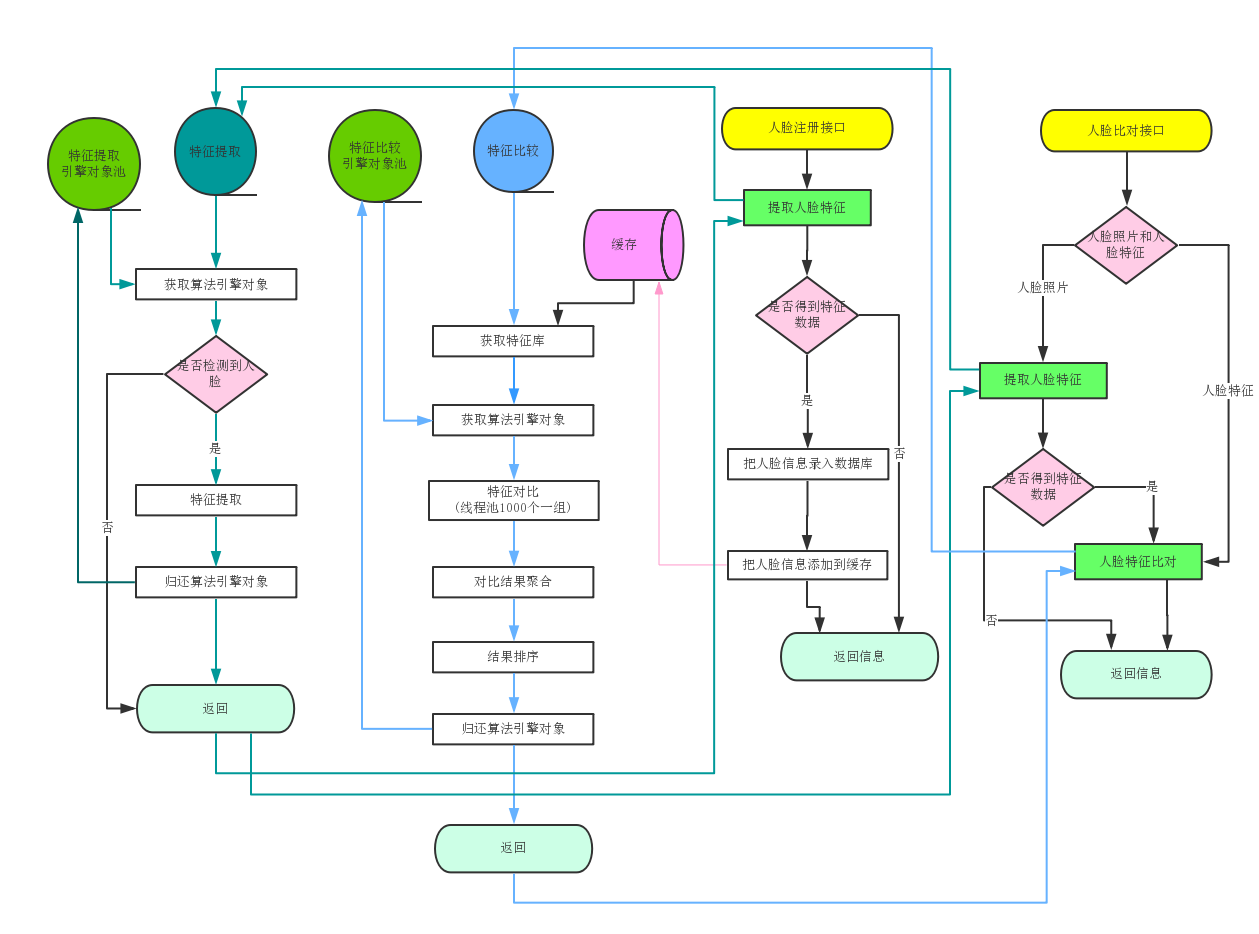
四、项目流程
五、效果展示
在Application启动类 右击 选择 Run Application 即可运行程序,待程序启动完成后,访问 http://127.0.0.1:8089/

六、核心代码说明
1. application.properties 配置说明
#上传文件 最大值限制
spring.servlet.multipart.max-file-size=100MB
#请求 最大值限制
spring.servlet.multipart.max-request-size=100MB
#请求头 最大值限制
server.max-http-header-size=2MB
#请求体 最大值限制
server.tomcat.max-http-post-size=50MB
#项目访问端口
server.port=8089
#人脸识别引擎库路径
config.arcface-sdk.sdk-lib-path=d:/arcsoft_lib
#sdk appId
config.arcface-sdk.app-id=9iSfMeAhj********************Kes2TpSrd
#sdk sdkKey
config.arcface-sdk.sdk-key=BuRTH3hGs9*******************yP9xu6fiFG7G
#人脸识别 引擎池大小
config.arcface-sdk.detect-pool-size=5
#人脸比对 引擎池大小
config.arcface-sdk.compare-pool-size=5
#关闭freemarker模板引擎缓存
spring.freemarker.cache=false
#模板引擎更新延迟设置为0
spring.freemarker.settings.template_update_delay=0
其中 人脸识别引擎库,APP_ID,SDK_KEY 可通过虹软官网”开发者中心“,进行 “登录”后 在“我的应用“中进行获取。
2. 项目实体类说明
1)UserRamCache 人脸信息存储类
public class UserRamCache {
    private static  ConcurrentHashMap<String, UserInfo> userInfoMap = new ConcurrentHashMap<>();
    public static void addUser(UserInfo userInfo) {
        userInfoMap.put(userInfo.getFaceId(), userInfo);
    }
    public static void removeUser(String faceId) {
        userInfoMap.remove(faceId);
    }
    public static List<UserInfo> getUserList() {
        List<UserInfo> userInfoList = Lists.newLinkedList();
        for (UserInfo value : userInfoMap.values()) {
            userInfoList.add(value);
        }
        return userInfoList;
    }
    @Data
    public static class UserInfo {
        //人脸Id
        private String faceId;
        //人脸名称
        private String name;
        //人脸特征值
        private byte[] faceFeature;
    }
}
此类拥有一个 UserInfo的内部类,用于封装人脸信息,userInfoMap以人脸名称为key,UserInfo对象为Value 存储 并提供相应增/删/查功能的方法。
2)ProcessInfo 人脸检测实体类
public class ProcessInfo {
    //年龄
    private int age;
    //性别
    private int gender;
    //是否活体
    private int liveness;
}
3)UserCompareInfo 人脸识别实体类 此类继承自 人脸信息存储类的人脸信息类(内部类)
public class UserCompareInfo extends UserRamCache.UserInfo {
    //人脸比对后的相似值
    private Float similar;
}
4)FaceDetectResDTO 人脸检测DTO封装类
public class FaceDetectResDTO {
    //人脸框
    private Rect rect;
    //人脸角度
    private int orient;
    //人脸Id
    private int faceId = -1;
    //年龄
    private int age = -1;
    //性别
    private int gender = -1;
    //是否为活体
    private int liveness = -1;
}
5)FaceRecognitionResDTO 人脸识别DTO封装类
public class FaceRecognitionResDTO {
    //人脸框
    private Rect rect;
    //人脸名称
    private String name;
    //人脸比对相似值
    private float similar;
}
3. FaceEngineFactory类 源码说明
此类继承自BasePooledObjectFactory抽象类,为FaceEngine对象池。
1)成员变量说明
//SDK引擎库的路径
private String libPath;
//SDK APP_ID
private String appId;
//SDK SDK_KEY
private String sdkKey;
//SDK 激活码
private String activeKey;
//引擎配置类
private EngineConfiguration engineConfiguration;
2)create()方法
@Override
public FaceEngine create() {
    FaceEngine faceEngine = new FaceEngine(libPath);
    int activeCode = faceEngine.activeOnline(appId, sdkKey);
    if (activeCode != ErrorInfo.MOK.getValue() && activeCode != ErrorInfo.MERR_ASF_ALREADY_ACTIVATED.getValue()) {
        log.error("引擎激活失败" + activeCode);
        throw new BusinessException(ErrorCodeEnum.FAIL, "引擎激活失败" + activeCode);
    }
    int initCode = faceEngine.init(engineConfiguration);
    if (initCode != ErrorInfo.MOK.getValue()) {
        log.error("引擎初始化失败" + initCode);
        throw new BusinessException(ErrorCodeEnum.FAIL, "引擎初始化失败" + initCode);
    }
    return faceEngine;
}
-
参数说明:无
-
返回结果:
FaceEngine人脸识别引擎 -
代码流程解读:
此方法,通过
libPath(SDK引擎库的路径)实例化FaceEngine对象,再根据APP_ID,SDK_KEY调用activeOnline()方法激活引擎 (联网状态下)成功激活引擎后,根据
EngineConfiguration引擎配置类 调用init()方法初始化引擎 。
3)wrap()方法
public PooledObject<FaceEngine> wrap(FaceEngine faceEngine) {
    return new DefaultPooledObject<>(faceEngine);
}
-
参数说明:
FaceEngine人脸识别引擎 -
返回结果:
PooledObject包装类 -
代码流程解读:
此方法,通过
PooledObject包装器对象 将faceEngine进行包装,便于维护引擎的状态。
4)destroyObject()方法
public void destroyObject(PooledObject<FaceEngine> p) throws Exception {
    FaceEngine faceEngine = p.getObject();
    int result = faceEngine.unInit();
    super.destroyObject(p);
}
-
参数说明:
PooledObject包装类 -
返回结果:无
-
代码流程解读:
此方法,从
PooledObject包装器对象中获取faceEngine引擎,随后卸载引擎。
4. FaceEngineServiceImpl类 源码说明
1)成员变量说明
@Value("${config.arcface-sdk.sdk-lib-path}")
public String sdkLibPath;

@Value("${config.arcface-sdk.app-id}")
public String appId;

@Value("${config.arcface-sdk.sdk-key}")
public String sdkKey;

@Value("${config.arcface-sdk.detect-pool-size}")
public Integer detectPooSize;

@Value("${config.arcface-sdk.compare-pool-size}")
public Integer comparePooSize;

private ExecutorService compareExecutorService;

//通用人脸识别引擎池
private GenericObjectPool<FaceEngine> faceEngineGeneralPool;

//人脸比对引擎池
private GenericObjectPool<FaceEngine> faceEngineComparePool;
此类的成员变量可通过@Value()注解获取配置文件中的相应配置。
2)init()方法
@PostConstruct
public void init() {
    GenericObjectPoolConfig detectPoolConfig = new GenericObjectPoolConfig();
    detectPoolConfig.setMaxIdle(detectPooSize);
    detectPoolConfig.setMaxTotal(detectPooSize);
    detectPoolConfig.setMinIdle(detectPooSize);
    detectPoolConfig.setLifo(false);
    EngineConfiguration detectCfg = new EngineConfiguration();
    FunctionConfiguration detectFunctionCfg = new FunctionConfiguration();
    //开启人脸检测功能
    detectFunctionCfg.setSupportFaceDetect(true);
    //开启人脸识别功能
    detectFunctionCfg.setSupportFaceRecognition(true);
    //开启年龄检测功能
    detectFunctionCfg.setSupportAge(true);
    //开启性别检测功能
    detectFunctionCfg.setSupportGender(true);
    //开启活体检测功能
    detectFunctionCfg.setSupportLiveness(true);
    detectCfg.setFunctionConfiguration(detectFunctionCfg);
    //图片检测模式,如果是连续帧的视频流图片,那么改成VIDEO模式
    detectCfg.setDetectMode(DetectMode.ASF_DETECT_MODE_IMAGE);
    //人脸旋转角度
    detectCfg.setDetectFaceOrientPriority(DetectOrient.ASF_OP_0_ONLY);
    //底层库算法对象池
    faceEngineGeneralPool = new GenericObjectPool(new FaceEngineFactory(sdkLibPath, appId, sdkKey, null, detectCfg), detectPoolConfig);

    //初始化特征比较线程池
    GenericObjectPoolConfig comparePoolConfig = new GenericObjectPoolConfig();
    comparePoolConfig.setMaxIdle(comparePooSize);
    comparePoolConfig.setMaxTotal(comparePooSize);
    comparePoolConfig.setMinIdle(comparePooSize);
    comparePoolConfig.setLifo(false);
    EngineConfiguration compareCfg = new EngineConfiguration();
    FunctionConfiguration compareFunctionCfg = new FunctionConfiguration();
    //开启人脸识别功能
    compareFunctionCfg.setSupportFaceRecognition(true);
    compareCfg.setFunctionConfiguration(compareFunctionCfg);
    //图片检测模式,如果是连续帧的视频流图片,那么改成VIDEO模式
    compareCfg.setDetectMode(DetectMode.ASF_DETECT_MODE_IMAGE);
    //人脸旋转角度
    compareCfg.setDetectFaceOrientPriority(DetectOrient.ASF_OP_0_ONLY);
    //底层库算法对象池
    faceEngineComparePool = new GenericObjectPool(new FaceEngineFactory(sdkLibPath, appId, sdkKey, null, compareCfg), comparePoolConfig);
    compareExecutorService = Executors.newFixedThreadPool(comparePooSize);
}
-
参数说明:无
-
返回结果:无
-
代码流程解读:
@PostConstruct注解:Spring在实例化该Bean之后 立刻去执行此方法。在此方法中,首先去实例化通用人脸识别引擎池配置对象并设置其对应属性,之后实例化EngineConfiguration(设置图像检测模式、人脸旋转角度)和FunctionConfiguration(用于功能配置,开启引擎相应功能,被EngineConfiguration所依赖),最后调FaceEngineFactory的构造方法去初始化引擎并获取对象池。人脸比对引擎池 同理。
3)detectFaces()方法 人脸检测
@Override
public List<FaceInfo> detectFaces(ImageInfo imageInfo) {

    FaceEngine faceEngine = null;
    try {
        faceEngine = faceEngineGeneralPool.borrowObject();
        if (faceEngine == null) {
            throw new BusinessException(ErrorCodeEnum.FAIL, "获取引擎失败");
        }

        //人脸检测得到人脸列表
        List<FaceInfo> faceInfoList = new ArrayList<FaceInfo>();
        //人脸检测
        int errorCode = faceEngine.detectFaces(imageInfo.getImageData(), imageInfo.getWidth(), imageInfo.getHeight(), imageInfo.getImageFormat(), faceInfoList);
        if (errorCode == 0) {
            return faceInfoList;
        } else {
            log.error("人脸检测失败,errorCode:" + errorCode);
        }

    } catch (Exception e) {
        log.error("", e);
    } finally {
        if (faceEngine != null) {
            //释放引擎对象
            faceEngineGeneralPool.returnObject(faceEngine);
        }
    }

    return null;

}
-
参数说明:
ImageInfo图像信息 -
返回结果:
List<FaceInfo>人脸信息列表 -
代码流程解读:
此方法,根据传入的
ImageInfo图像信息,通过faceEngine引擎调用detectFaces()方法检测人脸信息(所需参数: 图像数据,图像宽度(4的倍数),图片高度,图像的颜色格式,存放检测到的人脸信息List),随后回收引擎对象。注:
detectFaces该功能依赖初始化的模式选择,初始化中detectFaceOrientPriority、detectFaceScaleVal、detectFaceMaxNum参数的设置,对能否检测到人脸以及检测到几张人脸都有决定性的作用。
4)extractFaceFeature()方法 人脸特征值提取
@Override
public byte[] extractFaceFeature(ImageInfo imageInfo, FaceInfo faceInfo) {

    FaceEngine faceEngine = null;
    try {
        faceEngine = faceEngineGeneralPool.borrowObject();
        if (faceEngine == null) {
            throw new BusinessException(ErrorCodeEnum.FAIL, "获取引擎失败");
        }

        FaceFeature faceFeature = new FaceFeature();
        //提取人脸特征
        int errorCode = faceEngine.extractFaceFeature(imageInfo.getImageData(), imageInfo.getWidth(), imageInfo.getHeight(), imageInfo.getImageFormat(), faceInfo, faceFeature);
        if (errorCode == 0) {
            return faceFeature.getFeatureData();
        } else {
            log.error("特征提取失败,errorCode:" + errorCode);
        }

    } catch (Exception e) {
        log.error("", e);
    } finally {
        if (faceEngine != null) {
            //释放引擎对象
            faceEngineGeneralPool.returnObject(faceEngine);
        }
    }

    return null;

}
-
参数说明:
ImageInfo图像信息,FaceInfo人脸信息 -
返回结果:人脸特征值 字节数组
-
代码流程解读:
此方法,根据传入的
ImageInfo图像信息数据和FaceInfo人脸信息 通过faceEngine引擎调用extractFaceFeature()方法获取人脸特征数据(所需参数:图像数据,图像宽度(4的倍数),图像高度,图像的颜色格式,人脸信息,存放提取到的人脸特征信息),随后回收引擎对象。注:
extractFaceFeature()方法依赖detectFaces成功检测到人脸,将检测到的人脸,取单张人脸信息和使用的图像信息 传入该接口进行特征提取。
5)compareFace()方法 人脸相似度比对
@Override
public Float compareFace(ImageInfo imageInfo1, ImageInfo imageInfo2) {

    List<FaceInfo> faceInfoList1 = detectFaces(imageInfo1);
    List<FaceInfo> faceInfoList2 = detectFaces(imageInfo2);

    if (CollectionUtil.isEmpty(faceInfoList1) || CollectionUtil.isEmpty(faceInfoList2)) {
        throw new BusinessException(ErrorCodeEnum.FAIL,"未检测到人脸");
    }

    byte[] feature1 = extractFaceFeature(imageInfo1, faceInfoList1.get(0));
    byte[] feature2 = extractFaceFeature(imageInfo2, faceInfoList2.get(0));

    FaceEngine faceEngine = null;
    try {
        faceEngine = faceEngineGeneralPool.borrowObject();
        if (faceEngine == null) {
            throw new BusinessException(ErrorCodeEnum.FAIL, "获取引擎失败");
        }

        FaceFeature faceFeature1 = new FaceFeature();
        faceFeature1.setFeatureData(feature1);
        FaceFeature faceFeature2 = new FaceFeature();
        faceFeature2.setFeatureData(feature2);
        //提取人脸特征
        FaceSimilar faceSimilar = new FaceSimilar();
        int errorCode = faceEngine.compareFaceFeature(faceFeature1, faceFeature2, faceSimilar);
        if (errorCode == 0) {
            return faceSimilar.getScore();
        } else {
            log.error("特征提取失败,errorCode:" + errorCode);
        }

    } catch (Exception e) {
        log.error("", e);
    } finally {
        if (faceEngine != null) {
            //释放引擎对象
            faceEngineGeneralPool.returnObject(faceEngine);
        }
    }

    return null;

}
-
参数说明:需要比对的两个
ImageInfo图像信息 -
返回结果:人脸比对相似值
-
代码流程解读:
此方法,根据传入的两个
ImageInfo图像信息分别调用detectFaces()方法获取各自人脸信息,成功检测到人脸信息后,再调用extractFaceFeature()方法提取各自人脸特征值,成功获取到人脸特征值后,根据两个特征值再通过faceEngine引擎调用compareFaceFeature()方法进行比对(所需参数:人脸特征值1,人脸特征值2,比对模型,存放比对相似值结果), 最后获取人脸相似值返回 并回收引擎对象。
6)CompareFaceTask
FaceEngineServiceImpl的一个成员内部类,其实现Callable接口,用于完成线程任务
private class CompareFaceTask implements Callable<List<UserCompareInfo>> {
    //存储的人脸信息列表
    private List<UserRamCache.UserInfo> userInfoList;
    //目标特征值
    private FaceFeature targetFaceFeature;
    //相似度预期值
    private float passRate;

    public CompareFaceTask(List<UserRamCache.UserInfo> userInfoList, FaceFeature targetFaceFeature, float passRate) {
        this.userInfoList = userInfoList;
        this.targetFaceFeature = targetFaceFeature;
        this.passRate = passRate;
    }

    @Override
    public List<UserCompareInfo> call() throws Exception {
        FaceEngine faceEngine = null;
        List<UserCompareInfo> resultUserInfoList = Lists.newLinkedList();//识别到的人脸列表
        try {
            faceEngine = faceEngineComparePool.borrowObject();
            for (UserRamCache.UserInfo userInfo : userInfoList) {
                FaceFeature sourceFaceFeature = new FaceFeature();
                sourceFaceFeature.setFeatureData(userInfo.getFaceFeature());
                FaceSimilar faceSimilar = new FaceSimilar();
                faceEngine.compareFaceFeature(targetFaceFeature, sourceFaceFeature, faceSimilar);
                if (faceSimilar.getScore() > passRate) {//相似值大于配置预期,加入到识别到人脸的列表
                    UserCompareInfo info = new UserCompareInfo();
                    info.setName(userInfo.getName());
                    info.setFaceId(userInfo.getFaceId());
                    info.setSimilar(faceSimilar.getScore());
                    resultUserInfoList.add(info);
                }
            }
        } catch (Exception e) {
            logger.error("", e);
        } finally {
            if (faceEngine != null) {
                faceEngineComparePool.returnObject(faceEngine);
            }
        }
        return resultUserInfoList;
    }
}
-
参数说明:无
-
返回结果:
List<UserCompareInfo>人脸识别实体类列表 -
代码流程解读:
call()方法中遍历userInfoList中每个UserInfo获取特征值,并结合目标特征值 通过faceEngine引擎调用compareFaceFeature()方法获取相似度大小 ,将获取到的相似度大小和预期相似度进行比较,若大于配置的预期值,则加入到识别到人脸的列表,最后回收引擎对象。
7)faceRecognition()方法 人脸识别
@Override
public List<UserCompareInfo> faceRecognition(byte[] faceFeature, List<UserRamCache.UserInfo> userInfoList, float passRate) {
    List<UserCompareInfo> resultUserInfoList = Lists.newLinkedList();//识别到的人脸列表

    FaceFeature targetFaceFeature = new FaceFeature();
    targetFaceFeature.setFeatureData(faceFeature);

    List<List<UserRamCache.UserInfo>> faceUserInfoPartList = Lists.partition(userInfoList, 1000);//分成1000一组,多线程处理
    CompletionService<List<UserCompareInfo>> completionService = new ExecutorCompletionService(compareExecutorService);
    for (List<UserRamCache.UserInfo> part : faceUserInfoPartList) {
        completionService.submit(new CompareFaceTask(part, targetFaceFeature, passRate));
    }
    for (int i = 0; i < faceUserInfoPartList.size(); i++) {
        List<UserCompareInfo> faceUserInfoList = null;
        try {
            faceUserInfoList = completionService.take().get();
        } catch (InterruptedException | ExecutionException e) {
        }
        if (CollectionUtil.isNotEmpty(userInfoList)) {
            resultUserInfoList.addAll(faceUserInfoList);
        }
    }

    resultUserInfoList.sort((h1, h2) -> h2.getSimilar().compareTo(h1.getSimilar()));//从大到小排序

    return resultUserInfoList;
}
-
参数说明:人脸特征值 字节数组,
List<UserRamCache.UserInfo>存储的人脸信息列表,相似度预期值 -
返回结果:
List<UserCompareInfo>人脸识别实体类列表 -
代码流程解读:
此方法,根据传入的人脸特征值以及
UserRamCache.UserInfo列表,先将UserRamCache.UserInfo分为每1000一组,再通过多线程处理,即上述CompareFaceTask类,处理完之后再将结果合并,按从大到小排序后返回。
8)process()方法 人脸属性检测
@Override
public List<ProcessInfo> process(ImageInfo imageInfo, List<FaceInfo> faceInfoList) {
    FaceEngine faceEngine = null;
    try {
        //获取引擎对象
        faceEngine = faceEngineGeneralPool.borrowObject();
        if (faceEngine == null) {
            throw new BusinessException(ErrorCodeEnum.FAIL, "获取引擎失败");
        }

        int errorCode = faceEngine.process(imageInfo.getImageData(), imageInfo.getWidth(), imageInfo.getHeight(), imageInfo.getImageFormat(), faceInfoList, FunctionConfiguration.builder().supportAge(true).supportGender(true).supportLiveness(true).build());
        if (errorCode == 0) {
            List<ProcessInfo> processInfoList = Lists.newLinkedList();

            //性别列表
            List<GenderInfo> genderInfoList = new ArrayList<GenderInfo>();
            faceEngine.getGender(genderInfoList);

            //年龄列表
            List<AgeInfo> ageInfoList = new ArrayList<AgeInfo>();
            faceEngine.getAge(ageInfoList);
            //活体结果列表
            List<LivenessInfo> livenessInfoList = new ArrayList<LivenessInfo>();
            faceEngine.getLiveness(livenessInfoList);


            for (int i = 0; i < genderInfoList.size(); i++) {
                ProcessInfo processInfo = new ProcessInfo();
                processInfo.setGender(genderInfoList.get(i).getGender());
                processInfo.setAge(ageInfoList.get(i).getAge());
                processInfo.setLiveness(livenessInfoList.get(i).getLiveness());
                processInfoList.add(processInfo);
            }
            return processInfoList;

        }
    } catch (Exception e) {
        logger.error("", e);
    } finally {
        if (faceEngine != null) {
            //释放引擎对象
            faceEngineGeneralPool.returnObject(faceEngine);
        }
    }

    return null;

}
-
参数说明:
ImageInfo图像信息,List<FaceInfo>人脸信息列表 -
返回结果:
List<ProcessInfo>人脸检测实体类列表 -
代码流程解读:
此方法,根据传入的
ImageInfo图像信息以及检测到的FaceInfo人脸信息列表,通过faceEngine引擎调用process()方法(所需参数:图像数据,图片宽度(4的倍数),图像高度,图像的颜色空间格式,人脸信息列表,需检测的属性),之后可从faceEngine对象获取 性别,年龄,是否活体等结果的列表,并将一系列列表结果遍历 设置于ProcessInfo对象返回,随后回收引擎对象。注:
process()支持检测AGE、GENDER、FACE3DANGLE、LIVENESS四种属性,若想检测这些属性,须在初始化引擎接口中对想要检测的属性进行设置。
5. FaceController类 源码说明
1)initFace()方法:初始化注册人脸
@PostConstruct
public void initFace() throws FileNotFoundException {
    Map<String, String> fileMap = Maps.newHashMap();
    fileMap.put("zhao1", "赵丽颖");
    fileMap.put("yang1", "杨紫");

    for (String f : fileMap.keySet()) {
        ClassPathResource resource = new ClassPathResource("static/images/" + f +  ".jpg");
        InputStream inputStream = null;
        try {
            inputStream = resource.getInputStream();
        } catch (IOException e) {
        }
        ImageInfo rgbData = ImageFactory.getRGBData(inputStream);
        List<FaceInfo> faceInfoList = faceEngineService.detectFaces(rgbData);
        if (CollectionUtil.isNotEmpty(faceInfoList)) {
            byte[] feature = faceEngineService.extractFaceFeature(rgbData, faceInfoList.get(0));
            UserRamCache.UserInfo userInfo = new UserCompareInfo();
            userInfo.setFaceId(f);
            userInfo.setName(fileMap.get(f));
            userInfo.setFaceFeature(feature);
            UserRamCache.addUser(userInfo);
        }
    }

    log.info("http://127.0.0.1:" + port + "/");

}
-
参数说明:无
-
返回结果:无
-
代码流程解读:
@PostConstruct注解表示Spring在实例化该Bean之后 立刻去执行此方法。首先去加载static/images/下的图片资源将其解析为ImageInfo类型的RGB图像信息数据,之后依次调用FaceEngineService类的detectFaces(),extractFaceFeature()方法提取人脸特征值,最后将人脸相关数据设置于UserRamCache.UserInfo对象中(此Demo仅将数据暂存于内存中,用户可根据需要,自行创建数据库相关表并持久化于磁盘中)。
2)faceAdd()方法 添加人脸
@RequestMapping(value = "/faceAdd", method = RequestMethod.POST)
@ResponseBody
public Response faceAdd(String file, String faceId, String name) {
    return null;
}
-
参数说明:浏览器上传的图片信息,人脸Id,人脸名
-
返回结果:Json格式
-
代码流程解读:
此方法,可用于添加更多人脸信息,根据用户需要自行完善。
3)faceRecognition()方法 人脸识别
@RequestMapping(value = "/faceRecognition", method = RequestMethod.POST)
@ResponseBody
public Response<List<FaceRecognitionResDTO>> faceRecognition(String image) {

    List<FaceRecognitionResDTO> faceRecognitionResDTOList = Lists.newLinkedList();
    byte[] bytes = Base64Util.base64ToBytes(image);
    ImageInfo rgbData = ImageFactory.getRGBData(bytes);
    List<FaceInfo> faceInfoList = faceEngineService.detectFaces(rgbData);
    if (CollectionUtil.isNotEmpty(faceInfoList)) {
        for (FaceInfo faceInfo : faceInfoList) {
            FaceRecognitionResDTO faceRecognitionResDTO = new FaceRecognitionResDTO();
            faceRecognitionResDTO.setRect(faceInfo.getRect());
            byte[] feature = faceEngineService.extractFaceFeature(rgbData, faceInfo);
            if (feature != null) {
                List<UserCompareInfo> userCompareInfos = faceEngineService.faceRecognition(feature, UserRamCache.getUserList(), 0.8f);
                if (CollectionUtil.isNotEmpty(userCompareInfos)) {
                    faceRecognitionResDTO.setName(userCompareInfos.get(0).getName());
                    faceRecognitionResDTO.setSimilar(userCompareInfos.get(0).getSimilar());
                }
            }
            faceRecognitionResDTOList.add(faceRecognitionResDTO);
        }
    }
    return Response.newSuccessResponse(faceRecognitionResDTOList);
}
-
参数说明:浏览器上传的图片信息
-
返回结果:Json格式
List<FaceRecognitionResDTO>人脸识别DTO列表 -
代码流程解读:
此方法,先将请求上传的(base64编码后)的图片解析为
ImageInfo类型的RGB图像信息数据,再依次调用FaceEngineService类的detectFaces(),extractFaceFeature(),faceRecognition()方法 与先前存于内存中的人脸信息进行比对,获取相似度最大的人脸信息,并将结果设置于FaceRecognitionResDTO后返回。
4)detectFaces() 方法 人脸检测
@RequestMapping(value = "/detectFaces", method = RequestMethod.POST)
@ResponseBody
public Response<List<FaceDetectResDTO>> detectFaces(String image) {

    byte[] bytes = Base64Util.base64ToBytes(image);
    ImageInfo rgbData = ImageFactory.getRGBData(bytes);
    List<FaceDetectResDTO> faceDetectResDTOS = Lists.newLinkedList();
    List<FaceInfo> faceInfoList = faceEngineService.detectFaces(rgbData);
    if (CollectionUtil.isNotEmpty(faceInfoList)) {
        List<ProcessInfo> process = faceEngineService.process(rgbData, faceInfoList);

        for (int i = 0; i < faceInfoList.size(); i++) {
            FaceDetectResDTO faceDetectResDTO = new FaceDetectResDTO();
            FaceInfo faceInfo = faceInfoList.get(i);
            faceDetectResDTO.setRect(faceInfo.getRect());
            faceDetectResDTO.setOrient(faceInfo.getOrient());
            faceDetectResDTO.setFaceId(faceInfo.getFaceId());
            if (CollectionUtil.isNotEmpty(process)) {
                ProcessInfo processInfo = process.get(i);
                faceDetectResDTO.setAge(processInfo.getAge());
                faceDetectResDTO.setGender(processInfo.getGender());
                faceDetectResDTO.setLiveness(processInfo.getLiveness());

            }
            faceDetectResDTOS.add(faceDetectResDTO);

        }
    }

    return Response.newSuccessResponse(faceDetectResDTOS);
}
-
参数说明:浏览器上传的图片信息
-
返回结果:Json格式
List<FaceDetectResDTO>人脸检测DTO列表 -
代码流程解读:
此方法,先将请求上传的(base64编码后)的图片解析为
ImageInfo类型的RGB图像信息数据,再依次调用FaceEngineService类的detectFaces()process()方法获取人脸检测数据(年龄,性别,是否活体),并将结果设置于FaceDetectResDTO后返回。
5)compareFaces()方法 人脸比对
@RequestMapping(value = "/compareFaces", method = RequestMethod.POST)
@ResponseBody
public Response<Float> compareFaces(String image1, String image2) {

    byte[] bytes1 = Base64Util.base64ToBytes(image1);
    byte[] bytes2 = Base64Util.base64ToBytes(image2);
    ImageInfo rgbData1 = ImageFactory.getRGBData(bytes1);
    ImageInfo rgbData2 = ImageFactory.getRGBData(bytes2);

    Float similar = faceEngineService.compareFace(rgbData1, rgbData2);

    return Response.newSuccessResponse(similar);
}
-
参数说明:两张浏览器上传的图片信息
-
返回结果:人脸比对相似值
-
代码流程解读:
此方法,先将请求上传的(base64编码后)的图片解析为
ImageInfo类型的RGB图像信息数据,之后通过FaceEngineService类的compareFace()方法进行人脸比对,获取人脸相似值并返回。
七、源码下载
若有想一起学习虹软SDK,感受人脸识别奥秘的同学,可通过点击此链接获取Demo源码。
相关产品大家可以到虹软视觉开放平台进一步了解