cffi是连接Python与c的桥梁,可实现在Python中调用c文件。cffi为c语言的外部接口,在Python中使用该接口可以实现在Python中使用外部c文件的数据结构及函数。
由于资料较少,所以对cffi的原理还不是十分熟悉,此处仅从使用进行简单介绍。
所了解的使用方式有以下几种:1)直接在Python文件中通过cffi调用库函数或自定义函数。2)在一个Python文件中进行函数的定义,生成扩展模块后在其他Python中使用定义的函数。3)使用cffi在Python中调用已定义好的函数库中的c文件。
以下分别对这几种方式进行说明:
(一)直接在Python中通过cffi定义c函数并使用
通过二进制文件调用库函数,如:
from cffi import FFI
ffi = FFI()
#cdef用来定义结构体,变量,或者方法的声明
ffi.cdef("""
    int printf(const char *format, ...); //库函数
""")
#dlopen是ABI模式的的基本读取方式
C = ffi.dlopen(None) # 加载整个C命名空间
arg = ffi.new("char[]", b"world") # 等于C代码: char arg[] = "world";
C.printf(b"hello %s!
", arg)
运行:

定义结构体变量的方式如下:
from cffi import FFI
ffi = FFI()
#cdef用来定义结构体,变量,或者方法的声明
ffi.cdef("""
    typedef struct{
        int x;
        int y;
    } te;
    """)
test = ffi.new("te *",[1,2]) #定义一个结构体变量并赋值
test = ffi.new("te *", {'x':1, 'y':2}) #另一种赋值方式
也可自定义函数并调用:
from cffi import FFI
ffi = FFI()
ffi.cdef("""
    int add(int a, int b);
    int sub(int a, int b);
""")
#verify是在线api模式的基本方法它里面直接写C代码即可
lib = ffi.verify("""
    int add(int a,int b){
        return a+b;
    }
     int sub(int a,int b){
        return a-b;
    }

""")
print(lib.add(10,2))
print(lib.sub(10,2))
运行:

若c的源码独立成文件,也可以使用ffi.verify(sources=['file.c'])指定,如在当前文件夹下定义一个c文件test.c如下:
#include <stdio.h>

int add(int a, int b)
{
    int c;
    c = a+b;
    return c;
}

void cprint(void)
{
    printf("hello world!
");
}

int mul(int a,int b)
{
    return a*b;
}
定义test2.py调用该c文件中的函数:
from cffi import FFI
ffi = FFI()
ffi.cdef("""
    int add(int a, int b);
    void cprint(void);
    int mul(int a,int b);
""")
#verify是在线api模式的基本方法它里面直接写C代码即可
lib = ffi.verify(sources=['test.c'])
print(lib.add(10,2))
lib.cprint()
print(lib.mul(3,5))
运行:

其会生成文件__pycache__如下:

(二)生成扩展模块提供给其他Python程序使用
该种方式也称为离线API方式。相关代码参考链接: https://www.jianshu.com/p/4f60eea33d68
首先建立ext_build.py用于生成扩展模块:
# ext_build.py
import cffi

ffi = cffi.FFI() #生成cffi实例

ffi.cdef("""int add(int a, int b);""") #函数声明
ffi.cdef("""int sub(int a, int b);""")

ffi.set_source('_ext', """
    int add(int a, int b) //函数定义
    {
        return a + b;
    }
    int sub(int a, int b)
    {
        return a - b;
    }
""")

if __name__ == '__main__':
    ffi.compile(verbose=True)
ffi.cdef表示声明一个函数,ffi.set_source中第一个参数为要生成的扩展模块的名字,第二个参数为函数的具体定义。
执行python ext_build.py,会生成下面三个文件
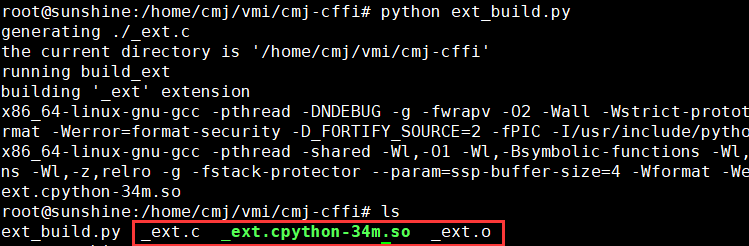
生成模块_ext用于其他Python文件使用。新建一个test.py使用_ext模块中的c函数:
#test.py
from _ext import ffi, lib #此处import的ffi即为_ext中的ffi

print(lib.add(2, 3))
print(lib.sub(2, 3))
输出:

如此即可在Python文件中使用定义的C函数。
(三)在Python中使用cffi调用外部c库函数
使用cffi还可以在Python中使用外部已经定义好的c库函数。代码参考:https://github.com/wolever/python-cffi-example
对该例子中使用fnmatch的部分代码进行解释,fnmatch用于判断字符串是不是符合pattern所指的结构。需要将库函数中fnmatch函数的声明写入一个头文件中,该例子中建立了一个fnmatch.h,复制函数声明如下,此处根据测试中出现的问题进行了相关修改,头文件中的FNM_PATHNAME参考/usr/include/fnmatch.h进行复制,由于不支持原本的移位运算方式,直接定义成16进制数。
/*
 * Definitions for fnmatch, copy+pasted from <fnmatch.h> with some small
 * cleanups by hand.
 */

/* Bits set in the FLAGS argument to `fnmatch'.  */
#define FNM_PATHNAME    0x1 /* No wildcard can ever match `/'.  */
#define FNM_NOESCAPE    0x10 /* Backslashes don't quote special chars.  */
#define FNM_PERIOD  0x100 /* Leading `.' is matched only explicitly.  */

// /* Value returned by `fnmatch' if STRING does not match PATTERN.  */
 #define    FNM_NOMATCH    1

/* Match NAME against the filename pattern PATTERN,
   returning zero if it matches, FNM_NOMATCH if not.  */
extern int fnmatch (const char *__pattern, const char *__name, int __flags);
编写setup.py,其中cffi_modules制定了需要生成ffi实例的文件
#!/usr/bin/env python

#setup.py
import os
import sys

from setuptools import setup, find_packages

os.chdir(os.path.dirname(sys.argv[0]) or ".")

setup(
    name="cffi-example",
    version="0.1",
    classifiers=[
        "Development Status :: 4 - Beta",
        "Programming Language :: Python :: 2",
        "Programming Language :: Python :: 3",
        "Programming Language :: Python :: Implementation :: PyPy",
        "License :: OSI Approved :: BSD License",
    ],
    packages=find_packages(),
    install_requires=["cffi>=1.0.0"],
    setup_requires=["cffi>=1.0.0"],
    cffi_modules=[
        "./cffi_example/build_fnmatch.py:ffi",
    ],
)
build_fnmatch.py如下,用于生成模块,在fnmatch.py中进行使用
import os

from cffi import FFI

ffi = FFI()

ffi.set_source("cffi_example._fnmatch",
    # Since we are calling fnmatch directly no custom source is necessary. We
    # need to #include <fnmatch.h>, though, because behind the scenes cffi
    # generates a .c file which contains a Python-friendly wrapper around
    # ``fnmatch``:
    #    static PyObject *
    #    _cffi_f_fnmatch(PyObject *self, PyObject *args) {
    #        ... setup ...
    #        result = fnmatch(...);
    #        return PyInt_FromLong(result);
    #    }
    "#include <fnmatch.h>", #此处fnmatch.h为动态库中的头文件
    # The important thing is to inclue libc in the list of libraries we're
    # linking against:
    libraries=["c"],
)

with open(os.path.join(os.path.dirname(__file__), "fnmatch.h")) as f: #此处fnmatch.h为根据动态库中的fnmatch.h自己定义的文件,内容参考动态库中的fnmatch.h,选出需要使用的函数的声明等
    ffi.cdef(f.read())

if __name__ == "__main__":
    ffi.compile()
运行 python setup.py build
python setup.py install
生成如下文件:

进入cffi_example,运行python build_fnmatch.py,与第二种方式相同会生成相关.c,.o,.so文件。
对test文件夹下的test_fnmatch.py做了细微修改,由于提示 AttributeError: 'function' object has no attribute 'FNM_PATHNAME' ,故直接将其换为0x1:
import pytest

from fnmatch import fnmatch

@pytest.mark.parametrize("pattern,name,flags,expected", [
    ("foo", "bar", 0, False),
    ("f**", "foo", 0, False),
    ("f/bar", "f/bar", 0, True),
    ("f*bar", "f/bar", 0x1, False),
])
def test_fnmatch(pattern, name, flags, expected):
    assert fnmatch(pattern, name) == expected
运行py.test test/测试结果如下:

因此对于外部c文件,可以使用cffi.verify()的形式使用,但是该种方式仍然需要进行函数声明。或者将c文件编译成为函数库,如此自定义.h文件声明需要使用的函数,即可在Python中通过cffi使用其中的函数。如libvirt库等。此外开源工具nitro中对于libvmi的使用方式也是如此。
参考:https://cffi.readthedocs.io/en/latest/using.html#