作者:王路路
链接:https://www.zhihu.com/question/36048657/answer/93692293
来源:知乎
著作权归作者所有。商业转载请联系作者获得授权,非商业转载请注明出处。
activeMQ,它是消息队列,叫做messagequeen,我们是使用在电商平台上。比如当用户商品上架的时候,它将用户的商品信息,它就是一个消息服务中间件,里面保存了参数值,就是商品上架的同时,将商品的ID信息保存到消息服务的中间件中,这是这一端,然后我到另一端,solr服务端和我的freemarker服务端都会反复不断的监听,监听activeMQ中的一些相应的参数信息,就是ID,如果找到了ID信息,那么我就会相应处理,而且activeMQ可以采用一对一模式和主题订阅模式。当引用了activeMQ的时候,它将用户的商品信息保存到消息服务中间件,然后我的另外2个,一个solr,一个freemarker这2个服务器都可以同时或者很短的时间内异步监听到ID信息,同时取出这个信息,异步的进行先相关处理,这样可以节约大量的时间,这就是为什么用,activeMQ是节省时间的。
ActiveMQ消息中间件是在分布式系统中完成消息的发送和接收的基础软件ActiveMQ通信方式
第一种:队列 一对一 类似QQ私聊
第二种:主题 一对多 类似QQ群聊
JMS是Sun公司定制的标准,ActiveMQ 是一个完全支持JMS1.1和J2EE 1.4规范的 JMS Provider实现。
配置ActiveMQ的步骤
1 配置消息生产方
2编写消息生产方业务代码
3 编写消息消费方业务代码
4 配置消息消费方
5编写自定义消息监听器类
具体如下
1 配置消息生产方
1、配置连接工厂,用来连接我们的消息服务中间件ActiveMQ
2、配置连接工厂的连接池,用来优化连接,需要注入连接工厂
3、配置Spring的JMS连接工厂,作用是交由spring来进行管理,需要注入连接工厂的连接池
4、配置Spring提供的JmsTemplate,作用是可以使用spring封装好的jms api,需要注入Spring的JMS连接工厂
<!-- activemq 配置 -->
<!-- 配置连接工厂 -->
<bean id="activeMQConnectionFactory" class="org.apache.activemq.ActiveMQConnectionFactory">
<!-- 配置消息服务中间件地址 -->
<property name="brokerURL" value="tcp://192.168.56.101:61616"></property>
<!-- 配置用户名和密码 -->
<property name="userName" value="admin"></property>
<property name="password" value="admin"></property>
</bean>

<!-- 配置工厂连接池 -->
<bean id="pooledConnectionFactoryBean" class="org.apache.activemq.pool.PooledConnectionFactoryBean">
<!-- 注入连接工厂bean -->
<property name="connectionFactory" ref="activeMQConnectionFactory"></property>
</bean>

<!-- 使用spring来进行管理 -->
<bean id="singleConnectionFactory"
class="org.springframework.jms.connection.SingleConnectionFactory">
<!-- 注入连接工厂连接池的bean -->
<property name="targetConnectionFactory" ref="pooledConnectionFactoryBean"></property>
</bean>

<!-- 配置JmsTemplate -->
<bean id="jmsTemplate" class="org.springframework.jms.core.JmsTemplate">
<!-- 注入使用spring来进行管理的bean -->
<property name="connectionFactory" ref="singleConnectionFactory"></property>
</bean>
2 编写消息生产方业务代码
@Autowired
	private JmsTemplate jmsTemplate;

	@Override
	public void update(Product product, final String ids)
			throws SolrServerException, IOException {

		Example example = new Example(Product.class);

		// 将ids的字符串转成list集合
		List arrayList = new ArrayList<Object>();
		String[] split = ids.split(",");
		for (String string : split) {
			arrayList.add(string);
		}

		// 设置批量修改的id条件
		example.createCriteria().andIn("id", arrayList);

		// 进行批量,选择性属性修改
		productDAO.updateByExampleSelective(product, example);

		// 如果是商品上架
		// 需要保存的信息有:商品id、商品名称、图片地址、售价、品牌id、上架时间(可选)
		if (product.getIsShow() == 1) {
			// 采用消息服务模式
			// 将商品信息添加到solr服务器中(发送消息(ids)到ActiveMQ中)
			jmsTemplate.send("productIds", new MessageCreator() {

				@Override
				public Message createMessage(Session session) throws JMSException {
					// TODO Auto-generated method stub
					//使用session创建文本消息
					return session.createTextMessage(ids);
				}
			});

			// 后续还有CMS-生成静态商品信息页面功能

		}

	}
3 编写消息消费方业务代码
接口
/**
	 * 添加商品到solr服务器中
	 *
	 * @param ids
	 * @throws SolrServerException
	 * @throws IOException
	 */
	 public void addProduct(String ids) throws SolrServerException, IOException;
实现类
@Autowired
private SkuDAO skuDAO;

@Autowired
private ProductDAO productDAO;

@Override
public void addProduct(String ids) throws SolrServerException, IOException {

Example example = new Example(Product.class);

// 将ids的字符串转成list集合
List arrayList = new ArrayList<Object>();
String[] split = ids.split(",");
for (String string : split) {
arrayList.add(string);
}

// 设置批量修改的id条件
example.createCriteria().andIn("id", arrayList);

// 查询ids中的所有商品
List<Product> products = productDAO.selectByExample(example);
// 遍历查询出来的商品集合
for (Product product2 : products) {

// 将商品的各个信息,添加到文档对象中
SolrInputDocument doc = new SolrInputDocument();
doc.addField("id", product2.getId());
doc.addField("name_ik", product2.getName());
doc.addField("url", product2.getImgUrl().split(",")[0]);
doc.addField("brandId", product2.getBrandId());

// 查询出某商品库存中的最低价格
// SELECT price from bbs_sku WHERE bbs_sku.product_id = 449
// ORDER BY price ASC LIMIT 1

Example example2 = new Example(Sku.class);
// 某商品的库存
example2.createCriteria().andEqualTo("productId", product2.getId());
example2.setOrderByClause("price asc");// 价格升序
// 开始分页 limit
PageHelper.startPage(1, 1);
List<Sku> skus = skuDAO.selectByExample(example2);
// 结束分页
PageHelper.endPage();

doc.addField("price", skus.get(0).getPrice());

// 将文档对象添加到solr服务器中
solrServer.add(doc);

// 提交
solrServer.commit();
}
}
4 配置消息消费方
<!-- activemq 配置 -->
	<!-- 配置连接工厂 -->
	<bean id="activeMQConnectionFactory" class="org.apache.activemq.ActiveMQConnectionFactory">
		<!-- 配置消息服务中间件地址 -->
		<property name="brokerURL" value="tcp://192.168.56.101:61616"></property>
		<!-- 配置用户名和密码 -->
		<property name="userName" value="admin"></property>
		<property name="password" value="admin"></property>
	</bean>

	<!-- 配置工厂连接池 -->
	<bean id="pooledConnectionFactoryBean" class="org.apache.activemq.pool.PooledConnectionFactoryBean">
		<!-- 注入连接工厂bean -->
		<property name="connectionFactory" ref="activeMQConnectionFactory"></property>
	</bean>

	<!-- 使用spring来进行管理 -->
	<bean id="singleConnectionFactory"
		class="org.springframework.jms.connection.SingleConnectionFactory">
		<!-- 注入连接工厂连接池的bean -->
		<property name="targetConnectionFactory" ref="pooledConnectionFactoryBean"></property>
	</bean>

	<!-- 配置JmsTemplate -->
	<bean id="jmsTemplate" class="org.springframework.jms.core.JmsTemplate">
		<!-- 注入使用spring来进行管理的bean -->
		<property name="connectionFactory" ref="singleConnectionFactory"></property>
	</bean>

	<!-- 配置回调消息处理类 -->
	<bean id="myMessageListener" class="cn.itcast.core.message.MyMessageListener"></bean>


	<!-- 配置消息消费方监听器 -->
	<bean
		class="org.springframework.jms.listener.DefaultMessageListenerContainer">
		<!-- 注入使用spring来进行管理的bean -->
		<property name="connectionFactory" ref="singleConnectionFactory"></property>
		<!-- 配置回调消息处理类:当监听到消息后,该做什么 -->
		<property name="messageListener" ref="myMessageListener"></property>
		<!-- 监听目标名称 -->
		<property name="destinationName" value="productIds"></property>
	</bean>
编写自定义消息监听器类
/**
 * 自定义消息监听器类
 *
 * @author Administrator
 *
 */
public class MyMessageListener implements MessageListener {

	@Autowired
	private SolrService solrService;

	/**
	 * 当监听到消息后,会自动调用此方法
	 */
	@Override
	public void onMessage(Message message) {
		// TODO Auto-generated method stub
		ActiveMQTextMessage amessage = (ActiveMQTextMessage) message;
		try {
			String ids = amessage.getText();
			System.out.println("消费方接收到的消息:" + ids);
			// 添加商品信息到solr服务器
			solrService.addProduct(ids);
		} catch (JMSException e) {
			// TODO Auto-generated catch block
			e.printStackTrace();
		} catch (SolrServerException e) {
			// TODO Auto-generated catch block
			e.printStackTrace();
		} catch (IOException e) {
			// TODO Auto-generated catch block
			e.printStackTrace();
		}
	}
}
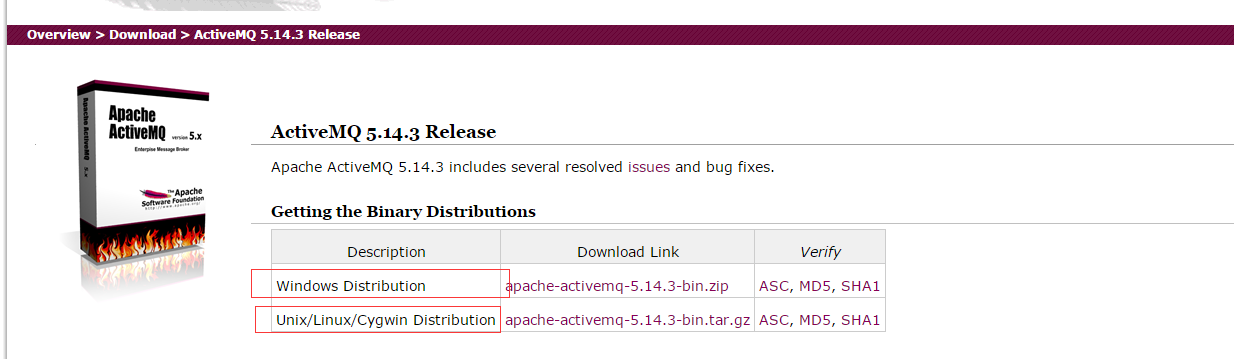
ActiveMQ官网下载地址:http://activemq.apache.org/download.html
ActiveMQ 提供了Windows 和Linux、Unix 等几个版本,楼主这里选择了Linux 版本下进行开发。
下载完安装包,解压之后的目录:

从它的目录来说,还是很简单的:
- bin存放的是脚本文件
- conf存放的是基本配置文件
- data存放的是日志文件
- docs存放的是说明文档
- examples存放的是简单的实例
- lib存放的是activemq所需jar包
- webapps用于存放项目的目录
2、启动ActiveMQ
进入到ActiveMQ 安装目录的Bin 目录,linux 下输入 ./activemq start 启动activeMQ 服务。
输入命令之后,会提示我们创建了一个进程IP 号,这时候说明服务已经成功启动了。

ActiveMQ默认启动时,启动了内置的jetty服务器,提供一个用于监控ActiveMQ的admin应用。
admin:http://127.0.0.1:8161/admin/
我们在浏览器打开链接之后输入账号密码(这里和tomcat 服务器类似)
默认账号:admin
密码:admin
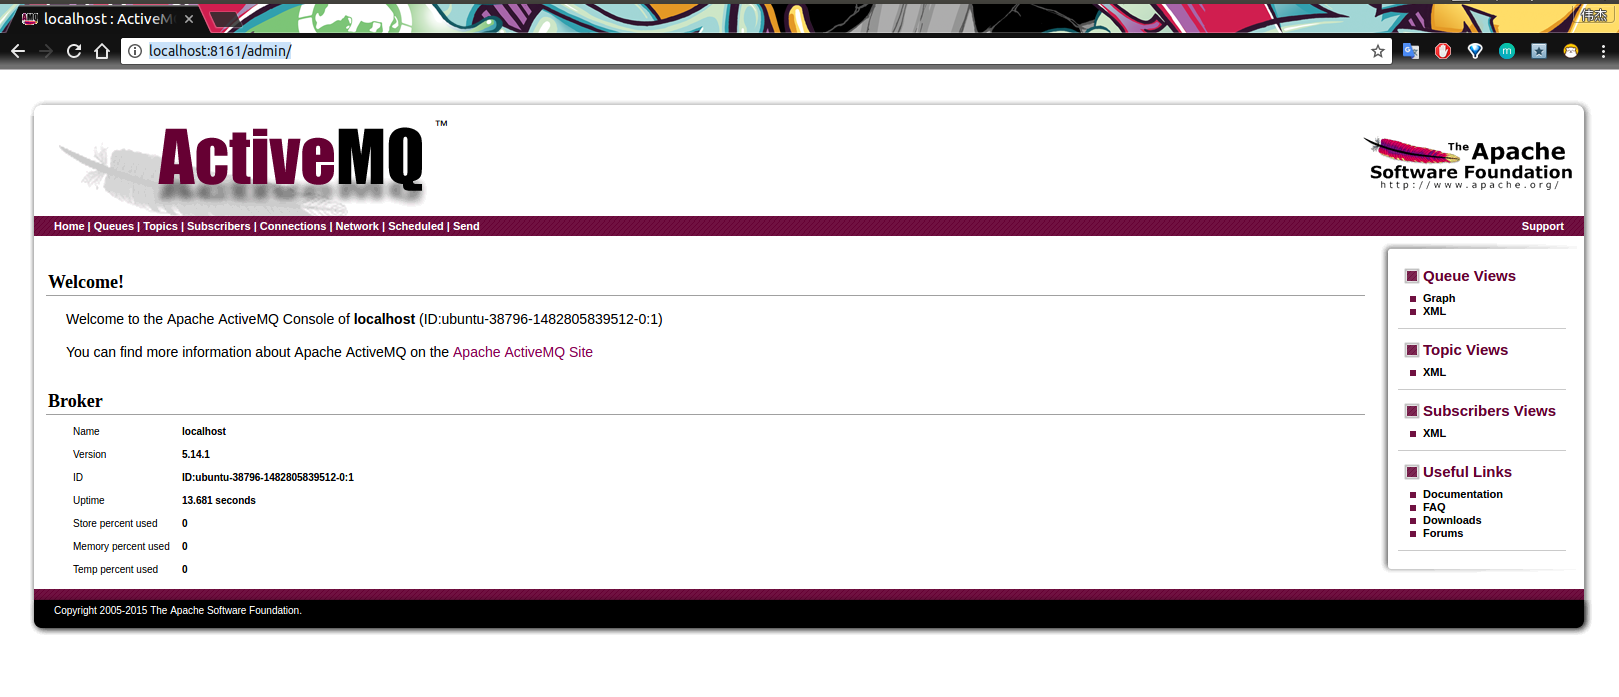
到这里为止,ActiveMQ 服务端就启动完毕了。
ActiveMQ 在linux 下的终止命令是 ./activemq stop
3、创建一个ActiveMQ工程
项目目录结构:
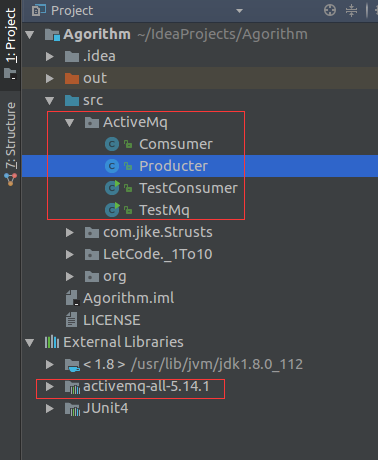
上述在官网下载ActiveMq 的时候,我们可以在目录下看到一个jar包:

这个jar 包就是我们需要在项目中进行开发中使用到的相关依赖。
3.1 创建生产者

public class Producter {

    //ActiveMq 的默认用户名
    private static final String USERNAME = ActiveMQConnection.DEFAULT_USER;
    //ActiveMq 的默认登录密码
    private static final String PASSWORD = ActiveMQConnection.DEFAULT_PASSWORD;
    //ActiveMQ 的链接地址
    private static final String BROKEN_URL = ActiveMQConnection.DEFAULT_BROKER_URL;

    AtomicInteger count = new AtomicInteger(0);
    //链接工厂
    ConnectionFactory connectionFactory;
    //链接对象
    Connection connection;
    //事务管理
    Session session;
    ThreadLocal<MessageProducer> threadLocal = new ThreadLocal<>();

    public void init(){
        try {
            //创建一个链接工厂
            connectionFactory = new ActiveMQConnectionFactory(USERNAME,PASSWORD,BROKEN_URL);
            //从工厂中创建一个链接
            connection  = connectionFactory.createConnection();
            //开启链接
            connection.start();
            //创建一个事务(这里通过参数可以设置事务的级别)
            session = connection.createSession(true,Session.SESSION_TRANSACTED);
        } catch (JMSException e) {
            e.printStackTrace();
        }
    }

    public void sendMessage(String disname){
        try {
            //创建一个消息队列
            Queue queue = session.createQueue(disname);
            //消息生产者
            MessageProducer messageProducer = null;
            if(threadLocal.get()!=null){
                messageProducer = threadLocal.get();
            }else{
                messageProducer = session.createProducer(queue);
                threadLocal.set(messageProducer);
            }
           while(true){
                Thread.sleep(1000);
                int num = count.getAndIncrement();
                //创建一条消息
                TextMessage msg = session.createTextMessage(Thread.currentThread().getName()+
                        "productor:我是大帅哥,我现在正在生产东西!,count:"+num);
                System.out.println(Thread.currentThread().getName()+
                        "productor:我是大帅哥,我现在正在生产东西!,count:"+num);
                //发送消息
                messageProducer.send(msg);
                //提交事务
                session.commit();
            }
        } catch (JMSException e) {
            e.printStackTrace();
        } catch (InterruptedException e) {
            e.printStackTrace();
        }
    }
}
3.2 创建消费者
public class Comsumer {

    private static final String USERNAME = ActiveMQConnection.DEFAULT_USER;

    private static final String PASSWORD = ActiveMQConnection.DEFAULT_PASSWORD;

    private static final String BROKEN_URL = ActiveMQConnection.DEFAULT_BROKER_URL;

    ConnectionFactory connectionFactory;

    Connection connection;

    Session session;

    ThreadLocal<MessageConsumer> threadLocal = new ThreadLocal<>();
    AtomicInteger count = new AtomicInteger();

    public void init(){
        try {
            connectionFactory = new ActiveMQConnectionFactory(USERNAME,PASSWORD,BROKEN_URL);
            connection  = connectionFactory.createConnection();
            connection.start();
            session = connection.createSession(false,Session.AUTO_ACKNOWLEDGE);
        } catch (JMSException e) {
            e.printStackTrace();
        }
    }


    public void getMessage(String disname){
        try {
            Queue queue = session.createQueue(disname);
            MessageConsumer consumer = null;

            if(threadLocal.get()!=null){
                consumer = threadLocal.get();
            }else{
                consumer = session.createConsumer(queue);
                threadLocal.set(consumer);
            }
            while(true){
                Thread.sleep(1000);
                TextMessage msg = (TextMessage) consumer.receive();
                if(msg!=null) {
                    msg.acknowledge();
                    System.out.println(Thread.currentThread().getName()+": Consumer:我是消费者,我正在消费Msg"+msg.getText()+"--->"+count.getAndIncrement());
                }else {
                    break;
                }
            }
        } catch (JMSException e) {
            e.printStackTrace();
        } catch (InterruptedException e) {
            e.printStackTrace();
        }
    }
}
4、运行ActiveMQ项目
4.1 生产者开始生产消息
public class TestMq {
    public static void main(String[] args){
        Producter producter = new Producter();
        producter.init();
        TestMq testMq = new TestMq();
        try {
            Thread.sleep(1000);
        } catch (InterruptedException e) {
            e.printStackTrace();
        }
        //Thread 1
        new Thread(testMq.new ProductorMq(producter)).start();
        //Thread 2
        new Thread(testMq.new ProductorMq(producter)).start();
        //Thread 3
        new Thread(testMq.new ProductorMq(producter)).start();
        //Thread 4
        new Thread(testMq.new ProductorMq(producter)).start();
        //Thread 5
        new Thread(testMq.new ProductorMq(producter)).start();
    }

    private class ProductorMq implements Runnable{
        Producter producter;
        public ProductorMq(Producter producter){
            this.producter = producter;
        }

        @Override
        public void run() {
            while(true){
                try {
                    producter.sendMessage("Jaycekon-MQ");
                    Thread.sleep(10000);
                } catch (InterruptedException e) {
                    e.printStackTrace();
                }
            }
        }
    }
}
运行结果:
 INFO | Successfully connected to tcp://localhost:61616
Thread-6productor:我是大帅哥,我现在正在生产东西!,count:0
Thread-4productor:我是大帅哥,我现在正在生产东西!,count:1
Thread-2productor:我是大帅哥,我现在正在生产东西!,count:3
Thread-5productor:我是大帅哥,我现在正在生产东西!,count:2
Thread-3productor:我是大帅哥,我现在正在生产东西!,count:4
Thread-6productor:我是大帅哥,我现在正在生产东西!,count:5
Thread-3productor:我是大帅哥,我现在正在生产东西!,count:6
Thread-5productor:我是大帅哥,我现在正在生产东西!,count:7
Thread-2productor:我是大帅哥,我现在正在生产东西!,count:8
Thread-4productor:我是大帅哥,我现在正在生产东西!,count:9
Thread-6productor:我是大帅哥,我现在正在生产东西!,count:10
Thread-3productor:我是大帅哥,我现在正在生产东西!,count:11
Thread-5productor:我是大帅哥,我现在正在生产东西!,count:12
Thread-2productor:我是大帅哥,我现在正在生产东西!,count:13
Thread-4productor:我是大帅哥,我现在正在生产东西!,count:14
Thread-6productor:我是大帅哥,我现在正在生产东西!,count:15
Thread-3productor:我是大帅哥,我现在正在生产东西!,count:16
Thread-5productor:我是大帅哥,我现在正在生产东西!,count:17
Thread-2productor:我是大帅哥,我现在正在生产东西!,count:18
Thread-4productor:我是大帅哥,我现在正在生产东西!,count:19

4.2 消费者开始消费消息
public class TestConsumer {
    public static void main(String[] args){
        Comsumer comsumer = new Comsumer();
        comsumer.init();
        TestConsumer testConsumer = new TestConsumer();
        new Thread(testConsumer.new ConsumerMq(comsumer)).start();
        new Thread(testConsumer.new ConsumerMq(comsumer)).start();
        new Thread(testConsumer.new ConsumerMq(comsumer)).start();
        new Thread(testConsumer.new ConsumerMq(comsumer)).start();
    }

    private class ConsumerMq implements Runnable{
        Comsumer comsumer;
        public ConsumerMq(Comsumer comsumer){
            this.comsumer = comsumer;
        }

        @Override
        public void run() {
            while(true){
                try {
                    comsumer.getMessage("Jaycekon-MQ");
                    Thread.sleep(10000);
                } catch (InterruptedException e) {
                    e.printStackTrace();
                }
            }
        }
    }
}
运行结果:
|
1
2
3
4
5
6
7
8
9
10
11
12
13
14
15
16
17
18
19
20
21
22
|
INFO | Successfully connected to tcp://localhost:61616Thread-2: Consumer:我是消费者,我正在消费MsgThread-5productor:我是大帅哥,我现在正在生产东西!,count:4--->0Thread-3: Consumer:我是消费者,我正在消费MsgThread-4productor:我是大帅哥,我现在正在生产东西!,count:36--->1Thread-4: Consumer:我是消费者,我正在消费MsgThread-3productor:我是大帅哥,我现在正在生产东西!,count:38--->2Thread-5: Consumer:我是消费者,我正在消费MsgThread-6productor:我是大帅哥,我现在正在生产东西!,count:37--->3Thread-2: Consumer:我是消费者,我正在消费MsgThread-6productor:我是大帅哥,我现在正在生产东西!,count:2--->4Thread-3: Consumer:我是消费者,我正在消费MsgThread-5productor:我是大帅哥,我现在正在生产东西!,count:40--->5Thread-4: Consumer:我是消费者,我正在消费MsgThread-6productor:我是大帅哥,我现在正在生产东西!,count:42--->6Thread-5: Consumer:我是消费者,我正在消费MsgThread-4productor:我是大帅哥,我现在正在生产东西!,count:41--->7Thread-2: Consumer:我是消费者,我正在消费MsgThread-3productor:我是大帅哥,我现在正在生产东西!,count:1--->8Thread-3: Consumer:我是消费者,我正在消费MsgThread-2productor:我是大帅哥,我现在正在生产东西!,count:44--->9Thread-4: Consumer:我是消费者,我正在消费MsgThread-4productor:我是大帅哥,我现在正在生产东西!,count:46--->10Thread-5: Consumer:我是消费者,我正在消费MsgThread-5productor:我是大帅哥,我现在正在生产东西!,count:45--->11Thread-2: Consumer:我是消费者,我正在消费MsgThread-2productor:我是大帅哥,我现在正在生产东西!,count:3--->12Thread-3: Consumer:我是消费者,我正在消费MsgThread-3productor:我是大帅哥,我现在正在生产东西!,count:48--->13Thread-4: Consumer:我是消费者,我正在消费MsgThread-5productor:我是大帅哥,我现在正在生产东西!,count:50--->14Thread-5: Consumer:我是消费者,我正在消费MsgThread-2productor:我是大帅哥,我现在正在生产东西!,count:49--->15Thread-4: Consumer:我是消费者,我正在消费MsgThread-2productor:我是大帅哥,我现在正在生产东西!,count:54--->16Thread-2: Consumer:我是消费者,我正在消费MsgThread-5productor:我是大帅哥,我现在正在生产东西!,count:6--->17Thread-3: Consumer:我是消费者,我正在消费MsgThread-6productor:我是大帅哥,我现在正在生产东西!,count:52--->18Thread-5: Consumer:我是消费者,我正在消费MsgThread-3productor:我是大帅哥,我现在正在生产东西!,count:53--->19Thread-4: Consumer:我是消费者,我正在消费MsgThread-3productor:我是大帅哥,我现在正在生产东西!,count:58--->20 |
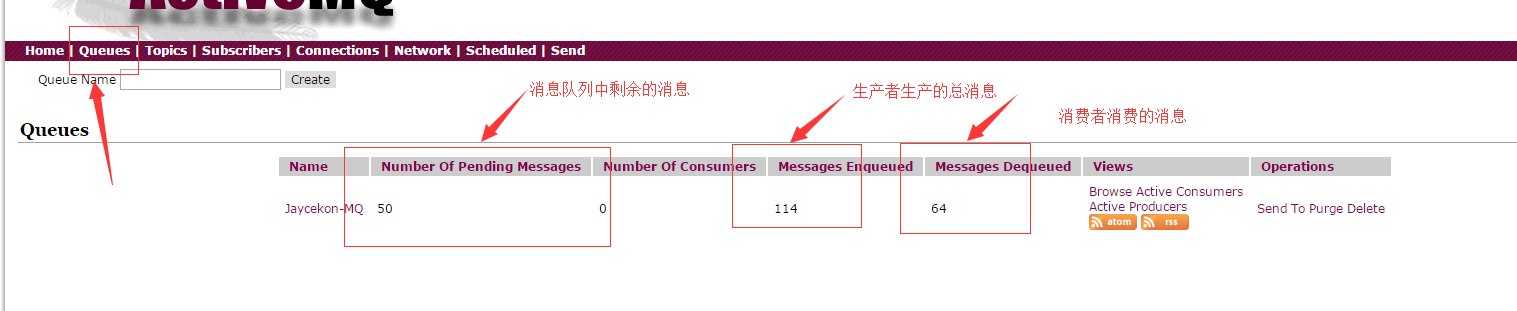
查看运行结果,我们可以做ActiveMQ 服务端:http://127.0.0.1:8161/admin/ 里面的Queues 中查看我们生产的消息。
5、ActiveMQ的特性
5.1 ActiveMq 的特性
- 多种语言和协议编写客户端。语言: Java, C, C++, C#, Ruby, Perl, Python, PHP。应用协议: OpenWire,Stomp REST,WS Notification,XMPP,AMQP
- 完全支持JMS1.1和J2EE 1.4规范 (持久化,XA消息,事务)
- 对Spring的支持,ActiveMQ可以很容易内嵌到使用Spring的系统里面去,而且也支持Spring2.0的特性
- 通过了常见J2EE服务器(如 Geronimo,JBoss 4, GlassFish,WebLogic)的测试,其中通过JCA 1.5 resource adaptors的配置,可以让ActiveMQ可以自动的部署到任何兼容J2EE 1.4 商业服务器上
- 支持多种传送协议:in-VM,TCP,SSL,NIO,UDP,JGroups,JXTA
- 支持通过JDBC和journal提供高速的消息持久化
- 从设计上保证了高性能的集群,客户端-服务器,点对点
- 支持Ajax
- 支持与Axis的整合
- 可以很容易得调用内嵌JMS provider,进行测试
5.2 什么情况下使用ActiveMQ?
- 多个项目之间集成
(1) 跨平台
(2) 多语言
(3) 多项目 - 降低系统间模块的耦合度,解耦
(1) 软件扩展性 - 系统前后端隔离
(1) 前后端隔离,屏蔽高安全区