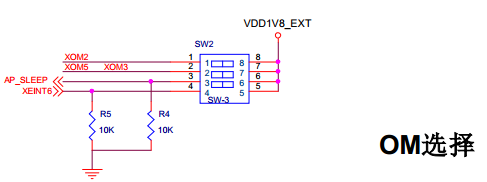
一、配置GPIO读
在视频14的基础上做
1.利用拨码开关来实现GPIO输入


所以AP_SLEEP对应GPC0_3,然后在drivers/gpio/gpio-exynos4.c中对应EXYNOS4_GPC0(0)
XEINT6→GPX0_6→EXYNOS4_GPX0(6)
读寄存器手册分析流程:
- 设置寄存器为输入 GPC0CON
- 读寄存器值 GPC0DAT
- 不上拉,不下拉 GPC0PUD
2.GPIO的输入需要哪些函数,从archarmplat-samsunggpio-config.c中找
- 申请gpio_request
- 读寄存器gpio_get_value
- 设置GPIO为输入模式s3c_gpio_cfgpin S3C_GPIO_INPUT
- 设置上拉下拉s3c_gpio_setpull S3C_GPIO_PULL_NONE
- 释放GPIO gpio_free
3.平台文件中设备注册
在文件arch/arm/mach-exynos/mach-itop4412.c中:
struct platform_device s3c_device_read_gpio_ctl = {
.name = "read_gpio_ctl",
.id = -1,
};
&s3c_device_read_gpio_ctl,
在init_lcd_type函数中request了GPIO。所以在get_lcd_type需要释放GPIO
gpio_free(EXYNOS4_GPC0(3));
gpio_free(EXYNOS4_GPX0(6));
4.Makefile修改

TARGET_NAME = read_gpio
APP_NAME = app_read_gpio
obj-m += $(TARGET_NAME).o

KDIR := /home/topeet/chen/kernel-3.0/iTop4412_Kernel_3.0

PWD ?= $(shell pwd)

all:app
    make -C $(KDIR) M=$(PWD) modules

app:$(APP_NAME)
    arm-none-linux-gnueabi-gcc $(APP_NAME).c -o $(APP_NAME) -static

clean:
    rm -rf *.o *.ko *.mod.c *.symvers *.order
    .$(TARGET_NAME)* $(APP_NAME)
5.驱动的修改

#include <linux/init.h>
#include <linux/module.h>

/*驱动注册的头文件,包含驱动的结构体和注册和卸载的函数*/
#include <linux/platform_device.h>
/*注册杂项设备头文件*/
#include <linux/miscdevice.h>
/*注册设备节点的文件结构体*/
#include <linux/fs.h>

/*Linux中申请GPIO的头文件*/
#include <linux/gpio.h>
/*三星平台的GPIO配置函数头文件*/
/*三星平台EXYNOS系列平台,GPIO配置参数宏定义头文件*/
#include <plat/gpio-cfg.h>
#include <mach/gpio.h>
/*三星平台4412平台,GPIO宏定义头文件*/
#include <mach/gpio-exynos4.h>

#define DRIVER_NAME "read_gpio_ctl"
#define DEVICE_NAME "read_gpio_ctl"


MODULE_LICENSE("Dual BSD/GPL");
MODULE_AUTHOR("TOPEET");

static long read_gpio_ioctl( struct file *files, unsigned int cmd, unsigned long arg)
{
    printk("cmd is %d,arg is %d
",cmd,arg);

    if(cmd > 1){
        printk(KERN_EMERG "cmd is 0 or 1
");
    }
    if(arg > 1){
        printk(KERN_EMERG "arg is only 1
");
    }

    //if cmd is 0, return GPC(3)>>switch3
    //if cmd is 1, return GPX(6)>>switch4
    if(cmd == 0) {
        return gpio_get_value(EXYNOS4_GPC0(3));
    }
    if(cmd == 1) {
        return gpio_get_value(EXYNOS4_GPX0(6));
    }

    return 0;
}

static int read_gpio_release(struct inode *inode, struct file *file)
{
    printk(KERN_EMERG "read_gpio release
");
    return 0;
}

static int read_gpio_open(struct inode *inode, struct file *file)
{
    printk(KERN_EMERG "read_gpio open
");
    return 0;
}

static struct file_operations read_gpio_ops = {
    .owner = THIS_MODULE,
    .open = read_gpio_open,
    .release = read_gpio_release,
    .unlocked_ioctl = read_gpio_ioctl,
};

static  struct miscdevice read_gpio_dev = {
    .minor = MISC_DYNAMIC_MINOR,
    .name = DEVICE_NAME,
    .fops = &read_gpio_ops,
};


static int read_gpio_probe(struct platform_device *pdv)
{
    int ret;

    printk(KERN_EMERG "	initialized
");

    ret = gpio_request(EXYNOS4_GPC0(3),"Switch3");
    if(ret < 0){
        printk(KERN_EMERG "gpio_request EXYNOS4_GPL2(0) failed!
");
        return ret;
    } else {
        s3c_gpio_cfgpin(EXYNOS4_GPC0(3), S3C_GPIO_INPUT);
        s3c_gpio_setpull(EXYNOS4_GPC0(3), S3C_GPIO_PULL_NONE);

    }

    ret = gpio_request(EXYNOS4_GPX0(6),"Switch4");
    if(ret < 0){
        printk(KERN_EMERG "gpio_request EXYNOS4_GPL2(0) failed!
");
        return ret;
    } else {
        s3c_gpio_cfgpin(EXYNOS4_GPX0(6), S3C_GPIO_INPUT);
        s3c_gpio_setpull(EXYNOS4_GPX0(6), S3C_GPIO_PULL_NONE);

    }

    misc_register(&read_gpio_dev);

    return 0;
}

static int read_gpio_remove(struct platform_device *pdv)
{
    printk(KERN_EMERG "	remove
");
    gpio_free(EXYNOS4_GPC0(3));
    gpio_free(EXYNOS4_GPX0(6));
    misc_deregister(&read_gpio_dev);
    return 0;
}

static void read_gpio_shutdown(struct platform_device *pdv)
{

    ;
}

static int read_gpio_suspend(struct platform_device *pdv,pm_message_t pmt)
{

    return 0;
}

static int read_gpio_resume(struct platform_device *pdv)
{

    return 0;
}

struct platform_driver read_gpio_driver = {
    .probe = read_gpio_probe,
    .remove = read_gpio_remove,
    .shutdown = read_gpio_shutdown,
    .suspend = read_gpio_suspend,
    .resume = read_gpio_resume,
    .driver = {
        .name = DRIVER_NAME,
        .owner = THIS_MODULE,
    }
};


static int read_gpio_init(void)
{
    int DriverState;

    printk(KERN_EMERG "read_gpio enter!
");
    DriverState = platform_driver_register(&read_gpio_driver);

    printk(KERN_EMERG "	DriverState is %d
",DriverState);
    return 0;
}


static void read_gpio_exit(void)
{
    printk(KERN_EMERG "read_gpio exit!
");

    platform_driver_unregister(&read_gpio_driver);
}

module_init(read_gpio_init);
module_exit(read_gpio_exit);
应用程序:

#include <stdio.h>

#include <sys/types.h>
#include <sys/stat.h>
#include <fcntl.h>
#include <unistd.h>
#include <sys/ioctl.h>

#include <string.h>

#define GPIOS 32

int main(int argc, char *argv[])
{
        int fd, i, cmd = 2;
        char *read_gpio = "/dev/read_gpio_ctl";
        char *cmd0 = "0";
        char *cmd1 = "1";
        printf("argv[0] is %s;argv[1] is %s;
", argv[0], argv[1]);

        if(strcmp(argv[1], cmd0) == 0) {
                cmd = 0;
        }
        if(strcmp(argv[1], cmd1) == 0) {
                cmd = 1;
        }

        if((fd = open(read_gpio, O_RDWR|O_NDELAY)) < 0) {
                printf("APP open %s failed
", read_gpio);
        } else {
                printf("APP open %s success!
", read_gpio);
                printf("%d io value is %d
", cmd, ioctl(fd, cmd, 0));
        }

        close(fd);
}
测试结果:

[root@iTOP-4412]# ./app_read_gpio 1
argv[0] is ./app_[  312.514145] read_gpio open
[  312.516876] cmd is 1,arg is 0
[  312.519870] read_gpio release
read_gpio;argv[1] is 1;
APP open /dev/read_gpio_ctl success!
1 io value is 0
[root@iTOP-4412]# ./app_read_gpio 0
argv[0] is ./app_[  314.786489] read_gpio open
[  314.789131] cmd is 0,arg is 0
[  314.792307] read_gpio release
read_gpio;argv[1] is 0;
APP open /dev/read_gpio_ctl success!
0 io value is 0
[root@iTOP-4412]# ./app_read_gpio 1
argv[0] is ./app_[  321.786146] read_gpio open
[  321.788790] cmd is 1,arg is 0
[  321.791899] read_gpio release
read_gpio;argv[1] is 1;
APP open /dev/read_gpio_ctl success!
1 io value is 1
[root@iTOP-4412]# ./app_read_gpio 0
argv[0] is ./app_[  323.449833] read_gpio open
[  323.452526] cmd is 0,arg is 0
[  323.455489] read_gpio release
read_gpio;argv[1] is 0;
APP open /dev/read_gpio_ctl success!
0 io value is 1
二、ioremap控制GPIO寄存器
上面使用的是直接通过软件转换好了的,其实内核也是可以自己做转化的。
自己实现物理地址到虚拟地址的转化,iounmap和ioremap函数可以实现物理地址到虚拟地址的转化
1.硬件
- 原理图部分

- datasheet物理地址
- GPL2CON = 0x1100 0000 + 0x0100 = 0x1100 0100
- GPL2DAT = 0x1100 0000 + 0x0104 = 0x1100 0104
- GPL2PUD = 0x1100 0000 + 0x0108 = 0x1100 0108
- 寄存器不一定是32位的,也有16位或8位的
2.软件

#include <linux/init.h>
#include <linux/module.h>
#include <asm/io.h>

MODULE_LICENSE("Dual BSD/GPL");
MODULE_AUTHOR("Topeet");

//用于存放虚拟地址和物理地址
volatile unsigned long virt_addr, phys_addr;
//用户存放三个寄存器的地址
volatile unsigned long *GPL2CON, *GPL2DAT, *GPL2PUD;

static void gpl2_device_init(void)
{
    //物理地址起始地址0x1100 0100
    phys_addr = 0x11000100;
    //0x11000100是GPL2CON的物理地址
    virt_addr = (unsigned long)ioremap(phys_addr, 0x10);
    //指定需要操作的寄存器地址
    GPL2CON = (unsigned long *)(virt_addr + 0x00);
    GPL2DAT = (unsigned long *)(virt_addr + 0x04);
    GPL2PUD = (unsigned long *)(virt_addr + 0x08);
}

//配置开发板的GPIO寄存器
static void gpl2_configure(void)
{
    //配置为输出模式
    *GPL2CON &= 0xFFFFFFF0;
    *GPL2CON |= 0x00000001;
    //GPL2PUD &= 0xfff0;
    //GPL2PUD寄存器,bit[0:1]设为0x03,上拉模式
    *GPL2PUD |= 0x0003;
}

//点灯
static void gpl2_on(void)
{
    *GPL2DAT |= 0x01;
}

//灭灯
static void gpl2_off(void)
{
    *GPL2DAT &= 0xfe;
}

static int led_gpl2_init(void)
{
    printk(KERN_EMERG "led enter!
");
    gpl2_device_init();         //实现IO内存映射
    gpl2_configure();           //配置GPL2为输出模式
    gpl2_on();
    printk("led dgp2 open
");
    return 0;
}

static void led_gpl2_exit(void)
{
    gpl2_off();
    printk(KERN_EMERG "led exit!
");
}

module_init(led_gpl2_init);
module_exit(led_gpl2_exit);
makefile文件:

TARGET_NAME = ioremap_leds
obj-m += $(TARGET_NAME).o

KDIR := /home/topeet/chen/kernel-3.0/iTop4412_Kernel_3.0

PWD ?= $(shell pwd)

all:
        make -C $(KDIR) M=$(PWD) modules

clean:
        rm -rf *.o *.ko *.mod.c *.symvers *.order
        .$(TARGET_NAME)*
3.编译测试

[root@iTOP-4412]# insmod ioremap_leds.ko
[ 6116.064904] led enter!
[ 6116.065940] led dgp2 open
[root@iTOP-4412]# rmmod ioremap_leds
[ 6122.913415] led exit!
[root@iTOP-4412]# insmod ioremap_leds.ko
[ 6133.090595] led enter!
[ 6133.091567] led dgp2 open
[root@iTOP-4412]# rmmod ioremap_leds
[ 6137.830391] led exit
加载驱动,小灯亮
卸载驱动,小灯灭
