Clickhouse版本:20.3.6.40-2

安装包地址:https://repo.yandex.ru/clickhouse/rpm/stable/x86_64/
一、单机版
1、安装依赖
yum install libicu.x86_64
2、下载安装包
http://repo.yandex.ru/clickhouse/rpm/
3、安装
rpm -ivh *.rpm --force --nodeps
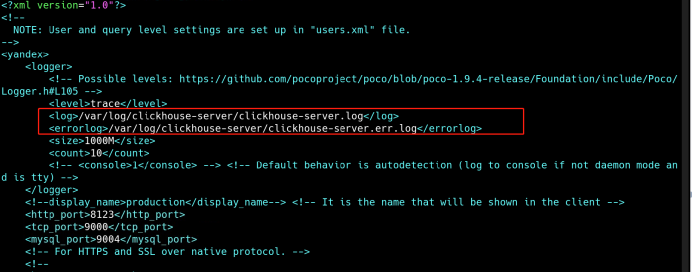
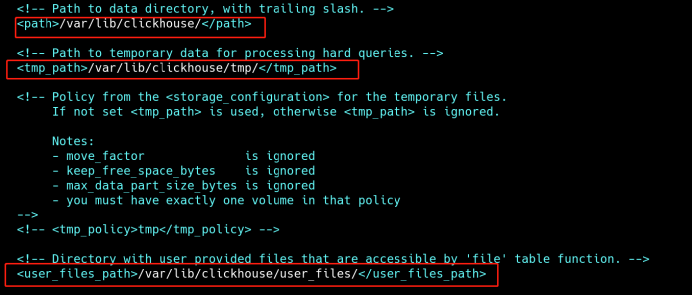
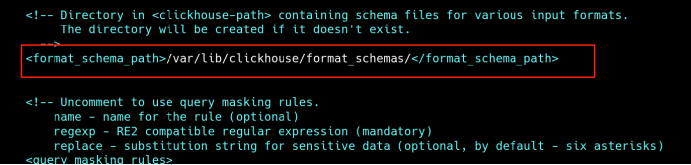
4、修改数据、日志目录
vi /etc/clickhouse-server/config.xml

5、创建相关目录
只需创建log文件目录即可
mkdir /bigdata/clickhouse
mkdir /bigdata/clickhouse/log
chown clickhouse:clickhouse /bigdata/clickhouse
chown clickhouse:clickhouse /bigdata/clickhouse/log
6、启动
/etc/init.d/clickhouse-server start
/etc/init.d/clickhouse-server stop
7、登录
由于9000与其它服务端口冲突,故tcp端口更改为9011
clickhouse-client --host localhost --port 9011
二、集群版
1、修改配置文件(三分片、单副本)
分别在三个节点都创建文件,红色字体每个节点配置不一样
vim /etc/metrika.xml
<yandex>
    <clickhouse_remote_servers>
        <cluster-01>
            <shard>
                <internal_replication>true</internal_replication>
                <replica>
                    <host>spbsjzy19</host>
                    <port>9011</port>
                    <user>rt</user>
                    <password>passwd</password>
                </replica>
            </shard>
            <shard>
                <internal_replication>true</internal_replication>
                <replica>
                    <host>spbsjzy20</host>
                    <port>9011</port>
                    <user>rt</user>
                    <password>passwd</password>
                </replica>
            </shard>
            <shard>
                <internal_replication>true</internal_replication>
                <replica>
                    <host>spbsjzy21</host>
                    <port>9011</port>
                    <user>rt</user>
                    <password>passwd</password>
                </replica>
            </shard>
        </cluster-01>
    </clickhouse_remote_servers>
    <zookeeper-servers>
        <node index="1">
            <host>spbsjzy33</host>
            <port>2181</port>
        </node>
        <node index="2">
            <host>spbsjzy34</host>
            <port>2181</port>
        </node>
        <node index="3">
            <host>spbsjzy35</host>
            <port>2181</port>
        </node>
    </zookeeper-servers>
     <macros>
      <cluster>cluster-01</cluster>
      <shard>01</shard>
      <replica>spbsjzy19</replica>
     <!-- <shard>02</shard>
      <replica>spbsjzy20</replica>
      <shard>03</shard>
      <replica>spbsjzy21</replica>
-->
    </macros>
    <clickhouse_compression>
        <case>
            <min_part_size>10000000000</min_part_size>
            <min_part_size_ratio>0.01</min_part_size_ratio>
            <method>lz4</method>
        </case>
    </clickhouse_compression>
</yandex>
注意:
1) <macros> </macros>中的shard名
三个节点配置相同则在任意一个节点插入数据,其他节点都会查询到;不相同的话复制表之间数据不会同步(插入分布表,数据会随机分配到某个节点的复制表;插入任意一个节点的复制表,分布表可以查询到,其他节点复制表无法查到)
2) <macros> </macros>中 <cluster>表示集群名称,<shard>表示分片编号,<replica>表示副本标识,这里使用了cluster{cluster}-{shard}-{replica}的表示方式
3) <internal_replication>
如果设置为true,则往本地表写入数据时,总是写入到完整健康的副本里,然后由表自身完成复制,这就要求本地表是能自我复制的(推荐)。如果设置为false,则写入数据时,是写入到所有副本中。这时,是无法保证一致性的
4) <user></user><password></password>
添加完后使用默认default用户也可以查询分布表。
相关报错信息:
ru.yandex.clickhouse.except.ClickHouseException: ClickHouse exception, code: 516, host: spbsjzy20, port: 8123; Code: 516, e.displayText() = DB::Exception: Received from spbsjzy19:9011. DB::Exception: default: Authentication failed: password is incorrect or there is no user with such name. (version 20.3.6.40 (official build))
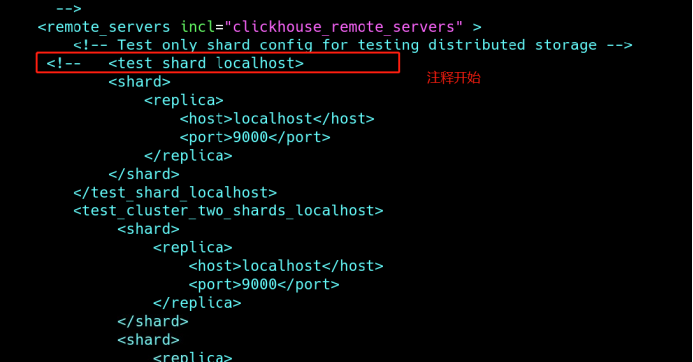
2、修改配置
vim /etc/clickhouse-server/config.xml
把注释打开,否则节点之间无法访问,分布表也无法查询其它节点数据

3、建议
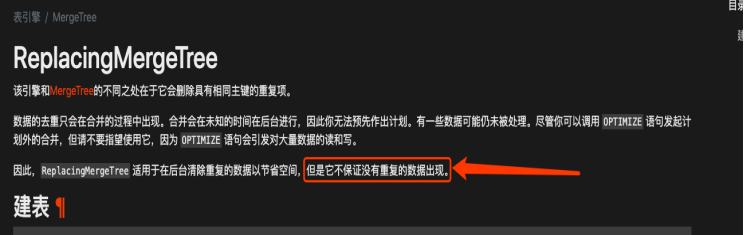
生产中建议一般采用复制表和分布表;先创建复制表而后创建分布表,复制表用来存储数据,分布表用来查询和写入
ReplacingMergeTree:
4、创建表
分别在三个节点创建复制表:
分别在三个节点创建复制表:
CREATE TABLE default.test (`eventdate` Date, `company` String, `deliveryno` String, `usercardtype` String, `id` String, `name` String, `mob` String, `orgcode` String, `creditcode` String, `taxregno` String, `type` String, `cardid` String, `staffna` String, `staffmob` String, `staffaddress` String, `checkdate` String, `method` String, `address` String, `utcdate` DateTime DEFAULT now()) ENGINE = ReplicatedMergeTree('/clickhouse/tables/{shard}/test', '{replica}', eventdate, (eventdate, company, deliveryno, id, mob, name), 8192)
在一个节点创建分布表:
CREATE TABLE default.test_all (`eventdate` Date, `company` String, `deliveryno` String, `usercardtype` String, `id` String, `name` String, `mob` String, `orgcode` String, `creditcode` String, `taxregno` String, `type` String, `cardid` String, `staffna` String, `staffmob` String, `staffaddress` String, `checkdate` String, `method` String, `address` String, `utcdate` DateTime DEFAULT now()) ENGINE = Distributed('{cluster}', 'default', 'test', rand())
5、插入表
insert into test(eventdate,company,deliveryno,id) VALUES('2020-12-05','ff','vv','xx');
insert into test_all(eventdate,company,deliveryno,id) VALUES('2020-12-06','xx','vv','xx');
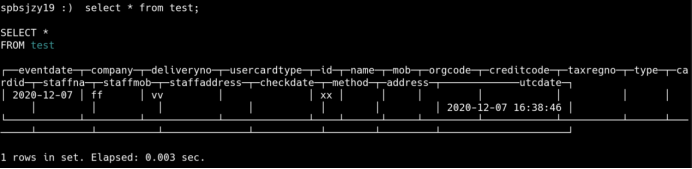
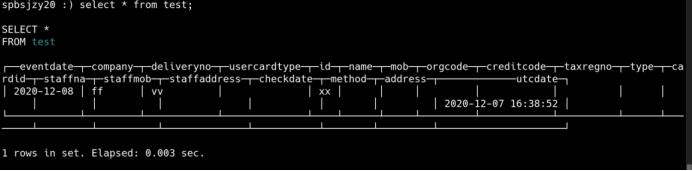
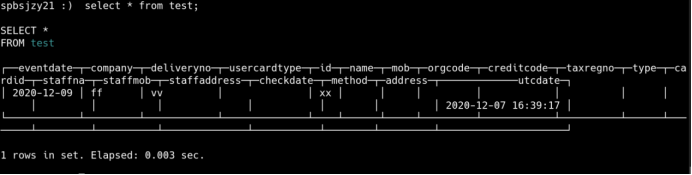
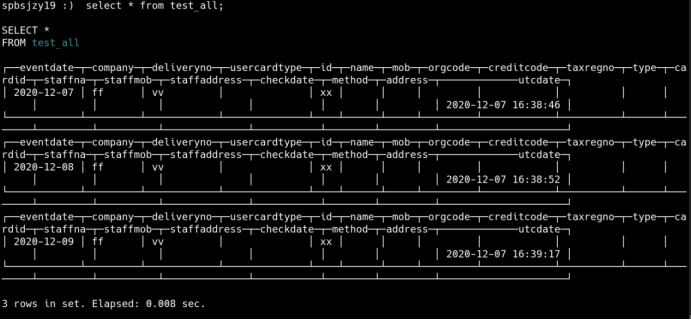
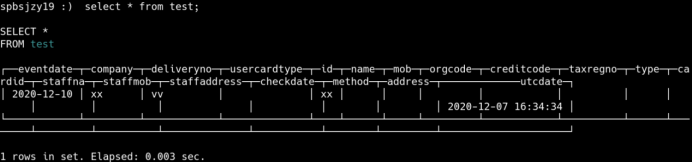
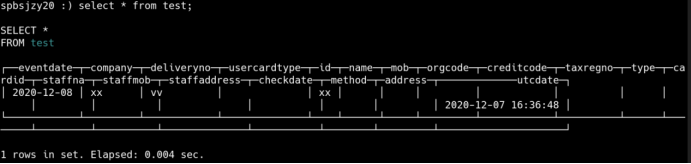
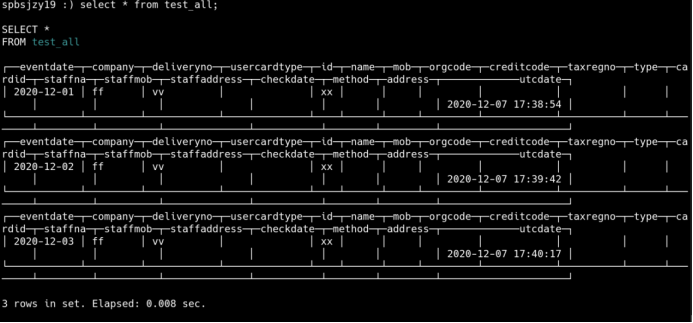
6、数据分布测试
(1)三张复制表分别执行
insert into test(eventdate,company,deliveryno,id) VALUES('2020-12-07','ff','vv','xx');
insert into test(eventdate,company,deliveryno,id) VALUES('2020-12-08','ff','vv','xx');
insert into test(eventdate,company,deliveryno,id) VALUES('2020-12-09','ff','vv','xx');
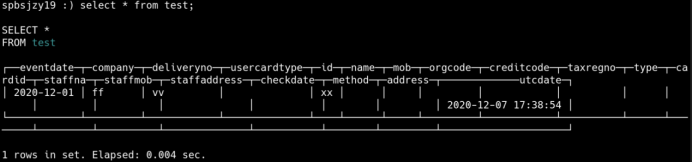
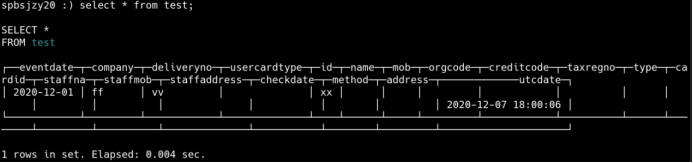
查询复制表:
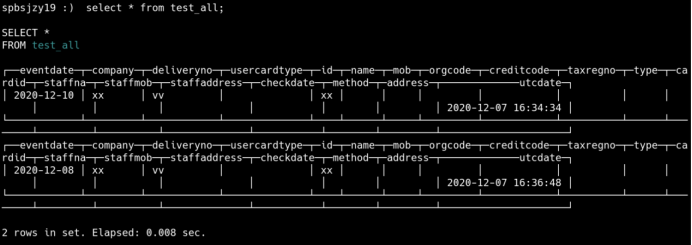
查询分布表
(2)插入分布表(随机分布)
insert into test_all(eventdate,company,deliveryno,id) VALUES('2020-12-07','xx','vv','xx');
insert into test_all(eventdate,company,deliveryno,id) VALUES('2020-12-08','xx','vv','xx');
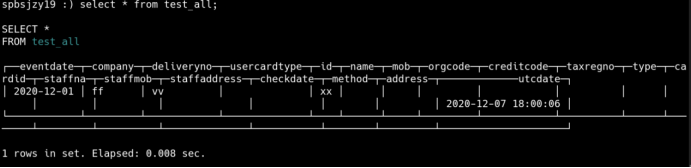
查询复制表
查询分布表
7、节点宕机测试

三、高可用版
1、新增配置文件
cp /etc/clickhouse-server/config.xml /etc/clickhouse-server/config1.xml
cp /etc/metrika.xml /etc/metrika1.xml
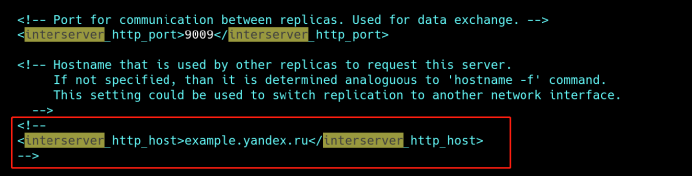
2、修改配置文件
端口:
vim /etc/clickhouse-server/config1.xml
<http_port>8124</http_port>
<tcp_port>9021</tcp_port>
<mysql_port>9014</mysql_port>
<interserver_http_port>9019</interserver_http_port>
目录:
<log>/bigdata/clickhouse1/log/clickhouse-server.log</log>
<errorlog>/bigdata/clickhouse1/log/clickhouse-server.err.log</errorlog>
<path>/bigdata/clickhouse1/data/</path>
<tmp_path>/bigdata/clickhouse1/tmp/</tmp_path>
<user_files_path>/bigdata/clickhouse1/user_files/</user_files_path>
<format_schema_path>/bigdata/clickhouse1/format_schemas/</format_schema_path>
3、集群配置文件metrika.xml更改为自定义
mv /etc/metrika.xml /etc/clickhouse-server/metrika.xml
mv /etc/metrika1.xml /etc/clickhouse-server/metrika1.xml
vim /etc/clickhouse-server/config.xml(新增标签)
<include_from>/etc/clickhouse-server/metrika.xml</include_from>
vim /etc/clickhouse-server/config1.xml
<include_from>/etc/clickhouse-server/metrika1.xml</include_from>
4、创建新实例目录
mkdir /bigdata/clickhouse1
mkdir /bigdata/clickhouse1/log
修改权限
5、创建新实例启动脚本
cp /etc/init.d/clickhouse-server /etc/init.d/clickhouse-server1
vim /etc/init.d/clickhouse-server1
修改配置文件
CLICKHOUSE_CONFIG=$CLICKHOUSE_CONFDIR/config1.xml
CLICKHOUSE_PIDFILE="$CLICKHOUSE_PIDDIR/$PROGRAM-1.pid"
6、修改metrika.xml文件,配置高可用
相同部分
<clickhouse_remote_servers>
<cluster-01>
<shard>
<internal_replication>true</internal_replication>
<replica>
<host>spbsjzy19</host>
<port>9011</port>
<user>rt</user>
<password>passwd</password>
</replica>
<replica>
<host>spbsjzy20</host>
<port>9021</port>
<user>rt</user>
<password>passwd</password>
</replica>
</shard>
<shard>
<internal_replication>true</internal_replication>
<replica>
<host>spbsjzy20</host>
<port>9011</port>
<user>rt</user>
<password>passwd</password>
</replica>
<replica>
<host>spbsjzy21</host>
<port>9021</port>
<user>rt</user>
<password>passwd</password>
</replica>
</shard>
<shard>
<internal_replication>true</internal_replication>
<replica>
<host>spbsjzy21</host>
<port>9011</port>
<user>rt</user>
<password>passwd</password>
</replica>
<replica>
<host>spbsjzy19</host>
<port>9021</port>
<user>rt</user>
<password>passwd</password>
</replica>
</shard>
</cluster-01>
</clickhouse_remote_servers>

不同部分

1节点clickhouse
<macros>
<cluster>cluster-01</cluster>
<shard>01</shard>
<replica>cluster-01-01-01</replica>
</macros>
1节点clickhouse1
<macros>
<cluster>cluster-01</cluster>
<shard>03</shard>
<replica>cluster-01-03-02</replica>
</macros>
2节点clickhouse
<macros>
<cluster>cluster-01</cluster>
<shard>02</shard>
<replica>cluster-01-02-01</replica>
</macros>
2节点clickhouse1
<macros>
<cluster>cluster-01</cluster>
<shard>01</shard>
<replica>cluster-01-01-02</replica>
</macros>
3节点clickhouse
<macros>
<cluster>cluster-01</cluster>
<shard>03</shard>
<replica>cluster-01-03-01</replica>
</macros>
3节点clickhouse1
<macros>
<cluster>cluster-01</cluster>
<shard>02</shard>
<replica>cluster-01-02-02</replica>
 </macros>
7、添加用户
默认是default用户,没有密码,修改完无需重启
vim /etc/clickhouse-server/users.xml
在<users></users>中添加
<rt>
<networks incl="networks" replace="replace">
<ip>::/0</ip>
</networks>
<profile>default</profile>
<quota>default</quota>
<password>passwd</password>
</rt>
只读配置:
<profile>readonly</profile>
登录:
clickhouse-client --host localhost --port 9011 -u rt --password 'passwd'
8、启动
/etc/init.d/clickhouse-server start
/etc/init.d/clickhouse-server1 start
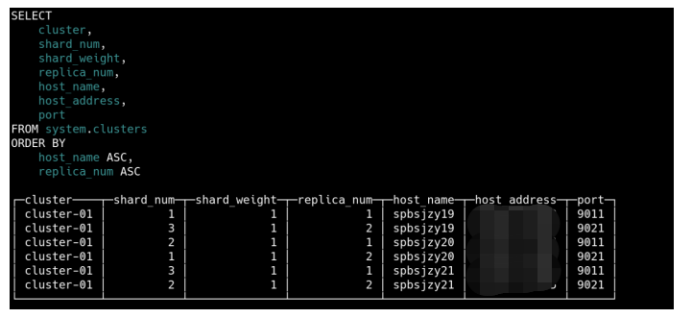
9、查看集群信息
10、数据分布测试
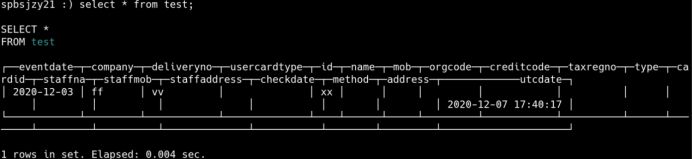
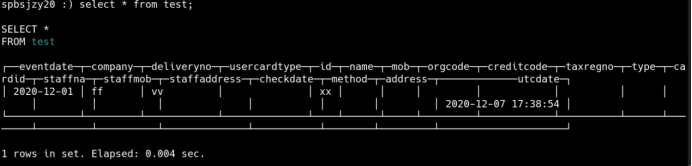
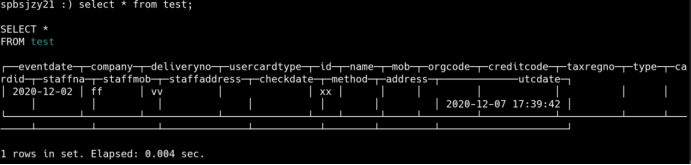
(1) 插入复制表
分别在三个clickhouse(9011)实例执行
insert into test(eventdate,company,deliveryno,id) VALUES('2020-12-01','ff','vv','xx');

insert into test(eventdate,company,deliveryno,id) VALUES('2020-12-02','ff','vv','xx');

insert into test(eventdate,company,deliveryno,id) VALUES('2020-12-03','ff','vv','xx');
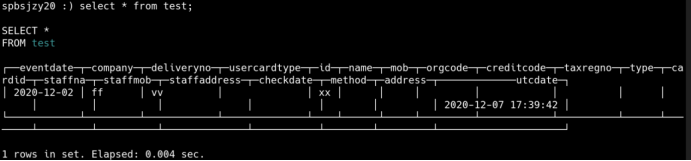
查询复制表
Clickhouse实例:
Clickhouse1实例:

查询分布表:
(1) 插入分布表
insert into test_all(eventdate,company,deliveryno,id) VALUES('2020-12-01','ff','vv','xx');
查询复制表:
Clickhouse实例
Clickhouse1实例

查询分布表:
11、节点宕机测试

--------------------------------END --------------------------------
以上为本人亲测,希望对大家有帮助,有问题多交流