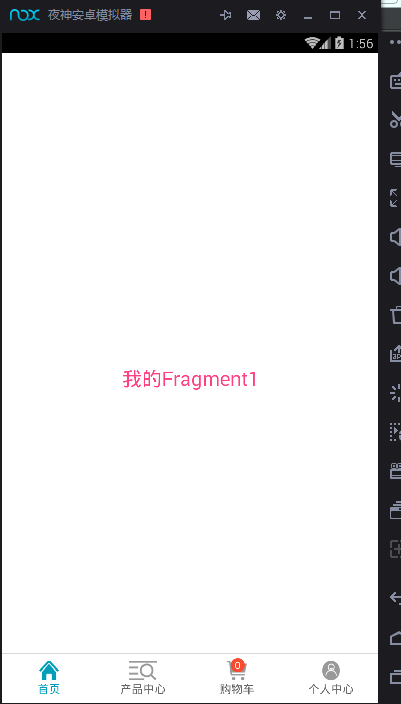
底部切换菜单实现方法有多种,比如使用 RadioButton 实现起来更方便容易一些,但是,当你的底部菜单要嵌入其它标签的时候,比如消息提示功能,那 FragmentTabHost 实现起来就更容易了,效果图如下:
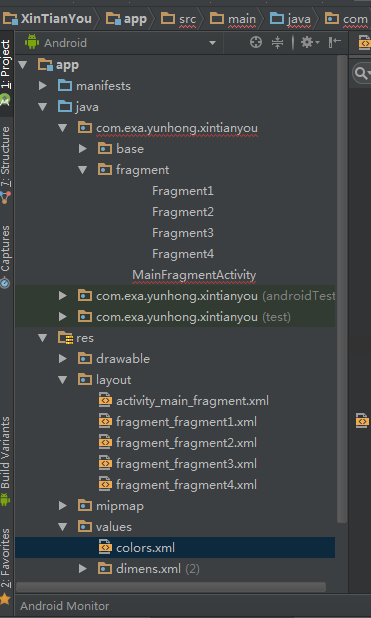
项目的结构图如下:
布局文件的代码如下:
<?xml version="1.0" encoding="utf-8"?>
<RelativeLayout xmlns:android="http://schemas.android.com/apk/res/android"
    xmlns:tools="http://schemas.android.com/tools"
    android:layout_width="match_parent"
    android:layout_height="match_parent"
    android:background="#fff"
    tools:context="com.exa.yunhong.xintianyou.MainFragmentActivity">

    <LinearLayout
        android:layout_width="match_parent"
        android:layout_height="match_parent"
        android:orientation="vertical">

        <!-- android:layout_weight="1" 必须加上   还有控件的 id 必须这样写 -->
        <android.support.v4.app.FragmentTabHost
            android:id="@android:id/tabhost"
            android:layout_width="match_parent"
            android:layout_height="wrap_content"
            android:layout_weight="1"
            android:background="@android:color/background_light">

            <LinearLayout
                android:layout_width="match_parent"
                android:layout_height="match_parent"
                android:orientation="vertical">

                <FrameLayout
                    android:id="@+id/realtabcontent"
                    android:layout_width="match_parent"
                    android:layout_height="match_parent" />
            </LinearLayout>

            <LinearLayout
                android:layout_width="match_parent"
                android:layout_height="match_parent"
                android:gravity="bottom"
                android:orientation="vertical">

                <View
                    android:layout_width="match_parent"
                    android:layout_height="1dp"
                    android:background="#D9D9D9" />

                <LinearLayout
                    android:layout_width="match_parent"
                    android:layout_height="60dp"
                    android:background="#fff"
                    android:orientation="horizontal">

                    <LinearLayout
                        android:id="@+id/Button0"
                        android:layout_width="match_parent"
                        android:layout_height="wrap_content"
                        android:layout_gravity="center"
                        android:layout_weight="1"
                        android:gravity="center"
                        android:orientation="vertical">

                        <ImageView
                            android:id="@+id/image1"
                            android:layout_width="24dp"
                            android:layout_height="24dp"
                            android:background="@drawable/tab1_light" />

                        <TextView
                            android:id="@+id/text1"
                            android:layout_width="wrap_content"
                            android:layout_height="wrap_content"
                            android:text="首页"
                            android:textColor="#009eb8" />
                    </LinearLayout>

                    <LinearLayout
                        android:id="@+id/Button1"
                        android:layout_width="match_parent"
                        android:layout_height="wrap_content"
                        android:layout_gravity="center"
                        android:layout_weight="1"
                        android:gravity="center"
                        android:orientation="vertical">

                        <ImageView
                            android:id="@+id/image2"
                            android:layout_width="33dp"
                            android:layout_height="24dp"
                            android:background="@drawable/tab2_normal" />

                        <TextView
                            android:id="@+id/text2"
                            android:layout_width="wrap_content"
                            android:layout_height="wrap_content"
                            android:text="产品中心"
                            android:textColor="#666666" />
                    </LinearLayout>

                    <RelativeLayout
                        android:id="@+id/Button2"
                        android:layout_width="match_parent"
                        android:layout_height="wrap_content"
                        android:layout_weight="1"
                        android:orientation="vertical">

                        <LinearLayout
                            android:layout_width="match_parent"
                            android:layout_height="match_parent"
                            android:layout_gravity="center"
                            android:gravity="center"
                            android:orientation="vertical">

                            <ImageView
                                android:id="@+id/image3"
                                android:layout_width="25dp"
                                android:layout_height="24dp"
                                android:background="@drawable/tab3_normal" />

                            <TextView
                                android:id="@+id/text3"
                                android:layout_width="wrap_content"
                                android:layout_height="wrap_content"
                                android:text="购物车"
                                android:textColor="#666666" />
                        </LinearLayout>

                        <RelativeLayout
                            android:id="@+id/rlNum1"
                            android:layout_width="17dp"
                            android:layout_height="17dp"
                            android:layout_marginLeft="50dp"
                            android:layout_marginTop="5dp"
                            android:background="@drawable/point1">

                            <TextView
                                android:id="@+id/tvcartNum"
                                android:layout_width="wrap_content"
                                android:layout_height="wrap_content"
                                android:layout_centerInParent="true"
                                android:text="0"
                                android:textColor="#ffffff"
                                android:textSize="12sp" />
                        </RelativeLayout>
                    </RelativeLayout>

                    <LinearLayout
                        android:id="@+id/Button3"
                        android:layout_width="match_parent"
                        android:layout_height="wrap_content"
                        android:layout_gravity="center"
                        android:layout_weight="1"
                        android:gravity="center"
                        android:orientation="vertical">

                        <ImageView
                            android:id="@+id/image4"
                            android:layout_width="22dp"
                            android:layout_height="24dp"
                            android:layout_centerHorizontal="true"
                            android:background="@drawable/tab4_normal" />

                        <TextView
                            android:id="@+id/text4"
                            android:layout_width="wrap_content"
                            android:layout_height="wrap_content"
                            android:layout_below="@+id/image4"
                            android:layout_centerHorizontal="true"
                            android:text="个人中心"
                            android:textColor="#666666" />
                    </LinearLayout>
                </LinearLayout>
            </LinearLayout>
        </android.support.v4.app.FragmentTabHost>

    </LinearLayout>

</RelativeLayout>


窗体的文件代码如下:

public class MainFragmentActivity extends FragmentActivity implements View.OnClickListener {
    private FragmentTabHost mTabHost;
    private LinearLayout button0, button1, button3;

    //初始化标签数组
    String tabs[] = {"Tab1", "Tab2", "Tab3", "Tab4"};

    //初始化界面数组
    Class cls[] = {Fragment1.class, Fragment2.class, Fragment3.class,
            Fragment4.class};

    private ImageView image1, image2, image3, image4;
    private TextView text1, text2, text3, text4, tvcartNum;
    private RelativeLayout button2, rlNum1; //显示数字标签布局

    @Override
    protected void onCreate(Bundle savedInstanceState) {
        super.onCreate(savedInstanceState);
        setContentView(R.layout.activity_main_fragment);

        //初始化控件
        initView();
    }

    private void initView() {
        //实例化控件
        this.image1 = (ImageView) findViewById(R.id.image1);
        this.image2 = (ImageView) findViewById(R.id.image2);
        this.image3 = (ImageView) findViewById(R.id.image3);
        this.image4 = (ImageView) findViewById(R.id.image4);
        this.text1 = (TextView) findViewById(R.id.text1);
        this.text2 = (TextView) findViewById(R.id.text2);
        this.text3 = (TextView) findViewById(R.id.text3);
        this.text4 = (TextView) findViewById(R.id.text4);

        //实例化 FragmentTabHost (注:id 的获取必须为固定) 与 FrameLayout 布局
        mTabHost = (FragmentTabHost) this.findViewById(android.R.id.tabhost);
        mTabHost.setup(this, getSupportFragmentManager(), R.id.realtabcontent);
        mTabHost.getTabWidget().setVisibility(View.GONE);//隐藏顶部切换菜单
        for (int i = 0; i < tabs.length; i++) {
            //向 FragmentTabHost 添加标签以及 Fragment 界面
            mTabHost.addTab(mTabHost.newTabSpec(tabs[i]).setIndicator(tabs[i]),
                    cls[i], null);

        }

        //实例化布局按钮控件
        button0 = (LinearLayout) findViewById(R.id.Button0);
        button1 = (LinearLayout) findViewById(R.id.Button1);
        button3 = (LinearLayout) findViewById(R.id.Button3);
        button2 = (RelativeLayout) findViewById(R.id.Button2);
        //设置监听事件
        this.button0.setOnClickListener(this);
        this.button1.setOnClickListener(this);
        this.button2.setOnClickListener(this);
        this.button3.setOnClickListener(this);

        //这里是实例化显示的提示标签数字
        rlNum1 = (RelativeLayout) findViewById(R.id.rlNum1);
        tvcartNum = (TextView) findViewById(R.id.tvcartNum);

        //设置默认选中标签
        mTabHost.setCurrentTabByTag(tabs[0]);
    }

    @Override
    public void onClick(View v) {
        switch (v.getId()) {
            case R.id.Button0:
                setlayoutbutton1();
                mTabHost.setCurrentTabByTag(tabs[0]);
                break;
            case R.id.Button1:
                setlayoutbutton2();
                mTabHost.setCurrentTabByTag(tabs[1]);
                break;
            case R.id.Button2:
                setlayoutbutton3();
                mTabHost.setCurrentTabByTag(tabs[2]);
                break;

            case R.id.Button3:
                setlayoutbutton4();
                mTabHost.setCurrentTabByTag(tabs[3]);
                break;
        }
    }

    //设置点击切换标签字体颜色与背景图片的切换
   private void setlayoutbutton1() {
        image1.setBackgroundResource(R.drawable.tab1_light);
        image2.setBackgroundResource(R.drawable.tab2_normal);
        image3.setBackgroundResource(R.drawable.tab3_normal);
        image4.setBackgroundResource(R.drawable.tab4_normal);
        text1.setTextColor(this.getResources().getColor(R.color.txt009eb8));
        text2.setTextColor(this.getResources().getColor(R.color.txt666));
        text3.setTextColor(this.getResources().getColor(R.color.txt666));
        text4.setTextColor(this.getResources().getColor(R.color.txt666));
    }

    private void setlayoutbutton2() {
        image1.setBackgroundResource(R.drawable.tab1_normal);
        image2.setBackgroundResource(R.drawable.tab2_light);
        image3.setBackgroundResource(R.drawable.tab3_normal);
        image4.setBackgroundResource(R.drawable.tab4_normal);
        text1.setTextColor(this.getResources().getColor(R.color.txt666));
        text2.setTextColor(this.getResources().getColor(R.color.txt009eb8));
        text3.setTextColor(this.getResources().getColor(R.color.txt666));
        text4.setTextColor(this.getResources().getColor(R.color.txt666));
    }

    private void setlayoutbutton3() {
        image1.setBackgroundResource(R.drawable.tab1_normal);
        image2.setBackgroundResource(R.drawable.tab2_normal);
        image3.setBackgroundResource(R.drawable.tab3_light);
        image4.setBackgroundResource(R.drawable.tab4_normal);
        text1.setTextColor(this.getResources().getColor(R.color.txt666));
        text2.setTextColor(this.getResources().getColor(R.color.txt666));
        text3.setTextColor(this.getResources().getColor(R.color.txt009eb8));
        text4.setTextColor(this.getResources().getColor(R.color.txt666));
    }

    private void setlayoutbutton4() {
        image1.setBackgroundResource(R.drawable.tab1_normal);
        image2.setBackgroundResource(R.drawable.tab2_normal);
        image3.setBackgroundResource(R.drawable.tab3_normal);
        image4.setBackgroundResource(R.drawable.tab4_light);
        text1.setTextColor(this.getResources().getColor(R.color.txt666));
        text2.setTextColor(this.getResources().getColor(R.color.txt666));
        text3.setTextColor(this.getResources().getColor(R.color.txt666));
        text4.setTextColor(this.getResources().getColor(R.color.txt009eb8));
    }

}
现以页面布局1为例(其它的同理),fragment_fragment1.xml 代码如下:
<FrameLayout xmlns:android="http://schemas.android.com/apk/res/android"
    xmlns:tools="http://schemas.android.com/tools"
    android:layout_width="match_parent"
    android:layout_height="match_parent"
    android:background="#fff"
    tools:context="com.exa.yunhong.xintianyou.fragment.Fragment1">

    <!-- TODO: Update blank fragment layout -->
    <TextView
        android:layout_width="match_parent"
        android:layout_height="match_parent"
        android:textSize="24dp"
        android:textColor="@color/colorAccent"
        android:gravity="center"
        android:text="我的Fragment1" />

 </FrameLayout>
颜色文件代码如下:

<?xml version="1.0" encoding="utf-8"?>
<resources>
    <color name="colorPrimary">#3F51B5</color>
    <color name="colorPrimaryDark">#303F9F</color>
    <color name="colorAccent">#FF4081</color>

    <!-- 底部切换菜单 -->
    <color name="txt666">#666666</color>
    <color name="txt009eb8">#009eb8</color>
    <color name="list_viewColor">#efefef</color>
    <color name="list_viewColor2">#ffffff</color>
    <color name="list_viewColor3">#00000000</color>
    <color name="orange">#FFA500</color>
    <color name="red">#db2725</color>
</resources>