前言
上文我们进行了初步的高层设计,现在我们将实现图片预加载和显示地图的功能需求。我采用TDD开发,大家可以看到在实现的过程中我们会修改设计,修改设计后又会修改对应的实现代码,这是一个不断迭代的过程。在有测试套件的保护下,我们可以放心地重构。
本文目的
掌握地图绘制的技术。
本文主要内容
回顾上文与显示地图相关的领域模型

开发策略
使用我的控件YPreLoadImg来实现图片预加载,结合progressBar插件,能够显示出加载进度条。
只建一个ShowMap类,用这个类来进行实验,找到显示地图的方法,然后在重构的时候再分离出Main类和MapData数据类。
原因
- 因为我对canvas很不熟悉,需要先集中精力熟悉canvas的使用,而不是把精力放在架构设计上。
- 因为我是采用TDD开发,因此可以安全地进行重构。可以在实现“显示地图”功能后,再在重构时提炼出Main和MapData类。
开发策略也是迭代修正的
开发策略只是就当前的知识指定的大概计划,会随着开发的进行而进行细化和修正。如现在的开发策略并没有考虑到在重构时会增加Game类。
预加载图片
预加载的目的
将图片下载到本地内存中。
为什么要预加载
- 必须等到图片完全加载后才能使用canvas对图片进行操作。如果试图在图片未完全加载之前就将其呈现到canvas上,那么canvas将不会显示任何图片。
- 如果不使用预加载,则在使用图片之前需要先下载图片到本地。即使有浏览器优化,第一次使用图片时也需要先下载图片,这样在第一次使用图片时,会有卡的感觉。
因此,在游戏开始之前,先要进行游戏初始化,预加载游戏所需的图片。
如何进行预加载
基本示例:
var img = new Image();    //创建一个图片对象
img.src = "test.png"; //下载该路径的图片
img.onload = function () { //图片下载完毕时异步调用callback函数。
    callback(img);
};
预加载网上教程
显示进度条
YPreLoadImg控件结合进度条插件progressbar,可以显示出进度条。
新增ShowMap类并实现预加载图片
新增ShowMap类,使用TDD开发并实现预加载图片,需要先写测试用例。
这里先简单介绍下测试驱动开发的步骤:
- 写一个测试用例,验证行为
- 运行测试,检查测试用例本身是否有错误(测试是否按自己所期望的方式失败)。
- 写实现代码,使得测试通过
- 重构代码
- 运行测试,使得测试通过
测试代码
下面是关于预加载的测试代码(这里只是展示最后结果,实际开发中并不是一口气就先把测试代码写完然后就直接写实现代码了,而是每次先写验证一个行为的测试代码,然后再写相应的实现代码,然后再写验证下一个行为的测试代码,这样迭代开发):
describe("showMap.js", function () {

    describe("init", function () {

        beforeEach(function () {
            //不执行onload
            spyOn(showMap, "onload").andCallFake(function () {
            });
        });
        afterEach(function () {
        });
        it("传入的参数为数组,数组元素包含id和url属性", function () {
            var urls = [];
            var temp = [];
            var i = 0, len = 0;
            spyOn(window.YYC.Control, "PreLoadImg");

            temp = [
                { id: "ground", url: "ground.png" },
                { id: "wall", url: "wall.png" }
            ];

            for (i = 0, len = temp.length; i < len; i++) {
                urls.push({ id: temp[i].id, url: "../../../../Content/Bomber/Image/Map/" + temp[i].url });
            }
            showMap.init();
            expect(YYC.Control.PreLoadImg).toHaveBeenCalled();
            expect(YYC.Control.PreLoadImg.calls[0].args[0]).toBeArray();
            expect(YYC.Control.PreLoadImg.calls[0].args[0][0].id).toBeDefined();
            expect(YYC.Control.PreLoadImg.calls[0].args[0][0].url).toBeDefined();
        });
    });
    describe("onload", function () {
        var dom = null;

        function insertDom() {
            dom = $("<div id='progressBar'></div>");
            $("body").append(dom);
        };
        function removeDom() {
            dom.remove();
        };
        beforeEach(function () {
            insertDom();
        });
        afterEach(function () {
            removeDom();
        });
        it("加载完毕后,隐藏加载进度条", function () {
            expect($("#progressBar").css("display")).toEqual("block");
            showMap.onload();
            expect($("#progressBar").css("display")).toEqual("none");
        });
    });
});
实现代码
var showMap = (function () {
    var _getImg = function () {
        var urls = [];
        var temp = [];
        var i = 0, len = 0;

        temp = [{ id: "ground", url: "ground.png" }, { id: "wall", url: "wall.png" }];

        for (i = 0, len = temp.length; i < len; i++) {
            urls.push({ id: temp[i].id, url: "../../../../Content/Bomber/Image/Map/" + temp[i].url });
        }

        return urls;
    };

    return {
        init: function () {
            this.imgLoader = new YYC.Control.PreLoadImg(_getImg(), function (currentLoad, imgCount) {
                $("#progressBar_img_show").progressBar(parseInt(currentLoad * 100 / imgCount, 10));     //调用进度条插件
            }, YYC.Tool.func.bind(this, this.onload));
        },
        onload: function(){
                $("#progressBar").css("display", "none");
                alert("complete!");
        }
    };

    window.showMap = showMap;
}());
补充说明
YYC.Tool.func.bind是我的一个工具类方法,作用是将onload中的this指向showMap。
预加载完成后,调用onload,隐藏进度条,弹出对话框,提示“complete”。
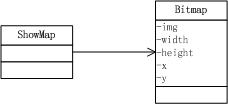
领域模型

运行
在页面上调用init方法
      $(function () {
          showMap.init();
      });
显示效果

加载图片中

加载完成
重构
识别出config类,放到辅助操作层
为什么要增加Config类?
ShowMap中预加载图片的url是相对于当前页面的,所以在不同的页面预加载图片时(如在测试页面和实际页面),url的前缀可能不一样。
因此我希望url的前缀是可以配置的,这样当在不同的页面调用ShowMap时,只需要改动配置文件就好了。
领域模型

具体内容
所以我增加Config全局配置类,在Config中配置url的前缀。该类属于辅助操作层。
Config
var bomberConfig = {
    url_pre: {
        //showMap.js
        SHOWMAP: "../../../../Content/Bomber/"
    }
};
ShowMap
var _getImg = function () {
...
    for (i = 0, len = temp.length; i < len; i++) {
        urls.push({ id: temp[i].id, url: bomberConfig.url_pre.SHOWMAP + temp[i].url });
    }

    return urls;
};
显示地图
开发策略
现在我就要开始着手显示游戏地图了。考虑到我没有canvas的使用经验,因此我先进行试验,熟悉canvas中与显示地图相关的api;然后对代码和领域模型进行重构,提炼出新的显示地图的模型;最后再具体实现“显示地图”的功能。
因为要使用canvas显示图片,先要对该图片进行预加载。因此先在showMap.onload中进行试验。
注意:对onload的测试为异步测试(要等待图片加载完成后才能使用canvas显示图片)。
用drawImage显示空地图片
因为canvas中使用drawImage来绘制图片,因此需要先掌握该API的用法。
测试代码
            it("绘制一张空地图片", function () {
                spyOn(showMap, "getContext").andCallFake(function (canvas) {
                    showMap.context = canvas.getContext("2d");
                    spyOn(showMap.context, "drawImage");
                });

                showMap.init();

                //延迟100ms测试
                testTool.asynRun(function () {
                    expect(showMap.context.drawImage).toHaveBeenCalledWith(showMap.imgLoader.get("ground"), 0, 0);
                }, 100);
            });
实现代码
var showMap = (function () {
    var _createCanvas = function () {
        // 创建canvas,并初始化 (我们也可以直接以标签形式写在页面中,然后通过id等方式取得canvas)
        var canvas = document.createElement("canvas");
        //设置宽度、高度
        canvas.width = 600;
        canvas.height = 400;

        document.body.appendChild(canvas);

        return canvas;
    };
    var _getImg = function () {
        var urls = [];
        var temp = [];
        var i = 0, len = 0;

        temp = [{ id: "ground", url: "ground.png" }, { id: "wall", url: "wall.png" }];

        for (i = 0, len = temp.length; i < len; i++) {
            urls.push({ id: temp[i].id, url: bomberConfig.url_pre.SHOWMAP + "image/map/" + temp[i].url });
        }
        return urls;
    };

    return {
        context: null,
        imgLoader: null,

        init: function () {
            var self = this;
            var canvas = _createCanvas();

            //为了方便测试,将“取得2d绘图上下文”封装到方法中
            this.getContext(canvas);

            this.imgLoader = new YYC.Control.PreLoadImg(_getImg(), function (currentLoad, imgCount) {
                $("#progressBar_img_show").progressBar(parseInt(currentLoad * 100 / imgCount, 10));     //调用进度条插件
            }, YYC.Tool.func.bind(this, this.onload));
        },
        onload: function(){
                $("#progressBar").css("display", "none");
                this.context.drawImage(this.imgLoader.get("ground"), 0, 0);
        },
        getContext: function (canvas) {
            this.context = canvas.getContext("2d");
        }
    };

    window.showMap = showMap;
}());
补充说明
这里canvas是动态创建的,但是这样创建canvas会有drawImage中的dx、dy和clearRect中的x、y按比例缩放的问题。在第5篇博文中,我们会碰到这个问题,到时候我再详细说明。
运行效果

用createPattern显示空地图片区域
在游戏开发中,可能需要绘制一片相同图片的区域,该区域由一张图片在x、y方向重复绘制而成,需要用到createPattern、fillStyle、fillRect。因此先进行实验。
测试代码
describe("画出地图", function () {
    function spyOnContext(func) {
        spyOn(showMap, "getContext").andCallFake(function (canvas) {
            showMap.context = canvas.getContext("2d");
            func();
        });
    };

    it("获得pattern", function () {
        spyOnContext(function () {
            spyOn(showMap.context, "createPattern");
        });

        showMap.init();

        //延迟100ms测试
        testTool.asynRun(function () {
            expect(showMap.context.createPattern).toHaveBeenCalledWith(showMap.imgLoader.get("ground"), "repeat");
            expect(showMap._pattern).not.toBeNull();
        }, 100);
    });
    it("缓存pattern", function () {
        spyOnContext(function () {
            spyOn(showMap.context, "createPattern");
        });

        showMap.init();

        expect(showMap.context.createPattern.calls.length).toEqual(1);

        //*延迟100ms后,执行“showMap.init();”。
        //*然后再延迟100ms后,如果showMap.context.createPattern没有被调用,就验证pattern被缓存了“

        testTool.asynRun(function () {
            showMap.init();
        }, 100);
        testTool.asynRun(function () {
            expect(showMap.context.createPattern.calls.length).toEqual(1);
        }, 100);
    });
    it("画出200*200的空地图片区域,ie、ff显示正常", function () {
        spyOnContext(function () {
            spyOn(showMap.context, "fillRect");
        });

        showMap.init();

        testTool.asynRun(function () {
            expect(showMap.context.fillStyle).toEqual(showMap._pattern);
            expect(showMap.context.fillRect).toHaveBeenCalledWith(0, 0, 200, 200);
        }, 100);
    });
});
实现代码
onload: function(){
    $("#progressBar").css("display", "none");

    if (!this._pattern) {
        this._pattern = this.context.createPattern(showMap.imgLoader.get("ground"), "repeat");
    }
    this.context.fillStyle = this._pattern;
    this.context.fillRect(0, 0, 200, 200);

},
运行效果
重构
现在需要停一下,对已有的代码进行梳理。
创建Bitmap类,并进行对应重构
我发现,在ShowMap的onload方法中,多次使用到了图片对象:showMap.imgLoader.get("ground"),这个对象是预加载图片后的Image对象。
考虑到在游戏中需要对图片进行操作,那为什么不能提出“图片类”的概念,将与图片本身相关的内容都放到该类中呢?
因此,我提炼出Bitmap类,该类有以下职责:
- 包含图片的信息(如图片对象image、width、height等)
- 包含图片的基本操作(如剪切、缩放等)
进一步思考
- 绘制图片的draw方法应不应该放到Bitmap类中呢?
考虑到Bitmap类是图片的包装类,包含与图片本身密切相关的属性和方法。而绘制图片方法的职责是读取图片的属性,使用canvas的api进行操作。Bitmap类不需要知道自己是如何被调用的,因此绘制图片的职责应该放到调用Bitmap的类,即放到ShowMap类中。
- 为什么不创建图片的精灵类?
因为图片不是独立的个体,它属于数据的概念,是精灵的一个属性,在概念上它并不是精灵。
- Bitmap应该具体有哪些成员?
属性:
应该包含预加载后的图片对象、宽度和高度、图片的坐标。
方法:
目前来看,不需要对图片进行操作,因此不需要如剪切等方法。
领域模型
测试代码
describe("Bitmap.js", function () {
    var bitmap = null;

    beforeEach(function () {
    });
    afterEach(function () {
    });

    describe("构造函数Init", function () {
        var dom = null;

        function insertDom() {
            dom = $("<img id='test_img'>");
            $("body").append(dom);
        };
        function removeDom() {
            dom.remove();
        };

        beforeEach(function () {
            insertDom();
        });
        afterEach(function () {
            removeDom();
        });

        it("获得预加载后的图片对象、宽度、高度、图片的坐标", function () {
            bitmap = new Bitmap($("#test_img")[0], 2, 3, 4, 5);

            expect(bitmap.img).not.toBeNull();
            expect(bitmap.width).toEqual(2);
            expect(bitmap.height).toEqual(3);
            expect(bitmap.x).toEqual(4);
            expect(bitmap.y).toEqual(5);
        });
    });
});
实际代码
(function () {
    var Bitmap = YYC.Class({
        Init: function (img, width, height, x, y) {
            var judge = YYC.Tool.judge;

            this.img = img;
            this.width = width;
            this.height = height;
            this.x = x;
            this.y = y;
        },
        Private: {
        },
        Public: {
            img: null,
             0,
            height: 0,
            x: 0,
            y: 0
        }
    });

    window.Bitmap = Bitmap;
}());
重构Bitmap
Bitmap构造函数的参数太多了,因此使用一个对象直接量来包装参数:
(function () {
    var Bitmap = YYC.Class({
        Init: function (data) {
            this.img = data.img;
            this.width = data.width;
            this.height = data.height;
            this.x = data.x;
            this.y = data.y;
        },
        Private: {
        },
        Public: {
            img: null,
             0,
            height: 0,
            x: 0,
            y: 0
        }
    });

    window.Bitmap = Bitmap;
}());
运行测试,测试失败。
修改测试代码,使测试通过:
        it("获得预加载后的图片对象、宽度、高度、图片的坐标", function () {
            bitmap = new Bitmap({
                img: $("#test_img")[0],
                 2,
                height: 3,
                x: 4,
                y: 5
            });

            expect(bitmap.img).not.toBeNull();
            expect(bitmap.width).toEqual(2);
            expect(bitmap.height).toEqual(3);
            expect(bitmap.x).toEqual(4);
            expect(bitmap.y).toEqual(5);
        });
创建BitmapFactory类
因为在ShowMap类中需要创建Bitmap实例,因此需要增加Bitmap的工厂BitmapFactory类。
理由如下:
- Bitmap构造函数有3个参数,比较复杂,需要将创建实例这个过程封装起来。因此需要工厂类来负责和管理创建过程。
领域模型

测试代码
describe("bitmapFactory.js", function () {

    describe("createBitmap", function () {
        var dom = null;

        function insertDom() {
            dom = $("<img id='test_img'>");
            $("body").append(dom);
        };
        function removeDom() {
            dom.remove();
        };

        beforeEach(function () {
            insertDom();
        });
        afterEach(function () {
            removeDom();
        });

        it("方法存在", function () {
            expect(bitmapFactory.createBitmap).toBeDefined();
        });
        it("如果参数为1个(HTMLImg对象),则bitmap的width、height为HTMLImg的width、height", function () {
            var bitmap = null,
            width = 0,
            height = 0;


            bitmap = bitmapFactory.createBitmap($("#test_img")[0]),
            width = $("#test_img").width(),
            height = $("#test_img").height();

            expect(bitmap.width).toEqual(width);
            expect(bitmap.height).toEqual(height);
        });
        it("如果参数为3个(HTMLImg对象、width、height),则bitmap的width、height为传入的width、height", function () {
            var bitmap = null;

            bitmap = bitmapFactory.createBitmap($("#test_img")[0], 100, 200),

            expect(bitmap.width).toEqual(100);
            expect(bitmap.height).toEqual(200);
        });
    });
});
实际代码
(function () {
    var bitmapFactory = {
        createBitmap: function (img, width, height) {
            if (arguments.length == 1) {

                return new Bitmap(img, img.width, img.height);
            }
            else if (arguments.length == 3) {
                return new Bitmap(img, width, height);
            }
        }
    };

    window.bitmapFactory = bitmapFactory;
}());
showMap.onload对应改变
onload: function(){
    $("#progressBar").css("display", "none");

    if (!this._pattern) {
        this._pattern = this.context.createPattern(bitmapFactory.createBitmap(showMap.imgLoader.get("ground")).img, "repeat");
    }
    this.context.fillStyle = this._pattern;
    this.context.fillRect(0, 0, 200, 200);
},
重构测试
现在让我们来回头看下drawImage和createPattern的测试,在测试中都需要异步测试。
每增加一个测试用例就需要延迟测试,这样增加了很多重复代码,为什么不能把延迟测试分离出去,从而在测试中把精力放到我们的主要任务-即如何测试行为上呢?
因此,我把init方法放到测试页面SpecRunner上调用,然后在测试页面上对整个测试进行延迟,这样就能保证整个测试都是在图片预加载成功后进行的了。
测试页面相关代码:
<body>
<script type="text/javascript">
(function () {
    //图片预加载
    main.init()

    //清除“main.init()”创建的多余html元素
    function clear() {
        $("body").children().not("script").remove();
    };

    var jasmineEnv = jasmine.getEnv();
    jasmineEnv.updateInterval = 1000;

    var htmlReporter = new jasmine.HtmlReporter();

    jasmineEnv.addReporter(htmlReporter);

    jasmineEnv.specFilter = function (spec) {
        return htmlReporter.specFilter(spec);
    };

    var currentWindowOnload = window.onload;

    //延迟300ms执行测试(等待预加载完后执行)
    setTimeout(function () {
        clear();

        if (currentWindowOnload) {
            currentWindowOnload();
        }
        execJasmine();
    }, 1000);

    function execJasmine() {
        jasmineEnv.execute();
    }

})();
</script>
</body>
现在测试用例中就不再需要“testTool.asynRun”进行异步测试了。
重构ShowMap
现在,让我们再来看看showMap类,发现该类做了三件事:
- 游戏初始化:图片预加载
- 游戏逻辑
- 显示地图
增加Main类
根据单一职责原则,一个类只应该有一个职责,只有一个原因引起变化。再结合之前给出的领域模型,Main类是游戏入口,负责控制游戏的主循环,调用相关的操作。因此,将showMap中负责游戏初始化的init方法移到Main中。
增加Game类
showMap中还包含了游戏逻辑,如在onload中隐藏进度条,然后显示地图。根据以往游戏开发经验,知道游戏逻辑会越来越复杂,因此可以将游戏逻辑提取出来形成新类Game,这样ShowMap只负责调用canvas的API显示地图了。
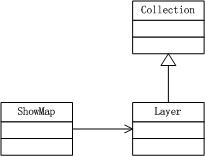
重构后的领域模型

相关代码
Main
var main = (function () {
    var _getImg = function () {
        var urls = [];
        var temp = [];
        var i = 0, len = 0;

        temp = [{ id: "ground", url: "ground.png" }, { id: "wall", url: "wall.png" }];

        for (i = 0, len = temp.length; i < len; i++) {
            urls.push({ id: temp[i].id, url: bomberConfig.url_pre.SHOWMAP + "image/map/" + temp[i].url });
        }
        return urls;
    };

    return {
        imgLoader: null,

        init: function () {
            var game = new Game();

            this.imgLoader = new YYC.Control.PreLoadImg(_getImg(), function (currentLoad, imgCount) {
                $("#progressBar_img_show").progressBar(parseInt(currentLoad * 100 / imgCount, 10));     //调用进度条插件
            }, YYC.Tool.func.bind(game, game.onload));
        }
    };

    window.main = main;
}());
Game
(function () {
    var Game = YYC.Frame.MyClass({
        Init: function () {
            this.showMap = new ShowMap();
        },
        Private: {
        },
        Public: {
            showMap: null,

            onload: function () {
                $("#progressBar").css("display", "none");
                this.showMap.drawMap();
            }
        }
    });

    window.Game = Game;
}());
重构showMap
改成类的形式
将ShowMap改成类的形式。
提出Layer
结合领域模型分析和第2篇博文中分层渲染的概念,我增加Layer类,将图片类Bitmap装入Layer,然后使用Layer来统一绘制图片。
Layer包含canvas属性,canvas由Game创建并通过Layer的构造函数将其注入到Layer中。
Layer有一个draw方法,负责调用canvas的API来绘制图片。
重构Layer
提出Collection
考虑到Layer是集合类,因此可以将集合这个概念提出,形成新的Collection类,把集合的相关操作和集合的容器_childs放到Collection中,让Layer继承Collection。从而Layer就具有了集合类的功能。
进一步思考
为什么这里选择继承的方式复用,而不是选择组合的方式复用呢?
- 通过继承来复用比起组合来说更方便和优雅,可以减少代码量。
- 从概念上来说,Collection和Layer都是属于集合类,应该属于一个类族。Collection是从Layer中提炼出来的,它是集合类的共性,因此Collection作为父类,Layer作为子类。
领域模型
继续实现显示地图
重构到这里就告一段落,现在继续实现“显示地图”。
增加MapData
根据领域模型,增加MapData类,它是一个二维数组,用来保存地图数据。
MapData
(function () {
    var ground = 1,
        wall = 2;

    var mapData = [
        [ground, wall, ground, ground],
        [ground, wall, ground, ground],
        [ground, wall, ground, ground],
        [ground, wall, ground, ground]
    ];

    window.mapData = mapData;
}());
增加MapDataOperate
ShowMap不应该直接操作MapData,因为:
- MapData在后续的迭代中可能会变化,因此需要封装这个变化,使得MapData变化时不会影响到ShowMap
- 根据分层的结果,应该由数据操作层的类来操作MapData
因此增加数据操作层的MapDataOperate,它负责获得MapData。
领域模型

相关代码
MapDataOperate
(function () {
    var mapDataOperate = {
        getMapData: function () {
            return YYC.Tool.array.clone(mapData);
        }
    };

    window.mapDataOperate = mapDataOperate;
}());
显示地图的实现
实现drawMap
在ShowMap中,通过调用MapDataOperate的getMapData方法,就可以获得地图数据,然后再根据数据向Layer中加入对应的Bitmap类即可。
相关代码
ShowMap
_getMapImg: function (i, j, mapData) {
    var img = null;

    switch (mapData[i][j]) {
        case 1:
            img = main.imgLoader.get("ground");
            break;
        case 2:
            img = main.imgLoader.get("wall");
            break;
        default:
            break
    }

    return img;
}
...
drawMap: function () {
    var i = 0,
        j = 0,
        width =   34,
        height = 34,
        row = 4,
        col = 4,
        bitmap = null,
        mapData = mapDataOperate.getMapData(),
        x = 0,
        y = 0,
        img = null;

    this._createLayer();

    for (i = 0; i < row; i++) {
        //注意!
        //y为纵向height,x为横向width
        y = i * height;

        for (j = 0; j < col; j++) {
            x = j * width;
            img = this._getMapImg(i, j, mapData);
            bitmap = bitmapFactory.createBitmap({ img: img,  width, height: height, x: x, y: y });
            this.layer.appendChild(bitmap);
        }
    }
    this.layer.draw();
}
重构
重构MapData
将MapData的ground与wall设为枚举值,增加可读性。
将枚举值放到Config类中。
相关代码
Config
    map: {
...
        type: {
            GROUND: 1,
            WALL: 2
        }
    },
MapData
    var ground = bomberConfig.map.type.GROUND,
        wall = bomberConfig.map.type.WALL;
重构drawMap
config增加bomberConfig.map配置
目前地图大小是在drawMap写死了:
大小为4*4,单元格宽度和高度为34px。
考虑到地图大小可能在后期的开发中不断变化,因此将其放到Config中进行统一配置。
相关代码
Config
   map: {
        //方格宽度
        WIDTH: 34,
        //方格高度
        HEIGHT: 34,
        ROW: 4,
        COL: 4,
        type: {
            GROUND: 1,
            WALL: 2
        }
    },
ShowMap
_getMapImg: function (i, j, mapData) {
    var img = null,
        type = bomberConfig.map.type;

    switch (mapData[i][j]) {
        case type.GROUND:
            img = window.imgLoader.get("ground");
            break;
        case type.WALL:
            img = window.imgLoader.get("wall");
            break;
        default:
            break
    }

    return img;
}
...
drawMap: function () {
    var i = 0,
        j = 0,
        map = bomberConfig.map,
        bitmap = null,
        mapData = mapDataOperate.getMapData(),
        x = 0,
        y = 0,
        img = null;

    this._createLayer();

    for (i = 0; i < map.ROW; i++) {
        //注意!
        //y为纵向height,x为横向width
        y = i * map.HEIGHT;

        for (j = 0; j < map.COL; j++) {
            x = j * map.WIDTH;
            img = this._getMapImg(i, j, mapData);
            bitmap = bitmapFactory.createBitmap({ img: img,  map.WIDTH, height: map.HEIGHT, x: x, y: y });
            this.layer.appendChild(bitmap);
        }
    }
    this.layer.draw();
}
本文最终领域模型

高层划分
重构层
增加数据操作层
本文增加了MapDataOperate类,对应增加数据操作层。该层负责对数据进行操作。
分析
Bitmap放到哪?
我们来看下Bitmap的职责:
- 包含图片的信息(如图片对象image、width、height等)
- 包含图片的基本操作(如剪切、缩放等)
从中得出Bitmap应该放到数据操作层。
层、领域模型

演示
本文参考资料