Ansible介绍
什么是Ansible?
Ansible是一个开源部署工具
开发语言:Python
特点:SSH协议通信,全平台,无需要编译,模块化部署管理
作用:推送Playbook进行远程节点快速部署
Ansible
Python语言编写,无Client,模块化配置管理
Playbook脚本编写规范,易于上手,适合中小规模快速部署
Ansible的优势和应用场景
轻量级无客户端
开源免费,学习成本低,快速上手
使用Playbook作为核心配置架构,统一的脚本格式批量化部署
完善的模块化扩展,支持目前主流的开发场景
强大的稳定性和兼容性
Ansible配合virtualenv安装配置

Ansible的两种安装模式(Centos7)
1.Yum包管理安装
yum -y install ansible
2.Git源代码安装【推荐】
git clone https://github.com/ansible/ansible.git
Ansible 2.5 + Python3.6 安装步骤【Centos7】
1.预先安装Python3.6版本
2.安装virtualenv
pip install virtualenv
3.创建Ansible账户并安装python3.6版本virtualenv实例
useradd deploy && su - deploy
virtualenv -p /usr/local/bin/python3.6 .py3-a2.5-env
4. Git源代码安装ansible2.5
cd /home/deploy/.py3-a2.5-env
git clone https://github.com/ansible/ansible.git
cd ansible && git checkout stable-2.5
5. 加载python3.6 virtualenv 环境
source /home/deploy/.py3-a2.5-env/bin/activate
6.安装ansible依赖包
pip install paramiko PyYAML jinja2
7.在python3.6虚拟环境下加载ansible2.5
source /hone/deploy/.py3-a2.5-env/ansible/hacking/env-setup -q
8.验证ansible2.5
ansible --version
演示
前提工作

安装Python3.6和Virtualenv
[root@ansible ~]# wget https://www.python.org/ftp/python/3.6.5/Python-3.6.5.tar.xz
[root@ansible ~]# tar xf Python-3.6.5.tar.xz
[root@ansible ~]# cd Python-3.6.5/
[root@ansible Python-3.6.5]# yum install -y gcc
[root@ansible Python-3.6.5]# ./configure --prefix=/usr/local/ --with-ensurepip=install --enable-shared LDFLAGS="-Wl,-rpath /usr/local/lib"
[root@ansible Python-3.6.5]# make && make install
[root@ansible local]# which pip3.6
/usr/local/bin/pip3.6
[root@ansible local]# ln -s /usr/local/bin/pip3.6 /usr/local/bin/pip
[root@ansible local]# pip install virtualenv
创建ansible系统账户并在该系统账户下安装python3.6版本的Virtualenv实例
[root@ansible local]# useradd deploy
[root@ansible local]# su - deploy
[deploy@ansible ~]$ virtualenv -p /usr/local/bin/python3.6 .py3-a2.5-env
安装git
[root@ansible local]# cd /home/deploy/.py3-a2.5-env/
如果没有Git就yum安装一个
[root@ansible .py3-a2.5-env]# yum install -y git
克隆ansible
[root@ansible local]# su - deploy
[root@localhost Python-3.6.5]$ git clone https://github.com/ansible/ansible.git
加载vintualenv环境
[deploy@ansible ~]$ source /home/deploy/.py3-a2.5-env/bin/activate
(.py3-a2.5-env) [deploy@ansible ~]$
完成
(.py3-a2.5-env) [deploy@ansible ~]$ pip install paramiko pyYAML jinja2
(.py3-a2.5-env) [deploy@ansible ~]$ mv ansible/ .py3-a2.5-env/
(.py3-a2.5-env) [deploy@ansible ~]$ cd .py3-a2.5-env/ansible/
(.py3-a2.5-env) [deploy@ansible ansible]$ git checkout stable-2.5
分支 stable-2.5 设置为跟踪来自 origin 的远程分支 stable-2.5。
切换到一个新分支 'stable-2.5'
(.py3-a2.5-env) [deploy@ansible ansible]$ source  /home/deploy/.py3-a2.5-env/ansible/hacking/env-setup -q
(.py3-a2.5-env) [deploy@ansible ansible]$ ansible --version
Ansible playbooks入门和编写规范
Playbooks框架与格式
Test Playbooks
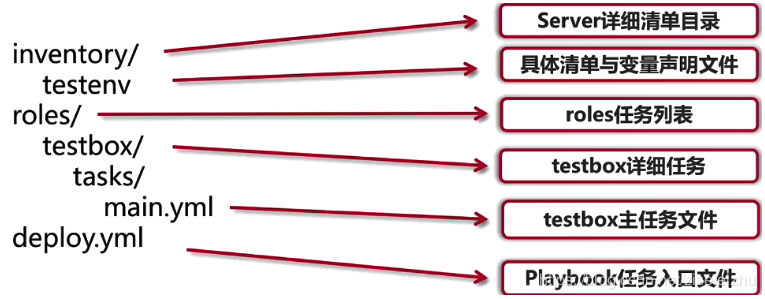
详细目录testenv
主任务文件main.yml
任务入口文件deploy.yml
Playbooks编写规范
演示
前提步骤
[root@localhost ~]# su - deploy
上一次登录:三 4月 10 15:24:28 CST 2019pts/0 上
[deploy@ansible ~]$ source .py3-a2.5-env/bin/activate
(.py3-a2.5-env) [deploy@ansible ~]$ source .py3-a2.5-env/ansible/hacking/env-setup -q
(.py3-a2.5-env) [deploy@ansible ~]$ ansible --version
ansible 2.5.15 (stable-2.5 5b3fd67381) last updated 2019/04/10 15:31:37 (GMT +800)
写剧本
(.py3-a2.5-env) [deploy@ansible ~]$ ansible-playbook --version
说明在python3.6.5虚拟环境下加载了ansible2.5版本
(.py3-a2.5-env) [deploy@ansible ~]$ mkdir test_playbooks
(.py3-a2.5-env) [deploy@ansible ~]$ cd test_playbooks
(.py3-a2.5-env) [deploy@ansible test_playbooks]$ mkdir inventory
(.py3-a2.5-env) [deploy@ansible test_playbooks]$ mkdir roles
(.py3-a2.5-env) [deploy@ansible test_playbooks]$ cd inventory/
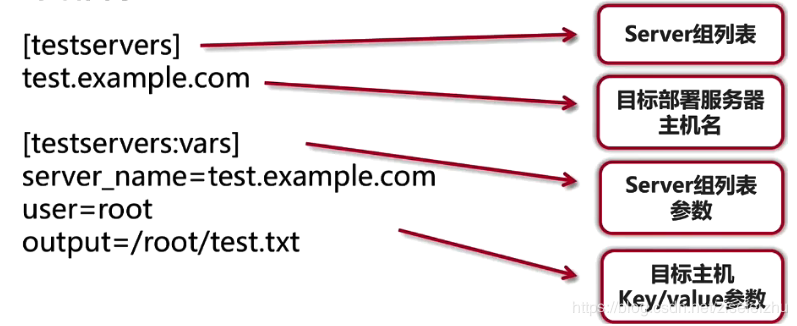
(.py3-a2.5-env) [deploy@ansible inventory]$ cat testenv
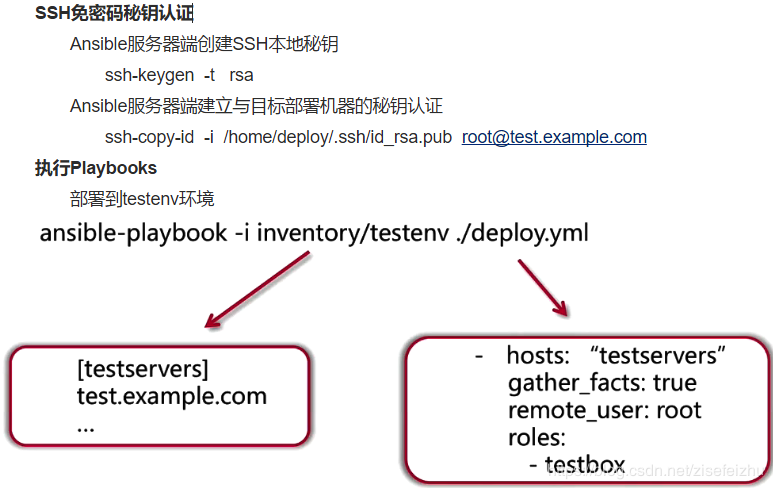
[testservers]
192.168.122.135
[testservers:vars]
server_name=192.168.122.135
user=root
output=/root/test.txt
(.py3-a2.5-env) [deploy@ansible inventory]$ cd ..
(.py3-a2.5-env) [deploy@ansible test_playbooks]$ cd roles/
(.py3-a2.5-env) [deploy@ansible roles]$ mkdir testbox
(.py3-a2.5-env) [deploy@ansible roles]$ cd testbox/
(.py3-a2.5-env) [deploy@ansible testbox]$ mkdir tasks
(.py3-a2.5-env) [deploy@ansible testbox]$ cd tasks/
(.py3-a2.5-env) [deploy@ansible tasks]$ vim main.yml
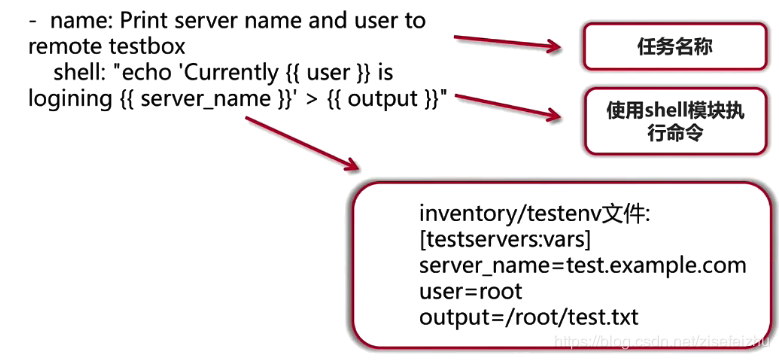
(.py3-a2.5-env) [deploy@ansible tasks]$ cat main.yml
- name: Print server name and user to remote testbox
shell: "echo 'Cueerntly {{user}} is logining {{server_name}}' > {{output}}"
(.py3-a2.5-env) [deploy@ansible tasks]$ pwd
/home/deploy/test_playbooks/roles/testbox/tasks
(.py3-a2.5-env) [deploy@ansible tasks]$ cd ../../..
(.py3-a2.5-env) [deploy@ansible test_playbooks]$ pwd
/home/deploy/test_playbooks
#创建入口文件
(.py3-a2.5-env) [deploy@ansible test_playbooks]$ ls
inventory roles
(.py3-a2.5-env) [deploy@ansible test_playbooks]$ vim deploy.yml
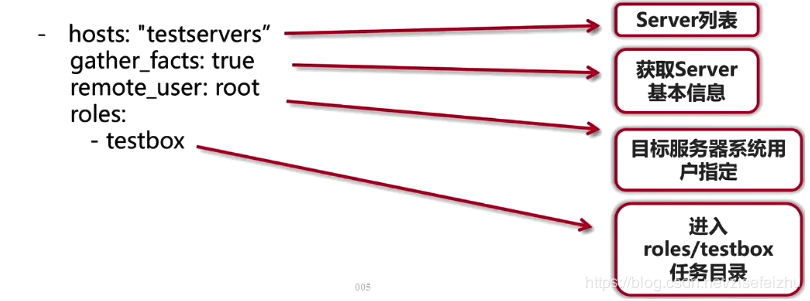
(.py3-a2.5-env) [deploy@ansible test_playbooks]$ cat deploy.yml
- hosts: "testservers"
gather_facts: true
remote_user: root
roles:
- testbox
查看一下
(.py3-a2.5-env) [deploy@ansible test_playbooks]$ tree .
.
├── deploy.yml
├── inventory
│ └── testenv
└── roles
└── testbox
└── tasks
└── main.yml
4 directories, 3 files
配置秘钥认证
(.py3-a2.5-env) [deploy@ansible test_playbooks]$ ssh-keygen -t rsa
(.py3-a2.5-env) [deploy@ansible test_playbooks]$ ssh-copy-id -i /home/deploy/.ssh/id_rsa.pub root@192.168.122.135
#测试是否不需要密码登陆
(.py3-a2.5-env) [deploy@ansible test_playbooks]$ ssh root@192.168.122.135
执行
(.py3-a2.5-env) [deploy@ansible test_playbooks]$ ansible-playbook -i inventory/testenv ./deploy.yml

PLAY [testservers] ******************************************************************************************************************

TASK [Gathering Facts] **************************************************************************************************************
ok: [192.168.122.135]

TASK [testbox : Print server name and user to remote testbox] ***********************************************************************
changed: [192.168.122.135]

PLAY RECAP **************************************************************************************************************************
192.168.122.135            : ok=2    changed=1    unreachable=0    failed=0
验证是否成功
(.py3-a2.5-env) [deploy@ansible test_playbooks]$ ssh root@192.168.122.135
Last login: Wed Apr 10 16:34:50 2019 from 192.168.122.1
[root@node01 ~]# ls
anaconda-ks.cfg  test.txt
[root@node01 ~]# cat test.txt
Cueerntly root is logining 192.168.122.135
Ansible Playbboks常用模块
Ansible Playbook 常用模块介绍
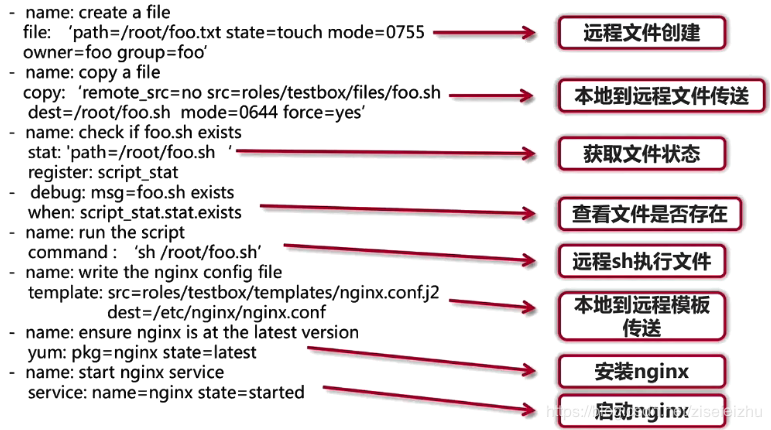
File模块
在目标主机创建文件或目录,并赋予其系统权限

Copy模块
实现Ansible服务器到目标主机的文件传送

remote_src=no不要目标主机上搜索文件,如果是yes则允许在目标主机上搜索文件
Stat模块
获取远程文件状态信息

Debug模块
打印语句到Ansible执行输出

如果存在打印foo.sh exists 不存在则不打印
Command/Shell模块
用来执行Linux目录主机命令行
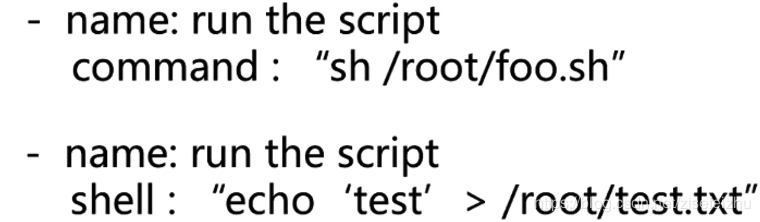
shell模块支持重定向管道符
Template模块
实现Ansible服务端到目标主机的jinja2模块传送

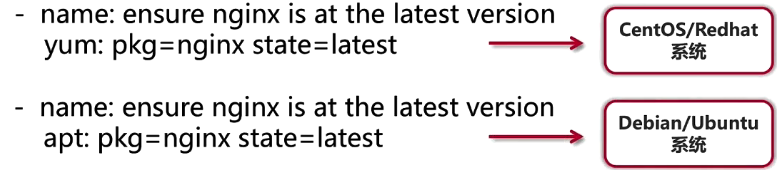
Packaging模块
调用目标主机系统包管理工具(yum , apt)进行安装
Service模块
管理目标主机系统服务

Ansible Playbooks常用模块应用
演示
目标主机预配置工作
[root@localhost ~]# su - deploy
[deploy@ansible ~]$ source .py3-a2.5-env/bin/activate
(.py3-a2.5-env) [deploy@ansible ~]$
(.py3-a2.5-env) [deploy@ansible ~]$ ps -ef | grep ansible | awk '{print $2}'
77171
(.py3-a2.5-env) [deploy@ansible ~]$ source .py3-a2.5-env/ansible/hacking/env-setup -q
(.py3-a2.5-env) [deploy@ansible ~]$ ansible-playbook --version


预配置
(.py3-a2.5-env) [deploy@ansible test_playbooks]$ ssh root@192.168.122.135
[root@node01 ~]# useradd foo
[root@node01 ~]# useradd deploy
[root@node01 ~]# mkdir /etc/nginx

[root@node01 ~]# wget http://nginx.org/packages/centos/7/noarch/RPMS/nginx-release-centos-7-0.el7.ngx.noarch.rpm
[root@node01 ~]# rpm -ivh nginx-release-centos-7-0.el7.ngx.noarch.rpm
在上一个的test_palybook上进行更改
#file模块
1、改写剧本
(.py3-a2.5-env) [deploy@ansible test_playbooks]$ cat roles/testbox/tasks/main.yml
- name: Print server name and user to remote testbox
  shell: "echo 'Cueerntly {{user}} is logining {{server_name}}' > {{output}}"
- name: create a file
  file: 'path=/root/foo.txt state=touch mode=0755 owner=foo group=foo'
2、执行
(.py3-a2.5-env) [deploy@ansible test_playbooks]$ ansible-playbook -i inventory/testenv ./deploy.yml
#copy模块
1、准备及写剧本
(.py3-a2.5-env) [deploy@ansible test_playbooks]$ mkdir roles/testbox/tasks/files
(.py3-a2.5-env) [deploy@ansible test_playbooks]$ cat roles/testbox/tasks/files/foo.sh
echo "this is a test scripts"


(.py3-a2.5-env) [deploy@ansible test_playbooks]$ cat roles/testbox/tasks/main.yml
- name: Print server name and user to remote testbox
  shell: "echo 'Cueerntly {{user}} is logining {{server_name}}' > {{output}}"
- name: create a file
  file: 'path=/root/foo.txt state=touch mode=0755 owner=foo group=foo'
- name: copya file
  copy: 'remote_src=no src=roles/testbox/tasks/files/foo.sh dest=/root/foo.sh mode=0644 force=yes'
2、运行
(.py3-a2.5-env) [deploy@ansible test_playbooks]$ ansible-playbook -i inventory/testenv ./deploy.yml
#Stat&debu&command
1、编写剧本
(.py3-a2.5-env) [deploy@ansible test_playbooks]$ cat roles/testbox/tasks/main.yml
- name: Print server name and user to remote testbox
  shell: "echo 'Cueerntly {{user}} is logining {{server_name}}' > {{output}}"
- name: create a file
  file: 'path=/root/foo.txt state=touch mode=0755 owner=foo group=foo'
- name: copya file
  copy: 'remote_src=no src=roles/testbox/tasks/files/foo.sh dest=/root/foo.sh mode=0644 force=yes'
- name: check if foo.sh exits
  stat: 'path=/root/foo.sh'
  register: script_stat
- debug: msg="foo.sh exists"
  when: script_stat.stat.exists
- name: run the scripts
  command: 'sh /root/foo.sh'
2、运行
(.py3-a2.5-env) [deploy@ansible test_playbooks]$ ansible-playbook -i inventory/testenv ./deploy.yml
#Template模块
1、
(.py3-a2.5-env) [deploy@ansible test_playbooks]$ cat inventory/testenv
[testservers]
192.168.122.135

[testservers:vars]
server_name=192.168.122.135
user=root
output=/root/test.txt
server_name=192.168.122.135
port=80
user=deploy
worker_processes=1
max_open_file=65505
root=/www
2、
(.py3-a2.5-env) [deploy@ansible test_playbooks]$ mkdir roles/testbox/Templates


(.py3-a2.5-env) [deploy@ansible test_playbooks]$ cat  roles/testbox/Templates/nginx.conf.j2
#user  {{ user }};
worker_processes  {{ worker_processes }};

#error_log  logs/error.log;
#error_log  logs/error.log  notice;
#error_log  logs/error.log  info;

#pid        logs/nginx.pid;


events {
    worker_connections  1024;
}


http {
    include       mime.types;
    default_type  application/octet-stream;

    #log_format  main  '$remote_addr - $remote_user [$time_local] "$request" '
    #                  '$status $body_bytes_sent "$http_referer" '
    #                  '"$http_user_agent" "$http_x_forwarded_for"';

    #access_log  logs/access.log  main;

    sendfile        on;
    #tcp_nopush     on;

    #keepalive_timeout  0;
    keepalive_timeout  65;

    #gzip  on;

    server {
        listen       {{ port }};
        server_name  {{ server_name }};

        #charset koi8-r;

        #access_log  logs/host.access.log  main;

        location / {
            root   {{ root }};
            index  index.html index.htm;
        }

        #error_page  404              /404.html;

        # redirect server error pages to the static page /50x.html
        #
        error_page   500 502 503 504  /50x.html;
        location = /50x.html {
            root   html;
        }

        # proxy the PHP scripts to Apache listening on 127.0.0.1:80
        #
        #location ~ .php$ {
        #    proxy_pass   http://127.0.0.1;
        #}

        # pass the PHP scripts to FastCGI server listening on 127.0.0.1:9000
        #
        #location ~ .php$ {
        #    root           html;
        #    fastcgi_pass   127.0.0.1:9000;
        #    fastcgi_index  index.php;
        #    fastcgi_param  SCRIPT_FILENAME  /scripts$fastcgi_script_name;
        #    include        fastcgi_params;
        #}

        # deny access to .htaccess files, if Apache's document root
        # concurs with nginx's one
        #
        #location ~ /.ht {
        #    deny  all;
        #}
    }


    # another virtual host using mix of IP-, name-, and port-based configuration
    #
    #server {
    #    listen       8000;
    #    listen       somename:8080;
    #    server_name  somename  alias  another.alias;

    #    location / {
    #        root   html;
    #        index  index.html index.htm;
    #    }
    #}


    # HTTPS server
    #
    #server {
    #    listen       443 ssl;
    #    server_name  localhost;

    #    ssl_certificate      cert.pem;
    #    ssl_certificate_key  cert.key;

    #    ssl_session_cache    shared:SSL:1m;
    #    ssl_session_timeout  5m;

    #    ssl_ciphers  HIGH:!aNULL:!MD5;
    #    ssl_prefer_server_ciphers  on;

    #    location / {
    #        root   html;
    #        index  index.html index.htm;
    #    }
    #}

}
3、
(.py3-a2.5-env) [deploy@ansible test_playbooks]$ cat roles/testbox/tasks/main.yml
- name: Print server name and user to remote testbox
  shell: "echo 'Cueerntly {{user}} is logining {{server_name}}' > {{output}}"
- name: create a file
  file: 'path=/root/foo.txt state=touch mode=0755 owner=foo group=foo'
- name: copya file
  copy: 'remote_src=no src=roles/testbox/tasks/files/foo.sh dest=/root/foo.sh mode=0644 force=yes'
- name: check if foo.sh exits
  stat: 'path=/root/foo.sh'
  register: script_stat
- debug: msg="foo.sh exists"
  when: script_stat.stat.exists
- name: run the scripts
  command: 'sh /root/foo.sh'
- name: write the nginx config file
  template: src=roles/testbox/Templates/nginx.conf.j2 dest=/etc/nginx/nginx.conf
- name: ensure nginx is at the latest version
  yum: pkg=nginx state=latest
- name: start nginx service
  service: name=nginx state=started
4、
(.py3-a2.5-env) [deploy@ansible test_playbooks]$ ansible-playbook -i inventory/testenv ./deploy.yml
5、
[root@node01 yum.repos.d]# mkdir /www
[root@node01 www]# touch a.txt
[root@node01 www]# cat a.txt
aaa
6、
(.py3-a2.5-env) [deploy@ansible test_playbooks]$ curl 192.168.122.135/a.txt
aaa