- ssm框架之spring:Spring 是一个开源框架,是为了解决企业应用程序开发复杂性而创建的。框架的主要优势之一就是其分层架构,分层架构允许您选择使用哪一个组件,同时为 J2EE 应用程序开发提供集成的框架。起主要的核心模块是当然是AOP(面向切面编程)和IOC(控制反转)啦,笔者这里就不详细讲述啦。
- ssm框架之springmvc:它是一个典型的教科书式的mvc构架,而不像struts等都是变种或者不是完全基于mvc系统的框架,对于初学者或者想了解mvc的人来说我觉得 spring是最好的,它的实现就是教科书!第二它和tapestry一样是一个纯正的servlet系统,这也是它和tapestry相比 struts所具有的优势。而且框架本身有代码,看起来容易理解。
- ssm框架之mybatis:MyBatis 是一款优秀的持久层框架,它支持定制化 SQL、存储过程以及高级映射。MyBatis 避免了几乎所有的 JDBC 代码和手动设置参数以及获取结果集。MyBatis 可以使用简单的 XML 或注解来配置和映射原生信息,将接口和 Java 的 POJOs(Plain Old Java Objects,普通的 Java对象)映射成数据库中的记录。相对于hibernate来讲,mybatis更加轻巧灵活,易于使用。
介绍完三大框架之后,笔者就要介绍如何搭建ssm框架啦,继续往下看吧:
框架搭建第一步,当然是打开你的开发工具,创建一个web project啦,笔者这里使用的是Myeclipse2015,创建工程名为ssmDemo,如图:
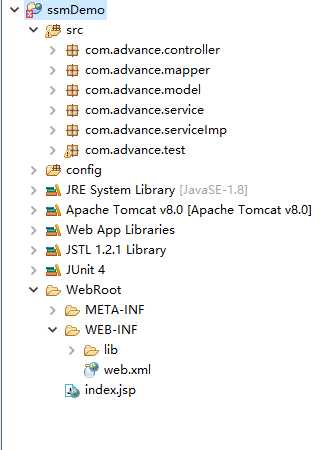
这里笔者介绍一下我的项目目录结构:
src:主要用来放置java类文件
config:用来存放项目配置文件(注意:这里笔者将此文件夹设置为根目录文件夹,所以在后面的配置中会出现classpath:xxx.xml, 就是因为它是根目录)
WebRoot:用来存放静态资源文件。
创建好项目以后,我们需要准备的是ssm框架搭建所需要的jar包,这里笔者提供的只是项目所需基本jar包,如有需要另外寻找,如下图:

以上jar包下载地址为:http://pan.baidu.com/s/1o8FWGHk 提取码:egoo
接下来,我们需要创建一个测试用数据库,取名为test,在test下创建一张测试用表,名为ssmDemo。脚本代码如下:

CREATE SCHEMA `test` DEFAULT CHARACTER SET utf8 COLLATE utf8_bin ;


CREATE TABLE `test`.`ssmdemo` (
  `s_id` INT NOT NULL AUTO_INCREMENT,
  `s_name` VARCHAR(45) CHARACTER SET 'utf8' COLLATE 'utf8_bin' NOT NULL,
  `s_text` VARCHAR(45) CHARACTER SET 'utf8' COLLATE 'utf8_bin' NOT NULL,
  `s_age` INT NOT NULL,
  PRIMARY KEY (`s_id`))
ENGINE = InnoDB
DEFAULT CHARACTER SET = utf8
COLLATE = utf8_bin;

INSERT INTO `test`.`ssmdemo` (`s_name`, `s_text`, `s_age`) VALUES ('ssmDemo1', 'ssmDemo1Text', '20');
INSERT INTO `test`.`ssmdemo` (`s_name`, `s_text`, `s_age`) VALUES ('ssmDemo2', 'ssmDemo2Text', '30');
INSERT INTO `test`.`ssmdemo` (`s_name`, `s_text`, `s_age`) VALUES ('ssmDemo3', 'ssmDemo3Text', '40');

接下来,我们就可以创建好我们需要用到的类文件啦,第一步,创建数据库表对应的实体类咯,这里是ssmDemo.java,放置在com.advance.model下,内容如下:
package com.advance.model;

public class ssmDemo {

    private Integer sId;
    private String sName;
    private String sText;
    private Integer sAge;
    public Integer getsId() {
        return sId;
    }
    public void setsId(Integer sId) {
        this.sId = sId;
    }
    public String getsName() {
        return sName;
    }
    public void setsName(String sName) {
        this.sName = sName;
    }
    public String getsText() {
        return sText;
    }
    public void setsText(String sText) {
        this.sText = sText;
    }
    public Integer getsAge() {
        return sAge;
    }
    public void setsAge(Integer sAge) {
        this.sAge = sAge;
    }
    @Override
    public String toString() {
        return "ssmDemo [sId=" + sId + ", sName=" + sName + ", sText=" + sText
                + ", sAge=" + sAge + "]";
    }

}
下一步,创建一个接口类文件,用来对应你的mapper配置文件,这里是ssmDemoMapper.java,放置在com.advance.mapper,内容如下:
package com.advance.mapper;

import java.util.List;

import com.advance.model.ssmDemo;

public interface ssmDemoMapper {
    List<ssmDemo> getAllBeans();
}
这里需要注意的是,这个接口类文件跟接下来我们创建的ssmDemoMapper.xml文件是对应的,他们两者结合实现与数据库交互。
那我们就来看看这个神奇的配置文件ssmDemoMapper.xml,放置在config/Mapper中,内容如下
<?xml version="1.0" encoding="UTF-8" ?>
<!DOCTYPE mapper PUBLIC "-//mybatis.org//DTD Mapper 3.0//EN" "http://mybatis.org/dtd/mybatis-3-mapper.dtd" >
<mapper namespace="com.advance.mapper.ssmDemoMapper">

    <resultMap type="com.advance.model.ssmDemo" id="demoResultMap">
        <id column="s_id" property="sId"/>
        <result column="s_name" property="sName"/>
        <result column="s_text" property="sText"/>
        <result column="s_age" property="sAge"/>
    </resultMap>

    <select id="getAllBeans" resultMap="demoResultMap">
        select * from ssmdemo
    </select>
</mapper>
这里你会发现,配置文件中的namespace指向的就是接口类文件ssmDemoMapper.java的全路径,这个不能写错,然后还需注意的是配置文件中执行语句的id也应该跟接口类文件的方法名对应,这个只是一些小问题啦,相信学习过mybatis之后,都应该知道这些问题啦。
为了是程序结构更加清晰,笔者这里另外加了service层以及serviceImp层,其代码如下:
ssmDemoService.java放置在com.advance.service下,内容如下:
package com.advance.service;

import java.util.List;

import com.advance.model.ssmDemo;

public interface ssmDemoService {
    List<ssmDemo> getAllRecords();
}
实现类ssmDemoServiceImp.java放置在com.advance.serviceImp下,内容如下:
package com.advance.serviceImp;

import java.util.List;

import javax.annotation.Resource;

import org.springframework.stereotype.Service;

import com.advance.mapper.ssmDemoMapper;
import com.advance.model.ssmDemo;
import com.advance.service.ssmDemoService;
/**
 * @author advance
 *    service层实现类方法
 */
@Service
public class ssmDemoServiceImp implements ssmDemoService {

    @Resource
    private ssmDemoMapper ssmDemoMapper;

    @Override
    public List<ssmDemo> getAllRecords() {
        // TODO Auto-generated method stub
        return ssmDemoMapper.getAllBeans();
    }

}
接下来,我们就可以连接数居库来进行测试啦,首先创建一个名为db.properties文件,放置在config下,主要用来配置jdbc的参数啦,内容如下
jdbc.drivername=com.mysql.jdbc.Driver
jdbc.url=jdbc:mysql://localhost:3306/test
jdbc.username=root
jdbc.password=123456
四个参数主要为jdbc驱动类程序,jdbc链接url,数据库名称以及数据库密码,笔者这里提供的是我本地的数据库账号密码,参考时记得改为自己的账号密码。
有了jdbc的配置文件之后,我们就开始整合spring与mybatis啦,这里你会发现,在简单的spring与mybatis整合时,mybatis的配置文件里好像什么也没有,就连数据源都是在spring的配置文件中,因为使用spring来代理更加高大上啦,开个玩笑啦,继续往下走:
mybatis.xml内容如下:
<?xml version="1.0" encoding="UTF-8"?>
<!DOCTYPE configuration PUBLIC "-//mybatis.org//DTD Config 3.0//EN" "http://mybatis.org/dtd/mybatis-3-config.dtd">
<configuration>
</configuration>
令人神往的spring配置文件(spring.xml)放置在config下,内容如下:
<?xml version="1.0" encoding="UTF-8"?>
<beans xmlns="http://www.springframework.org/schema/beans"
    xmlns:xsi="http://www.w3.org/2001/XMLSchema-instance"
    xmlns:p="http://www.springframework.org/schema/p"
    xmlns:c="http://www.springframework.org/schema/c"
    xmlns:context="http://www.springframework.org/schema/context"
    xmlns:mybatis-spring="http://mybatis.org/schema/mybatis-spring"
    xmlns:aop="http://www.springframework.org/schema/aop"
    xmlns:tx="http://www.springframework.org/schema/tx"
    xsi:schemaLocation="http://www.springframework.org/schema/aop http://www.springframework.org/schema/aop/spring-aop-4.0.xsd
        http://www.springframework.org/schema/beans http://www.springframework.org/schema/beans/spring-beans-4.0.xsd
        http://mybatis.org/schema/mybatis-spring http://mybatis.org/schema/mybatis-spring-1.2.xsd
        http://www.springframework.org/schema/tx http://www.springframework.org/schema/tx/spring-tx-4.0.xsd
        http://www.springframework.org/schema/context http://www.springframework.org/schema/context/spring-context-4.0.xsd">
        <!-- 设置基础扫描包,也就是说项目加载时,spring会在基础扫描宝中去扫描有相应注解的类进行动态代理啦 -->
    <context:component-scan base-package="com.advance.serviceImp"></context:component-scan>
    <!-- 引入db.properties文件 -->
    <context:property-placeholder location="classpath:db.properties" />
    <!-- 配置数据源 -->
    <bean id="dataSource"
        class="org.springframework.jdbc.datasource.DriverManagerDataSource">
        <property name="driverClassName" value="${jdbc.drivername}" />
        <property name="url" value="${jdbc.url}" />
        <property name="username" value="${jdbc.username}" />
        <property name="password" value="${jdbc.password}" />
    </bean>
    <!-- 配置SqlSessionFactory对象 -->
    <bean id="sqlSessionFactory" class="org.mybatis.spring.SqlSessionFactoryBean">
        <property name="dataSource" ref="dataSource" />
        <property name="configLocation" value="classpath:mybatis.xml" />
        <property name="typeAliasesPackage" value="com.advance.model" />
        <property name="mapperLocations" value="classpath:Mapper/*.xml" />
    </bean>
    <!-- 配置扫描Dao接口包,动态实现Dao接口,注入到spring容器中 -->
    <bean class="org.mybatis.spring.mapper.MapperScannerConfigurer">
        <property name="sqlSessionFactoryBeanName" value="sqlSessionFactory"/>
        <property name="basePackage" value="com.advance.mapper"/>
    </bean>
    <bean id="sqlSessionTemplate" class="org.mybatis.spring.SqlSessionTemplate">
        <constructor-arg ref="sqlSessionFactory" />
    </bean>
</beans>
到了这一步,那么恭喜你,spring与mybatis的整合已经完成了,不相信的话,我们可以进行一个测试,笔者这里创建一个junitTestCase(Myeclipse自带)一个小小的单元测试
编写测试类test01.java,放置在com.advance.test下,内容如下:
package com.advance.test;

import java.util.List;

import org.junit.Before;
import org.junit.Test;
import org.springframework.context.ApplicationContext;
import org.springframework.context.support.ClassPathXmlApplicationContext;

import com.advance.mapper.ssmDemoMapper;
import com.advance.model.ssmDemo;
import com.advance.service.ssmDemoService;

public class test01 {

    private ApplicationContext ctx = null;

    @Before
    public void doBefore(){
        ctx = new ClassPathXmlApplicationContext("classpath:spring.xml");
    }

    @Test
    public void test() {
        ssmDemoService ssmDemoService = ctx.getBean(ssmDemoService.class);

        List<ssmDemo> beans = ssmDemoService.getAllRecords();
     //java8 的遍历方式,笔者这里是图方便,反正最终是要便利list,自己看咯,哈哈
        beans.forEach(e->System.out.println(e));

    }

}
其运行结果如下:
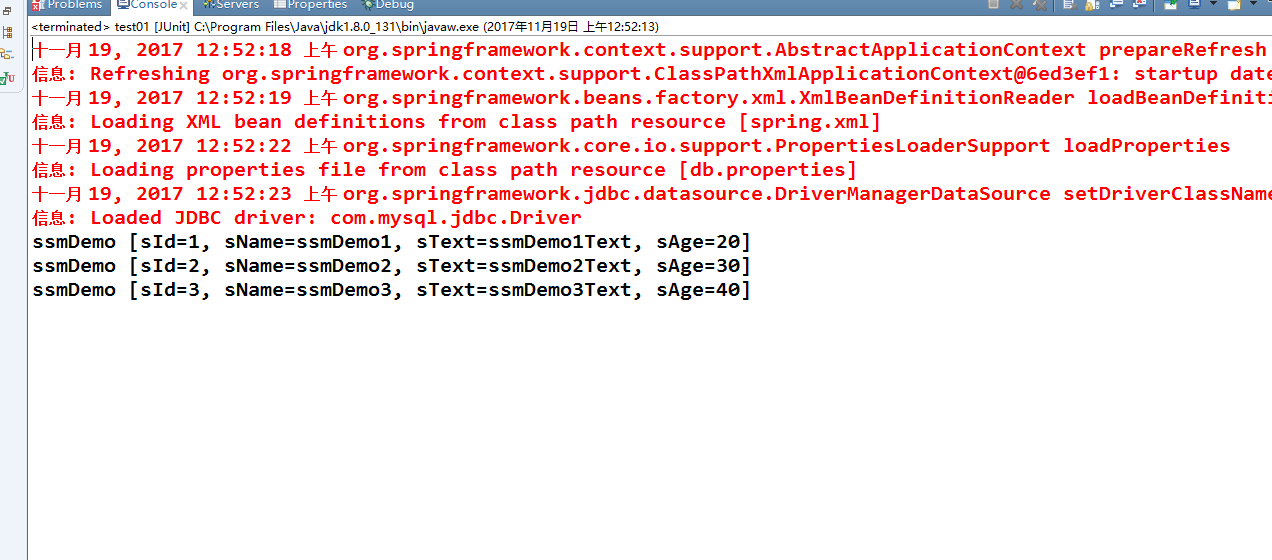
如果你也跟我一下的话,那就可以进行下一步啦,因为到这里,就已经证明我们前面的工作是正确的啦,接下来我们就要集成我们的springmvc框架啦,一个web项目就快要完成啦;
创建springmvc.xml放置在config下,内容如下:
<beans xmlns="http://www.springframework.org/schema/beans"
    xmlns:context="http://www.springframework.org/schema/context"
    xmlns:mvc="http://www.springframework.org/schema/mvc"
    xmlns:xsi="http://www.w3.org/2001/XMLSchema-instance"
    xsi:schemaLocation="http://www.springframework.org/schema/beans http://www.springframework.org/schema/beans/spring-beans-4.0.xsd
    http://www.springframework.org/schema/mvc http://www.springframework.org/schema/mvc/spring-mvc-4.0.xsd
    http://www.springframework.org/schema/context http://www.springframework.org/schema/context/spring-context-4.0.xsd">

    <context:component-scan base-package="com.advance.controller" />

    <mvc:annotation-driven />

    <bean
        class="org.springframework.web.servlet.view.InternalResourceViewResolver">
        <property name="prefix">
            <value>/</value>
        </property>
        <property name="suffix">
            <value>.jsp</value>
        </property>
    </bean>

</beans>
到这里配置文件就已经完成啦,想一下,现在是不是就可以啦?当然不行,如果只是这样,程序该如何加载这些配置文件呢?是吧,所以,我们还需要在web.xml文件中就行配置啦,这个文件作为程序的入口,我们要相当重视它,接下来,web.xml文件内容如下:
<?xml version="1.0" encoding="UTF-8"?>
<web-app xmlns:xsi="http://www.w3.org/2001/XMLSchema-instance" xmlns="http://java.sun.com/xml/ns/javaee" xsi:schemaLocation="http://java.sun.com/xml/ns/javaee http://java.sun.com/xml/ns/javaee/web-app_3_0.xsd" id="WebApp_ID" version="3.0">
  <display-name>ssmDemo</display-name>
  <filter>
        <filter-name>characterEncodingFilter</filter-name>
        <filter-class>org.springframework.web.filter.CharacterEncodingFilter</filter-class>
        <init-param>
            <param-name>encoding</param-name>
            <param-value>UTF-8</param-value>
        </init-param>
        <init-param>
            <param-name>forceEncoding</param-name>
            <param-value>true</param-value>
        </init-param>
    </filter>
    <filter-mapping>
        <filter-name>characterEncodingFilter</filter-name>
        <url-pattern>/*</url-pattern>
    </filter-mapping>
    <!-- 配置org.springframework.web.filter.HiddenHttpMethodFilter -->
    <filter>
        <filter-name>HiddenHttpMethodFilter</filter-name>
        <filter-class>org.springframework.web.filter.HiddenHttpMethodFilter</filter-class>
    </filter>
    <filter-mapping>
        <filter-name>HiddenHttpMethodFilter</filter-name>
        <url-pattern>/*</url-pattern>
    </filter-mapping>
  <context-param>
        <param-name>contextConfigLocation</param-name>
        <param-value>classpath:spring.xml</param-value>
    </context-param>
    <listener>
        <listener-class>org.springframework.web.context.ContextLoaderListener</listener-class>
    </listener>
    <!-- 配置控制转发器 -->
    <servlet>
        <servlet-name>springDispatcherServlet</servlet-name>
        <servlet-class>org.springframework.web.servlet.DispatcherServlet</servlet-class>
        <!-- 配置文件位置 -->
        <init-param>
            <param-name>contextConfigLocation</param-name>
            <param-value>classpath:springmvc.xml</param-value>
        </init-param>
        <load-on-startup>1</load-on-startup>
    </servlet>
    <servlet-mapping>
        <servlet-name>springDispatcherServlet</servlet-name>
        <url-pattern>*.do</url-pattern>
    </servlet-mapping>

</web-app>
好了,这样子你才能算是吧整个框架给集成好了,那就让我们来测试一下吧,编写一个控制器文件,命名为ssmDemoController.java,放置在com.advance.controller下,内容如下:
package com.advance.controller;

import java.util.List;

import javax.annotation.Resource;

import org.springframework.stereotype.Controller;
import org.springframework.web.bind.annotation.RequestMapping;
import org.springframework.web.servlet.ModelAndView;

import com.advance.model.ssmDemo;
import com.advance.service.ssmDemoService;

@Controller
public class SsmDemoController {

    @Resource
    private ssmDemoService ssmDemoService;

    @RequestMapping("/getAllRecords.do")
    public ModelAndView toIndex(){
        ModelAndView mav = new ModelAndView();

        List<ssmDemo> records = ssmDemoService.getAllRecords();

        mav.addObject("beans", records);

        mav.setViewName("index");

        return mav;
    }

}
最后,在小小的编写一个前端界面进行效果展示啦,这里笔者将它命名为index.jsp,内容如下:
<%@ page language="java" import="java.util.*" pageEncoding="UTF-8"%>
<%@taglib uri="http://java.sun.com/jsp/jstl/core" prefix="c"%>
<%
String path = request.getContextPath();
String basePath = request.getScheme()+"://"+request.getServerName()+":"+request.getServerPort()+path+"/";
%>

<!DOCTYPE HTML PUBLIC "-//W3C//DTD HTML 4.01 Transitional//EN">
<html>
<head>
<base href="<%=basePath%>">

<title>My JSP 'index.jsp' starting page</title>
<meta http-equiv="pragma" content="no-cache">
<meta http-equiv="cache-control" content="no-cache">
<meta http-equiv="expires" content="0">
<meta http-equiv="keywords" content="keyword1,keyword2,keyword3">
<meta http-equiv="description" content="This is my page">
<style type="text/css">
table {
     80%;
    border: 1px solid #ccc;
    margin-left: 10%;
    text-align: center;
}
table thead tr{
    border: 1px solid #ccc;
    background: yellow;
    height: 30px;
}
table tbody td{
    border: 1px solid #ccc;
    height: 25px;
}
</style>
</head>

<body>
    <br />
    <h1 style="text-align: center;100%;">SSM_DEMO By Advance</h1>
    <br />
    <br />
    <hr />
    <br />
    <br />
    <br />
    <table>
        <thead>
            <tr>
                <td>sId</td>
                <td>sName</td>
                <td>sText</td>
                <td>sAge</td>
            </tr>
        </thead>
        <c:forEach items="${beans }" var="bean">
            <tbody>
                <tr>
                    <td>${bean.sId }</td>
                    <td>${bean.sName }</td>
                    <td>${bean.sText }</td>
                    <td>${bean.sAge }</td>
                </tr>
            </tbody>
        </c:forEach>
    </table>
</body>
</html>
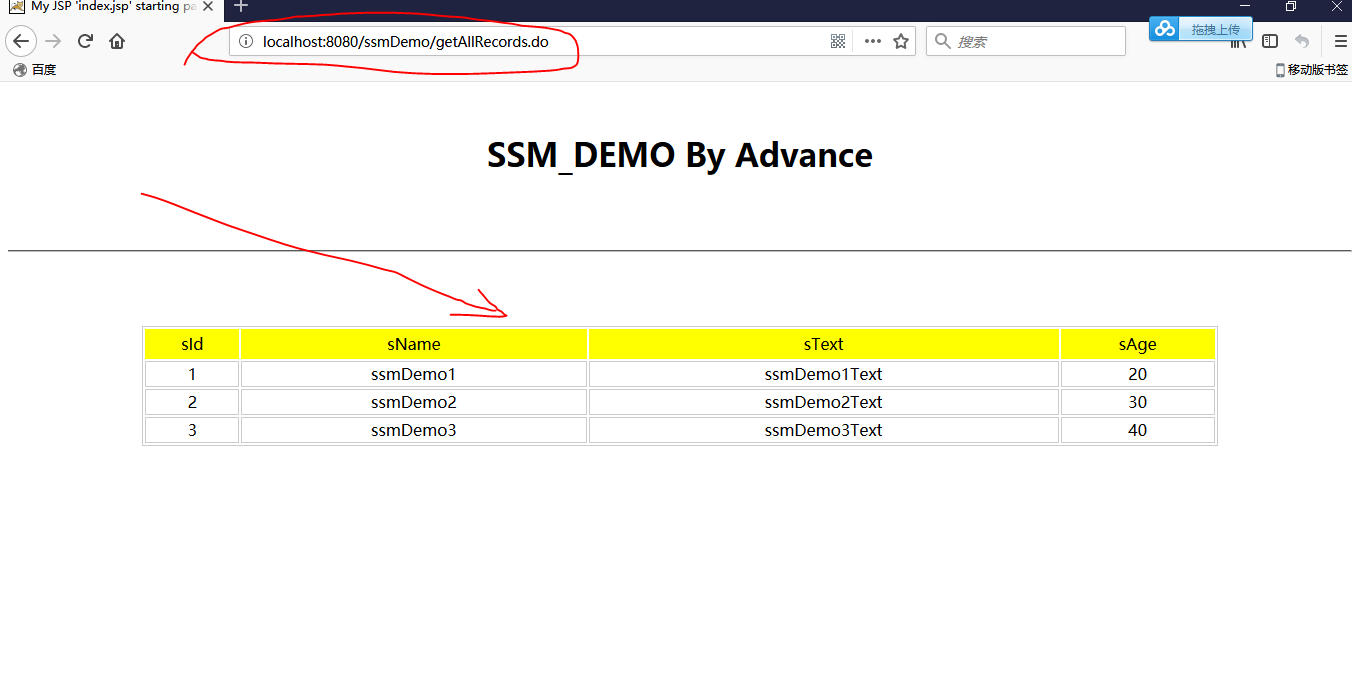
OK,现在就到了激动人心的时刻了,因为你已经千辛万苦的把框架做了集成,但是成不成功就在此一步啦,让我们启动tomcat,看看控制台有没有报错,没有的话,那就可以打开浏览器,输入地址啦,笔者这里地址是:http://localhost:8080/ssmDemo/getAllRecords.do,输入以后,如看到以下界面,那么,你的框架就搭建成功啦!
OK,笔者这里只是提供了一个查询的功能,如果需要实现增删改查,需要另行添加,其实也很简单啦,哈哈!