1.1、实例生命周期
每个 Vue 实例在被创建之前都要经过一系列的初始化过程。例如需要设置数据监听、编译模板、挂载实例到 DOM、在数据变化时更新 DOM 等。同时在这个过程中也会运行一些叫做生命周期钩子的函数,给予用户机会在一些特定的场景下添加他们自己的代码。
比如 created 钩子可以用来在一个实例被创建之后执行代码:
 1 new Vue({
 2 data: {
 3 a: 1
 4 },
 5 created: function () {
 6 // `this` 指向 vm 实例
 7 console.log('a is: ' + this.a)
 8 }
 9 })
10 // => "a is: 1"
也有一些其它的钩子,在实例生命周期的不同场景下调用,如 mounted、updated、destroyed。钩子的 this 指向调用它的 Vue 实例。
不要在选项属性或回调上使用箭头函数,比如 created: () => console.log(this.a) 或 vm.$watch('a', newValue => this.myMethod())。因为箭头函数是和父级上下文绑定在一起的,this 不会是如你所预期的 Vue 实例,经常导致 Uncaught TypeError: Cannot read property of undefined 或 Uncaught TypeError: this.myMethod is not a function 之类的错误。
1.2、生命周期图示
下图说明了实例的生命周期。你不需要立马弄明白所有的东西,不过随着你的不断学习和使用,它的参考价值会越来越高。
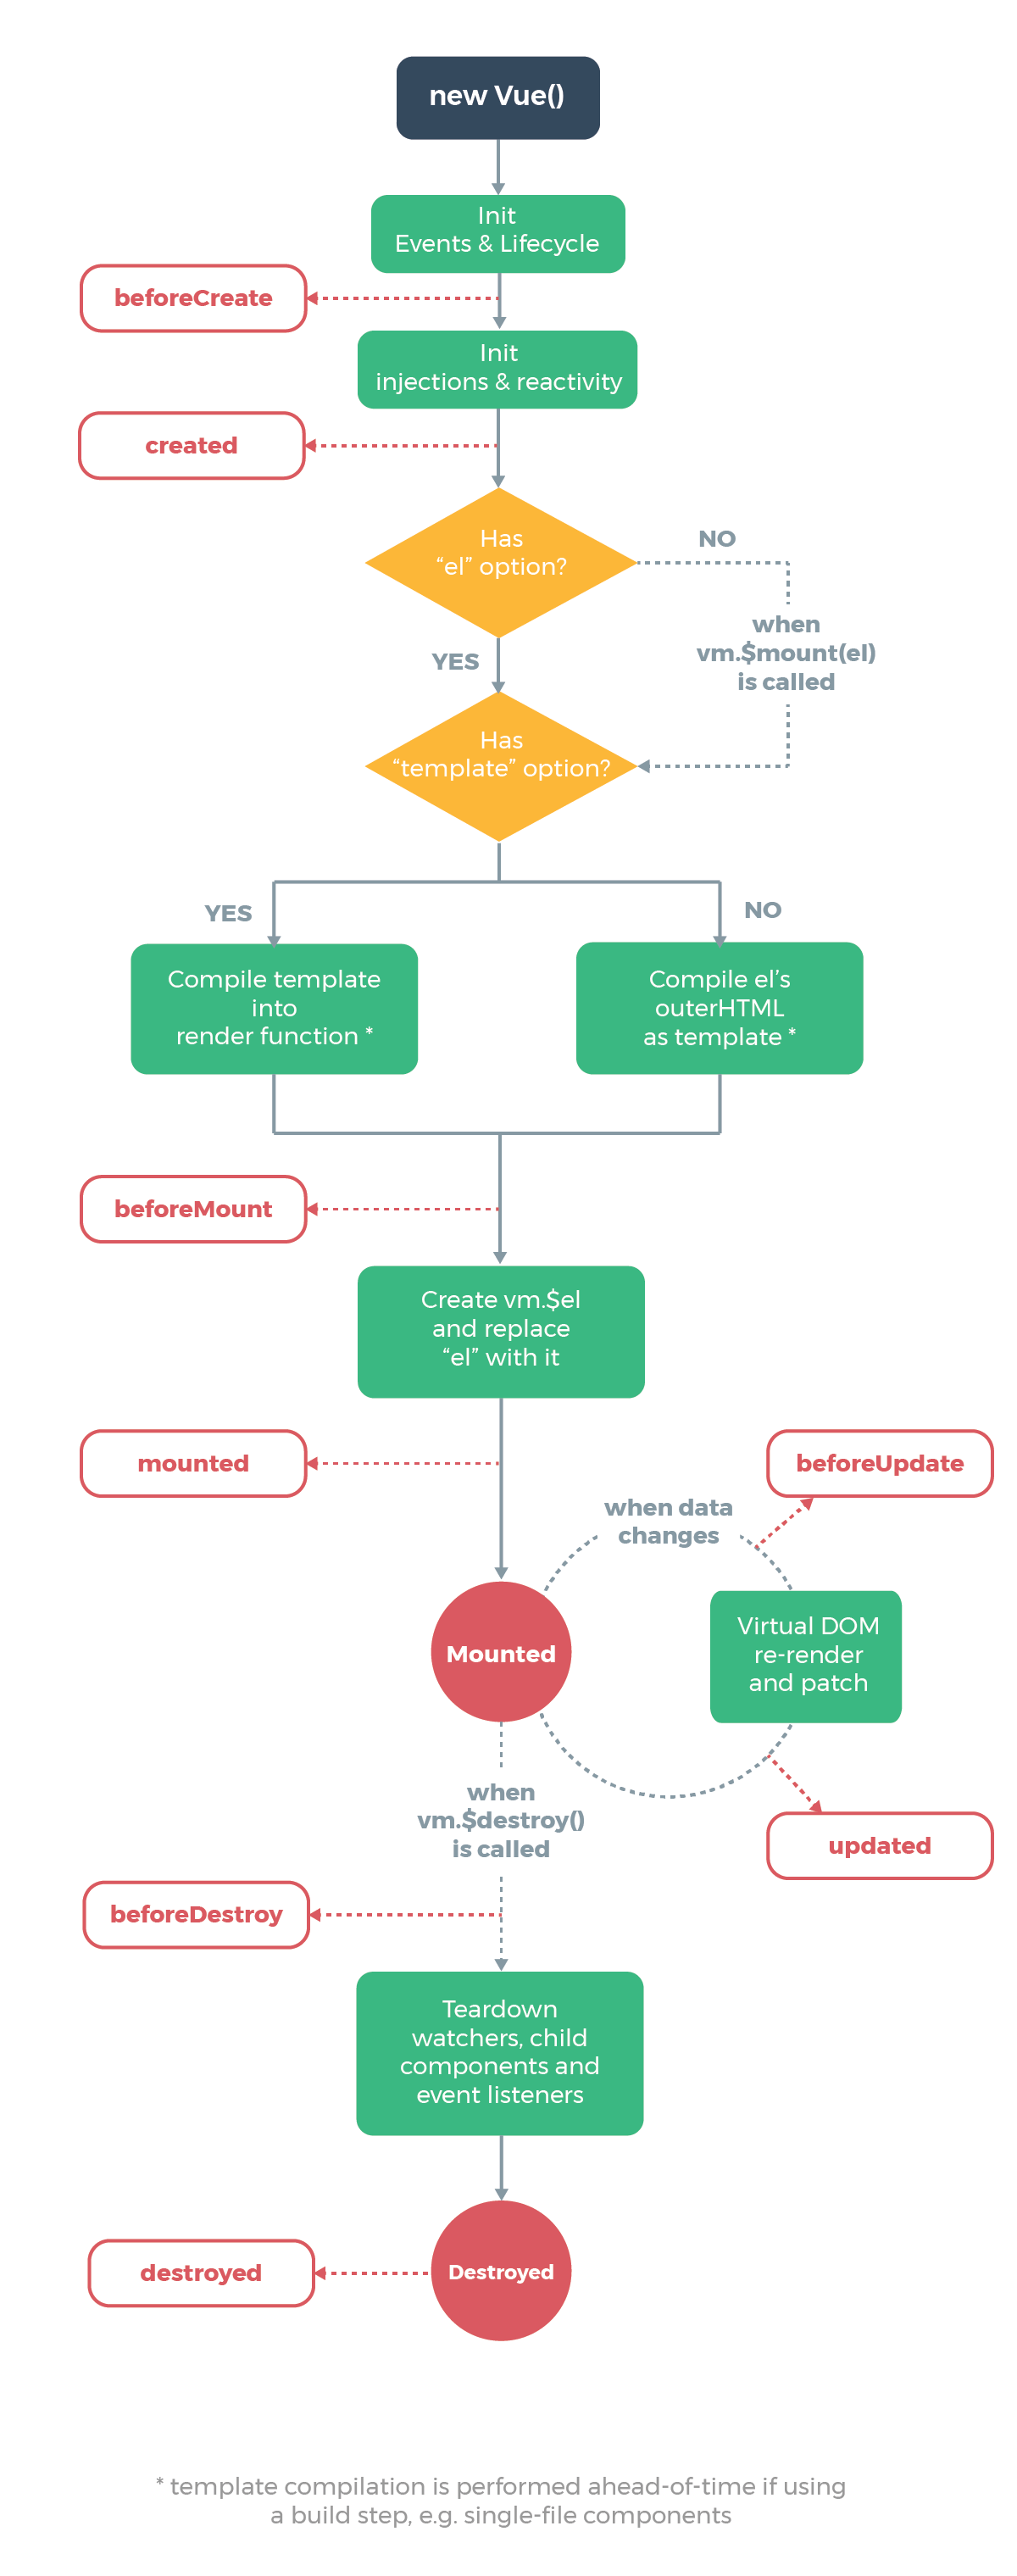
1. beforeCreate
在实例初始化之后,数据观测(data observer) 和 event/watcher 事件配置之前被调用。
2. created
实例已经创建完成之后被调用。在这一步,实例已完成以下的配置:数据观测(data observer),属性和方法的运算, watch/event 事件回调。然而,挂载阶段还没开始,$el 属性目前不可见。 可以在组件的这个期间请求数据,如果是keep-alive组件会被缓存起来,生命周期不会再次触发,如果需要更新数据可以watch当前router变化,如果router是当前组件所在的router则请求数据。
 1 methods : {
 2 getData : function(id){
 3 ...
 4 this.content = 'test';
 5 }
 6 },
 7 created : function(){
 8 this.getData(this.id);
 9 }
10 ...
11 watch : {
12 $route : function(){
13 if(this.$route.name == 'xxx'){
14 this.getData(this.id);
15 }
16 }
17 }
3. beforeMount
在挂载开始之前被调用:相关的 render 函数首次被调用。
4. mounted
vm.$el已挂载在文档内,对已有dom节点的操作可以在这期间进行。
5. beforeUpdate
数据更新时调用,发生在虚拟 DOM 重新渲染和打补丁之前。
可以在这个钩子中进一步地更改状态,这不会触发附加的重渲染过程。
6.updated
由于数据更改导致的虚拟 DOM 重新渲染和打补丁,在这之后会调用该钩子。
当这个钩子被调用时,组件 DOM 已经更新,所以你现在可以执行依赖于 DOM 的操作。然而在大多数情况下,你应该避免在此期间更改状态,因为这可能会导致更新无限循环。
7.activated
keep-alive 组件激活时调用。
8.deactivated
keep-alive 组件停用时调用。
9.beforeDestroy
实例销毁之前调用。在这一步,实例仍然完全可用。
10.destroyed
Vue 实例销毁后调用。调用后,Vue 实例指示的所有东西都会解绑定,所有的事件监听器会被移除,所有的子实例也会被销毁。
2.生命周期示例一
示例1:
 1 <!DOCTYPE html>
 2 <html>
 3     <head>
 4         <meta charset="UTF-8">
 5         <title>Vue2的生命周期</title>
 6         <style type="text/css">
 7             // <div> 不会显示,直到编译结束。
 8                 [v-cloak] {
 9                   display: none;
10                 }
11         </style>
12     </head>
13     <body>
14         <div id="app1">
15             <input v-model="msg" v-cloak/>
16             {{msg}}
17         </div>
18         <button onclick="destroy()">销毁</button>
19         <script src="https://cdn.jsdelivr.net/npm/vue@2.5.13/dist/vue.js"></script>
20         <script type="text/javascript">
21              //格式化输出
22             console.log("示例:%c%s","background:red;color:#fff","vue2生命周期","开始了");
23             console.log("你哈:%c%s,%c%s","color:green;","我是绿色","background:#ddd","我是灰色")
24             var app1 = new Vue({
25                 el:"#app1",
26                 data:{
27                     msg:'vue'
28                 },
29                 beforeCreate:function(){
30                     console.log("创建前:"+this.msg);
31                 },
32                 created:function(){
33                     console.log("创建后:"+this.msg+"."+this.$el);
34                 },
35                 beforeMount:function(){
36                     console.log("挂载前:");
37                     console.log(this.$el);
38                 },
39                 mounted:function(){
40                     console.log("挂载后:");
41                     console.log(this.$el);
42                 },
43                 beforeUpdate:function(){
44                     console.log("实例更新前:"+this.$el.innerHTML);
45                     console.log(this.msg);
46                     console.log(this.$el);
47                 },
48                 updated:function(){
49                     console.log("实例更新后:"+this.$el.innerHTML);
50                     console.log(this.msg);
51                     console.log(this.$el);
52                 },
53                 beforeDestroy:function(){
54                     console.log("销毁前");
55                     console.log(this.msg);
56                 },
57                 destroyed:function(){
58                     console.log("销毁后");
59                     console.log(this.msg);
60                 }
61
62             })
63             function destroy(){
64                 app1.$destroy();
65             }
66         </script>
67     </body>
68 </html>
初始化结果1:

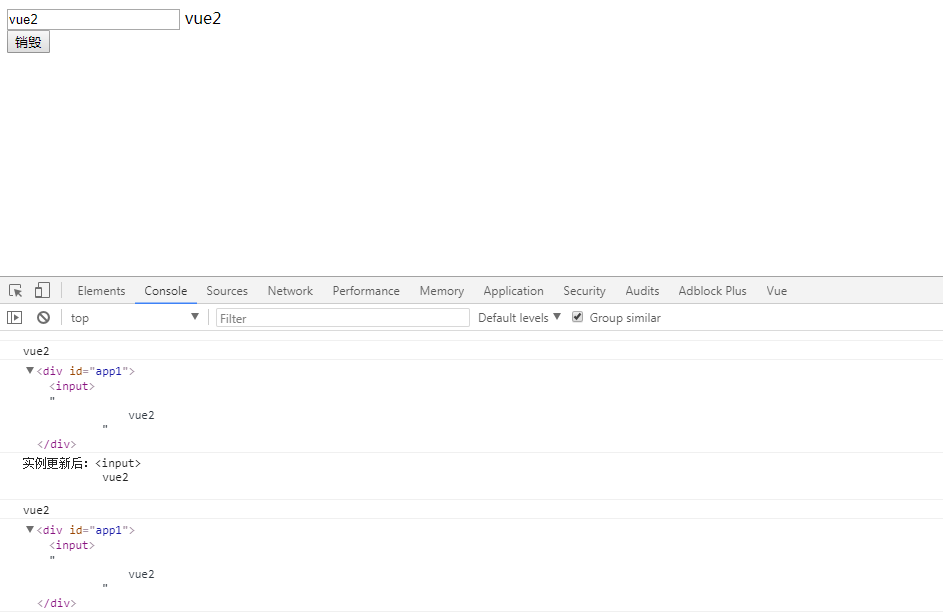
修改msg的值为vue2后的结果:
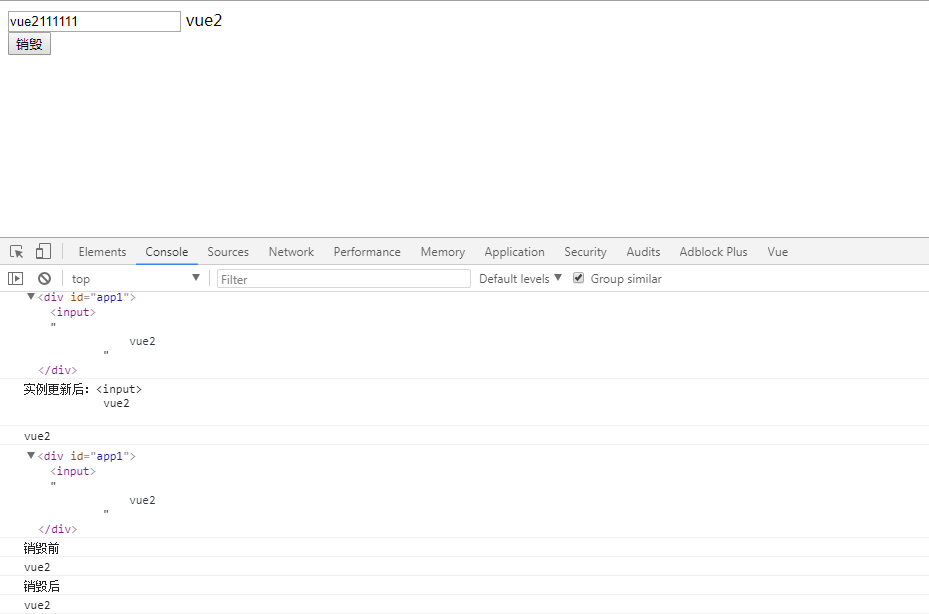
执行销毁:
2.1生命周期示例二
示例2:
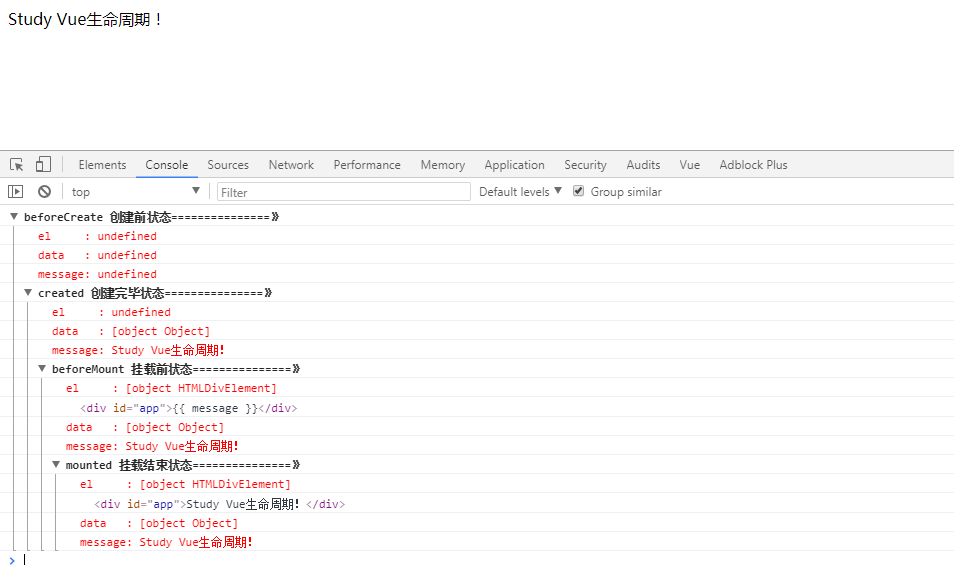
 1 <!DOCTYPE html>
 2 <html>
 3     <head>
 4         <meta charset="UTF-8">
 5         <title>Vue2生命周期</title>
 6     </head>
 7     <body>
 8         <div id="app">{{ message }}</div>
 9         <script type="text/javascript" src="https://cdn.jsdelivr.net/vue/2.1.3/vue.js"></script>
10         <script type="text/javascript">
11             var app = new Vue({
12                 el: '#app',
13                 data: {
14                     message: "Study Vue生命周期!"
15                 },
16                 beforeCreate: function() {
17                     console.group('beforeCreate 创建前状态===============》');
18                     console.log("%c%s", "color:red", "el     : " + this.$el); //undefined
19                     console.log("%c%s", "color:red", "data   : " + this.$data); //undefined
20                     console.log("%c%s", "color:red", "message: " + this.message)
21                 },
22                 created: function() {
23                     console.group('created 创建完毕状态===============》');
24                     console.log("%c%s", "color:red", "el     : " + this.$el); //undefined
25                     console.log("%c%s", "color:red", "data   : " + this.$data); //已被初始化
26                     console.log("%c%s", "color:red", "message: " + this.message); //已被初始化
27                 },
28                 beforeMount: function() {
29                     console.group('beforeMount 挂载前状态===============》');
30                     console.log("%c%s", "color:red", "el     : " + (this.$el)); //已被初始化
31                     console.log(this.$el);
32                     console.log("%c%s", "color:red", "data   : " + this.$data); //已被初始化
33                     console.log("%c%s", "color:red", "message: " + this.message); //已被初始化
34                 },
35                 mounted: function() {
36                     console.group('mounted 挂载结束状态===============》');
37                     console.log("%c%s", "color:red", "el     : " + this.$el); //已被初始化
38                     console.log(this.$el);
39                     console.log("%c%s", "color:red", "data   : " + this.$data); //已被初始化
40                     console.log("%c%s", "color:red", "message: " + this.message); //已被初始化
41                 },
42                 beforeUpdate: function() {
43                     console.group('beforeUpdate 更新前状态===============》');
44                     console.log("%c%s", "color:red", "el     : " + this.$el);
45                     console.log(this.$el);
46                     console.log("%c%s", "color:red", "data   : " + this.$data);
47                     console.log("%c%s", "color:red", "message: " + this.message);
48                 },
49                 updated: function() {
50                     console.group('updated 更新完成状态===============》');
51                     console.log("%c%s", "color:red", "el     : " + this.$el);
52                     console.log(this.$el);
53                     console.log("%c%s", "color:red", "data   : " + this.$data);
54                     console.log("%c%s", "color:red", "message: " + this.message);
55                 },
56                 beforeDestroy: function() {
57                     console.group('beforeDestroy 销毁前状态===============》');
58                     console.log("%c%s", "color:red", "el     : " + this.$el);
59                     console.log(this.$el);
60                     console.log("%c%s", "color:red", "data   : " + this.$data);
61                     console.log("%c%s", "color:red", "message: " + this.message);
62                 },
63                 destroyed: function() {
64                     console.group('destroyed 销毁完成状态===============》');
65                     console.log("%c%s", "color:red", "el     : " + this.$el);
66                     console.log(this.$el);
67                     console.log("%c%s", "color:red", "data   : " + this.$data);
68                     console.log("%c%s", "color:red", "message: " + this.message)
69                 }
70             })
71         </script>
72     </body>
73 </html>
初始化结果
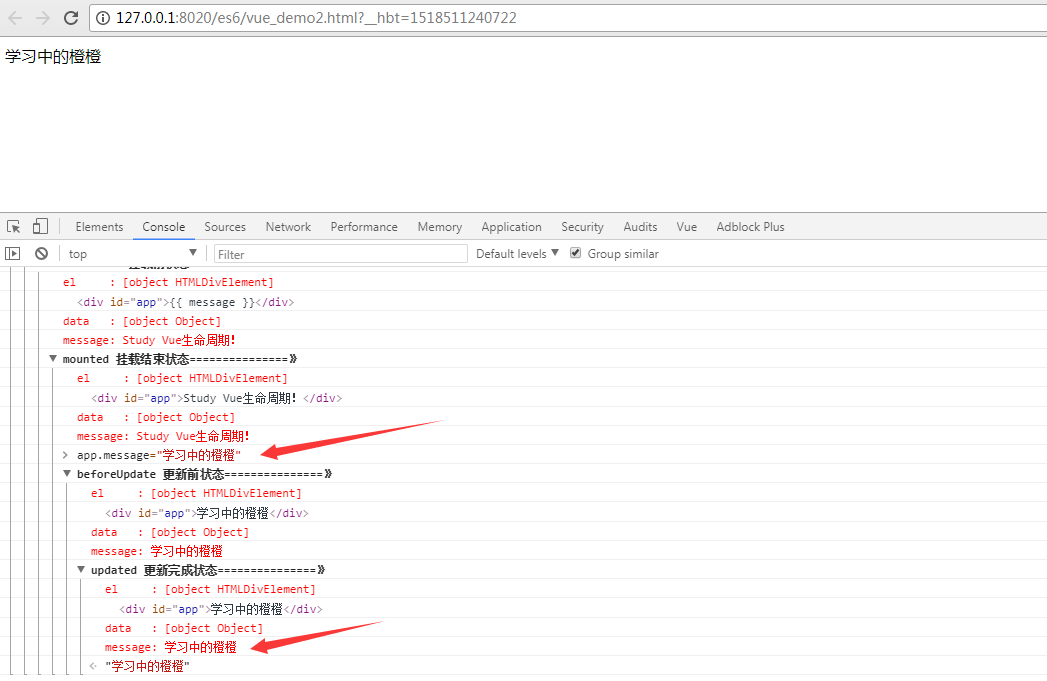
更新message的值:
手动销毁实例:

2.2、手动挂载与调用事件
2.2.1、手动挂载
vm.$mount( [elementOrSelector] ) 如果 Vue 实例在实例化时没有收到 el 选项,则它处于“未挂载”状态,没有关联的 DOM 元素。可以使用 vm.$mount() 手动地挂载一个未挂载的实例。
如果没有提供 elementOrSelector 参数,模板将被渲染为文档之外的的元素,并且你必须使用原生 DOM API 把它插入文档中。
这个方法返回实例自身,因而可以链式调用其它实例方法。
 1 var MyComponent = Vue.extend({
 2 template: '<div>Hello!</div>'
 3 })
 4
 5 // 创建并挂载到 #app (会替换 #app)
 6 new MyComponent().$mount('#app')
 7
 8 // 同上
 9 new MyComponent({ el: '#app' })
10
11 // 或者,在文档之外渲染并且随后挂载
12 var component = new MyComponent().$mount()
13 document.getElementById('app').appendChild(component.$el)
示例:
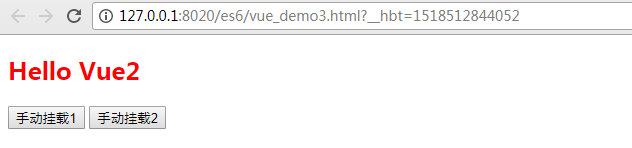
 1 <!DOCTYPE html>
 2 <html>
 3     <head>
 4         <meta charset="UTF-8">
 5         <title>Vue2手动挂载</title>
 6         <style type="text/css">
 7             #app1{
 8                 color: red;
 9             }
10             #app2{
11                 color: blue;
12             }
13         </style>
14     </head>
15     <body>
16         <div id="app1">
17             <!--<input v-model="msg" />{{msg}}-->
18         </div>
19         <div id="app2">
20             <!--<input v-model="msg" />{{msg}}-->
21         </div>
22         <button onclick="loaddata1()">手动挂载1</button>
23         <button onclick="loaddata2()">手动挂载2</button>
24         <script type="text/javascript" src="https://cdn.jsdelivr.net/vue/2.1.3/vue.js"></script>
25         <script type="text/javascript">
26             var app1 = new Vue({
27                 template:"<h2>{{msg}}</h2>",
28                 data:{
29                     msg:"Hello Vue2"
30                 }
31             });
32             function loaddata1(){
33                 app1.$mount();
34                 document.getElementById("app1").appendChild(app1.$el);
35             }
36             function loaddata2(){
37                 app1.$mount();
38                 document.getElementById("app2").appendChild(app1.$el);
39             }
40         </script>
41     </body>
42 </html>
结果:
2.2.2、销毁实例
vm.$destroy() 完全销毁一个实例。清理它与其它实例的连接,解绑它的全部指令及事件监听器。
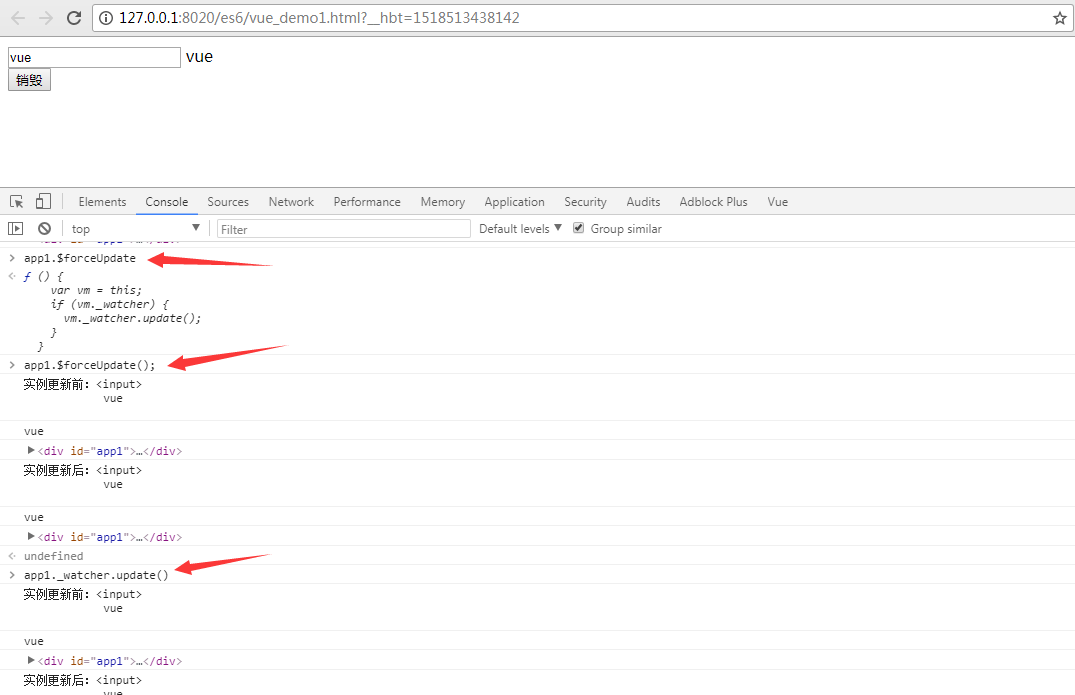
2.2.3、强制更新
vm.$forceUpdate() 迫使 Vue 实例重新渲染。注意它仅仅影响实例本身和插入插槽内容的子组件,而不是所有子组件。