一、概念
1.Numpy里没有Variable这个概念,如果大家学过TensorFlow就会知道,Variable提供了自动求导的功能。
2.Variable需要放进一个计算图中,然后进行前后向传播和自动求导。
3.Variable的属性有三个:
- data:Variable里Tensor变量的数值
- grad:Variable反向传播的梯度
- grad_fn:得到Variable的操作
二、Variable的创建和使用
1.我们首先创建一个空的Variable:
import torch
#创建Variable
a = torch.autograd.Variable()
print(a)
结果如下:

可以看到默认的类型为Tensor
2.那么,我们如果需要给Variable变量赋值,那么就一定是Tensor类型,例如:
b = torch.autograd.Variable(torch.Tensor([[1, 2], [3, 4],[5, 6], [7, 8]]))
print(b)
代码变为:
import torch
#创建Variable
a = torch.autograd.Variable()
print(a)
b = torch.autograd.Variable(torch.Tensor([[1, 2], [3, 4],[5, 6], [7, 8]]))
print(b)
结果为:
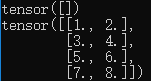
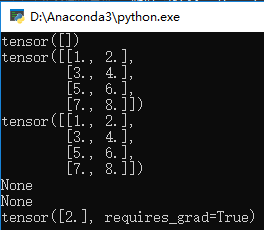
3.第一章提到了Variable的三个属性,我们依次打印它们:
import torch
#创建Variable
a = torch.autograd.Variable()
print(a)
b = torch.autograd.Variable(torch.Tensor([[1, 2], [3, 4],[5, 6], [7, 8]]))
print(b)
print(b.data)
print(b.grad)
print(b.grad_fn)
结果为:

可以看到data就是Tensor的内容,剩下的两个属性为空
三、标量求导计算图
1.为了方便起见,我们可以将torch.autograd.Variable简写为Variable:
from torch.autograd import Variable
2.之后,我们先声明一个变量x,这里requires_grad=True意义是否对这个变量求梯度,默认的 Fa!se:
x = Variable(torch.Tensor([2]),requires_grad = True)
print(x)
代码变为:
import torch
#创建Variable
a = torch.autograd.Variable()
print(a)
b = torch.autograd.Variable(torch.Tensor([[1, 2], [3, 4],[5, 6], [7, 8]]))
print(b)
print(b.data)
print(b.grad)
print(b.grad_fn)

#建立计算图
from torch.autograd import Variable
x = Variable(torch.Tensor([2]),requires_grad = True)
print(x)
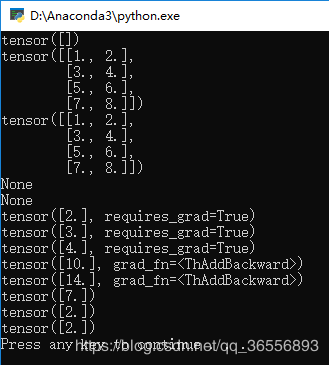
结果为:
3.我们再声明两个变量w和b:
w = Variable(torch.Tensor([3]),requires_grad = True)
print(w)
b = Variable(torch.Tensor([4]),requires_grad = True)
print(b)
4.我们再写两个变量y1和y2:
y1 = w * x + b
print(y1)
y2 = w * x + b * x
print(y2)
5.我们来计算各个变量的梯度,首先是y1:
#计算梯度
y1.backward()
print(x.grad)
print(w.grad)
print(b.grad)
代码变为:
import torch
#创建Variable
a = torch.autograd.Variable()
print(a)
b = torch.autograd.Variable(torch.Tensor([[1, 2], [3, 4],[5, 6], [7, 8]]))
print(b)
print(b.data)
print(b.grad)
print(b.grad_fn)

#建立计算图
from torch.autograd import Variable
x = Variable(torch.Tensor([2]),requires_grad = True)
print(x)
w = Variable(torch.Tensor([3]),requires_grad = True)
print(w)
b = Variable(torch.Tensor([4]),requires_grad = True)
print(b)
y1 = w * x + b
print(y1)
y2 = w * x + b * x
print(y2)
#计算梯度
y1.backward()
print(x.grad)
print(w.grad)
print(b.grad)
结果为:

其中:
y1 = 3 * 2 + 4 = 10,
y2 = 3 * 2 + 4 * 2 = 14,
x的梯度是3因为是3 * x,
w的梯度是2因为w * 2,
b的梯度是1因为b * 1(* 1被省略)
6.其次是y2,注销y1部分:
y2.backward(x)
print(x.grad)
print(w.grad)
print(b.grad)
代码为:

import torch
#创建Variable
a = torch.autograd.Variable()
print(a)
b = torch.autograd.Variable(torch.Tensor([[1, 2], [3, 4],[5, 6], [7, 8]]))
print(b)
print(b.data)
print(b.grad)
print(b.grad_fn)

#建立计算图
from torch.autograd import Variable
x = Variable(torch.Tensor([2]),requires_grad = True)
print(x)
w = Variable(torch.Tensor([3]),requires_grad = True)
print(w)
b = Variable(torch.Tensor([4]),requires_grad = True)
print(b)
y1 = w * x + b
print(y1)
y2 = w * x + b * x
print(y2)
#计算梯度
#y1.backward()
#print(x.grad)
#print(w.grad)
#print(b.grad)
y2.backward()
print(x.grad)
print(w.grad)
print(b.grad)
结果为:
其中:
x的梯度是7因为是3 * x + 4 * x,
w的梯度是2因为w * 2,
b的梯度是2因为b * 2
7.backward的函数可以填入参数,例如我们填入变量a:
a = Variable(torch.Tensor([5]),requires_grad = True)
y2.backward(a)
print(x.grad)
print(w.grad)
print(b.grad)
代码变为:
import torch
#创建Variable
a = torch.autograd.Variable()
print(a)
b = torch.autograd.Variable(torch.Tensor([[1, 2], [3, 4],[5, 6], [7, 8]]))
print(b)
print(b.data)
print(b.grad)
print(b.grad_fn)

#建立计算图
from torch.autograd import Variable
x = Variable(torch.Tensor([2]),requires_grad = True)
print(x)
w = Variable(torch.Tensor([3]),requires_grad = True)
print(w)
b = Variable(torch.Tensor([4]),requires_grad = True)
print(b)
y1 = w * x + b
print(y1)
y2 = w * x + b * x
print(y2)
#计算梯度
#y1.backward()
#print(x.grad)
#print(w.grad)
#print(b.grad)
a = Variable(torch.Tensor([5]),requires_grad = True)
y2.backward(a)
print(x.grad)
print(w.grad)
print(b.grad)
结果为:
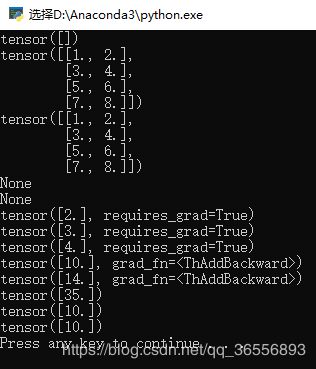
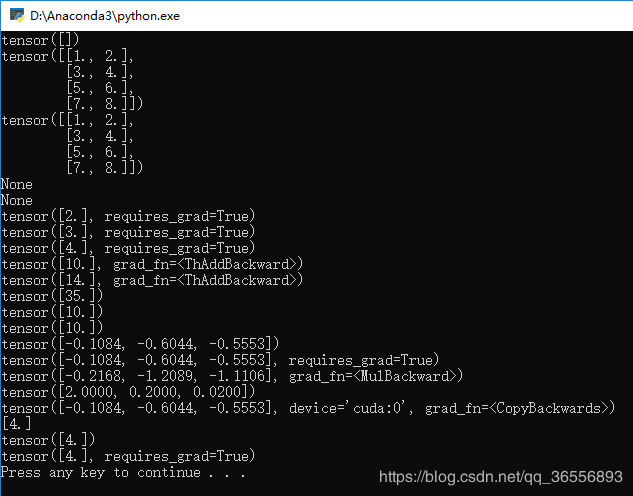
可以看到x,w,b的梯度乘以了a的值5,说明这个填入参数是梯度的系数。
四、矩阵求导计算图
1.例如:
#矩阵求导
c = torch.randn(3)
print(c)
c = Variable(c,requires_grad = True)
print(c)
y3 = c * 2
print(y3)
y3.backward(torch.FloatTensor([1, 0.1, 0.01]))
print(c.grad)
代码变为:
import torch
#创建Variable
a = torch.autograd.Variable()
print(a)
b = torch.autograd.Variable(torch.Tensor([[1, 2], [3, 4],[5, 6], [7, 8]]))
print(b)
print(b.data)
print(b.grad)
print(b.grad_fn)

#建立计算图
from torch.autograd import Variable
x = Variable(torch.Tensor([2]),requires_grad = True)
print(x)
w = Variable(torch.Tensor([3]),requires_grad = True)
print(w)
b = Variable(torch.Tensor([4]),requires_grad = True)
print(b)
y1 = w * x + b
print(y1)
y2 = w * x + b * x
print(y2)
#计算梯度
#y1.backward()
#print(x.grad)
#print(w.grad)
#print(b.grad)
a = Variable(torch.Tensor([5]),requires_grad = True)
y2.backward(a)
print(x.grad)
print(w.grad)
print(b.grad)

#矩阵求导
c = torch.randn(3)
print(c)
c = Variable(c,requires_grad = True)
print(c)
y3 = c * 2
print(y3)
y3.backward(torch.FloatTensor([1, 0.1, 0.01]))
print(c.grad)
结果为:
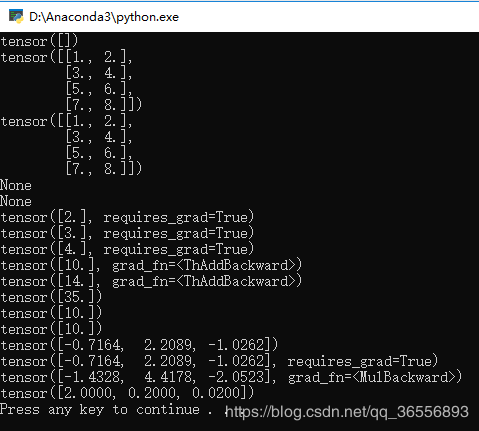
可以看到,c是一个1行3列的矩阵,因为y3 = c * 2,因此如果backward()里的参数为:
torch.FloatTensor([1, 1, 1])
则就是每个分量的梯度,但是传入的是:
torch.FloatTensor([1, 0.1, 0.01])
则每个分量梯度要分别乘以1,0.1和0.01
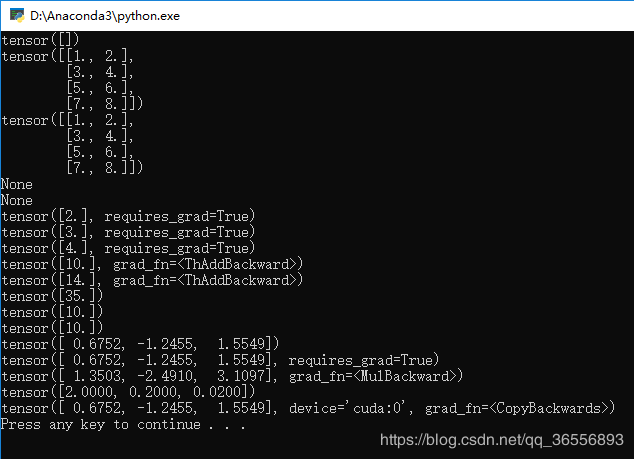
五、Variable放到GPU上执行
1.和Tensor一样的道理,代码如下:
#Variable放在GPU上
if torch.cuda.is_available():
d = c.cuda()
print(d)
代码变为:
import torch
#创建Variable
a = torch.autograd.Variable()
print(a)
b = torch.autograd.Variable(torch.Tensor([[1, 2], [3, 4],[5, 6], [7, 8]]))
print(b)
print(b.data)
print(b.grad)
print(b.grad_fn)

#建立计算图
from torch.autograd import Variable
x = Variable(torch.Tensor([2]),requires_grad = True)
print(x)
w = Variable(torch.Tensor([3]),requires_grad = True)
print(w)
b = Variable(torch.Tensor([4]),requires_grad = True)
print(b)
y1 = w * x + b
print(y1)
y2 = w * x + b * x
print(y2)
#计算梯度
#y1.backward()
#print(x.grad)
#print(w.grad)
#print(b.grad)
a = Variable(torch.Tensor([5]),requires_grad = True)
y2.backward(a)
print(x.grad)
print(w.grad)
print(b.grad)

#矩阵求导
c = torch.randn(3)
print(c)
c = Variable(c,requires_grad = True)
print(c)
y3 = c * 2
print(y3)
y3.backward(torch.FloatTensor([1, 0.1, 0.01]))
print(c.grad)
#Variable放在GPU上
if torch.cuda.is_available():
d = c.cuda()
print(d)
2.生成结果会慢一下,然后可以看到多了一个device=‘cuda:0’和grad_fn=<CopyBackwards>
六、Variable转Numpy与Numpy转Variable
1.值得注意的是,Variable里requires_grad 一般设置为 False,代码中为True则:
#变量转Numpy
e = Variable(torch.Tensor([4]),requires_grad = True)
f = e.numpy()
print(f)
会报如下错误:
Can't call numpy() on Variable that requires grad. Use var.detach().numpy() instead.
2.解决方法1:requires_grad改为False后,可以看到最后一行的Numpy类型的矩阵[4.]:
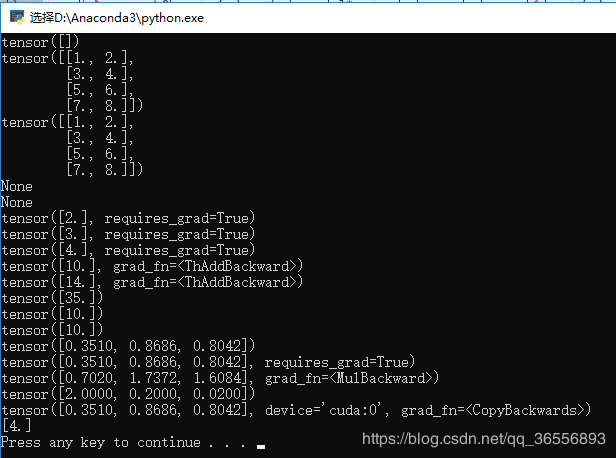
3.解决方法2::将numpy()改为detach().numpy(),可以看到最后一行的Numpy类型的矩阵[4.]
#变量转Numpy
e = Variable(torch.Tensor([4]),requires_grad = True)
f = e.detach().numpy()
print(f)
代码变为:
import torch
#创建Variable
a = torch.autograd.Variable()
print(a)
b = torch.autograd.Variable(torch.Tensor([[1, 2], [3, 4],[5, 6], [7, 8]]))
print(b)
print(b.data)
print(b.grad)
print(b.grad_fn)

#建立计算图
from torch.autograd import Variable
x = Variable(torch.Tensor([2]),requires_grad = True)
print(x)
w = Variable(torch.Tensor([3]),requires_grad = True)
print(w)
b = Variable(torch.Tensor([4]),requires_grad = True)
print(b)
y1 = w * x + b
print(y1)
y2 = w * x + b * x
print(y2)
#计算梯度
#y1.backward()
#print(x.grad)
#print(w.grad)
#print(b.grad)
a = Variable(torch.Tensor([5]),requires_grad = True)
y2.backward(a)
print(x.grad)
print(w.grad)
print(b.grad)

#矩阵求导
c = torch.randn(3)
print(c)
c = Variable(c,requires_grad = True)
print(c)
y3 = c * 2
print(y3)
y3.backward(torch.FloatTensor([1, 0.1, 0.01]))
print(c.grad)
#Variable放在GPU上
if torch.cuda.is_available():
d = c.cuda()
print(d)
#变量转Numpy
e = Variable(torch.Tensor([4]),requires_grad = True)
f = e.detach().numpy()
print(f)
结果为:
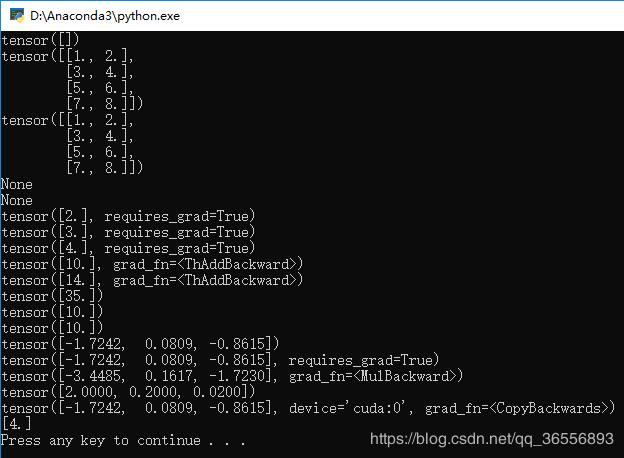
4.Numpy转Variable先是转为Tensor再转为Variable:
#转换为Tensor
g = torch.from_numpy(f)
print(g)
#转换为Variable
g = Variable(g,requires_grad = True)
print(g)
代码变为:
import torch
#创建Variable
a = torch.autograd.Variable()
print(a)
b = torch.autograd.Variable(torch.Tensor([[1, 2], [3, 4],[5, 6], [7, 8]]))
print(b)
print(b.data)
print(b.grad)
print(b.grad_fn)

#建立计算图
from torch.autograd import Variable
x = Variable(torch.Tensor([2]),requires_grad = True)
print(x)
w = Variable(torch.Tensor([3]),requires_grad = True)
print(w)
b = Variable(torch.Tensor([4]),requires_grad = True)
print(b)
y1 = w * x + b
print(y1)
y2 = w * x + b * x
print(y2)
#计算梯度
#y1.backward()
#print(x.grad)
#print(w.grad)
#print(b.grad)
a = Variable(torch.Tensor([5]),requires_grad = True)
y2.backward(a)
print(x.grad)
print(w.grad)
print(b.grad)

#矩阵求导
c = torch.randn(3)
print(c)
c = Variable(c,requires_grad = True)
print(c)
y3 = c * 2
print(y3)
y3.backward(torch.FloatTensor([1, 0.1, 0.01]))
print(c.grad)
#Variable放在GPU上
if torch.cuda.is_available():
d = c.cuda()
print(d)
#变量转Numpy
e = Variable(torch.Tensor([4]),requires_grad = True)
f = e.detach().numpy()
print(f)
#转换为Tensor
g = torch.from_numpy(f)
print(g)
#转换为Variable
g = Variable(g,requires_grad = True)
print(g)
结果为:
七、Variable总结
1.Variable和Tensor本质上没有区别,不过Variable会被放入一个计算图中,然后进行前向传播,反向传播,自动求导。
2.Variable有三个属性,可以通过构造函数结构求取梯度得到grad值和grad_fn值
3.Variable,Tensor和Numpy互相转化很方便,类型也比较兼容