上一篇从一个简单的例子大致了解到Tornado框架的一个概述,同时也看清了web框架的本质。
接下来,我们从tornado程序的起始来分析其源码:
一、概述
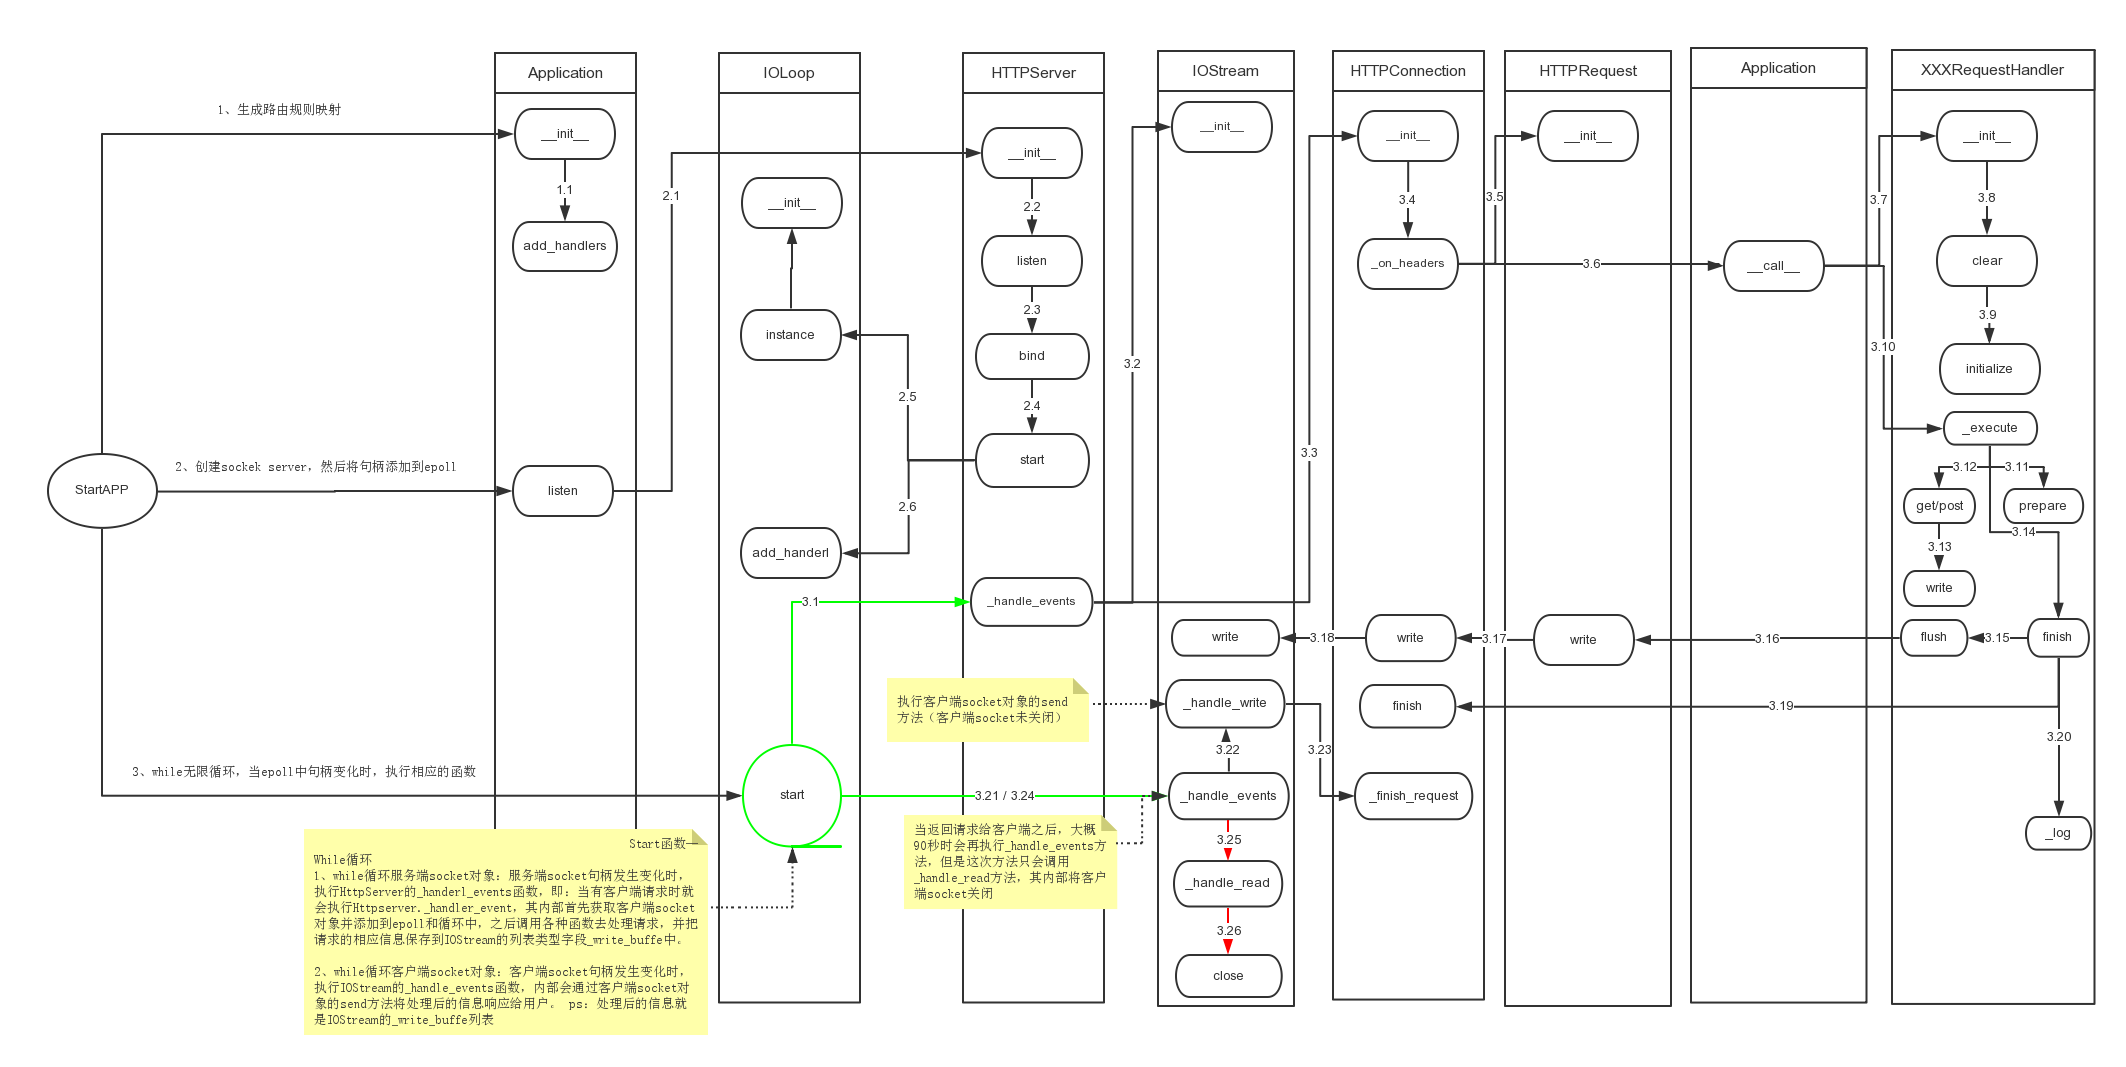
上图是摘自朋友的博客里的内容,这张图很明确的分析了tornado程序启动以及接收到客户端请求后的整个过程,对于整个过程可以分为两大部分:
- 启动程序阶段,又称为待请求阶段(上图1、2所有系列和3.0)
- 接收并处理客户端请求阶段(上图3系列)
简而言之:
1、在启动程序阶段,第一步,获取配置文件然后生成url映射(即:一个url对应一个XXRequestHandler处理方法,从而让XXRequestHandler来处理指定url发送的请求);第二步,创建服务器socket对象并添加到epoll中;第三步,创建死循环不断地去监听epoll。
2、在接收并处理请求阶段,第一步,接收客户端socket发送的请求(socket.accept);第二步,从请求中获取请求头信息,再然后根据请求头中的请求url去匹配某个XXRequestHandler;第三步,匹配成功的XXRequestHandler处理请求;第四步,将处理后的请求发送给客户端;第五步,关闭客户端socket。
二、分析
本篇的内容主要剖析【启动程序阶段】,下面我们就来一步一步的剖析整个过程,在此阶段主要是有下面重点标注的三个方法来实现。
import tornado.ioloop
import tornado.web

class MainHandler(tornado.web.RequestHandler):
    def get(self):
        self.write("Hello, world")

application = tornado.web.Application([
    (r"/index", MainHandler),
])

if __name__ == "__main__":
    application.listen(8888)
    tornado.ioloop.IOLoop.instance().start()
1、application = tornado.web.Application([(xxx,xxx)])
代码从上往下执行,到application这行时,就是执行Application类的构造函数。可以看到并传入的是一个列表类型的参数。这个列表里保存的是url规则和对应的处理类,即:当客户端的请求url可以配置这个规则时,那么该请求就交由对应的Handler方法去执行。


class Application(object):
    def __init__(self, handlers=None, default_host="", transforms=None,wsgi=False, **settings):
        #设置响应的编码和返回方式,对应的http相应头:Content-Encoding和Transfer-Encoding
        #Content-Encoding:gzip 表示对数据进行压缩,然后再返回给用户,从而减少流量的传输。
        #Transfer-Encoding:chunck 表示数据的传送方式通过一块一块的传输。
        if transforms is None:
            self.transforms = []
            if settings.get("gzip"):
                self.transforms.append(GZipContentEncoding)
            self.transforms.append(ChunkedTransferEncoding)
        else:
            self.transforms = transforms
        #将参数赋值为类的变量
        self.handlers = []
        self.named_handlers = {}
        self.default_host = default_host
        self.settings = settings
        #ui_modules和ui_methods用于在模版语言中扩展自定义输出
        #这里将tornado内置的ui_modules和ui_methods添加到类的成员变量self.ui_modules和self.ui_methods中
        self.ui_modules = {'linkify': _linkify,
                           'xsrf_form_html': _xsrf_form_html,
                           'Template': TemplateModule,
                           }
        self.ui_methods = {}
        self._wsgi = wsgi
        #获取获取用户自定义的ui_modules和ui_methods,并将他们添加到之前创建的成员变量self.ui_modules和self.ui_methods中
        self._load_ui_modules(settings.get("ui_modules", {}))
        self._load_ui_methods(settings.get("ui_methods", {}))


        #设置静态文件路径,设置方式则是通过正则表达式匹配url,让StaticFileHandler来处理匹配的url
        if self.settings.get("static_path"):
            #从settings中读取key为static_path的值,用于设置静态文件路径
            path = self.settings["static_path"]
            #获取参数中传入的handlers,如果空则设置为空列表
            handlers = list(handlers or [])
            #静态文件前缀,默认是/static/
            static_url_prefix = settings.get("static_url_prefix","/static/")
            #在参数中传入的handlers前再添加三个映射:
            #【/static/.*】            -->  StaticFileHandler
            #【/(favicon.ico)】    -->  StaticFileHandler
            #【/(robots.txt)】        -->  StaticFileHandler
            handlers = [
                (re.escape(static_url_prefix) + r"(.*)", StaticFileHandler,dict(path=path)),
                (r"/(favicon.ico)", StaticFileHandler, dict(path=path)),
                (r"/(robots.txt)", StaticFileHandler, dict(path=path)),
            ] + handlers
        #执行本类的Application的add_handlers方法
        #此时,handlers是一个列表,其中的每个元素都是一个对应关系,即:url正则表达式和处理匹配该正则的url的Handler
        if handlers: self.add_handlers(".*$", handlers)

        # Automatically reload modified modules
        #如果settings中设置了 debug 模式,那么就使用自动加载重启
        if self.settings.get("debug") and not wsgi:
            import autoreload
            autoreload.start()
class Application(object):
def add_handlers(self, host_pattern, host_handlers):
#如果主机模型最后没有结尾符,那么就为他添加一个结尾符。
if not host_pattern.endswith("$"):
host_pattern += "$"
handlers = []
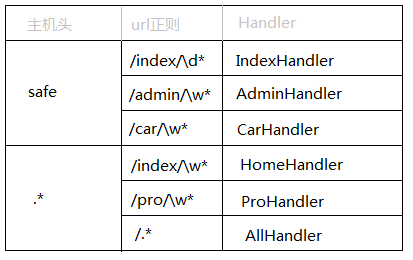
#对主机名先做一层路由映射,例如:http://www.wupeiqi.com 和 http://safe.wupeiqi.com
#即:safe对应一组url映射,www对应一组url映射,那么当请求到来时,先根据它做第一层匹配,之后再继续进入内部匹配。
#对于第一层url映射来说,由于.*会匹配所有的url,所将 .* 的永远放在handlers列表的最后,不然 .* 就会截和了...
#re.complie是编译正则表达式,以后请求来的时候只需要执行编译结果的match方法就可以去匹配了
if self.handlers and self.handlers[-1][0].pattern == '.*$':
self.handlers.insert(-1, (re.compile(host_pattern), handlers))
else:
self.handlers.append((re.compile(host_pattern), handlers))
#遍历我们设置的和构造函数中添加的【url->Handler】映射,将url和对应的Handler封装到URLSpec类中(构造函数中会对url进行编译)
#并将所有的URLSpec对象添加到handlers列表中,而handlers列表和主机名模型组成一个元祖,添加到self.Handlers列表中。
for spec in host_handlers:
if type(spec) is type(()):
assert len(spec) in (2, 3)
pattern = spec[0]
handler = spec[1]
if len(spec) == 3:
kwargs = spec[2]
else:
kwargs = {}
spec = URLSpec(pattern, handler, kwargs)
handlers.append(spec)
if spec.name:
#未使用该功能,默认spec.name = None
if spec.name in self.named_handlers:
logging.warning("Multiple handlers named %s; replacing previous value",spec.name)
self.named_handlers[spec.name] = spec
上述代码主要完成了以下功能:加载配置信息和生成url映射,并且把所有的信息封装在一个application对象中。
加载的配置信息包括:
- 编码和返回方式信息
- 静态文件路径
- ui_modules(模版语言中使用,暂时忽略)
- ui_methods(模版语言中使用,暂时忽略)
- 是否debug模式运行
以上的所有配置信息,都可以在settings中配置,然后在创建Application对象时候,传入参数即可。如:application = tornado.web.Application([(r"/index", MainHandler),],**settings)
生成url映射:
- 将url和对应的Handler添加到对应的主机前缀中,如:safe.index.com、www.auto.com
封装数据:
将配置信息和url映射关系封装到Application对象中,信息分别保存在Application对象的以下字段中:
- self.transforms,保存着编码和返回方式信息
- self.settings,保存着配置信息
- self.ui_modules,保存着ui_modules信息
- self.ui_methods,保存这ui_methods信息
- self.handlers,保存着所有的主机名对应的Handlers,每个handlers则是url正则对应的Handler
2、application.listen(8888)
第一步操作将配置和url映射等信息封装到了application对象中,而这第二步执行application对象的listen方法,该方法内部又把之前包含各种信息的application对象封装到了一个HttpServer对象中,然后继续调用HttpServer对象的liseten方法。
class Application(httputil.HTTPServerConnectionDelegate):
  # 将application的对象传入到HTTPServer中,创建socket,绑定IP和端口并添加相应的设置
    def listen(self, port, address="", **kwargs):

        # import is here rather than top level because HTTPServer
        # is not importable on appengine
        from tornado.httpserver import HTTPServer
        server = HTTPServer(self, **kwargs)
        server.listen(port, address)
        return server
from tornado.netutil import bind_sockets,add_accept_handler

class TCPServer(object):
    def listen(self, port, address=""):

        # 创建了socket 并绑定的端口和IP
        sockets = bind_sockets(port, address=address)
        self.add_sockets(sockets)
def bind_sockets(port, address=None, family=socket.AF_UNSPEC,
                 backlog=_DEFAULT_BACKLOG, flags=None, reuse_port=False):

try:
            sock = socket.socket(af, socktype, proto)
        except socket.error as e:
            if errno_from_exception(e) == errno.EAFNOSUPPORT:
                continue
            raise
sock.bind(sockaddr)
sock.listen(backlog)
bound_port = sock.getsockname()[1]
sockets.append(sock)
    return sockets
3、tornado.ioloop.IOLoop.instance().start()
class HTTPServer(object):
    def __init__(self, request_callback, no_keep_alive=False, io_loop=None,xheaders=False, ssl_options=None):
        #Application对象
        self.request_callback = request_callback
        #是否长连接
        self.no_keep_alive = no_keep_alive
        #IO循环
        self.io_loop = io_loop
        self.xheaders = xheaders
        #Http和Http
        self.ssl_options = ssl_options
        self._socket = None
        self._started = False

    def listen(self, port, address=""):
        self.bind(port, address)
        self.start(1)

    def bind(self, port, address=None, family=socket.AF_UNSPEC):
        assert not self._socket
        #创建服务端socket对象,IPV4和TCP连接
        self._socket = socket.socket(socket.AF_INET, socket.SOCK_STREAM, 0)
        flags = fcntl.fcntl(self._socket.fileno(), fcntl.F_GETFD)
        flags |= fcntl.FD_CLOEXEC
        fcntl.fcntl(self._socket.fileno(), fcntl.F_SETFD, flags)
        #配置socket对象
        self._socket.setsockopt(socket.SOL_SOCKET, socket.SO_REUSEADDR, 1)
        self._socket.setblocking(0)
        #绑定IP和端口
        self._socket.bind((address, port))
        #最大阻塞数量
        self._socket.listen(128)

    def start(self, num_processes=1):
        assert not self._started
        self._started = True
        if num_processes is None or num_processes <= 0:
            num_processes = _cpu_count()
        if num_processes > 1 and ioloop.IOLoop.initialized():
            logging.error("Cannot run in multiple processes: IOLoop instance "
                          "has already been initialized. You cannot call "
                          "IOLoop.instance() before calling start()")
            num_processes = 1
        #如果进程数大于1
        if num_processes > 1:
            logging.info("Pre-forking %d server processes", num_processes)
            for i in range(num_processes):
                if os.fork() == 0:
                    import random
                    from binascii import hexlify
                    try:
                        # If available, use the same method as
                        # random.py
                        seed = long(hexlify(os.urandom(16)), 16)
                    except NotImplementedError:
                        # Include the pid to avoid initializing two
                        # processes to the same value
                        seed(int(time.time() * 1000) ^ os.getpid())
                    random.seed(seed)
                    self.io_loop = ioloop.IOLoop.instance()
                    self.io_loop.add_handler(
                        self._socket.fileno(), self._handle_events,
                        ioloop.IOLoop.READ)
                    return
            os.waitpid(-1, 0)
        #进程数等于1,默认
        else:
            if not self.io_loop:
                #设置成员变量self.io_loop为IOLoop的实例,注:IOLoop使用methodclass完成了一个单例模式
                self.io_loop = ioloop.IOLoop.instance()
            #执行IOLoop的add_handler方法,将socket句柄、self._handle_events方法和IOLoop.READ当参数传入
            self.io_loop.add_handler(self._socket.fileno(),
                                     self._handle_events,
                                     ioloop.IOLoop.READ)
    def _handle_events(self, fd, events):
        while True:
            try:
                #====important=====#
                connection, address = self._socket.accept()
            except socket.error, e:
                if e.args[0] in (errno.EWOULDBLOCK, errno.EAGAIN):
                    return
                raise
            if self.ssl_options is not None:
                assert ssl, "Python 2.6+ and OpenSSL required for SSL"
                try:
                    #====important=====#
                    connection = ssl.wrap_socket(connection,server_side=True,do_handshake_on_connect=False,**self.ssl_options)
                except ssl.SSLError, err:
                    if err.args[0] == ssl.SSL_ERROR_EOF:
                        return connection.close()
                    else:
                        raise
                except socket.error, err:
                    if err.args[0] == errno.ECONNABORTED:
                        return connection.close()
                    else:
                        raise
            try:
                if self.ssl_options is not None:
                    stream = iostream.SSLIOStream(connection, io_loop=self.io_loop)
                else:
                    stream = iostream.IOStream(connection, io_loop=self.io_loop)
                #====important=====#
                HTTPConnection(stream, address, self.request_callback,self.no_keep_alive, self.xheaders)
            except:
                logging.error("Error in connection callback", exc_info=True)
class IOLoop(Configurable):

    # 单例模式创建IOLoop对象
    @staticmethod
    def instance():
        if not hasattr(IOLoop, "_instance"):
            with IOLoop._instance_lock:
                if not hasattr(IOLoop, "_instance"):
                    # New instance after double check
                    IOLoop._instance = IOLoop()
        return IOLoop._instance
def wrap(fn):
    '''Returns a callable object that will resore the current StackContext
    when executed.

    Use this whenever saving a callback to be executed later in a
    different execution context (either in a different thread or
    asynchronously in the same thread).
    '''
    if fn is None:
      return None
    # functools.wraps doesn't appear to work on functools.partial objects
    #@functools.wraps(fn)
    def wrapped(callback, contexts, *args, **kwargs):
        # If we're moving down the stack, _state.contexts is a prefix
        # of contexts.  For each element of contexts not in that prefix,
        # create a new StackContext object.
        # If we're moving up the stack (or to an entirely different stack),
        # _state.contexts will have elements not in contexts.  Use
        # NullContext to clear the state and then recreate from contexts.
        if (len(_state.contexts) > len(contexts) or
            any(a[1] is not b[1]
                for a, b in itertools.izip(_state.contexts, contexts))):
            # contexts have been removed or changed, so start over
            new_contexts = ([NullContext()] +
                            [cls(arg) for (cls,arg) in contexts])
        else:
            new_contexts = [cls(arg)
                            for (cls, arg) in contexts[len(_state.contexts):]]
        if len(new_contexts) > 1:
            with contextlib.nested(*new_contexts):
                callback(*args, **kwargs)
        elif new_contexts:
            with new_contexts[0]:
                callback(*args, **kwargs)
        else:
            callback(*args, **kwargs)
    if getattr(fn, 'stack_context_wrapped', False):
        return fn
    contexts = _state.contexts
    result = functools.partial(wrapped, fn, contexts)
    result.stack_context_wrapped = True
    return result
备注:stack_context.wrap其实就是对函数进行一下封装,即:函数在不同情况下上下文信息可能不同。
上述代码本质上就干了以下这么四件事:
- 把包含了各种配置信息的application对象封装到了HttpServer对象的request_callback字段中
- 创建了服务端socket对象
- 单例模式创建IOLoop对象,然后将socket对象句柄作为key,被封装了的函数_handle_events作为value,添加到IOLoop对象的_handlers字段中
- 向epoll中注册监听服务端socket对象的读可用事件
通过epoll监听服务端socket事件,一旦请求到达时,则执行3中被封装了的_handle_events函数,该函数又利用application中封装了的各种配置信息对客户端url来指定判定,然后指定对应的Handler处理该请求。
注意:使用epoll创建服务端socket
import socket, select

EOL1 = b'/n/n'
EOL2 = b'/n/r/n'
response  = b'HTTP/1.0 200 OK/r/nDate: Mon, 1 Jan 1996 01:01:01 GMT/r/n'
response += b'Content-Type: text/plain/r/nContent-Length: 13/r/n/r/n'
response += b'Hello, world!'

serversocket = socket.socket(socket.AF_INET, socket.SOCK_STREAM)
serversocket.setsockopt(socket.SOL_SOCKET, socket.SO_REUSEADDR, 1)
serversocket.bind(('0.0.0.0', 8080))
serversocket.listen(1)
serversocket.setblocking(0)

epoll = select.epoll()
epoll.register(serversocket.fileno(), select.EPOLLIN)

try:
   connections = {}; requests = {}; responses = {}
   while True:
      events = epoll.poll(1)
      for fileno, event in events:
         if fileno == serversocket.fileno():
            connection, address = serversocket.accept()
            connection.setblocking(0)
            epoll.register(connection.fileno(), select.EPOLLIN)
            connections[connection.fileno()] = connection
            requests[connection.fileno()] = b''
            responses[connection.fileno()] = response
         elif event & select.EPOLLIN:
            requests[fileno] += connections[fileno].recv(1024)
            if EOL1 in requests[fileno] or EOL2 in requests[fileno]:
               epoll.modify(fileno, select.EPOLLOUT)
               print('-'*40 + '/n' + requests[fileno].decode()[:-2])
         elif event & select.EPOLLOUT:
            byteswritten = connections[fileno].send(responses[fileno])
            responses[fileno] = responses[fileno][byteswritten:]
            if len(responses[fileno]) == 0:
               epoll.modify(fileno, 0)
               connections[fileno].shutdown(socket.SHUT_RDWR)
         elif event & select.EPOLLHUP:
            epoll.unregister(fileno)
            connections[fileno].close()
            del connections[fileno]
finally:
   epoll.unregister(serversocket.fileno())
   epoll.close()
   serversocket.close()
上一步中创建了socket对象并使得socket对象和epoll建立了关系,该步骤则就来执行epoll的epoll方法去轮询已经注册在epoll对象中的socket句柄,当有读可用信息时,则触发一些操作什么的....
class IOLoop(object):
    def add_handler(self, fd, handler, events):
        #HttpServer的Start方法中会调用该方法
        self._handlers[fd] = stack_context.wrap(handler)
        self._impl.register(fd, events | self.ERROR)

    def start(self):
        while True:
            poll_timeout = 0.2
            try:
                #epoll中轮询
                event_pairs = self._impl.poll(poll_timeout)
            except Exception, e:
                #省略其他
            #如果有读可用信息,则把该socket对象句柄和Event Code序列添加到self._events中
            self._events.update(event_pairs)
            #遍历self._events,处理每个请求
            while self._events:
                fd, events = self._events.popitem()
                try:
                    #以socket为句柄为key,取出self._handlers中的stack_context.wrap(handler),并执行
                    #stack_context.wrap(handler)包装了HTTPServer类的_handle_events函数的一个函数
                    #是在上一步中执行add_handler方法时候,添加到self._handlers中的数据。
                    self._handlers[fd](fd, events)
                except:
                    #省略其他
对于上述代码,执行start方法后,程序就进入“死循环”,也就是会一直不停的轮询的去检查是否有请求到来,如果有请求到达,则执行封装了HttpServer类的_handle_events方法和相关上下文的stack_context.wrap(handler)(其实就是执行HttpServer类的_handle_events方法)
本篇介绍了“待请求阶段”的所作所为,简要来说其实就是三件事:其一、把setting中的各种配置以及url和Handler之间的映射关系封装到来application对象中(application对象又被封装到了HttpServer对象的request_callback字段中);其二、结合epoll创建服务端socket;其三、当请求到达时交由HttpServer类的_handle_events方法处理请求,即:处理请求的入口。