一、前置条件:
安装工具如下:
- JDK
- MySql服务器
- SonarQube
- SonarScanner
从官网下载安装包进行安装,具体安装步骤略
二、配置
MySql配置:
打开SQL,创建sonar数据库,sonar用户,并赋予sonar用户sonar数据库权限;
mysql> CREATE DATABASE sonar CHARACTER SET utf8 COLLATE utf8_general_ci;
mysql> CREATE USER 'sonar' IDENTIFIED BY 'sonar';
mysql> GRANT ALL ON sonar.* TO 'sonar'@'%' IDENTIFIED BY 'sonar';
mysql> GRANT ALL ON sonar.* TO 'sonar'@'localhost' IDENTIFIED BY 'sonar';
mysql> FLUSH PRIVILEGES;
Ps:mysql8.0以上版本配置如下
CREATE DATABASE sonar CHARACTER SET utf8 COLLATE utf8_general_ci;
delete from mysql.user where user='sonar'; //如果存在sonar用户,先删除再创建,无sonar用户,略过此步
CREATE USER 'sonar'@'localhost' IDENTIFIED BY 'sonar';
CREATE USER 'sonar'@'%' IDENTIFIED BY 'sonar';
GRANT ALL ON sonar.* TO 'sonar'@'%';
GRANT ALL PRIVILEGES ON sonar.* TO 'sonar'@'localhost';
flush privileges;
Sonar、SonarScanner环境变量配置:
添加SONAR_HOME、SONAR_RUNNER_HOME环境变量,并将SONAR_RUNNER_HOME加入PATH
修改sonar配置文件sonar.properties


# User credentials.
# Permissions to create tables, indices and triggers must be granted to JDBC user.
# The schema must be created first.
sonar.jdbc.username=sonar
sonar.jdbc.password=sonar

#----- Embedded Database (default)
# H2 embedded database server listening port, defaults to 9092
#sonar.embeddedDatabase.port=9092
#----- MySQL 5.6 or greater
# Only InnoDB storage engine is supported (not myISAM).
# Only the bundled driver is supported. It can not be changed.
sonar.jdbc.url=jdbc:mysql://localhost:3306/sonar?useUnicode=true&characterEncoding=utf8&rewriteBatchedStatements=true&useConfigs=maxPerformance&useSSL=true
#Optional properties
sonar.jdbc.driverClassName=com.mysql.jdbc.Driver
修改SonarScanne配置文件sonar-scanner.properties
#----- Default SonarQube server
sonar.host.url=http://localhost:9000

#----- Default source code encoding
sonar.sourceEncoding=UTF-8

#----- Global database settings (not used for SonarQube 5.2+)
sonar.jdbc.username=sonar
sonar.jdbc.password=sonar

#----- PostgreSQL
#sonar.jdbc.url=jdbc:postgresql://localhost/sonar

#----- MySQL
sonar.jdbc.url=jdbc:mysql://localhost:3306/sonar?useUnicode=true&characterEncoding=utf8

#----- Oracle
#sonar.jdbc.url=jdbc:oracle:thin:@localhost/XE

#----- Microsoft SQLServer
#sonar.jdbc.url=jdbc:jtds:sqlserver://localhost/sonar;SelectMethod=Cursor
#----Security(when 'sonar.forceAuthentication'is set to 'true')
sonar.login=admin
sonar.password=admin
三、启动
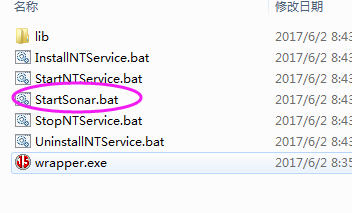
进入sonar的bin目录找到sonar启动文件,启动sonar服务
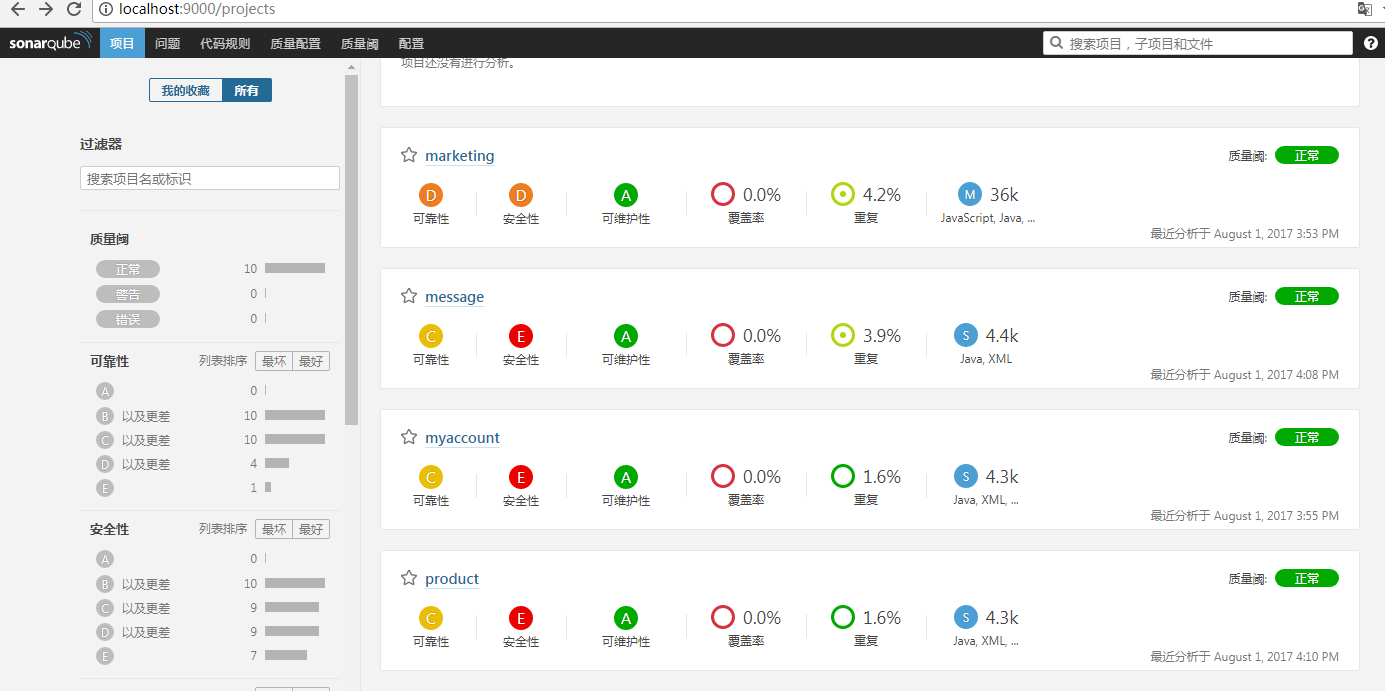
输入localhost:9000访问,页面展示如图

三、使用
通过maven进行集成
修改maven配置文件setting.xml
<?xml version="1.0" encoding="UTF-8"?>

<settings xmlns="http://maven.apache.org/SETTINGS/1.0.0"
          xmlns:xsi="http://www.w3.org/2001/XMLSchema-instance"
          xsi:schemaLocation="http://maven.apache.org/SETTINGS/1.0.0 http://maven.apache.org/xsd/settings-1.0.0.xsd">

<localRepository>D:/repository</localRepository>

  <pluginGroups>

    <pluginGroup>org.sonarsource.scanner.maven</pluginGroup>
  </pluginGroups>


  <proxies>

  </proxies>
  <servers>

      <id>siteServer</id>
      <privateKey>/path/to/private/key</privateKey>
      <passphrase>optional; leave empty if not used.</passphrase>
    </server>
    -->
    <server>
      <id>releases</id>
      <username>admin</username>
      <password>admin123</password>
    </server>

  </servers>

  <mirrors>
     <mirror>
        <id>nexus</id>
        <name>nexus Mirror,3rd party,chenshu repository</name>
        <url>http://192.168.102.92:8081/nexus/content/groups/public/</url>
        <mirrorOf>central</mirrorOf>
   </mirror>
  </mirrors>

  <profiles>
  <profile>
        <id>jdk1.8</id>
        <activation>
            <activeByDefault>true</activeByDefault>
            <jdk>1.8</jdk>
        </activation>
        <properties>
            <maven.compiler.source>1.8</maven.compiler.source>
            <maven.compiler.target>1.8</maven.compiler.target>
            <maven.compiler.compilerVersion>1.8</maven.compiler.compilerVersion>
        </properties>
        <repositories>
            <repository>
                <id>snapshots</id>
                <url>http://192.168.102.92:8081/nexus/content/repositories/snapshots/</url>
                <releases>
                    <enabled>true</enabled>
                </releases>
                <snapshots>
                    <enabled>true</enabled>
                      <updatePolicy>always</updatePolicy>
                </snapshots>
            </repository>
        </repositories>
    </profile>
    <profile>
           <id>sonar</id>
           <activation>
               <activeByDefault>true</activeByDefault>
           </activation>
           <properties>
               <!-- Optional URL to server. Default value is http://localhost:9000 -->
               <sonar.jdbc.url>jdbc:mysql://localhost:3306/sonar</sonar.jdbc.url>
               <sonar.jdbc.driver>com.mysql.jdbc.Driver</sonar.jdbc.driver>
               <sonar.jdbc.username>sonar</sonar.jdbc.username>
               <sonar.jdbc.password>sonar</sonar.jdbc.password>
               <sonar.host.url>http://localhost:9000</sonar.host.url>
           </properties>
       </profile>
  </profiles>
    <activeProfiles>
            <activeProfile>sonar</activeProfile>
    </activeProfiles>

</settings>
然后把配置文件copy至C:UsersAdministrator.m2目录
进入项目pom文件所在目录,地址栏输入cmd,进入命令窗口
执行mvn sonar:sonar
执行成功会把分析结果保存至数据库,通过浏览sonar地址访问