

最重要的三个注解,@Configuration,@EnableAutoConfiguration,@ComponentScan
#@EnableAutoConfiguration注解
selectImports#getAutoConfigurationEntry#getCandidateConfigurations#SpringFactoriesLoader.loadFactoryNames

所以,@EnableAutoConfiguration自动配置的魔法骑士就变成了:从classpath中搜寻所有的META-INF/spring.factories配置文件,并将其中org.springframework.boot.autoconfigure.EnableutoConfiguration对应的配置项通过反射(Java Refletion)实例化为对应的标注了@Configuration的JavaConfig形式的IoC容器配置类,然后汇总为一个并加载到IoC容器。
- - 启动流程
public SpringApplication(ResourceLoader resourceLoader, Class<?>... primarySources) {
    this.resourceLoader = resourceLoader;//此时为null,可以通过此参数指定类加载器
    Assert.notNull(primarySources, "PrimarySources must not be null");
    this.primarySources = new LinkedHashSet<>(Arrays.asList(primarySources));
    //推断应用类型,reactive,servlet
    this.webApplicationType = WebApplicationType.deduceFromClasspath();
    //初始化classpath下 META-INF/spring.factories中配置的ApplicationContextInitializer
    setInitializers((Collection) getSpringFactoriesInstances(ApplicationContextInitializer.class));
    //初始化classpath下所有配置的 ApplicationListener(META-INF/spring.factories)
    setListeners((Collection) getSpringFactoriesInstances(ApplicationListener.class));
    //根据调用栈,推断出 main 方法的类名
    this.mainApplicationClass = deduceMainApplicationClass();
}


private <T> Collection<T> getSpringFactoriesInstances(Class<T> type) {
    return getSpringFactoriesInstances(type, new Class<?>[] {});
}
//通过getClassLoader 从META-INF/spring.factories获取指定的Spring的工厂实例
private <T> Collection<T> getSpringFactoriesInstances(Class<T> type, Class<?>[] parameterTypes, Object... args) {
    //默认为Thread.currentThread().getContextClassLoader()/ClassLoader.getSystemClassLoader()
    ClassLoader classLoader = getClassLoader();
    //读取 key 为 type.getName() 的 value
    Set<String> names = new LinkedHashSet<>(SpringFactoriesLoader.loadFactoryNames(type, classLoader));
    //反射创建Bean
    List<T> instances = createSpringFactoriesInstances(type, parameterTypes, classLoader, args, names);
    AnnotationAwareOrderComparator.sort(instances);
    return instances;
}


private <T> List<T> createSpringFactoriesInstances(Class<T> type,Class<?>[] parameterTypes, ClassLoader                                 classLoader, Object[] args,Set<String> names) {
    List<T> instances = new ArrayList<>(names.size());
    for (String name : names) {
        try {
            //装载class文件到内存
            Class<?> instanceClass = ClassUtils.forName(name, classLoader);
            Assert.isAssignable(type, instanceClass);
            Constructor<?> constructor = instanceClass.getDeclaredConstructor(parameterTypes);
            //通过反射创建实例
            T instance = (T) BeanUtils.instantiateClass(constructor, args);
            instances.add(instance);
        } catch (Throwable ex) {
            throw new IllegalArgumentException(
                "Cannot instantiate " + type + " : " + name, ex);
        }
    }
    return instances;
}
- run方法
public ConfigurableApplicationContext run(String... args) {
    StopWatch stopWatch = new StopWatch(); //记录运行时间
    stopWatch.start();
    ConfigurableApplicationContext context = null;
    Collection<SpringBootExceptionReporter> exceptionReporters = new ArrayList<>();
    configureHeadlessProperty();//java.awt.headless是J2SE的一种模式用于在缺少显示屏、键盘或者鼠标时的系统配置,很多监控工具如jconsole 需要将该值设置为true,系统变量默认为true

    //从META-INF/spring.factories中获取监听器  SpringApplicationRunListeners
    SpringApplicationRunListeners listeners = getRunListeners(args);
    listeners.starting();//遍历回调SpringApplicationRunListeners的starting方法
    try {
        //封装命令行参数
        ApplicationArguments applicationArguments = new DefaultApplicationArguments(args);
        //构造应用上下文环境,完成后回调SpringApplicationRunListeners的environmentPrepared方法
        ConfigurableEnvironment environment = prepareEnvironment(listeners, applicationArguments);
        configureIgnoreBeanInfo(environment);//处理需要忽略的Bean
        Banner printedBanner = printBanner(environment);//打印banner
        //根据是否web环境创建相应的IOC容器
        context = createApplicationContext();
        //实例化SpringBootExceptionReporter,用来支持报告关于启动的错误
        exceptionReporters = getSpringFactoriesInstances(SpringBootExceptionReporter.class,
                          new Class[] { ConfigurableApplicationContext.class}, context);

        //准备上下文环境,将environment保持到IOC容器中
        //执行applyInitializers,遍历回调ApplicationContextInitializer的initialize方法
        //遍历回调SpringApplicationRunListeners的contextPrepared方法
        //遍历回调SpringApplicationRunListeners的contextLoaded方法
        prepareContext(context, environment, listeners, applicationArguments, printedBanner);
        refreshContext(context);//刷新应用上下文,组件扫描、创建、加载

        //从IOC容器获取所有的ApplicationRunner(先调用)和CommandLinedRunner进行回调
        afterRefresh(context, applicationArguments);
        stopWatch.stop();//时间记录停止
        if (this.logStartupInfo) {
            new StartupInfoLogger(this.mainApplicationClass).logStarted(getApplicationLog(), stopWatch);
        }
        listeners.started(context);//发布容器启动完成事件
        callRunners(context, applicationArguments);
    }catch (Throwable ex) {
        handleRunFailure(context, ex, exceptionReporters, listeners);
        throw new IllegalStateException(ex);
    }
    try {
        listeners.running(context);
    }catch (Throwable ex) {
        handleRunFailure(context, ex, exceptionReporters, null);
        throw new IllegalStateException(ex);
    }
    return context;
}
看下mybbtis的starter自动配置
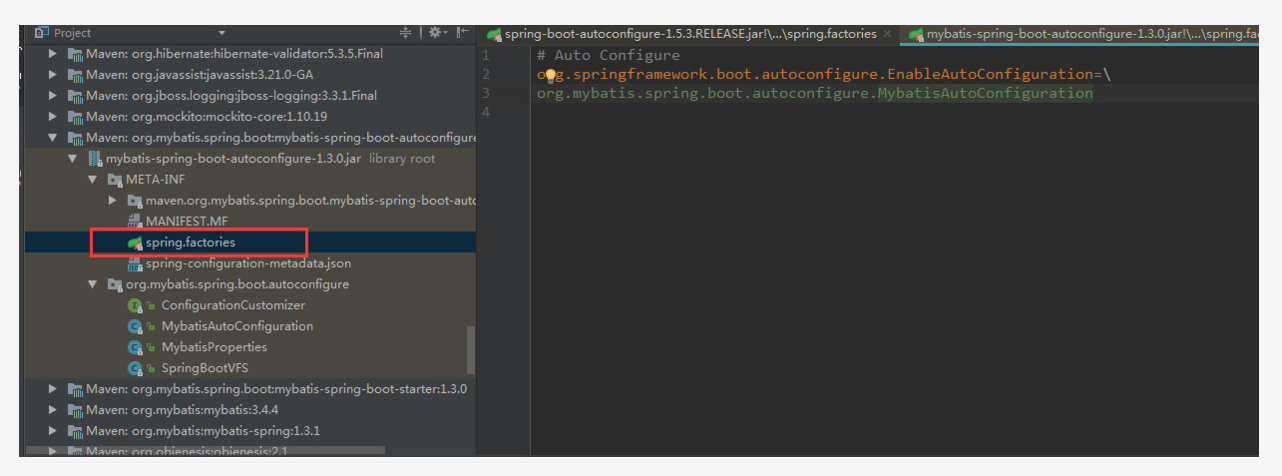
进入org.mybatis.spring.boot.autoconfigure.MybatisAutoConfiguration中,主要看一下类头:
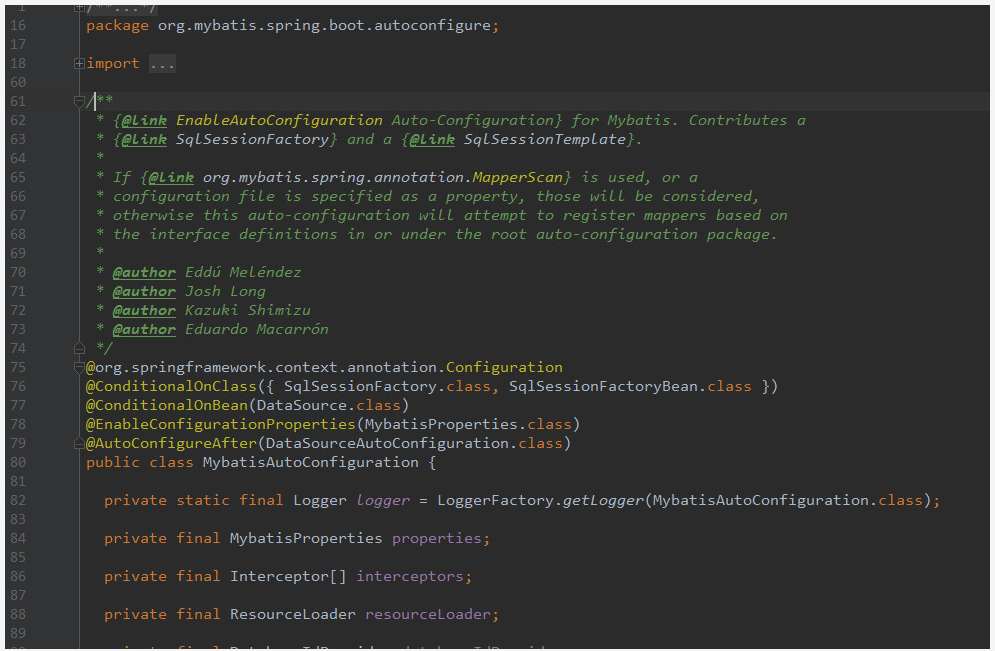
发现Spring的@Configuration,俨然是一个通过注解标注的springBean,继续向下看,
-
@ConditionalOnClass({ SqlSessionFactory.class, SqlSessionFactoryBean.class}):当存在SqlSessionFactory.class,SqlSessionFactoryBean.class这两个类时才解析MybatisAutoConfiguration配置类,否则不解析这一个配置类,make sence,我们需要mybatis为我们返回会话对象,就必须有会话工厂相关类。 -
@CondtionalOnBean(DataSource.class):只有处理已经被声明为bean的dataSource。 -
@ConditionalOnMissingBean(MapperFactoryBean.class)这个注解的意思是如果容器中不存在name指定的bean则创建bean注入,否则不执行(该类源码较长,篇幅限制不全粘贴)
以上配置可以保证sqlSessionFactory、sqlSessionTemplate、dataSource等mybatis所需的组件均可被自动配置,@Configuration注解已经提供了Spring的上下文环境,所以以上组件的配置方式与Spring启动时通过mybatis.xml文件进行配置起到一个效果。
通过分析我们可以发现,只要一个基于SpringBoot项目的类路径下存在SqlSessionFactory.class, SqlSessionFactoryBean.class,并且容器中已经注册了dataSourceBean,就可以触发自动化配置,意思说我们只要在maven的项目中加入了mybatis所需要的若干依赖,就可以触发自动配置,但引入mybatis原生依赖的话,每集成一个功能都要去修改其自动化配置类,那就得不到开箱即用的效果了。
所以Spring-boot为我们提供了统一的starter可以直接配置好相关的类,触发自动配置所需的依赖(mybatis)如下:
- 自定义starter
实现一个 starter 有四个要素:
- starter 命名 ;
- 自动配置类,用来初始化相关的 bean ;
- 指明自动配置类的配置文件 spring.factories ;
- 自定义属性实体类,声明 starter 的应用配置属性 ;
1. 给 starter 起个名字
也就是我们使用它的时候在 pom 中引用的 artifactId。命名有有规则的,官方规定:
官方的 starter 的命名格式为 spring-boot-starter-{name} ,例如上面提到的 spring-boot-starter-actuator。
非官方的 starter 的命名格式为 {name}-spring-boot-starter,我们把自定的 starter 命名为 kite-spring-boot-starter,命名在 pom 文件里。
<groupId>kite.springcloud</groupId>
<artifactId>kite-spring-boot-starter</artifactId>
<packaging>jar</packaging>
<version>1.0-SNAPSHOT</version>
2. 引入自动配置包及其它相关依赖包
实现 starter 主要依赖自动配置注解,所以要在 pom 中引入自动配置相关的两个 jar 包
<dependency>
    <groupId>org.springframework.boot</groupId>
    <artifactId>spring-boot-configuration-processor</artifactId>
</dependency>
<dependency>
    <groupId>org.springframework.boot</groupId>
    <artifactId>spring-boot-autoconfigure</artifactId>
</dependency>
除此之外,依赖的其他包当然也要引进来。
3. 创建 spring.factories 文件
在 resource/META-INF 目录下创建名称为 spring.factories 的文件,为什么在这里?当 Spring Boot 启动的时候,会在 classpath 下寻找所有名称为 spring.factories 的文件,然后运行里面的配置指定的自动加载类,将指定类(一个或多个)中的相关 bean 初始化。
例如本例中的配置信息是这样的:
org.springframework.boot.autoconfigure.EnableAutoConfiguration=
  kite.springcloud.boot.starter.example.KiteAutoConfigure
等号前面是固定的写法,后面就是我们自定义的自动配置类了,如果有多个的话,用英文逗号分隔开。
4. 编写自动配置类
自动配置类是用来初始化 starter 中的相关 bean 的。可以说是实现 starter 最核心的功能。
@Configuration
@ConditionalOnClass(KiteService.class)
@EnableConfigurationProperties(KiteProperties.class)
@Slf4j
public class KiteAutoConfigure {

    @Autowired
    private KiteProperties kiteProperties;

    @Bean
    @ConditionalOnMissingBean(KiteService.class)
    @ConditionalOnProperty(prefix = "kite.example",value = "enabled", havingValue = "true")
    KiteService kiteService(){
        return new KiteService(kiteProperties);
    }
}
代码非常简单,放眼望去,最多的就是各种注解。
@Configuration 这个不用解释,表示这是个自动配置类,我们平时做项目时也会用到,一般是用作读取配置文件的时候。
@ConditionalOnClass(KiteService.class) :
只有在 classpath 中找到 KiteService 类的情况下,才会解析此自动配置类,否则不解析。
@EnableConfigurationProperties(KiteProperties.class):
启用配置类。
@Bean:实例化一个 bean 。
@ConditionalOnMissingBean(KiteService.class):
与 @Bean 配合使用,只有在当前上下文中不存在某个 bean 的情况下才会执行所注解的代码块,也就是当前上下文还没有 KiteService 的 bean 实例的情况下,才会执行 kiteService() 方法,从而实例化一个 bean 实例出来。
@ConditionalOnProperty:
当应用配置文件中有相关的配置才会执行其所注解的代码块。
这个类的整体含义就是: 当 classpath 中存在 KiteService 类时解析此配置类,什么情况下才会在 classpath 中存在呢,就是项目引用了相关的 jar 包。并且在上下文中没有 KiteService 的 bean 实例的情况下,new 一个实例出来,并且将应用配置中的相关配置值传入。
5. 实现属性配置类
@Data
@ConfigurationProperties("kite.example")
public class KiteProperties {

    private String host;

    private int port;
}
配置类很简单,只有两个属性,一个 host ,一个 port 。配置参数以 kite.example 作为前缀。稍后我们在使用这个 starter 的时候会看到如何声明配置属性。
6. 实现相关功能类
也就是前面一直提到的 KiteService,其实严格来讲,这个业务功能类不应该放在 starter 中,应该放在单独的 jar 包里,但是此处 demo 非常简单,也就在这里写了。
@Slf4j
public class KiteService {

    private String host;

    private int port;

    public KiteService(KiteProperties kiteProperties){
        this.host = kiteProperties.getHost();
        this.port = kiteProperties.getPort();
    }

    public void print(){
        log.info(this.host + ":" +this.port);
    }
}
一个构造函数和一个 print 方法。
7. 打包
通过 maven 命令将这个 starter 安装到本地 maven 仓库
mvn install也可以通过 mvn package deploy 发布到你的私服
或者发布到中央仓库。
上面已经完成了 starter 的开发,并安装到了本地仓库,然后就是在我们的项目中使用它了。
1. 创建项目,在 pom 中引用
<dependency>
    <groupId>kite.springcloud</groupId>
    <artifactId>kite-spring-boot-starter</artifactId>
    <version>1.0-SNAPSHOT</version>
</dependency>
2. 应用配置项
创建 application.yml ,配置如下:
server:
  port: 3801
kite:
  example:
    enabled: true  # 开启才生效
    host: 127.0.0.1
    port: 3801
3. 调用 KiteService 的服务方法
@RestController
@RequestMapping(value = "use")
public class UseController {

    @Autowired
    private KiteService kiteService;

    @GetMapping(value = "print")
    public void print(){
        kiteService.print();
    }
}

3.1让starter生效
@Target({ElementType.TYPE})
@Retention(RetentionPolicy.RUNTIME)
@Documented
@Import({KiteAutoConfigure.class})
public @interface EnableKite {
}

- 启动类上加@EnableKite注解
4. 启动服务,并访问接口
访问 /use/print 接口,会发现在日志中打印出了配置信息
2019-05-24 16:45:04.234 INFO 36687 --- [nio-3801-exec-1] k.s.boot.starter.example.KiteService : 127.0.0.1:3801顺着上面的思路,我们来看一下官方的 starters 的结构。先来把 Spring Boot 从 github 上 clone 一份下来。用 idea 打开,可以看到项目结构如下
最后再贴个图

参考:https://zhuanlan.zhihu.com/p/67484886
https://mp.weixin.qq.com/s/yam6bcYB0Tpjo7b_nh77zQ
https://mp.weixin.qq.com/s/TsuQQE2lLrErITUIeikhsQ