写在前面:
好久不写了,实在是不想写,坚持果然是一件不容易的事情。
我喜欢玩,我更爱学习,然而喜欢是放肆,爱是克制,哈哈。每天上班有些忙就不想动,只想在床上翻滚或者鏖战召唤师峡谷。上班闲着时想了想,一是不方便写,二是忘了很多了---------经过铺垫可以明确的说了:前面都是借口。
白天自己承诺自己晚上要写,虽然没人知道,自己答应自己的事也不能不做啊,晚上复习了一个多小时,现在是实践的时候了:Come on baby,不逼自己一把,你永远不知道自己有多优秀。So anyway,鸡汤香否,哈哈哈,就喜欢转折转的措手不及,这是一种乐观的生活态度。历千劫万险,纵使魂飞魄散,我灵识依在,战百世轮回,纵使六道无常,我依然相信你可以在下面点个赞。
一、RabbitMQ队列
1.RabbitMQ介绍
MQ全称为Message Queue, 消息队列(MQ)是一种应用程序对应用程序的通信方法。应用程序通过读写出入队列的消息(针对应用程序的数据)来通信,而无需专用连接来链接它们。
消息传递指的是程序之间通过在消息中发送数据进行通信,而不是通过直接调用彼此来通信。
MQ是消费-生产者模型的一个典型的代表,一端往消息队列中不断写入消息,而另一端则可以读取或者订阅队列中的消息。
2.RabbitMQ安装(Windows)
http://www.rabbitmq.com/install-windows.html
安装python rabbitMQ module
#windows在cmd里执行即可
#(如果不能找不到命令是Python没有设置好环境变量,手动找pip命令)
pip install pika
or
easy_install pika
or
源码
https://pypi.python.org/pypi/pika
3.实现最简单的队列通信
send端
import pika
connection = pika.BlockingConnection(pika.ConnectionParameters('localhost'))
channel = connection.channel()
#声明queue
channel.queue_declare(queue='hello')
#n RabbitMQ a message can never be sent directly to the queue, it always needs to go through an exchange.
channel.basic_publish(exchange='',
                      routing_key='hello', #routing_key 就是queue名
                      body='Hello World!',
                     )
print(" [x] Sent 'Hello World!'")
connection.close()
receive端
import pika
connection = pika.BlockingConnection(pika.ConnectionParameters(
               'localhost'))
channel = connection.channel()
#You may ask why we declare the queue again ‒ we have already declared it in our previous code.
#We could avoid that if we were sure that the queue already exists. For example if send.py program
#was run before. But we're not yet sure which program to run first. In such cases it's a good
#practice to repeat declaring the queue in both programs.
channel.queue_declare(queue='hello')
def callback(ch, method, properties, body):
    print(ch,method,properties)
#ch <pika.adapters.blocking_connection.BlockingChannel object at 0x00000000029A5C50> 管理内存对象地址
#method <Basic.Deliver(['consumer_tag=ctag1.aef832e45baf4745af94ab1b2b75ff22', 'delivery_tag=1', 'exchange=', 'redelivered=False', 'routing_key=hello'])> 具体信息
#properties:<BasicProperties>

    print(" --> Received %r" % body)
    ch.basic_ack(delivery_tag=method.delivery_tag)
channel.basic_qos(prefetch_count=1)
channel.basic_consume(callback,
                      queue='hello'
                      no_ack=True)
print(' [*] Waiting for messages. To exit press CTRL+C')
channel.start_consuming()
4.RabbitMQ消息分发轮询
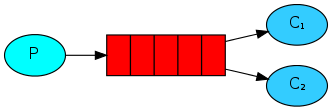
在这种模式下,RabbitMQ会默认把p发的消息依次分发给各个消费者(c),跟负载均衡差不多


import pika

connection = pika.BlockingConnection(pika.ConnectionParameters(
               'localhost'))
channel = connection.channel()

#声明queue
channel.queue_declare(queue='task_queue')

#n RabbitMQ a message can never be sent directly to the queue, it always needs to go through an exchange.
import sys

message = ' '.join(sys.argv[1:]) or "Hello World!"
channel.basic_publish(exchange='',
                      routing_key='task_queue',
                      body=message,
                      properties=pika.BasicProperties(
                      delivery_mode = 2, # make message persistent
                      ))
print(" [x] Sent %r" % message)
connection.close()
import pika,time

connection = pika.BlockingConnection(pika.ConnectionParameters(
               'localhost'))
channel = connection.channel()


def callback(ch, method, properties, body):
    print(" [x] Received %r" % body)
    time.sleep(body.count(b'.'))
    print(" [x] Done")
    ch.basic_ack(delivery_tag = method.delivery_tag)


channel.basic_consume(callback,
                      queue='task_queue',
                      )

print(' [*] Waiting for messages. To exit press CTRL+C')
channel.start_consuming()
此时,先启动消息生产者,然后再分别启动3个消费者,通过生产者多发送几条消息,你会发现,这几条消息会被依次分配到各个消费者身上
加上时间参数,延迟程序的执行时间,这时候如果消息没有执行完关闭就不会再有了,接收端里的no_ack=True去掉之后并在callback函数里面添加ch.basic_ack(delivery_tag = method.delivery_tag,就可以实现消息不被处理完不能在队列里清除。
import pika,time
connection = pika.BlockingConnection(pika.ConnectionParameters(
               'localhost'))
channel = connection.channel()
channel.queue_declare(queue='hello')
def callback(ch, method, properties, body):
    print(ch,method,properties)
#ch <pika.adapters.blocking_connection.BlockingChannel object at 0x00000000029A5C50> 管理内存对象地址
#method <Basic.Deliver(['consumer_tag=ctag1.aef832e45baf4745af94ab1b2b75ff22', 'delivery_tag=1', 'exchange=', 'redelivered=False', 'routing_key=hello'])> 具体信息
#properties:<BasicProperties>
    time.sleep(20)
    print(" --> Received %r" % body)
    ch.basic_ack(delivery_tag=method.delivery_tag)
channel.basic_qos(prefetch_count=1)
channel.basic_consume(callback,#如果收到消息,就调用callback函数处理消息
                      queue='hello')#,
                      #no_ack=True)
print(' [*] Waiting for messages. To exit press CTRL+C')
channel.start_consuming()
5.RabbitMQ消息持久化
查看消息队列:

如果消息在传输过程中rabbitMQ服务器宕机了,会发现之前的消息队列就不存在了,这时我们就要用到队列持久化,会让队列不随着服务器宕机而消失,会永久的保存下去消息,发送接收端都需要设置消息持久化,不持久化的接收端接收持久化的发送端会错误。
发送端:
import pika

connection = pika.BlockingConnection(pika.ConnectionParameters('localhost'))

channel = connection.channel()      #声明一个管道(管道内发消息)

channel.queue_declare(queue='hi',durable=True)    #队列持久化

channel.basic_publish(exchange='',
                      routing_key='hi',  #routing_key 就是queue名
                      body='Hello World!',
                      properties=pika.BasicProperties(
                          delivery_mode = 2     #消息持久化
                      )
)
print("Sent 'Hello,World!'")
connection.close()      #关闭
接收端:
import pika,time

connection = pika.BlockingConnection(pika.ConnectionParameters('localhost'))

channel = connection.channel()

channel.queue_declare(queue='hi',durable=True)

def callback(ch,method,properties,body):
    print("->>",ch,method,properties)
    time.sleep(15)              # 模拟处理时间
    print("Received %r"%body)
    ch.basic_ack(delivery_tag=method.delivery_tag)

channel.basic_consume(callback,     #如果收到消息,就调用callback函数处理消息
                      queue="hi",
                      )
print(' [*] Waiting for messages. To exit press CTRL+C')
channel.start_consuming()   #开始收消息
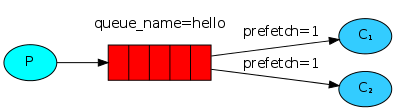
6.RabbitMQ消息公平分发
如果Rabbit只管按顺序把消息发到各个消费者身上,不考虑消费者负载的话,很可能出现,一个机器配置不高的消费者那里堆积了很多消息处理不完,同时配置高的消费者却一直很轻松。为解决此问题,可以在各个消费者端,配置perfetch=1,意思就是告诉RabbitMQ在我这个消费者当前消息还没处理完的时候就不要再给我发新消息了。
带消息持久化+公平分发的完整代码
生产者端:
import pika
import sys

connection = pika.BlockingConnection(pika.ConnectionParameters(
        host='localhost'))
channel = connection.channel()

channel.queue_declare(queue='task_queue', durable=True)

message = ' '.join(sys.argv[1:]) or "Hello World!"
channel.basic_publish(exchange='',
                      routing_key='task_queue',
                      body=message,
                      properties=pika.BasicProperties(
                         delivery_mode = 2, # make message persistent
                      ))
print(" [x] Sent %r" % message)
connection.close()
消费者端:
import pika
import time

connection = pika.BlockingConnection(pika.ConnectionParameters(
        host='localhost'))
channel = connection.channel()

channel.queue_declare(queue='task_queue', durable=True)
print(' [*] Waiting for messages. To exit press CTRL+C')

def callback(ch, method, properties, body):
    print(" [x] Received %r" % body)
    time.sleep(body.count(b'.'))
    print(" [x] Done")
    ch.basic_ack(delivery_tag = method.delivery_tag)

channel.basic_qos(prefetch_count=1)
channel.basic_consume(callback,
                      queue='task_queue')

channel.start_consuming()
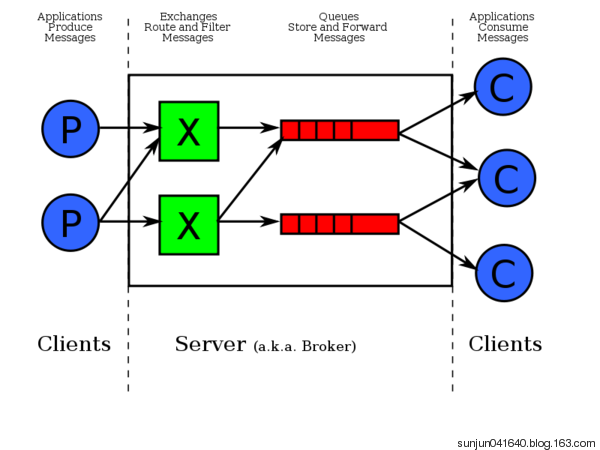
7.PublishSubscribe(消息发布订阅)
之前的例子都基本都是1对1的消息发送和接收,即消息只能发送到指定的queue里,但有些时候你想让你的消息被所有的Queue收到,类似广播的效果,这时候就要用到exchange了,
An exchange is a very simple thing. On one side it receives messages from producers and the other side it pushes them to queues. The exchange must know exactly what to do with a message it receives. Should it be appended to a particular queue? Should it be appended to many queues? Or should it get discarded. The rules for that are defined by the exchange type.
Exchange在定义的时候是有类型的,以决定到底是哪些Queue符合条件,可以接收消息
fanout: 所有bind到此exchange的queue都可以接收消息
direct: 通过routingKey和exchange决定的那个唯一的queue可以接收消息
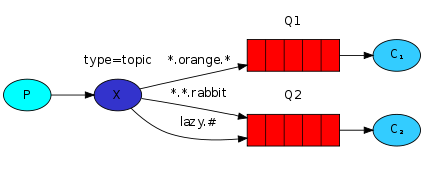
topic:所有符合routingKey(此时可以是一个表达式)的routingKey所bind的queue可以接收消息
表达式符号说明:#代表一个或多个字符,*代表任何字符
例:#.a会匹配a.a,aa.a,aaa.a等
*.a会匹配a.a,b.a,c.a等
注:使用RoutingKey为#,Exchange Type为topic的时候相当于使用fanout
headers: 通过headers 来决定把消息发给哪些queue

消息publisher
import pika
import sys

connection = pika.BlockingConnection(pika.ConnectionParameters(
        host='localhost'))
channel = connection.channel()

channel.exchange_declare(exchange='logs',
                         type='fanout')

message = ' '.join(sys.argv[1:]) or "info: Hello World!"
channel.basic_publish(exchange='logs',
                      routing_key='',
                      body=message)
print(" [x] Sent %r" % message)
connection.close()
消息publisher
import pika

connection = pika.BlockingConnection(pika.ConnectionParameters(
        host='localhost'))
channel = connection.channel()

channel.exchange_declare(exchange='logs',
                         type='fanout')

result = channel.queue_declare(exclusive=True) #不指定queue名字,rabbit会随机分配一个名字,exclusive=True会在使用此queue的消费者断开后,自动将queue删除
queue_name = result.method.queue

channel.queue_bind(exchange='logs',
                   queue=queue_name)

print(' [*] Waiting for logs. To exit press CTRL+C')

def callback(ch, method, properties, body):
    print(" [x] %r" % body)

channel.basic_consume(callback,
                      queue=queue_name,
                      no_ack=True)

channel.start_consuming()
8.有选择的接收消息(exchange type=direct)
RabbitMQ还支持根据关键字发送,即:队列绑定关键字,发送者将数据根据关键字发送到消息exchange,exchange根据 关键字 判定应该将数据发送至指定队列。

publisher
import pika
import sys

connection = pika.BlockingConnection(pika.ConnectionParameters(
        host='localhost'))
channel = connection.channel()

channel.exchange_declare(exchange='direct_logs',
                         type='direct')

severity = sys.argv[1] if len(sys.argv) > 1 else 'info'
message = ' '.join(sys.argv[2:]) or 'Hello World!'
channel.basic_publish(exchange='direct_logs',
                      routing_key=severity,
                      body=message)
print(" [x] Sent %r:%r" % (severity, message))
connection.close()
subscriber
import pika
import sys

connection = pika.BlockingConnection(pika.ConnectionParameters(
        host='localhost'))
channel = connection.channel()

channel.exchange_declare(exchange='direct_logs',
                         type='direct')

result = channel.queue_declare(exclusive=True)
queue_name = result.method.queue

severities = sys.argv[1:]
if not severities:
    sys.stderr.write("Usage: %s [info] [warning] [error]
" % sys.argv[0])
    sys.exit(1)

for severity in severities:
    channel.queue_bind(exchange='direct_logs',
                       queue=queue_name,
                       routing_key=severity)

print(' [*] Waiting for logs. To exit press CTRL+C')

def callback(ch, method, properties, body):
    print(" [x] %r:%r" % (method.routing_key, body))

channel.basic_consume(callback,
                      queue=queue_name,
                      no_ack=True)

channel.start_consuming()
9.更细致的消息过滤
import pika
import sys

connection = pika.BlockingConnection(pika.ConnectionParameters(
        host='localhost'))
channel = connection.channel()

channel.exchange_declare(exchange='topic_logs',
                         type='topic')

routing_key = sys.argv[1] if len(sys.argv) > 1 else 'anonymous.info'
message = ' '.join(sys.argv[2:]) or 'Hello World!'
channel.basic_publish(exchange='topic_logs',
                      routing_key=routing_key,
                      body=message)
print(" [x] Sent %r:%r" % (routing_key, message))
connection.close()
import pika
import sys

connection = pika.BlockingConnection(pika.ConnectionParameters(
        host='localhost'))
channel = connection.channel()

channel.exchange_declare(exchange='topic_logs',
                         type='topic')

result = channel.queue_declare(exclusive=True)
queue_name = result.method.queue

binding_keys = sys.argv[1:]
if not binding_keys:
    sys.stderr.write("Usage: %s [binding_key]...
" % sys.argv[0])
    sys.exit(1)

for binding_key in binding_keys:
    channel.queue_bind(exchange='topic_logs',
                       queue=queue_name,
                       routing_key=binding_key)

print(' [*] Waiting for logs. To exit press CTRL+C')

def callback(ch, method, properties, body):
    print(" [x] %r:%r" % (method.routing_key, body))

channel.basic_consume(callback,
                      queue=queue_name,
                      no_ack=True)

channel.start_consuming()
10.Remote procedure call (RPC)
二、Redis(linux)
1.Redis的基本安装和使用
wget http://download.redis.io/releases/redis-3.0.6.tar.gz
tar xzf redis-3.0.6.tar.gz
cd redis-3.0.6
make
2.启动
#启动服务端
src/redis-server
#启动客户端
src/redis-cli
redis> set foo bar
OK
redis> get foo
"bar"
3.Python操作Redis
sudo pip install redis
or
sudo easy_install redis
or
源码安装
详见:https://github.com/WoLpH/redis-py
API使用
redis-py 的API的使用可以分类为:
- 连接方式
- 连接池
- 操作
- String 操作
- Hash 操作
- List 操作
- Set 操作
- Sort Set 操作
- 管道
- 发布订阅
1、操作模式
redis-py提供两个类Redis和StrictRedis用于实现Redis的命令,StrictRedis用于实现大部分官方的命令,并使用官方的语法和命令,Redis是StrictRedis的子类,用于向后兼容旧版本的redis-py。
import redis

r = redis.Redis(host='127.0.0.1', port=6379)
r.set('foo', 'Bar')
print r.get('foo')
2、连接池
redis-py使用connection pool来管理对一个redis server的所有连接,避免每次建立、释放连接的开销。默认,每个Redis实例都会维护一个自己的连接池。可以直接建立一个连接池,然后作为参数Redis,这样就可以实现多个Redis实例共享一个连接池。
import redis

pool = redis.ConnectionPool(host='127.0.0.1', port=6379)

r = redis.Redis(connection_pool=pool)
r.set('foo', 'Bar')
print r.get('foo')
3、操作
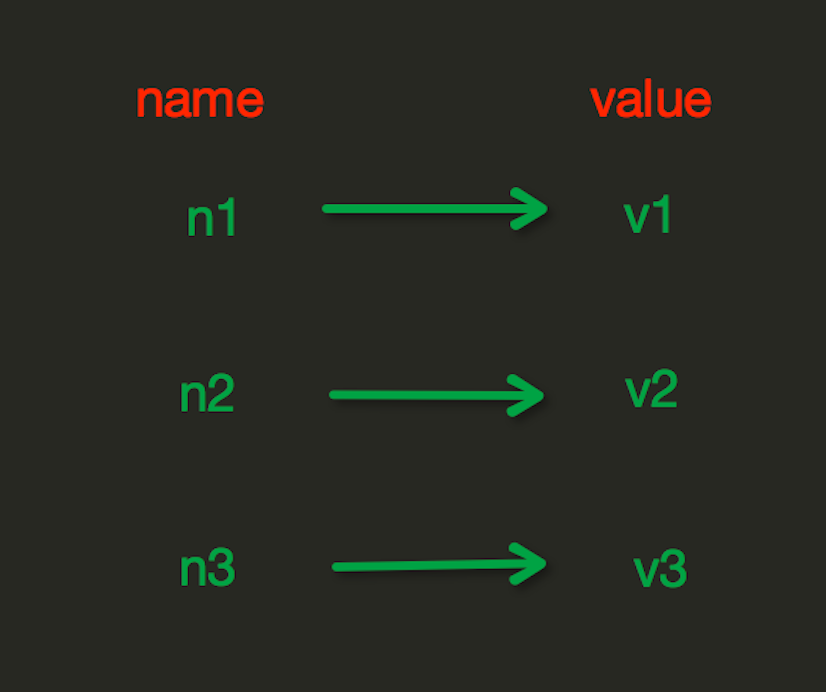
String操作,redis中的String在在内存中按照一个name对应一个value来存储。如图:
http://www.cnblogs.com/wupeiqi/articles/5132791.html