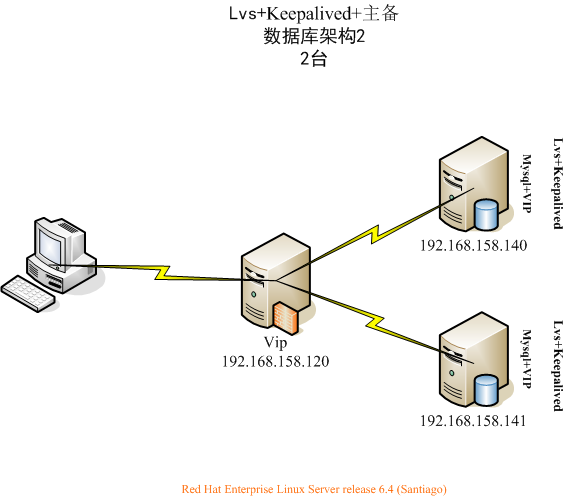
架构图
安装步骤省略。
158.140 keepalived.conf
! Configuration File for keepalived

global_defs {                           #全局标识模块
   notification_email {         #定义邮件通知
     test@163.com                       #目标邮箱
   }
   notification_email_from test@163.com #发送邮箱
   smtp_server 127.0.0.1        #发送邮箱的smtp服务器
   smtp_connect_timeout 30      #smtp服务器连接超时时间
   router_id LVS_2
}

vrrp_instance VI_1 {
    state BACKUP                        #本实例启动状态:MASTER/BACKUP
    interface eth0                      #监控的网络接口
    virtual_router_id 51        #vrrp实例(同一个组主备服务器设置一样)
    priority 100                        #优先级高的为master,不能超过255。(BACKUP可设置为50)
    advert_int 1                        #均衡器检测间隔1秒(服务器设置都一样)
#    nopreempt
    authentication {            #验证类型及密码(服务器设置都一样)
        auth_type PASS          #认证方式,PASS或AH
        auth_pass 123456        #认证密码
    }
    virtual_ipaddress {         #虚拟ip地址virtual_ipaddress,可以定义多个
        192.168.158.120
    }
}

virtual_server 192.168.158.120 3306 {   #定义虚拟服务器,与上面的virtual_server一样
    delay_loop 6                        #健康检查时间间隔,6秒
    lb_algo wrr                         #负载均衡调度算法:rr|wrr|lc|wlc|sh|dh|lblc
    lb_kind DR                          #负载均衡转发规则:NAT|DR|TUN
    nat_mask 255.255.255.0
    persistence_timeout 50      #回话保持时间50秒,动态服务建议开启
    protocol TCP                        #转发协议protocol,一般有tcp和udp两种

        #后端真实服务器,有几台就设置几个
    real_server 192.168.158.140 3306 {
        weight 1                        #权重越大负载分越大,0表示失效
        #notify_down /etc/keepalived/mysqlcheck/mysql.sh
        SSL_GET {                       #健康检查方式:HTTP_GET|SSL_GET|TCP_CHECK|SMTP_CHECK|MISC_CHECK
            connect_timeout 3
            nb_get_retry 3
            delay_before_retry 3
        }
    }
}
158.141 keepalived.conf
! Configuration File for keepalived

global_defs {                           #全局标识模块
   notification_email {         #定义邮件通知
     test@163.com                       #目标邮箱
   }
   notification_email_from test@163.com #发送邮箱
   smtp_server 127.0.0.1        #发送邮箱的smtp服务器
   smtp_connect_timeout 30      #smtp服务器连接超时时间
   router_id LVS_1
}

vrrp_instance VI_1 {
    state BACKUP                        #本实例启动状态:MASTER/BACKUP
    interface eth0                      #监控的网络接口
    virtual_router_id 51        #vrrp实例(同一个组主备服务器设置一样)
    priority 99                 #优先级高的为master,不能超过255。(BACKUP可设置为50)
    advert_int 1                        #均衡器检测间隔1秒(服务器设置都一样
    authentication {            #验证类型及密码(服务器设置都一样)
        auth_type PASS          #认证方式,PASS或AH
        auth_pass 123456        #认证密码
    }
    virtual_ipaddress {         #虚拟ip地址virtual_ipaddress,可以定义多个
        192.168.158.120
    }
}

virtual_server 192.168.158.120 3306 {   #定义虚拟服务器,与上面的virtual_server一样
    delay_loop 6                        #健康检查时间间隔,6秒
    lb_algo wrr                         #负载均衡调度算法:rr|wrr|lc|wlc|sh|dh|lblc
    lb_kind DR                          #负载均衡转发规则:NAT|DR|TUN
    nat_mask 255.255.255.0
    persistence_timeout 50      #回话保持时间50秒,动态服务建议开启
    protocol TCP                        #转发协议protocol,一般有tcp和udp两种

        #后端真实服务器,有几台就设置几个
    real_server 192.168.158.141 3306 {
        weight 1                        #权重越大负载分越大,0表示失效
        #notify_down /etc/keepalived/mysqlcheck/mysql.sh
        SSL_GET {                       #健康检查方式:HTTP_GET|SSL_GET|TCP_CHECK|SMTP_CHECK|MISC_CHECK
            connect_timeout 3
            nb_get_retry 3
            delay_before_retry 3
        }
    }
}
VIP
ifconfig eth0:0 192.168.158.120 netmask 255.255.255.0 up

ifconfig eth0:0

ifconfig eth0:0 up

ip a s dev eth0
check.sh
#!/bin/bash
while [ true ]; do
/bin/sleep 1
sh mysql_status.sh
done
mysql_status.sh
#!/bin/bash
#/usr/bin/nmap localhost | grep 3306
#lsof -i:3306
MYSQLPORT=`netstat -tlnp | grep "3306"|awk -F[:" "]+ '{print $4}'`

function checkMysqlStatus(){
    /usr/bin/mysql -uroot -plizhenghua --connect_timeout=5 -e "show databases;" &>/dev/null 2>&1
    if [ $? -ne 0 ]
    then
        restartMysqlService
        if [ "$MYSQLPORT" == "3306" ];then
            echo "mysql restart successful......"
        else
            echo "mysql restart failure......"
            echo "Server: $MYSQLIP mysql is down, please try to restart mysql by manual!" > /var/log/mysqlerr
            #mail -s "WARN! server: $MYSQLIP  mysql is down" admin@yourdomain.com < /var/log/mysqlerr
        fi
    else
        echo "mysql is running..."
    fi
}

function restartMysqlService(){
#    echo "测试重启mysql服务!"
    echo "清除mysql残余!"
    chengkill mysqld
    echo "关闭keepalived!!"
    chengkill keepalived
    echo "清除成功!"
}

if [ "$MYSQLPORT" == "3306" ]
then
    checkMysqlStatus
else
    restartMysqlService
fi
主主
CHANGE MASTER TO MASTER_HOST='192.168.158.140',MASTER_USER='sync',MASTER_PASSWORD='sync',MASTER_LOG_FILE='mysql-bin.000125',MASTER_LOG_POS=286514181;

start slave;

show slave status G
漂移
守护进程模式启动check.sh

check会自动运行mysql_status.sh脚本, mysql_status脚本的功能是

检测当前mysql, 当mysql挂掉的时候, 一起干掉keepalived,

这样, 即可实现漂移。