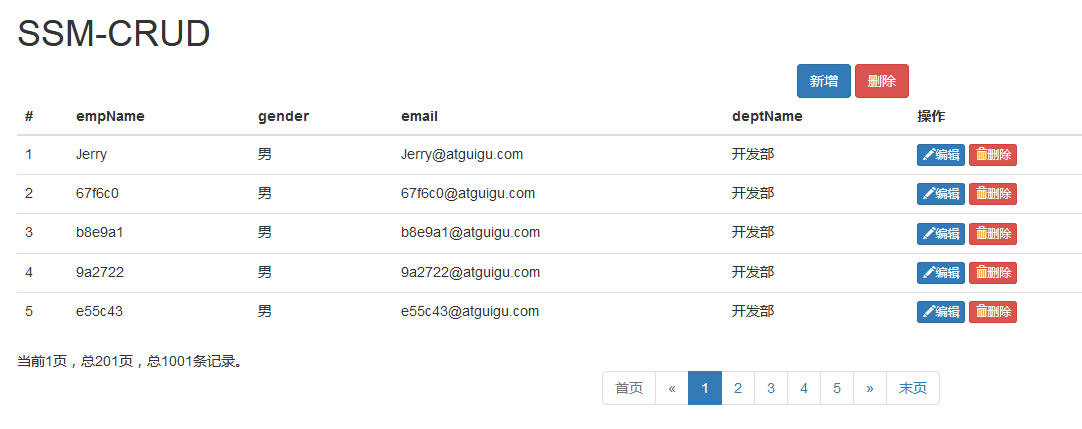
分页查询(ajax异步查询):
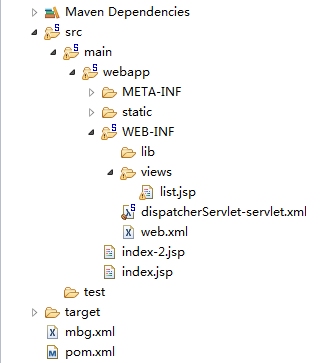
工程目录结构:
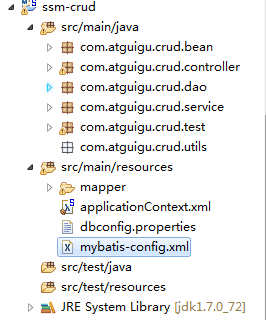
基于maven构建工程:
一、准配配置文件
1.创建pom.xml


<project xmlns="http://maven.apache.org/POM/4.0.0"
 xmlns:xsi="http://www.w3.org/2001/XMLSchema-instance"
xsi:schemaLocation="http://maven.apache.org/POM/4.0.0
http://maven.apache.org/xsd/maven-4.0.0.xsd">
  <modelVersion>4.0.0</modelVersion>
  <groupId>com.atguigu</groupId>
  <artifactId>ssm-crud</artifactId>
  <version>0.0.1-SNAPSHOT</version>
  <packaging>war</packaging>

  <!-- 引入项目依赖的jar包 -->
  <!-- springmvc、spring -->
  <dependencies>
      <!-- https://mvnrepository.com/artifact/org.springframework/spring-webmvc -->
    <dependency>
        <groupId>org.springframework</groupId>
        <artifactId>spring-webmvc</artifactId>
        <version>4.3.7.RELEASE</version>
    </dependency>

    <!-- spring-jdbc 事務控制-->
        <!-- https://mvnrepository.com/artifact/org.springframework/spring-jdbc -->
        <dependency>
            <groupId>org.springframework</groupId>
            <artifactId>spring-jdbc</artifactId>
            <version>4.3.7.RELEASE</version>
        </dependency>

    <!-- spring-test 单元测试模块 -->
    <!-- https://mvnrepository.com/artifact/org.springframework/spring-test -->
    <dependency>
        <groupId>org.springframework</groupId>
        <artifactId>spring-test</artifactId>
        <version>4.3.7.RELEASE</version>
        <scope>test</scope>
    </dependency>


    <!-- spring 面向切面編程 -->
        <!-- https://mvnrepository.com/artifact/org.springframework/spring-aspects -->
        <dependency>
            <groupId>org.springframework</groupId>
            <artifactId>spring-aspects</artifactId>
            <version>4.3.7.RELEASE</version>
        </dependency>

    <!-- mybatis -->
        <!-- https://mvnrepository.com/artifact/org.mybatis/mybatis -->
        <dependency>
            <groupId>org.mybatis</groupId>
            <artifactId>mybatis</artifactId>
            <version>3.4.2</version>
        </dependency>

    <!-- mybatis 整合spring的适配包 -->
    <!-- https://mvnrepository.com/artifact/org.mybatis/mybatis-spring -->
        <dependency>
            <groupId>org.mybatis</groupId>
            <artifactId>mybatis-spring</artifactId>
            <version>1.3.1</version>
        </dependency>

    <!-- 数据库连接池、驱动 -->
    <!-- https://mvnrepository.com/artifact/c3p0/c3p0 -->
        <dependency>
            <groupId>c3p0</groupId>
            <artifactId>c3p0</artifactId>
            <version>0.9.1.2</version>
        </dependency>

            <!-- https://mvnrepository.com/artifact/mysql/mysql-connector-java -->
        <dependency>
            <groupId>mysql</groupId>
            <artifactId>mysql-connector-java</artifactId>
            <version>5.1.41</version>
        </dependency>

    <!-- jstl,servlet-api,junit -->
        <!-- https://mvnrepository.com/artifact/jstl/jstl -->
        <dependency>
            <groupId>jstl</groupId>
            <artifactId>jstl</artifactId>
            <version>1.2</version>
        </dependency>
            <!-- https://mvnrepository.com/artifact/javax.servlet/servlet-api -->
        <!-- <dependency>
            <groupId>javax.servlet</groupId>
            <artifactId>servlet-api</artifactId>
            <version>2.5</version>
            <scope>provided</scope>
        </dependency> -->
        <!-- https://mvnrepository.com/artifact/javax.servlet/javax.servlet-api -->
        <dependency>
            <groupId>javax.servlet</groupId>
            <artifactId>javax.servlet-api</artifactId>
            <version>3.0.1</version>
            <scope>provided</scope>
        </dependency>


                <!-- https://mvnrepository.com/artifact/junit/junit -->
        <dependency>
            <groupId>junit</groupId>
            <artifactId>junit</artifactId>
            <version>4.12</version>
            <scope>test</scope>
        </dependency>

    <!-- 引入pageHelper插件 -->
    <dependency>
        <groupId>com.github.pagehelper</groupId>
        <artifactId>pagehelper</artifactId>
        <version>5.0.0</version>
    </dependency>

    <!-- 返回json字符串的支持 -->
    <!-- https://mvnrepository.com/artifact/com.fasterxml.jackson.core/jackson-databind -->
    <dependency>
        <groupId>com.fasterxml.jackson.core</groupId>
        <artifactId>jackson-databind</artifactId>
        <version>2.8.8</version>
    </dependency>


    <!-- MBG(mybatis generator) -->
    <!-- https://mvnrepository.com/artifact/org.mybatis.generator/mybatis-generator-core -->
    <dependency>
        <groupId>org.mybatis.generator</groupId>
        <artifactId>mybatis-generator-core</artifactId>
        <version>1.3.5</version>
    </dependency>


    <!-- <packaging>war</packaging>报错时,添加下面依赖 -->
      <dependency>
      <groupId>org.apache.maven.plugins</groupId>
      <artifactId>maven-resources-plugin</artifactId>
      <version>2.5</version> </dependency>

  </dependencies>
</project>
2.创建web.xml
<?xml version="1.0" encoding="UTF-8"?>
<web-app xmlns:xsi="http://www.w3.org/2001/XMLSchema-instance"
xmlns="http://java.sun.com/xml/ns/javaee"
xsi:schemaLocation="http://java.sun.com/xml/ns/javaee
http://java.sun.com/xml/ns/javaee/web-app_2_5.xsd"
id="WebApp_ID" version="2.5">

    <!-- 1、启动spring容器 -->
    <!-- needed for ContextLoaderListener -->
    <context-param>
        <param-name>contextConfigLocation</param-name>
        <param-value>classpath:applicationContext.xml</param-value>
    </context-param>

    <!-- Bootstraps the root web application context before servlet initialization -->
    <listener>
        <listener-class>org.springframework.web.context.ContextLoaderListener</listener-class>
    </listener>

    <!-- 2、springmvc的前端控制器 拦截所有请求 -->
    <!-- The front controller of this Spring Web application, responsible for handling all application requests -->
    <servlet>
        <servlet-name>dispatcherServlet</servlet-name>
        <servlet-class>org.springframework.web.servlet.DispatcherServlet</servlet-class>
        <load-on-startup>1</load-on-startup>
    </servlet>

    <!-- Map all requests to the DispatcherServlet for handling -->
    <servlet-mapping>
        <servlet-name>dispatcherServlet</servlet-name>
        <url-pattern>/</url-pattern>
    </servlet-mapping>

    <!-- 字符编码 过滤器  一定要放在所有过滤器之前的-->
    <filter>
        <filter-name>CharacterEncodingFilter</filter-name>
        <filter-class>org.springframework.web.filter.CharacterEncodingFilter</filter-class>
        <init-param>
            <param-name>encoding</param-name>
            <param-value>utf-8</param-value>
        </init-param>
        <init-param>
            <param-name>forceRequestEncoding</param-name>
            <param-value>true</param-value>
        </init-param>
        <init-param>
            <param-name>forceResponseEncoding</param-name>
            <param-value>true</param-value>
        </init-param>
    </filter>
    <filter-mapping>
        <filter-name>CharacterEncodingFilter</filter-name>
        <url-pattern>/*</url-pattern>
    </filter-mapping>

    <!-- 4、使用Rest风格的URI 将页面普通的post请求转为指定的delete或者put请求-->
    <filter>
        <filter-name>HiddenHttpMethodFilter</filter-name>
        <filter-class>org.springframework.web.filter.HiddenHttpMethodFilter</filter-class>
    </filter>
    <filter-mapping>
        <filter-name>HiddenHttpMethodFilter</filter-name>
        <url-pattern>/*</url-pattern>
    </filter-mapping>


  <display-name>ssm-crud</display-name>
  <welcome-file-list>
    <welcome-file>index.html</welcome-file>
    <welcome-file>index.htm</welcome-file>
    <welcome-file>index.jsp</welcome-file>
    <welcome-file>default.html</welcome-file>
    <welcome-file>default.htm</welcome-file>
    <welcome-file>default.jsp</welcome-file>
  </welcome-file-list>
</web-app>
3.创建(springmvc)dispatcherServlet-servlet.xml
<?xml version="1.0" encoding="UTF-8"?>
<beans xmlns="http://www.springframework.org/schema/beans"
    xmlns:xsi="http://www.w3.org/2001/XMLSchema-instance"
    xmlns:context="http://www.springframework.org/schema/context"
    xmlns:mvc="http://www.springframework.org/schema/mvc"
    xsi:schemaLocation="http://www.springframework.org/schema/mvc http://www.springframework.org/schema/mvc/spring-mvc-4.3.xsd
        http://www.springframework.org/schema/beans http://www.springframework.org/schema/beans/spring-beans.xsd
        http://www.springframework.org/schema/context http://www.springframework.org/schema/context/spring-context-4.3.xsd">

    <!-- springmvc配置文件,包含网站跳转逻辑的控制,配置 -->
    <context:component-scan base-package="com.atguigu" use-default-filters="false">
        <!-- 只扫描控制器 -->
        <context:include-filter type="annotation" expression="org.springframework.stereotype.Controller"/>
    </context:component-scan>

    <!-- 配置视图解析器,方便页面返回 -->
    <bean class="org.springframework.web.servlet.view.InternalResourceViewResolver">
        <property name="prefix" value="/WEB-INF/views/"></property>
        <property name="suffix" value=".jsp"></property>
    </bean>

    <!-- 两个标准配置 -->
    <!-- 将springMVC不能处理的请求交给Tomcat -->
    <mvc:default-servlet-handler/>
    <!-- 能支持springmvc更高级的一些功能 ,如:JSR303校验,快捷的ajax.. 映射动态请求-->
    <mvc:annotation-driven/>
</beans>
4.创建(mybatis全局配置文件) mybatis-config.xml
<?xml version="1.0" encoding="UTF-8" ?>
<!DOCTYPE configuration
  PUBLIC "-//mybatis.org//DTD Config 3.0//EN"
  "http://mybatis.org/dtd/mybatis-3-config.dtd">
 <configuration>
     <settings>
         <setting name="mapUnderscoreToCamelCase" value="true"/>
     </settings>
     <!-- 类型别名 配置-->
     <typeAliases>
         <package name="com.atguigu.crud.bean"/>
     </typeAliases>

     <!-- 注册pagehelper插件 -->
     <plugins>
         <plugin interceptor="com.github.pagehelper.PageInterceptor">
             <!-- 分页参数合理化 -->
             <property name="reasonable" value="true"/>
         </plugin>
     </plugins>
 </configuration>
5.创建(spring)applicationContext.xml
<?xml version="1.0" encoding="UTF-8"?>
<beans xmlns="http://www.springframework.org/schema/beans"
    xmlns:xsi="http://www.w3.org/2001/XMLSchema-instance"
    xmlns:context="http://www.springframework.org/schema/context"
    xmlns:aop="http://www.springframework.org/schema/aop"
    xmlns:tx="http://www.springframework.org/schema/tx"
    xsi:schemaLocation="http://www.springframework.org/schema/aop http://www.springframework.org/schema/aop/spring-aop-4.3.xsd
        http://www.springframework.org/schema/beans http://www.springframework.org/schema/beans/spring-beans.xsd
        http://www.springframework.org/schema/tx http://www.springframework.org/schema/tx/spring-tx-4.3.xsd
        http://www.springframework.org/schema/context http://www.springframework.org/schema/context/spring-context-4.3.xsd">


<!-- spring配置文件的核心点(数据源,与mybatis的整合,事务控制) -->

    <!--================ 扫描业务逻辑组件====================================-->
    <context:component-scan base-package="com.atguigu">
        <context:exclude-filter type="annotation" expression="org.springframework.stereotype.Controller"/>
    </context:component-scan>


    <!-- spring配置文件,这里主要配置和业务逻辑有关的 -->


    <!-- =====================数据源================================ -->

    <!-- 引入配置的dbconfig.properties -->
    <context:property-placeholder location="classpath:dbconfig.properties"/>

    <bean id="pooledDataSource" class="com.mchange.v2.c3p0.ComboPooledDataSource">
        <property name="jdbcUrl" value="${jdbc.jdbcUrl}"></property>
        <property name="driverClass" value="${jdbc.driverClass}"></property>
        <property name="user" value="${jdbc.user}"></property>
        <property name="password" value="${jdbc.password}"></property>
    </bean>

    <!--===================== 配置和mybatis的整合 ========================-->
    <bean id="sqlSessionFactory" class="org.mybatis.spring.SqlSessionFactoryBean">
        <!-- 指定mybatis全局配置文件的位置 -->
        <property name="configLocation" value="classpath:mybatis-config.xml"></property>
        <property name="dataSource" ref="pooledDataSource"></property>
        <!-- 指定mybatis,mapper文件的位置 -->
        <property name="mapperLocations" value="classpath:mapper/*.xml"></property>
    </bean>

    <!-- 配置扫描器,将mybatis接口的实现加入到ioc容器中 -->
    <bean class="org.mybatis.spring.mapper.MapperScannerConfigurer">
        <!-- 扫描所有dao接口的实现,加入到ioc容器中 -->
        <property name="basePackage" value="com.atguigu.crud.dao"></property>
    </bean>

    <!-- 配置一个可以执行批量的sqlSession -->
    <bean id="sqlSession" class="org.mybatis.spring.SqlSessionTemplate">
        <constructor-arg name="sqlSessionFactory" ref="sqlSessionFactory"></constructor-arg>
        <constructor-arg name="executorType" value="BATCH"></constructor-arg>
    </bean>


    <!--======================= 事务控制的配置========================== -->
    <bean id="transactionManager" class="org.springframework.jdbc.datasource.DataSourceTransactionManager">
        <!-- 控制住数据源 -->
        <property name="dataSource" ref="pooledDataSource"></property>
    </bean>
    <!-- 开启基于注解的事务,使用xml形式配置事务(一般比较重要的使用配置式) -->
    <aop:config>
        <!-- 切入点表达式,哪些要切入 -->
        <aop:pointcut expression="execution(* com.atguigu.crud.service..*(..))" id="txPoint" />
        <!-- 配置事务增强  -->
        <aop:advisor advice-ref="txAdvice" pointcut-ref="txPoint"/>
    </aop:config>

    <!-- 配置事务增强,事务如何切入 -->
    <tx:advice id="txAdvice" transaction-manager="transactionManager">
        <tx:attributes>
            <!-- 所有方法都是事务方法 -->
            <tx:method name="*"/>
            <!-- 以get开始的所有方法 -->
            <tx:method name="get*" read-only="true"/>
        </tx:attributes>
    </tx:advice>


</beans>
6.创建dbconfig.properties
jdbc.jdbcUrl=jdbc:mysql://localhost:3306/ssm_crud
jdbc.driverClass=com.mysql.jdbc.Driver
jdbc.user=root
jdbc.password=123
二、在src/main/java下创建项目包(controller、service、dao、bean、test、utils)
三、通过mybatis generator逆向工程通过数据库中的表生成对应的bean、dao、mapper
四、编写:

package com.atguigu.crud.controller;

import java.util.List;

import org.springframework.beans.factory.annotation.Autowired;
import org.springframework.stereotype.Controller;
import org.springframework.ui.Model;
import org.springframework.web.bind.annotation.RequestMapping;
import org.springframework.web.bind.annotation.RequestParam;
import org.springframework.web.bind.annotation.ResponseBody;

import com.atguigu.crud.bean.Employee;
import com.atguigu.crud.bean.Msg;
import com.atguigu.crud.service.EmployeeService;
import com.github.pagehelper.PageHelper;
import com.github.pagehelper.PageInfo;
/**
 * 处理员工CRUD请求
 * @author Administrator
 *
 */
@Controller
public class EmployeeController {

    @Autowired
    EmployeeService employeeService;

    /**
     * @ResponseBody要正常工作,需导入jackson包
     * @ResponseBody可以自动将返回的对象转换为json字符串
     */
    @RequestMapping("/emps")
    @ResponseBody
    public Msg    getEmpsWithJson(@RequestParam(value="pn",defaultValue="1") Integer pn){
        PageHelper.startPage(pn, 5);
        //startPage后面紧跟的这个查询就是一个分页查询
        List<Employee> emps = employeeService.getAll();
        //使用pageInfo包装查询后的结果,只需要将pageInfo交给页面就行了。
        //pageInfo里面封装了分页的详细信息,包括有我们查询出来的数据,传入连续显示的页数5
        PageInfo page = new PageInfo(emps,5);

        return Msg.success().add("pageInfo", page);

    }

    /**
     * 查询员工数据(分页查询)
     * @return
     *
     * Integer pn表示传入的所要查询的哪一页,若没有指定查哪一页,则为默认值 1
     */
    //@RequestMapping("/emps")
    public String getEmps(@RequestParam(value="pn",defaultValue="1") Integer pn,
            Model model){
        //这不是一个分页查询;
        //List<Employee> emps = employeeService.getAll();
        //return "list";

        //使用PageHelper分页插件
        //在查询之前只需要调用,传入页码,以及每页的大小
        PageHelper.startPage(pn, 5);
        //startPage后面紧跟的这个查询就是一个分页查询
        List<Employee> emps = employeeService.getAll();
        //使用pageInfo包装查询后的结果,只需要将pageInfo交给页面就行了。
        //pageInfo里面封装了分页的详细信息,包括有我们查询出来的数据,传入连续显示的页数5
        PageInfo page = new PageInfo(emps,5);
        //在Model里面传的数据都会带给页面
        model.addAttribute("pageInfo", page);

        return "list";
    }
}
package com.atguigu.crud.service;

import java.util.List;

import org.springframework.beans.factory.annotation.Autowired;
import org.springframework.stereotype.Service;

import com.atguigu.crud.bean.Employee;
import com.atguigu.crud.dao.EmployeeMapper;

@Service
public class EmployeeService {

    @Autowired
    EmployeeMapper employeeMapper;

    /**
     * 查询所有员工
     * @return
     */
    public List<Employee> getAll() {
        return employeeMapper.selectByExampleWithDept(null);
    }


}
五、测试(模拟前端测试数据)
package com.atguigu.crud.test;

import java.util.UUID;

import org.apache.ibatis.session.SqlSession;
import org.junit.Test;
import org.junit.runner.RunWith;
import org.springframework.beans.factory.annotation.Autowired;
import org.springframework.context.ApplicationContext;
import org.springframework.context.support.ClassPathXmlApplicationContext;
import org.springframework.test.context.ContextConfiguration;
import org.springframework.test.context.junit4.SpringJUnit4ClassRunner;

import com.atguigu.crud.bean.Department;
import com.atguigu.crud.bean.Employee;
import com.atguigu.crud.dao.DepartmentMapper;
import com.atguigu.crud.dao.EmployeeMapper;

/**
 * 测试dao层工作
 * @author Administrator
 *推荐Spring的项目就可以使用spring的单元测试,可以自动注入我们需要的组件
 *    1、导入springTest模块
 *    2、@ContextConfiguration指定spring配置文件的位置,帮我们自动创建出ioc容器
 *    3、@RunWith这个是junit里面的注解,我们在运行单元测试的时候,指定我们是用哪个来运行,
 *        我们使用的是spring的单元测试模块,里面的值为SpringJUnit4ClassRunner.class(所有的test运行的时候是它来运行的)
 *    4、直接autowired要使用的组件即可
 */

@RunWith(SpringJUnit4ClassRunner.class)
@ContextConfiguration(locations={"classpath:applicationContext.xml"})
public class MapperTest {

    //直接从ioc容器中取出dao接口实现
    @Autowired
    DepartmentMapper departmentMapper;

    @Autowired
    EmployeeMapper employeeMapper;

    @Autowired
    SqlSession sqlsession;

    /**
     * 测试DepartmentMapper
     */
    @Test
    public void testCRUD(){

        /*//原生从spring容器中获取实例
        //1、创建SpringIOC容器
        ApplicationContext ioc = new ClassPathXmlApplicationContext("applicationContext.xml");
        //2、从容器中获取mapper
        DepartmentMapper bean = ioc.getBean(DepartmentMapper.class);
        */

        System.out.println(departmentMapper);

        //1、插入几个部门
        //departmentMapper.insertSelective(new Department(null, "开发部"));
        //departmentMapper.insertSelective(new Department(null, "测试部"));

        //2.生成员工数据,测试员工插入
        //employeeMapper.insertSelective(new Employee(null, "Jerry", "M", "Jerry@atguigu.com", 1));

        //3.批量插入多个员工;批量,使用可以执行批量操作的sqlsession
        EmployeeMapper mapper = sqlsession.getMapper(EmployeeMapper.class);
        for(int i = 0;i<1000;i++){
            String uid = UUID.randomUUID().toString().substring(0, 5) + i;
            mapper.insertSelective(new Employee(null, uid, "M", uid+"@atguigu.com", 1));
        }

        System.out.println("批量完成");
    }
}
package com.atguigu.crud.test;

import java.util.List;

import org.junit.Before;
import org.junit.Test;
import org.junit.runner.RunWith;
import org.springframework.beans.factory.annotation.Autowired;
import org.springframework.mock.web.MockHttpServletRequest;
import org.springframework.test.context.ContextConfiguration;
import org.springframework.test.context.junit4.SpringJUnit4ClassRunner;
import org.springframework.test.context.web.WebAppConfiguration;
import org.springframework.test.web.servlet.MockMvc;
import org.springframework.test.web.servlet.MvcResult;
import org.springframework.test.web.servlet.request.MockMvcRequestBuilders;
import org.springframework.test.web.servlet.setup.MockMvcBuilders;
import org.springframework.web.context.WebApplicationContext;

import com.atguigu.crud.bean.Employee;
import com.github.pagehelper.PageInfo;

/**
 * 使用spring测试模块提供的测试请求功能,测试crud请求的正确性
 * spring4测试的时候,需要servlet3.0的支持
 * @author Administrator
 *
 */
@RunWith(SpringJUnit4ClassRunner.class)
@WebAppConfiguration
@ContextConfiguration(locations={"classpath:applicationContext.xml","file:src/main/webapp/WEB-INF/dispatcherServlet-servlet.xml"})
public class MvcTest {
    //传入Springmvc的ioc
    @Autowired
    WebApplicationContext context;

    //虚拟mvc请求,获取到处理结果。
    MockMvc mockMvc;

    @Before
    public void initMockMvc(){
        mockMvc = MockMvcBuilders.webAppContextSetup(context).build();
    }

    //编写测试分页的方法
    @Test
    public void testPage() throws Exception{
        //模拟请求,拿到返回值
        MvcResult result = mockMvc.perform(MockMvcRequestBuilders.get("/emps").param("pn", "5")).
                andReturn();

        //请求成功以后,请求域中会有pageInfo,可以取出pageInfo进行验证
        MockHttpServletRequest request = result.getRequest();
        PageInfo pi = (PageInfo) request.getAttribute("pageInfo");

        System.out.println("当前页码"+pi.getPageNum());
        System.out.println("总页码"+pi.getPages());
        System.out.println("总记录数"+pi.getTotal());
        System.out.println("在页面中需要连续显示的页码:");
        int[] nums = pi.getNavigatepageNums();
        for (int i : nums) {
            System.out.println(" "+i);
        }

        //获取员工数据
        List<Employee> list = pi.getList();
        for (Employee employee : list) {
            System.out.println("ID:"+employee.getdId()+"===>Name:  "+employee.getEmpName());
        }
    }
}
六、编写前端页面
<%@ page language="java" contentType="text/html; charset=UTF-8" pageEncoding="UTF-8"%> <%@taglib uri="http://java.sun.com/jsp/jstl/core" prefix="c"%> <!DOCTYPE html PUBLIC "-//W3C//DTD HTML 4.01 Transitional//EN" "http://www.w3.org/TR/html4/loose.dtd"> <html> <head> <meta http-equiv="Content-Type" content="text/html; charset=UTF-8"> <title>员工页面</title> <% pageContext.setAttribute("APP_PATH", request.getContextPath()); %> <script type="text/javascript" src="${APP_PATH }/static/js/jquery-1.12.4.min.js"></script> <link href="${APP_PATH }/static/bootstrap-3.3.7-dist/css/bootstrap.min.css" rel="stylesheet"> <script src="${APP_PATH }/static/bootstrap-3.3.7-dist/js/bootstrap.min.js"></script> </head> <body> <!-- 搭建显示页面 --> <div class="container"> <!-- 标题 --> <div class="row"> <div class="col-md-12"> <h1>SSM-CRUD</h1> </div> </div> <!-- 按钮 --> <div class="row"> <div class="col-md-4 col-md-offset-8"> <button class="btn btn-primary">新增</button> <button class="btn btn-danger">删除</button> </div> </div> <!-- 显示表格数据 --> <div class="row"> <div class="col-md-12"> <table class="table table-hover" id="emps_table"> <thead> <tr> <th>#</th> <th>empName</th> <th>gender</th> <th>email</th> <th>deptName</th> <th>操作</th> </tr> </thead> <tbody> </tbody> </table> </div> </div> <!-- 显示分页信息 --> <div class="row"> <!-- 分页文字信息 --> <div class="col-md-6" id = "page_info_area"> </div> <!-- 分页条信息 --> <div class="col-md-6" id = "page_nav_area"> </div> </div> </div> <script type="text/javascript"> //1、页面加载完成后,直接发送一个ajax请求,要到分页 数据 $(function(){ //页面加载完后,首先查询第一页 to_page(1); }); //查询分页的数据(抽取ajax查询方法) function to_page(pn){ $.ajax({ url:"${APP_PATH}/emps", data:"pn="+pn, type:"GET", success:function(result){ //console.log(result); //1.解析并显示员工数据 build_emps_table(result); //2.解析显示分页信息 build_page_info(result); //3.解析显示(构建)分页条 build_page_nav(result); } }); } //解析显示(构建)员工表格 function build_emps_table(result){ /*************** 查询数据之前,必须清空table表 */ $("#emps_table tbody").empty(); //取出员工数据 var emps = result.extend.pageInfo.list; //遍历员工数据 $.each(emps,function(index,item){ //alert(item.empName); //取出empId(构建单元格) var empIdTd = $("<td></td>").append(item.empId); var empNameTd = $("<td></td>").append(item.empName); var genderTd = $("<td></td>").append(item.gender=='M'?"男":"女"); var emailTd = $("<td></td>").append(item.email); var deptNameTd = $("<td></td>").append(item.department.deptName); /* <button class="btn btn-primary btn-xs"> <span class="glyphicon glyphicon-pencil" aria-hidden="true"></span> 编辑 </button> */ var editBtn = $("<button></button>").addClass("btn btn-primary btn-xs") .append($("<span></span>").addClass("glyphicon glyphicon-pencil")) .append("编辑"); var delBtn = $("<button></button>").addClass("btn btn-danger btn-xs") .append($("<span></span>").addClass("glyphicon glyphicon-trash")) .append("删除"); var btnTd = $("<td></td>").append(editBtn).append(" ").append(delBtn); $("<tr></tr>").append(empIdTd) .append(empNameTd) .append(genderTd) .append(emailTd) .append(deptNameTd) .append(btnTd) .appendTo("#emps_table tbody"); }); } //解析显示分页信息 function build_page_info(result){ /*************** 查询数据之前,必须清空分页信息 */ $("#page_info_area").empty(); $("#page_info_area").append("当前"+ result.extend.pageInfo.pageNum+"页,总"+ result.extend.pageInfo.pages+"页,总"+ result.extend.pageInfo.total+"条记录。") } //解析显示(构建)分页条,点击分页条要能去下一页。。。 function build_page_nav(result){ /*************** 查询数据之前,必须清空分页条信息 */ $("#page_nav_area").empty(); //page_info_area var ul= $("<ul></ul>").addClass("pagination"); //构建元素 var firstPageLi = $("<li></li>").append($("<a></a>").append("首页").attr("href","#")); var prePageLi = $("<li></li>").append($("<a></a>").append("«")); if(result.extend.pageInfo.hasPreviousPage==false){ firstPageLi.addClass("disabled"); prePageLi.addClass("disabled"); }else{ //为元素添加点击翻页事件 firstPageLi.click(function(){ to_page(1); }); prePageLi.click(function(){ to_page(result.extend.pageInfo.pageNum-1); }); } var nextPageLi = $("<li></li>").append($("<a></a>").append("»")); var lastPageLi = $("<li></li>").append($("<a></a>").append("末页").attr("href","#")); if(result.extend.pageInfo.hasNextPage==false){ nextPageLi.addClass("disabled"); lastPageLi.addClass("disabled"); }else{ //为元素添加点击翻页事件 nextPageLi.click(function(){ to_page(result.extend.pageInfo.pageNum + 1); }); lastPageLi.click(function(){ to_page(result.extend.pageInfo.pages); }); } //添加首页和前一页的提示 ul.append(firstPageLi).append(prePageLi); //遍历页码号 1.2.3. //将页码号添加到ul中 $.each(result.extend.pageInfo.navigatepageNums,function(index,item){ var numLi= $("<li></li>").append($("<a></a>").append(item)); if(result.extend.pageInfo.pageNum == item){ numLi.addClass("active"); } //添加点击事件,通过ajax查询选择的页面 numLi.click(function(){ to_page(item); }); ul.append(numLi); }); //添加下一页和末页的提示 ul.append(nextPageLi).append(lastPageLi); //将ul添加到nav var navEle = $("<nav></nav>").append(ul); navEle.appendTo("#page_nav_area"); } </script> </body> </html>