在老大的指引下,需要将系统的json文件格式转换成apidoc的json格式,也就是json格式的重组,但是这个apidoc的生成格式是不固定的,因为apidoc有自己一套的生成规则,我需要研究一下是怎么生成的。
一、官方基础栗子
二、理解apidoc生成静态文档的结构解读
三、深入理解一下apidoc生成原理以及规则
一、apidoc基础栗子
全局安装apidoc
npm install apidoc -g
1、首先建立文件目录
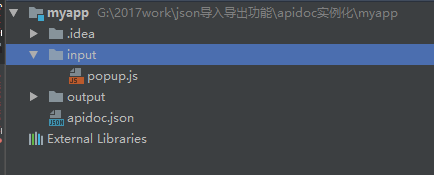
2、需要你在input文件夹里面写上你的js部分

这个是栗子的js部分。
/**
  @api {get} /user/:id Request User information
  @apiName GetUser
  @apiGroup User

  @apiParam {Number} id Users unique ID.

  @apiSuccess {String} firstname Firstname of the User.
  @apiSuccess {String} lastname  Lastname of the User.
 */


 /**
  @api {post} /user/:id Create User information
  @apiName CreateUser
  @apiGroup User

  @apiParam {Number} id Users unique ID.

  @apiSuccess {String} data
  @apiSuccess {String} data.firstname Firstname of the User.
  @apiSuccess {String} data.first.lastname  Lastname of the User.

  @apiSuccessExample {json} Success-Response:
 *     HTTP/1.1 200 OK
 *     {
 *       "firstname": "John",
 *       "lastname": "Doe"
 *     }
 */
3、新建apidoc.json文件
apidoc.json栗子
{
  "name": "example",
  "version": "0.1.0",
  "description": "apiDoc basic example",
  "title": "Custom apiDoc browser title",
  "url" : "https://api.github.com/v1"
}
4、在myapp文件夹下面运行
apidoc -i myapp/ -o apidoc/ -t mytemplate/
官网原文:Creates an apiDoc of all files within dir myapp/, uses template from dir mytemplate/ and put all output to dir apidoc/.
-i 是输入文件的路径 , -o 是输出文件的路径, -t是使用模板的路径(可缺省)

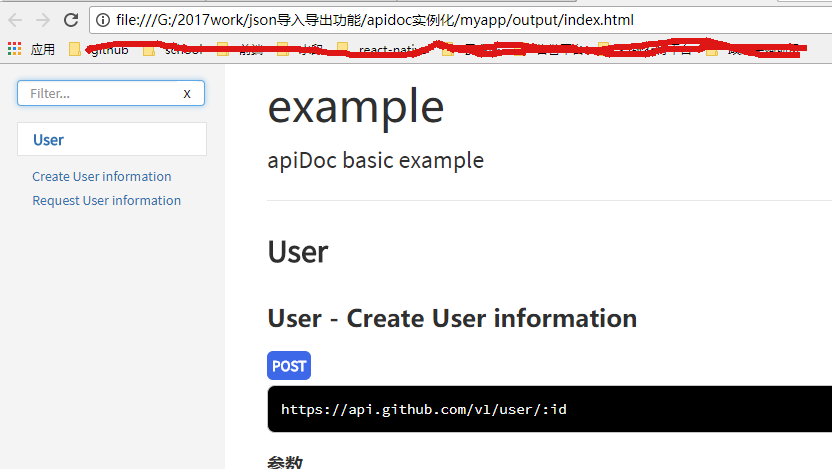
打开output文件夹,发现生成一个apidoc在线文档,直接打开html就可以看到
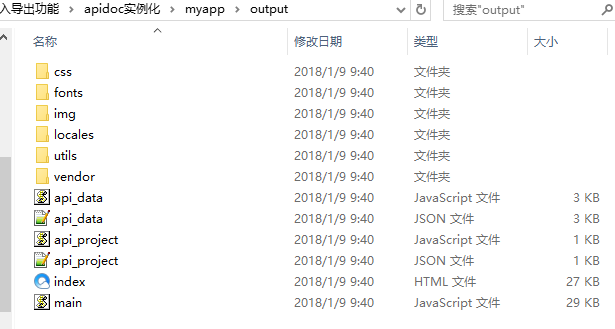
打开html文件
二、理解apidoc生成静态文档的结构解读
一个静态的文档很漂亮的生成了,但是实际控制这个现实的是api_data.js和api_project.js。但是实际上的数据显示是由api_data.json和api_project.json这两个json文件。
所以在支持将其他json格式转换成api_data.json和api_project.json,把apidoc生成的这两个文件进行替换,然后替换js文件,直接生产静态文档。
可以看一下api_data.json格式
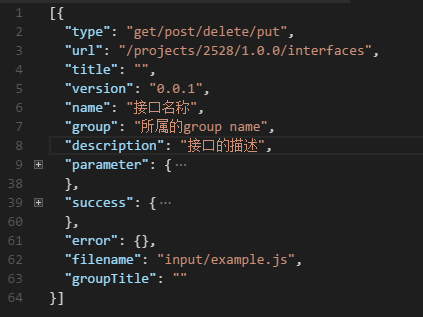
对比一下api_data.js格式

很明显就能看出来,就是在api_data.json的基础上,封装成了一层,加上define({ "api": api_data.json});
api_project.json和api_project.js也是使用相同的方法封装的。
三、深入理解一下apidoc生成原理以及规则
apidoc设计到如下的参数
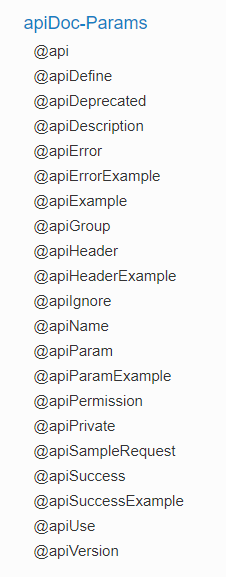
(1)第一个是@api
@api是必须的,
@api {method} path [title]
比如

method 包括请求的方式:get,post,put,delete,等
path 表示请求的路径。
title (可选项)表示分组的解释,导航。
对应的静态页面
(2)@apiDefine
@apiDefine name [title] [description]
表示的是:嵌入在api块或api中的文档块
没有找到对应的页面
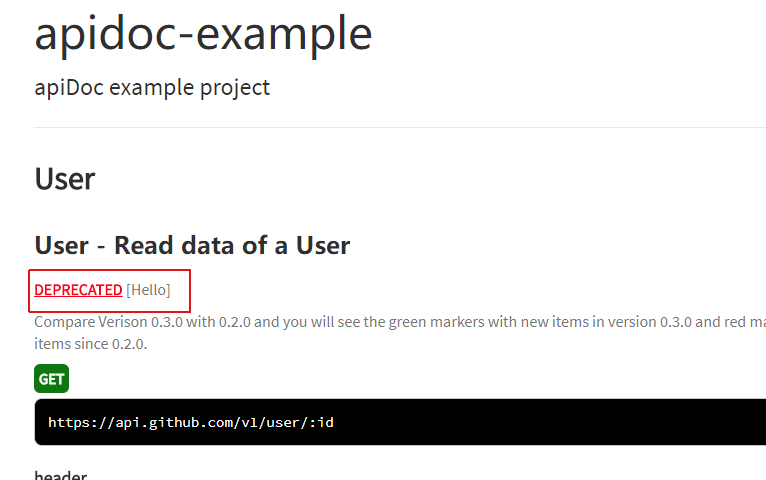
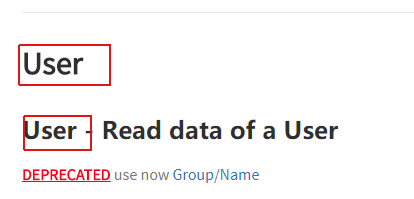
(3)@apiDeprecated
@apiDeprecated [text]
标志位api方法的反对(不对)的地方。
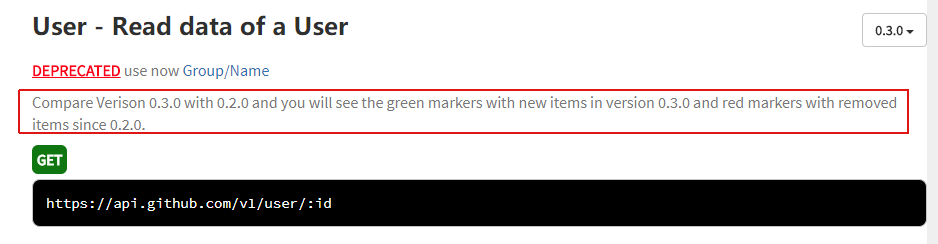
(4)@apiDescription
表示的是描述。
@apiDescription text

页面上显示的是:
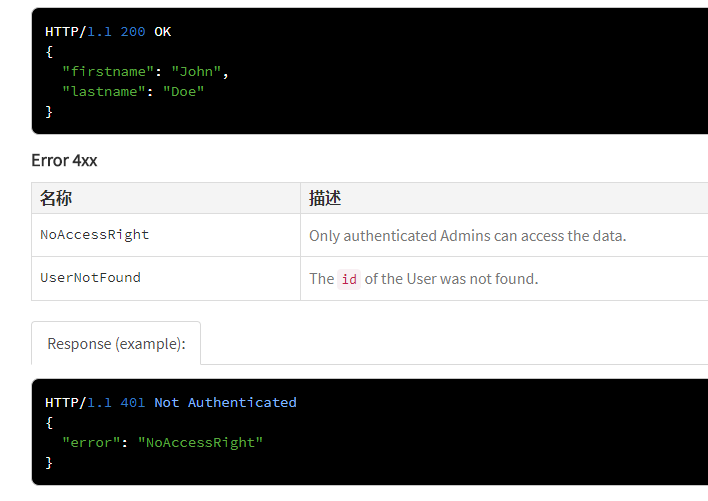
(5)@apiError和@apiErrorExample
表示的错误返回的参数
@apiError [(group)] [{type}] field [description]

页面的显示:
(6)@apiGroup
这个是必填项,表示的分组。

页面显示的是:
(7)@apiHeader
表示的是:传递给API头部的参数
@apiHeader [(group)] {type} [field=defaultValue] [description]
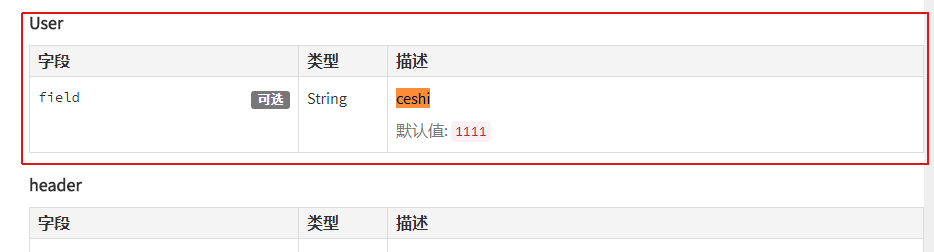
发现:@apiHeader与@apiParam用法显示上很像,但是在生成的api_data.json所在的树形结构不一致。
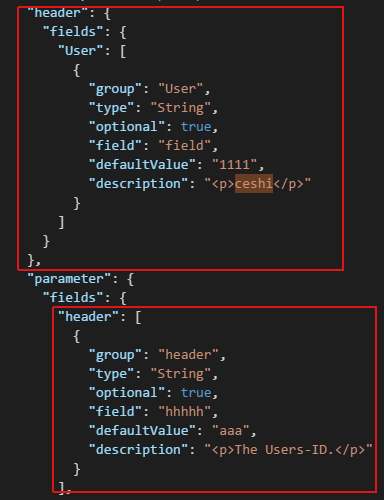 ,上面的红框是@apiHeader生成的,下面的红框是@apiParam生成的。
(8)@apiParam
表示的:传递给API方法的参数
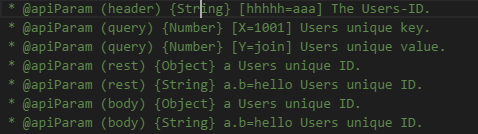
页面显示的是:
(9)@apiParamExample
表示的是:参数实例

页面上的显示:

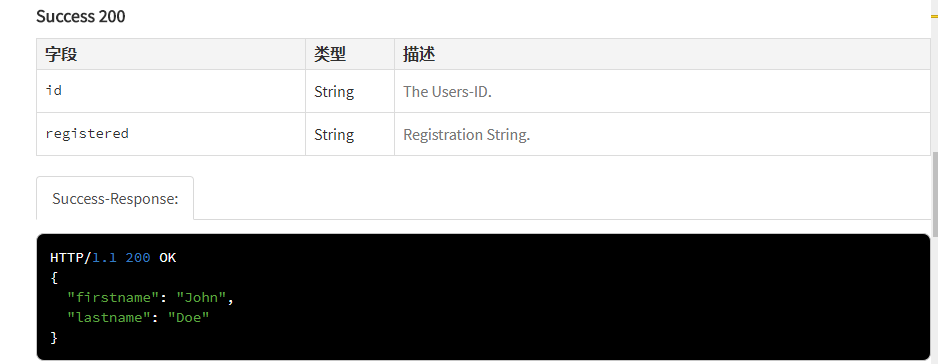
(10)@apiSuccess和@apiSuccessExample
表示的是:成功返回的参数。
页面上的显示:
目前主要用到了这10多个参数,还是够完成老大要求的任务。
apidoc的输入的js文件
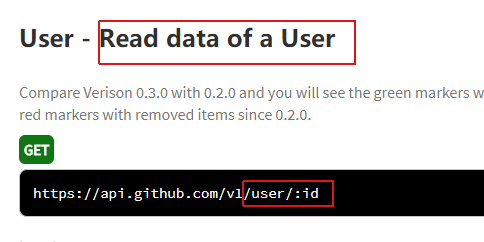
/**
 * @api {get} /user/:id Read data of a User
 * @apiVersion 0.3.0
 * @apiName GetUser
 * @apiGroup User
 * @apiDeprecated use now (#Group:Name)
 *
 * @apiDescription Compare Verison 0.3.0 with 0.2.0 and you will see the green markers with new items in version 0.3.0 and red markers with removed items since 0.2.0.
 *
 * @apiHeader (User) {String} [field=1111] ceshi
 * @apiParam (header) {String} [hhhhh=aaa] The Users-ID.
 * @apiParam (query) {Number} [X=1001] Users unique key.
 * @apiParam (query) {Number} [Y=join] Users unique value.
 * @apiParam (rest) {Object} a Users unique ID.
 * @apiParam (rest) {String} a.b=hello Users unique ID.
 * @apiParam (body) {Object} a Users unique ID.
 * @apiParam (body) {String} a.b=hello Users unique ID.
 * @apiParam (body) {String} a.b.c=world Users unique ID.
 * @apiParam (body) {String} a.c=ccccc Users unique ID.
 * @apiParamExample {json} Request-Example:
 *     {
 *       "id": 4711
 *     }
 *
 * @apiSuccess {String}   id            The Users-ID.
 * @apiSuccess {String}     registered    Registration String.
 * @apiSuccessExample {json} Success-Response:
 *     HTTP/1.1 200 OK
 *     {
 *       "firstname": "John",
 *       "lastname": "Doe"
 *     }
 *
 * @apiError NoAccessRight Only authenticated Admins can access the data.
 * @apiError UserNotFound   The <code>id</code> of the User was not found.
 *
 * @apiErrorExample Response (example):
 *     HTTP/1.1 401 Not Authenticated
 *     {
 *       "error": "NoAccessRight"
 *     }
 */


/**
 * @api {post} /user Create a new User
 * @apiVersion 0.3.0
 * @apiName PostUser
 * @apiGroup User
 *
 * @apiDescription In this case "apiUse" is defined and used.
 * Define blocks with params that will be used in several functions, so you dont have to rewrite them.
 *
 * @apiParam {String} name Name of the User.
 *
 * @apiSuccess {String} id         The new Users-ID.
 *
 * @apiUse CreateUserError
 */


/**
 * @api {put} /user/:id Change a new User
 * @apiVersion 0.3.0
 * @apiName PutUser
 * @apiGroup User
 *
 * @apiDescription This function has same errors like POST /user, but errors not defined again, they were included with "apiUse"
 *
 * @apiParam {String} name Name of the User.
 *
 * @apiUse CreateUserError
 */
apidoc.json文件
{
  "name": "apidoc-example",
  "version": "0.3.0",
  "description": "apiDoc example project",
  "title": "Custom apiDoc browser title",
  "url" : "https://api.github.com/v1",

  "order": [
    "GetUser",
    "PostUser"
  ],
  "template": {
      "withCompare": true,
      "withGenerator": true
  }
}