想用C#制作一个windows屏保,网上的文章大都泛泛而谈,语焉不详,特别是涉及到windows屏保设置的时候,怎样在屏保预览窗口显示屏保,没有找到详细的说明,胡乱测试了一通,还真做出来了,分享一下。

画面是这样的,就是简单的随机画点线条,代码都是别人写现成的,本身也简单。关键是怎么转为屏保。
using System;
using System.Diagnostics;
using System.Drawing;
using System.Windows.Forms;

namespace 屏幕保护程序
{
    public partial class Form1 : Form
    {
        public PictureBox pictureBox;
        Timer timer;
        Graphics graphics;
        Random random;
        Point start = new Point(0, 0);

        public Form1()
        {
            InitializeComponent();
            this.FormBorderStyle = FormBorderStyle.None;    //窗体运行后无边界
            this.ShowInTaskbar = false;     //程序运行后不显示在任务栏上
            this.WindowState = FormWindowState.Maximized;    //窗体运行后,最大化,充满整个屏幕
            pictureBox = new PictureBox();
            pictureBox.Parent = this;
            pictureBox.Dock = DockStyle.Fill;
            pictureBox.BackColor = Color.Black;
            this.KeyDown += new KeyEventHandler(this.Form1_KeyDown);
            this.MouseMove += new MouseEventHandler(this.Conctrol_MouseMove);    // 控件充满窗体时没用
            pictureBox.MouseMove += new MouseEventHandler(Conctrol_MouseMove);
        }

        private void Form1_Load(object sender, EventArgs e)
        {
            graphics = pictureBox.CreateGraphics();   // 在构造函数中使用时画图区域为窗体初始大小
            random = new Random();
            timer = new Timer();
            timer.Interval = 20;
            timer.Enabled = true;
            timer.Tick += new EventHandler(Timer_Tick);
            Cursor.Hide();
        }

        private Pen GetPen()
        {
            // make a random color
            int A = random.Next(0, 256);
            int R = random.Next(0, 256);
            int G = random.Next(0, 256);
            int B = random.Next(0, 256);
            Color color = Color.FromArgb(A, R, G, B);
            // make pen out of color
            int width = random.Next(2, 8);
            return new Pen(color, width);
        }

        public void DrawShape(Graphics graphics)    // 画随机线
        {
            Pen pen = GetPen();
            int x1 = random.Next(0, (int)graphics.VisibleClipBounds.Width);
            int y1 = random.Next(0, (int)graphics.VisibleClipBounds.Height);
            int x2 = random.Next(0, (int)graphics.VisibleClipBounds.Width);
            int y2 = random.Next(0, (int)graphics.VisibleClipBounds.Height);
            graphics.SmoothingMode = System.Drawing.Drawing2D.SmoothingMode.AntiAlias;
            graphics.DrawLine(pen, x1, y1, x2, y2);
        }

        private void Timer_Tick(object source, EventArgs e)
        {
            DrawShape(graphics);
        }

        private void Form1_FormClosed(object sender, FormClosedEventArgs e)
        {
            graphics.Dispose();
            timer.Dispose();
        }

        private void Form1_KeyDown(object sender, KeyEventArgs e)    // 检测有按键退出屏保
        {
            Cursor.Show();
            Application.Exit();
        }

        private void Conctrol_MouseMove(object sender, MouseEventArgs e)    // 控件充满窗体时窗体检测不到鼠标移动
        {
            Debug.WriteLine("MouseMove: {0}", e.Location);    // 窗体打开时鼠标即使不动也会不停触发MouseMove事件
            if (start == new Point(0, 0))    // 程序开始运行后,把鼠标当前的位置记录下来
            {
                start = e.Location;
                return;
            }
            else if (start != e.Location)    // 判断自程序运行后,鼠标的位置是否变动
            {
                Cursor.Show();
                Application.Exit();
            };
        }
    }
}
主要输出画面的代码根据注释一看就明白了,稍微麻烦的是在windows里怎么设置,如下:
using System;
using System.Drawing;
using System.Runtime.InteropServices;
using System.Windows.Forms;

namespace 屏幕保护程序
{
    static class Program
    {
        /// <summary>
        ///  The main entry point for the application.
        /// </summary>
        [STAThread]
        static void Main(string[] args)
        {
            if (args != null && args.Length != 0)
            {
                //for (int i = 0; i < args.Length; i++)    // 测试scr文件右键以及系统的屏幕保护程序设置使用的调用参数
                //{
                //    MessageBox.Show(i + ": " + args[i], "系统提示", MessageBoxButtons.OK, MessageBoxIcon.Information);
                //}
                if (args[0].StartsWith("/c") || args[0].StartsWith("/C") || args[0].StartsWith("-c") || args[0].StartsWith("-C"))
                {
                    MessageBox.Show("此屏幕保护没有可供设置的选项!", "系统提示", MessageBoxButtons.OK, MessageBoxIcon.Information);
                    return;
                }
                if (args[0].Equals("/p") || args[0].Equals("/P") || args[0].Equals("-p") || args[0].Equals("-P"))
                {
                    if (args.Length < 2) return;
                    if (!int.TryParse(args[1], out int result)) return;    // 参数/p之后有紧随另一个整数参数(句柄)
                    IntPtr handle = new IntPtr(result);
                    Form1 form1 = new Form1();    // 必须有此句预览窗口才有显示输出(到底起了什么作用?很奇怪!)
                    //form1.Show();    // 正常显示窗体,会盖住"屏幕保护程序设置"窗口
                    Graphics graphics = Graphics.FromHwnd(handle);
                    while (IsWindowVisible(handle))     // 在系统的"屏幕保护程序设置"的预览窗口显示输出
                    {
                        //form1.DrawShape(graphics);    // 这样调用(无论是实例化还是静态)死活不行
                        DrawShape(graphics);
                        System.Threading.Thread.Sleep(100);    // 间隔一定时间形成动画效果
                    }
                    form1.Close();
                    return;
                }
            }
            Application.SetHighDpiMode(HighDpiMode.SystemAware);
            Application.EnableVisualStyles();
            Application.SetCompatibleTextRenderingDefault(false);
            Application.Run(new Form1());
        }

        [DllImport("user32.dll")]
        private static extern bool IsWindowVisible(IntPtr handle);

        static Random random = new Random();
        static private Pen GetPen()
        {
            // make a random color
            int A = random.Next(0, 256);
            int R = random.Next(0, 256);
            int G = random.Next(0, 256);
            int B = random.Next(0, 256);
            Color color = Color.FromArgb(A, R, G, B);
            // make pen out of color
            int width = random.Next(2, 8);
            return new Pen(color, width);
        }

        static public void DrawShape(Graphics graphics)    // 画随机线
        {
            Pen pen = GetPen();
            int x1 = random.Next(0, (int)graphics.VisibleClipBounds.Width);
            int y1 = random.Next(0, (int)graphics.VisibleClipBounds.Height);
            int x2 = random.Next(0, (int)graphics.VisibleClipBounds.Width);
            int y2 = random.Next(0, (int)graphics.VisibleClipBounds.Height);
            graphics.DrawLine(pen, x1, y1, x2, y2);
        }
    }
}

生成Windows屏幕保护程序,正常编译得到exe文件,把"exe"改名为"scr",可拷贝到Windows的"System32"目录中
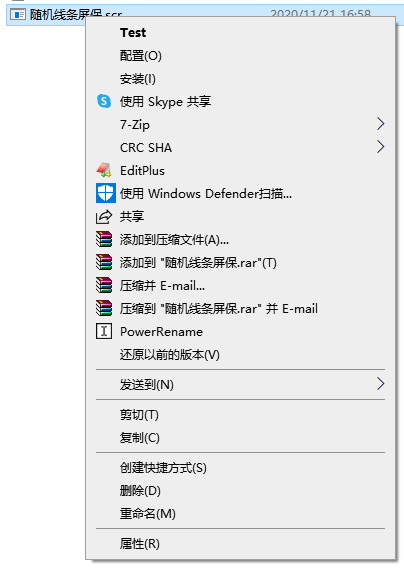
scr文件右键对应的菜单传递的参数:Test为/s,安装为/p和句柄参数,配置为空(不是/c)
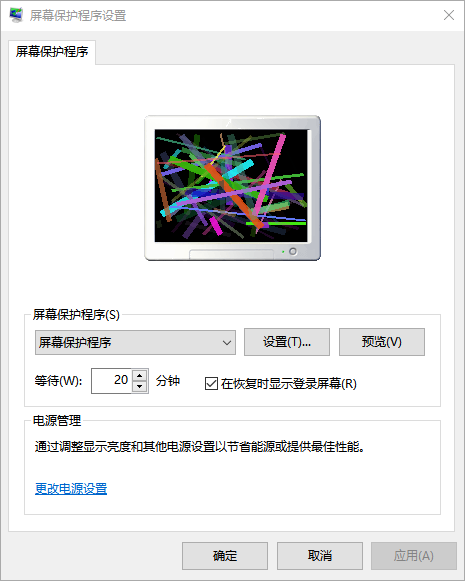
系统的"屏幕保护程序设置":下图的按钮"设置"和"预览"点击后分别被系统调用了两次,
"设置"第一次对应 (/c加一个整数句柄)参数调用(一个参数) ,第二次对应 (/p)和(句柄参数)参数调用(两个参数)
"预览"第一次对应(/s)参数调用 ,第二次对应 (/p)和(句柄参数)参数调用(两个参数)
"设置"点击后根据句柄参数可以打开设置窗体,"预览"点击后在主屏幕上预览,两者完毕后都在"预览"窗口显示预览(实际上是以预览参数又一次调用我们的屏保程序)
存在的疑问是:怎么在屏保预览窗口显示屏保,如下

这是我偶然试出来的,不明白为啥。就是必须在预览参数的代码段里实例化屏保窗体但却不使用:Form1 form1 = new Form1(); // 必须有此句预览窗口才有显示输出(到底起了什么作用?很奇怪!)
最开始确实是要实例化窗体的,因为要重复使用窗体类画图的代码,结果不行,没办法才在Main方法里重新搞了一遍,结果无意中可以预览了,真是神奇。