1.开发环境:以下列出的是部分必要库,详细请安装项目内的requirements.txt
Python==3.6.8rc1  注意:不能使用python3.7以上版本,有版本兼容问题
Django==2.1.3    注意:2.2版本以上有兼容性问题
channels==2.1.4
channels-redis==2.3.3
daphne==2.2.1
PyMySQL==0.9.2
pyOpenSSL==19.1.0
requests==2.23.0
service-identity==18.1.0
urllib3==1.25.8
uWSGI==2.0.18
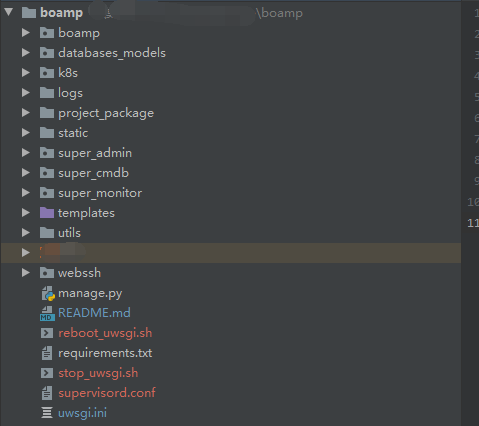
2.项目目录架构:
3.项目部署使用到的应用:
mysql==5.7
redis==3.2.12  【注意:目前使用中支持3.2.13版本,尝试过使用5.0.2版本,是不支持的,会提示连接不上如redis】
nginx==1.14.2
uwsgi==2.0.18
daphne==2.2.1
4.修改配置文件setting.py
#允许所有主机访问
ALLOWED_HOSTS = ["*"]

#mysql数据库配置
DATABASES = {
    'default': {
        'ENGINE': 'django.db.backends.mysql',
        'NAME': 'boamp',
        'USER': 'root',
        'PASSWORD': 'xxxxx',
        'HOST': 'xxxxx',                # Set to empty string for localhost. Not used with sqlite3
        'PORT': '3336',
        'OPTIONS':{
            'init_command': "SET sql_mode='STRICT_TRANS_TABLES'",
            'charset': 'utf8',
        }
    }
}

#定义api token 认证信息,主要用于客户端提交监控数据到后台的api
token_name = 'xxxx'
token_password = 'xxxx'
token_salt = 'xxxx' #加密加盐

#接入k8s api
k8s_api_server = 'https://xxx.xxx.xxx.xxx:6443'

#配置异步任务使用redis信息
BROKER_URL = 'redis://xxx.xxx.xxx.xxx:6379/1'
CELERY_RESULT_BACKEND = 'redis://xxx.xxx.xxx.xxx:6379/2'

#指定redis [channel layer是一种通信系统,允许多个consumer实例之间互相通信,以及与外部Djanbo程序实现互通]
#用于监控日志功能的redis配置
CHANNEL_LAYERS = {
    "default": {
        "BACKEND": "channels_redis.core.RedisChannelLayer",
        "CONFIG": {
            "hosts": [("xxx.xxx.xxx.xxx", 6379)],
        },
    },
}

################域名解析相关配置################
DOMAIN_LIST = ["主域名1","主域名2","......."]
LOGIN_TOKEN="dnspod密钥id,dnspod密钥"
FORMAT = "json"
################域名解析相关配置################
执行必要操作:
1.在目标数据库创建数据库:CREATE DATABASE IF NOT EXISTS boamp default charset utf8 COLLATE utf8_unicode_ci;
2.安装依赖标准库:pip install -r requirements.txt
3.生成数据结构:python manage.py makemigrations && python manage.py migrate
安装依赖库后,若出现这个报错: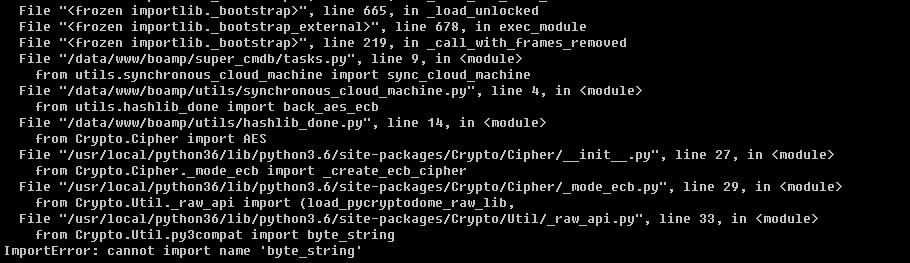
解决办法:
重新安装pycryptodome

卸载:/usr/local/python36/bin/pip3 uninstall pycryptodome
安装:/usr/local/python36/bin/pip3 install pycryptodome
5.部署异步任务进程:boamp_celery_worker 【使用supervisord部署】
编辑项目跟目录下的supervisord.conf
[unix_http_server]
file=/tmp/supervisor.sock   ; the path to the socket file

[supervisord]
logfile=/tmp/supervisord.log ; main log file; default $CWD/supervisord.log
logfile_maxbytes=50MB        ; max main logfile bytes b4 rotation; default 50MB
logfile_backups=10           ; # of main logfile backups; 0 means none, default 10
loglevel=info                ; log level; default info; others: debug,warn,trace
pidfile=/tmp/supervisord.pid ; supervisord pidfile; default supervisord.pid
nodaemon=false               ; start in foreground if true; default false
minfds=1024                  ; min. avail startup file descriptors; default 1024
minprocs=200                 ; min. avail process descriptors;default 200


[inet_http_server]  #启用页面管理:http://xxxxxxx:9001
port=0.0.0.0:9001
username=chenjinanwen
password=root123456.

[rpcinterface:supervisor]
supervisor.rpcinterface_factory = supervisor.rpcinterface:make_main_rpcinterface

[supervisorctl]
serverurl=unix:///tmp/supervisor.sock ; use a unix:// URL  for a unix socket

[program:boamp_celery_worker]
command=/opt/python36/bin/python3 manage.py celery worker -l INFO
directory=/data/www/boamp
autostart=true
autorestart=true
startsecs=20
redirect_stderr=true
stdout_logfile=/data/www/boamp/logs/boamp_celery_worker.log
user=chenjianwen
stopsignal=QUIT
6.部署支持channles websocket wss/ws协议进程:boamp_daphne_webssh【使用supervisord部署】
启动前安装必须模块:
/opt/python36/bin/pip3 asgiref==2.3.2
/opt/python36/bin/pip3 pyOpenSSL==19.1.0    #启用ssl必须模块
/opt/python36/bin/pip3 service-identity==18.1.0
在项目跟目录下的supervisord.conf追加:
[program:boamp_daphne_webssh]
#command=/opt/python36/bin/daphne -b 0.0.0.0 -p 8913 boamp.asgi:application -v2  #http协议 channles websocket 使用ws://
command=/opt/python36/bin/daphne -e ssl:8913:privateKey=/etc/nginx/ssl/证书.key:certKey=/etc/nginx/ssl/证书.crt boamp.asgi:application -v2
directory=/data/www/boamp
autostart=true
autorestart=true
startsecs=20
redirect_stderr=true
stdout_logfile=/data/www/boamp/logs/daphne_webssh.log
user=root
stopsignal=QUIT
注意:此处遗漏一个问题
daphne进程只能使用现在指定的端口8913,原因是daphne进程作为独立一个进程,而它在别处被调用,在boamp/static/websshwebssh.js文件的117行写死了8913端口,暂时没有想到办法让它动态获取,所以,暂时端口是指定的,不能更改,除非两边一起更改,端口一定要同步。
protocol = (location.protocol === 'https:') ? 'wss://' : 'ws://',
socketURL = protocol + location.hostname + ":8913" + '/webssh/?' + 'unique=' + unique + '&width=' + cols + '&height=' + rows;
7.启动两个进程
启动supervisord:/opt/python36/bin/supervisord -c supervisord.conf
启动项目进程:
/opt/python36/bin/supervisorctl status
/opt/python36/bin/supervisorctl restart all

8.部署uwsgi代理
vim uwsgi.ini
[uwsgi]
# 项目目录
chdir=/data/www/boamp/
# 启动uwsgi的用户名和用户组
uid=root
gid=root
# 指定项目的application
module=boamp.wsgi:application
# 指定sock的文件路径
socket=:4204
# 启用主进程
master=true
# 进程个数
workers=4
pidfile=/data/www/boamp/uwsgi.pid
# 自动移除unix Socket和pid文件当服务停止的时候
vacuum=true
# 序列化接受的内容,如果可能的话
thunder-lock=true
# 启用线程
enable-threads=true
# 设置自中断时间
harakiri=30
# 设置缓冲
post-buffering=4096
# 设置日志目录
daemonize=/data/www/boamp/logs/uwsgi.log
# 设置支持websockets
#http-websockets=true

#DJANGO_SETTINGS_MODULE=py_webserver.settings
#WEBSOCKET_FACTORY_CLASS="dwebsocket.backends.uwsgi.factory.uWsgiWebSocketFactory"
启动uwsgi代理:./reboot_uwsgi.sh 【/opt/python36/bin/uwsgi --ini /data/www/boamp/uwsgi.ini】
9.部署nginx
vim boamp_8910.conf
server {
        listen       8910;
        server_name  localhost,与证书匹配的域名:xxx.com;
        client_max_body_size 1024m;

                ssl on;
        ssl_certificate ssl/证书.crt;
        ssl_certificate_key  ssl/证书.key;
        ssl_protocols  SSLv2 SSLv3 TLSv1 TLSv1.2;
        ssl_ciphers  ALL:!ADH:!EXPORT56:RC4+RSA:+HIGH:+MEDIUM:+LOW:+SSLv2:+EXP;


        location / {
            include  uwsgi_params;
            uwsgi_pass  127.0.0.1:4204;
            ###########################################
            # # 启用支持websocket连接,ng+ssl+ws这样配置,访问的时候是wss://address:ip    【这个其实没用了,是之前寻找wss无法连接解决办法尝试用的,无效,暂留】
            #     proxy_set_header Origin '';
            #     proxy_redirect off;
            #    proxy_http_version 1.1;
            #     proxy_set_header Upgrade $http_upgrade;
            #     proxy_set_header Connection "upgrade";
            ###########################################
            access_log  /data/www/boamp/logs/access.log;
            error_log  /data/www/boamp/logs/error.log;
       uwsgi_connect_timeout 600;
       uwsgi_ignore_client_abort off;
       uwsgi_read_timeout 600;
       uwsgi_send_timeout 600;
      }
        location ~ ^/static/ {    #配置静态文件
             root /data/www/boamp;
             expires 24h;
             #access_log off;
             access_log  /data/www/boamp/logs/access.log;
                         error_log  /data/www/boamp/logs/error.log;
        }
}
重启nginx:/etc/init.d/nginx restart
10.访问项目:https://xxx.com:8910/super_cmdb/index/
初始账号:super_root
初始密码:super_boamp
注意: