html页面

<form method="post" action="" enctype="multipart/form-data">
    <input type="file" name="file"><br>
    <span class="loading"></span>
    <input type="submit" value="提交">
</form>

controller层代码
@GetMapping("/upload")
public String upload() {
    return "/test";
}

@PostMapping("/upload")
@ResponseBody
public String upload(@RequestParam("file") MultipartFile file) {
   /* System.out.println(username);*/
    if (file.isEmpty()) {
        return "上传失败,请选择文件";
    }
    String fileName = file.getOriginalFilename();
    String filePath = "D:/";
    File dest = new File(filePath + fileName);
    try {
        file.transferTo(dest);
        System.out.println("上传成功!");
        return "上传成功";
    } catch (IOException e) {
        System.out.println("上传失败!"+e.toString());
    }
    return "上传失败!";
}
测试:启动项目访问测试即可
上面是个简单demo,下面讲讲springboot图片上传步骤
第一步:图片上传的绝对路径和相对路径都配置在yml 文件中,这样后期项目部署到服务器上直接改yml 文件即可,免得还要找到具体的代码再改
yml如下:名称,存放位置都可以自定义
upload:
  #相对路径
  relativePath: /images/
  #文件上传路径
  profile: D:/profile/game/
第二步:读取配置文件里的值,上传图片工具类如下:
package com.game.config;
import org.springframework.boot.context.properties.ConfigurationProperties;
import org.springframework.stereotype.Component;
import org.springframework.web.multipart.MultipartFile;
import java.io.File;
import java.io.IOException;
import java.text.SimpleDateFormat;
import java.util.Random;
@Component
@ConfigurationProperties(prefix = "upload")//读取配置文件yml,以upload 开头的属性值
public class FileUpload {
    private static String profile;//绝对路径
    private static String relativePath;//相对路径

    public static String getRelativePath() {
        return relativePath;
    }

    public  void setRelativePath(String relativePath) {
        this.relativePath = relativePath;
    }

    public static String getProfile() {
        return profile;
    }

    public void setProfile(String profile) {
        this.profile = profile;
    }


    //1,文件上传后新命名规则
    public  static String getRandomFileName() {
        // 生成随机文件名:当前年月日时分秒+五位随机数(为了在实际项目中防止文件同名而进行的处理)
        // 获取随机数
        final Random r = new Random();
        int rannum = (int) (r.nextDouble() * (99999 - 10000 + 1)) + 10000;
        // 当前时间
        long currentTimeMillis = System.currentTimeMillis();
        SimpleDateFormat format = new SimpleDateFormat("yyyyMMddHHmmss");
        String nowTime =format.format(currentTimeMillis);
        return nowTime + rannum;
    }
    //2.存储路径(新放路径是否存在)
    public static File getPath(){
        File file=new File(FileUpload.profile);//这里是直接调用配置文件中的值
        if(!file.exists()){//如果文件夹不存在
            file.mkdirs();//创建文件夹
        }
        return file;
    }

    //3.上传图片动作(并返回相对路径存储在数据库中)
    public static String upload(MultipartFile file){
        String str=file.getOriginalFilename();//原始图片名称
        String lastName=str.substring(str.indexOf("."),str.length());//获取尾缀 如.png .jpg
        String fileName = FileUpload.getRandomFileName();//生成的新文件名
        String filePath=FileUpload.getPath().getPath();//图片存放的硬盘位置
        String relativeAdress=FileUpload.relativePath+ fileName+lastName;//相对路径
        File dest = new File(filePath +'\'+ fileName+lastName);
        try {
            file.transferTo(dest);//上传图片
            System.out.println("=====文件上传成功!");
        } catch (IOException e) {
            System.out.println("=====上传失败!"+e.toString());
        }
        return relativeAdress;
    }


}
第三步:controller层调用上传图片类,即可上传如下(这里仅做参考,每个人的代码不一样)
 @PostMapping("/goodsTypeAdd")
    public String addGooodsType(GoodsType goodsType,@RequestParam("file")MultipartFile file){
        if (StringUtils.isNotEmpty(file.getOriginalFilename())) {
            goodsType.setImg(FileUpload.upload(file));
        }
        GoodsType goodsType1=goodsTypeService.insert(goodsType);
        return "redirect:/admin//goodsType";
    }
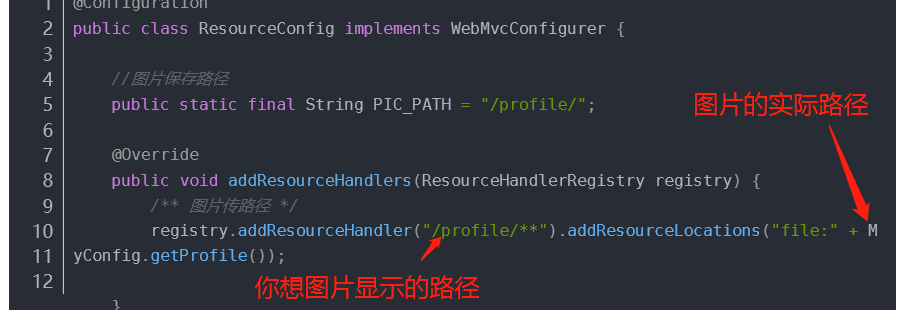
第四步:图片都上传成功了,但是怎么让图片在项目中显示呢?还需要做个资源映射
package com.game.config;

import org.springframework.context.annotation.Configuration;
import org.springframework.web.servlet.config.annotation.ResourceHandlerRegistry;
import org.springframework.web.servlet.config.annotation.WebMvcConfigurer;

@Configuration
public class MyWebAppConfigurer implements WebMvcConfigurer {
    @Override
    public void addResourceHandlers(ResourceHandlerRegistry registry) {
        registry.addResourceHandler(FileUpload.getRelativePath()+"**").addResourceLocations("file:"+FileUpload.getProfile());
    }

}
我这里都是读取yml 里的参数的,这里接个别人的图片来说吧,
不知道总结的好不好,自己的项目是这样弄的,谢谢大家的指点