前言
译文链接:http://websystique.com/spring/spring4-hibernate4-mysql-maven-integration-example-using-annotations/
本文将基于注解配置, 集成Spring 4和Hibernate 4,开发一个增删改查应用,涉及以下内容:
- 创建Hibernate实体
- 保存数据到mysql数据库中
- 在事务
transaction内部执行增删改查操作 - 典型企业应用中不同层之间的交互
- 基于注解配置
当然,我们也会给出XML配置作为对比。
如果你的应用是基于Spring MVC开发,那么可以参考该链接:Spring4 MVC Hibernate and MySQL integration.
涉及的技术及开发工具
- Spring 4.0.6.RELEASE
- Hibernate Core 4.3.6.Final
- MySQL Server 5.6
- Joda-time 2.3
- Maven 3
- JDK 1.6
- Eclipse JUNO Service Release 2
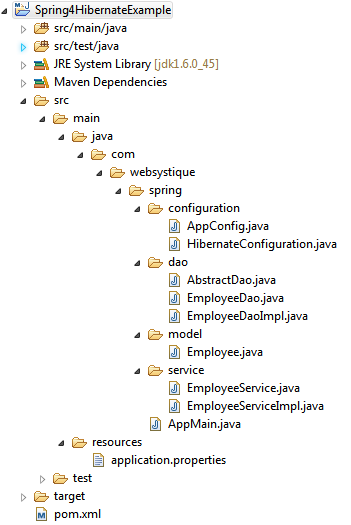
工程结构目录
步骤一:往pom.xml中添加依赖
<project xmlns="http://maven.apache.org/POM/4.0.0" xmlns:xsi="http://www.w3.org/2001/XMLSchema-instance"
    xsi:schemaLocation="http://maven.apache.org/POM/4.0.0 http://maven.apache.org/xsd/maven-4.0.0.xsd">

    <modelVersion>4.0.0</modelVersion>
    <groupId>com.websystique.spring</groupId>
    <artifactId>Spring4HibernateExample</artifactId>
    <version>1.0.0</version>
    <packaging>jar</packaging>

    <name>Spring4HibernateExample</name>

    <properties>
        <springframework.version>4.0.6.RELEASE</springframework.version>
        <hibernate.version>4.3.6.Final</hibernate.version>
        <mysql.connector.version>5.1.31</mysql.connector.version>
        <joda-time.version>2.3</joda-time.version>
    </properties>

    <dependencies>

        <!-- Spring -->
        <dependency>
            <groupId>org.springframework</groupId>
            <artifactId>spring-core</artifactId>
            <version>${springframework.version}</version>
        </dependency>
        <dependency>
            <groupId>org.springframework</groupId>
            <artifactId>spring-context</artifactId>
            <version>${springframework.version}</version>
        </dependency>
        <dependency>
            <groupId>org.springframework</groupId>
            <artifactId>spring-tx</artifactId>
            <version>${springframework.version}</version>
        </dependency>
        <dependency>
            <groupId>org.springframework</groupId>
            <artifactId>spring-orm</artifactId>
            <version>${springframework.version}</version>
        </dependency>

        <!-- Hibernate -->
        <dependency>
            <groupId>org.hibernate</groupId>
            <artifactId>hibernate-core</artifactId>
            <version>${hibernate.version}</version>
        </dependency>

        <!-- MySQL -->
        <dependency>
            <groupId>mysql</groupId>
            <artifactId>mysql-connector-java</artifactId>
            <version>${mysql.connector.version}</version>
        </dependency>

        <!-- Joda-Time -->
        <dependency>
            <groupId>joda-time</groupId>
            <artifactId>joda-time</artifactId>
            <version>${joda-time.version}</version>
        </dependency>

        <!-- To map JodaTime with database type -->
        <dependency>
            <groupId>org.jadira.usertype</groupId>
            <artifactId>usertype.core</artifactId>
            <version>3.0.0.CR1</version>
        </dependency>

    </dependencies>
    <build>
        <pluginManagement>
            <plugins>
                <plugin>
                    <groupId>org.apache.maven.plugins</groupId>
                    <artifactId>maven-compiler-plugin</artifactId>
                    <version>3.2</version>
                    <configuration>
                        <source>1.6</source>
                        <target>1.6</target>
                    </configuration>
                </plugin>
            </plugins>
        </pluginManagement>
    </build>

</project>
很明显我们需要添加Spring、Hibernate和Mysql连接器相关依赖,另外,由于我们使用了joda-time库来处理时间,所以也引入了joda-time依赖。usertype-core库引入是为了提供数据库时间类型与joda-time LocalDate之间的映射。
步骤二:配置Hibernate
com.websystique.spring.configuration.HibernateConfiguration
package com.websystique.spring.configuration;

import java.util.Properties;

import javax.sql.DataSource;

import org.hibernate.SessionFactory;
import org.springframework.beans.factory.annotation.Autowired;
import org.springframework.context.annotation.Bean;
import org.springframework.context.annotation.ComponentScan;
import org.springframework.context.annotation.Configuration;
import org.springframework.context.annotation.PropertySource;
import org.springframework.core.env.Environment;
import org.springframework.jdbc.datasource.DriverManagerDataSource;
import org.springframework.orm.hibernate4.HibernateTransactionManager;
import org.springframework.orm.hibernate4.LocalSessionFactoryBean;
import org.springframework.transaction.annotation.EnableTransactionManagement;

@Configuration
@EnableTransactionManagement
@ComponentScan({ "com.websystique.spring.configuration" })
@PropertySource(value = { "classpath:application.properties" })
public class HibernateConfiguration {

    @Autowired
    private Environment environment;

    @Bean
    public LocalSessionFactoryBean sessionFactory() {
        LocalSessionFactoryBean sessionFactory = new LocalSessionFactoryBean();
        sessionFactory.setDataSource(dataSource());
        sessionFactory.setPackagesToScan(new String[] { "com.websystique.spring.model" });
        sessionFactory.setHibernateProperties(hibernateProperties());
        return sessionFactory;
     }

    @Bean
    public DataSource dataSource() {
        DriverManagerDataSource dataSource = new DriverManagerDataSource();
        dataSource.setDriverClassName(environment.getRequiredProperty("jdbc.driverClassName"));
        dataSource.setUrl(environment.getRequiredProperty("jdbc.url"));
        dataSource.setUsername(environment.getRequiredProperty("jdbc.username"));
        dataSource.setPassword(environment.getRequiredProperty("jdbc.password"));
        return dataSource;
    }

    private Properties hibernateProperties() {
        Properties properties = new Properties();
        properties.put("hibernate.dialect", environment.getRequiredProperty("hibernate.dialect"));
        properties.put("hibernate.show_sql", environment.getRequiredProperty("hibernate.show_sql"));
        properties.put("hibernate.format_sql", environment.getRequiredProperty("hibernate.format_sql"));
        return properties;
    }

    @Bean
    @Autowired
    public HibernateTransactionManager transactionManager(SessionFactory s) {
       HibernateTransactionManager txManager = new HibernateTransactionManager();
       txManager.setSessionFactory(s);
       return txManager;
    }
}
@Configuration注解表明该类包含了用@Bean标注的方法,这些被@Bean标注的方法可以生成bean并交由spring容器管理,在这里例子中,这个类代表了hibernate的配置。
@ComponentScan注解与xml配置中的“context:component-scan base-package="..."”等价,提供了扫描bean的包路径。
@EnableTransactionManagement注解与xml配置中Spring的tx:*命名空间等价,主要用于开启基于注解的事务管理。
@PropertySource注解用于在Spring运行时Environment中声明一组属性(在应用classpath路径下的properties文件中定义),可根据不同环境灵活改变属性值。
sessionFactory()方法创建了一个LocalSessionFactoryBean,与基于XML的配置类似,我们需要一个数据源dataSource和hibernate配置文件(如hibernate.properties)。
多亏了@PropertySource注解,我们可以从.properties文件中得到具体属性值,使用Spring的Environment接口获取对应项目的配置值。
一旦创建了SessionFactory,该bean将会被注入到transactionManager方法中,最终对sessionFactory创建的sessions提供事务支持功能。
如下是本文使用的属性配置文件:
/src/main/resources/application.properties
jdbc.driverClassName = com.mysql.jdbc.Driver
jdbc.url = jdbc:mysql://localhost:3306/websystique
jdbc.username = myuser
jdbc.password = mypassword
hibernate.dialect = org.hibernate.dialect.MySQLDialect
hibernate.show_sql = false
hibernate.format_sql = false
另外,对应的基于XML配置如下
<?xml version="1.0" encoding="UTF-8"?>
<beans xmlns="http://www.springframework.org/schema/beans"
        xmlns:xsi="http://www.w3.org/2001/XMLSchema-instance"
        xmlns:context="http://www.springframework.org/schema/context"
        xmlns:tx="http://www.springframework.org/schema/tx"
        xmlns:aop="http://www.springframework.org/schema/aop"
        xsi:schemaLocation="http://www.springframework.org/schema/beans http://www.springframework.org/schema/beans/spring-beans-4.0.xsd
                            http://www.springframework.org/schema/context http://www.springframework.org/schema/context/spring-context-4.0.xsd
                            http://www.springframework.org/schema/aop http://www.springframework.org/schema/aop/spring-aop-4.0.xsd
                            http://www.springframework.org/schema/tx  http://www.springframework.org/schema/tx/spring-tx-4.0.xsd">


    <context:property-placeholder location="classpath:application.properties" />

    <context:component-scan  base-package="com.websystique.spring" />

    <tx:annotation-driven transaction-manager="transactionManager"/>

    <bean id="dataSource" class="org.springframework.jdbc.datasource.DriverManagerDataSource">
        <property name="driverClassName" value="${jdbc.driverClassName}" />
        <property name="url" value="${jdbc.url}"/>
        <property name="username" value="${jdbc.username}" />
        <property name="password" value="${jdbc.password}"/>

    </bean>

    <bean id="sessionFactory" class="org.springframework.orm.hibernate4.LocalSessionFactoryBean" >
        <property name="dataSource" ref="dataSource"/>
        <property name="packagesToScan">
            <list>
                <value>com.websystique.spring.model</value>
            </list>
        </property>
        <property name="hibernateProperties">
            <props>
                <prop key="hibernate.dialect">${hibernate.dialect}</prop>
                <prop key="hibernate.show_sql">${hibernate.show_sql:false}</prop>
                <prop key="hibernate.format_sql">${hibernate.format_sql:false}</prop>
            </props>
        </property>
    </bean>

    <bean id="transactionManager"  class="org.springframework.orm.hibernate4.HibernateTransactionManager">
        <property name="sessionFactory" ref="sessionFactory" />
    </bean>

    <bean id="persistenceExceptionTranslationPostProcessor"
        class="org.springframework.dao.annotation.PersistenceExceptionTranslationPostProcessor"/>

</beans>
步骤三:Spring配置
com.websystique.spring.configuration.AppConfig
package com.websystique.spring.configuration;

import org.springframework.context.annotation.ComponentScan;
import org.springframework.context.annotation.Configuration;

@Configuration
@ComponentScan(basePackages = "com.websystique.spring")
public class AppConfig {

}
在我们这个示例中,即使该配置类内部是空的,但是使用了@ComponentScan注解,可以自动检测到对应包下所有的beans。
其实你可以完全去除以上的配置,将bean扫描功能放在application context级别去实现(main方法里)。
在成熟的应用里,你会发现使用配置类配置beans(如messageSource、PropertySourcesPlaceHolderConfigurer...)非常方便。
对应的基于XML的配置
<beans xmlns="http://www.springframework.org/schema/beans"
    xmlns:xsi="http://www.w3.org/2001/XMLSchema-instance"
    xmlns:context="http://www.springframework.org/schema/context"
    xsi:schemaLocation="http://www.springframework.org/schema/beans http://www.springframework.org/schema/beans/spring-beans-4.0.xsd
    http://www.springframework.org/schema/context http://www.springframework.org/schema/context/spring-context-4.0.xsd">

    <context:component-scan base-package="com.websystique.spring" />

</beans>
以上就是关于本工程的所有配置了,现在,为了让工程能跑起来,我们还需要添加service、dao层,实体对象,数据库。
步骤四:DAO层
com.websystique.spring.dao.AbstractDao
package com.websystique.spring.dao;

import org.hibernate.Session;
import org.hibernate.SessionFactory;
import org.springframework.beans.factory.annotation.Autowired;

public abstract class AbstractDao {

    @Autowired
    private SessionFactory sessionFactory;

    protected Session getSession() {
        return sessionFactory.getCurrentSession();
    }

    public void persist(Object entity) {
        getSession().persist(entity);
    }

    public void delete(Object entity) {
        getSession().delete(entity);
    }
}
注意,我们在步骤二创建的SessionFactory会被自动装配到这里,这个类将作为基类用于执行数据库相关操作。
com.websystique.spring.dao.EmployeeDao
package com.websystique.spring.dao;

import java.util.List;

import com.websystique.spring.model.Employee;

public interface EmployeeDao {

    void saveEmployee(Employee employee);

    List<Employee> findAllEmployees();

    void deleteEmployeeBySsn(String ssn);

    Employee findBySsn(String ssn);

    void updateEmployee(Employee employee);
}
com.websystique.spring.dao.EmployeeDaoImpl
package com.websystique.spring.dao;

import java.util.List;

import org.hibernate.Criteria;
import org.hibernate.Query;
import org.hibernate.criterion.Restrictions;
import org.springframework.stereotype.Repository;

import com.websystique.spring.model.Employee;

@Repository("employeeDao")
public class EmployeeDaoImpl extends AbstractDao implements EmployeeDao{

    public void saveEmployee(Employee employee) {
        persist(employee);
    }

    @SuppressWarnings("unchecked")
    public List<Employee> findAllEmployees() {
        Criteria criteria = getSession().createCriteria(Employee.class);
        return (List<Employee>) criteria.list();
    }

    public void deleteEmployeeBySsn(String ssn) {
        Query query = getSession().createSQLQuery("delete from Employee where ssn = :ssn");
        query.setString("ssn", ssn);
        query.executeUpdate();
    }


    public Employee findBySsn(String ssn){
        Criteria criteria = getSession().createCriteria(Employee.class);
        criteria.add(Restrictions.eq("ssn",ssn));
        return (Employee) criteria.uniqueResult();
    }

    public void updateEmployee(Employee employee){
        getSession().update(employee);
    }

}
步骤五:添加Service层代码
com.websystique.spring.service.EmployeeService
package com.websystique.spring.service;

import java.util.List;

import com.websystique.spring.model.Employee;

public interface EmployeeService {

    void saveEmployee(Employee employee);

    List<Employee> findAllEmployees();

    void deleteEmployeeBySsn(String ssn);

    Employee findBySsn(String ssn);

    void updateEmployee(Employee employee);
}
com.websystique.spring.service.EmployeeServiceImpl
package com.websystique.spring.service;

import java.util.List;

import org.springframework.beans.factory.annotation.Autowired;
import org.springframework.stereotype.Service;
import org.springframework.transaction.annotation.Transactional;

import com.websystique.spring.dao.EmployeeDao;
import com.websystique.spring.model.Employee;

@Service("employeeService")
@Transactional
public class EmployeeServiceImpl implements EmployeeService{

    @Autowired
    private EmployeeDao dao;

    public void saveEmployee(Employee employee) {
        dao.saveEmployee(employee);
    }

    public List<Employee> findAllEmployees() {
        return dao.findAllEmployees();
    }

    public void deleteEmployeeBySsn(String ssn) {
        dao.deleteEmployeeBySsn(ssn);
    }

    public Employee findBySsn(String ssn) {
        return dao.findBySsn(ssn);
    }

    public void updateEmployee(Employee employee){
        dao.updateEmployee(employee);
    }
}
以上比较引人注目的部分是@Transactional注解,配置了该注解的类会在每个类方法开启事务,并在方法结束的时候提交事务(或者在方法内部出错时回滚事务)。
注意,由于以上事务范围是方法级别的,我们在方法内部使用DAO,DAO方法会在同样的事物内部执行。
步骤六:创建实体类(POJO)
com.websystique.spring.model.Employee
package com.websystique.spring.model;

import java.math.BigDecimal;

import javax.persistence.Column;
import javax.persistence.Entity;
import javax.persistence.GeneratedValue;
import javax.persistence.GenerationType;
import javax.persistence.Id;
import javax.persistence.Table;

import org.hibernate.annotations.Type;
import org.joda.time.LocalDate;

@Entity
@Table(name="EMPLOYEE")
public class Employee {

    @Id
    @GeneratedValue(strategy = GenerationType.IDENTITY)
    private int id;

    @Column(name = "NAME", nullable = false)
    private String name;

    @Column(name = "JOINING_DATE", nullable = false)
    @Type(type="org.jadira.usertype.dateandtime.joda.PersistentLocalDate")
    private LocalDate joiningDate;

    @Column(name = "SALARY", nullable = false)
    private BigDecimal salary;

    @Column(name = "SSN", unique=true, nullable = false)
    private String ssn;

    public int getId() {
        return id;
    }

    public void setId(int id) {
        this.id = id;
    }

    public String getName() {
        return name;
    }

    public void setName(String name) {
        this.name = name;
    }

    public LocalDate getJoiningDate() {
        return joiningDate;
    }

    public void setJoiningDate(LocalDate joiningDate) {
        this.joiningDate = joiningDate;
    }

    public BigDecimal getSalary() {
        return salary;
    }

    public void setSalary(BigDecimal salary) {
        this.salary = salary;
    }

    public String getSsn() {
        return ssn;
    }

    public void setSsn(String ssn) {
        this.ssn = ssn;
    }

    @Override
    public int hashCode() {
        final int prime = 31;
        int result = 1;
        result = prime * result + id;
        result = prime * result + ((ssn == null) ? 0 : ssn.hashCode());
        return result;
    }

    @Override
    public boolean equals(Object obj) {
        if (this == obj)
            return true;
        if (obj == null)
            return false;
        if (!(obj instanceof Employee))
            return false;
        Employee other = (Employee) obj;
        if (id != other.id)
            return false;
        if (ssn == null) {
            if (other.ssn != null)
                return false;
        } else if (!ssn.equals(other.ssn))
            return false;
        return true;
    }

    @Override
    public String toString() {
        return "Employee [id=" + id + ", name=" + name + ", joiningDate="
                + joiningDate + ", salary=" + salary + ", ssn=" + ssn + "]";
    }


}
这是一个标准的实体类,基于JPA注解@Entity, @Table, @Column以及hibernate注解@Type(用于提供数据库类型与Joda-Time LocalDate的映射)。
步骤七:在数据库里创建Schema
CREATE TABLE EMPLOYEE(
    id INT NOT NULL auto_increment,
    name VARCHAR(50) NOT NULL,
    joining_date DATE NOT NULL,
    salary DOUBLE NOT NULL,
    ssn VARCHAR(30) NOT NULL UNIQUE,
    PRIMARY KEY (id)
);
步骤八:创建main方法执行程序
package com.websystique.spring;

import java.math.BigDecimal;
import java.util.List;

import org.joda.time.LocalDate;
import org.springframework.context.annotation.AnnotationConfigApplicationContext;
import org.springframework.context.support.AbstractApplicationContext;

import com.websystique.spring.configuration.AppConfig;
import com.websystique.spring.model.Employee;
import com.websystique.spring.service.EmployeeService;

public class AppMain {

    public static void main(String args[]) {
        AbstractApplicationContext context = new AnnotationConfigApplicationContext(AppConfig.class);

        EmployeeService service = (EmployeeService) context.getBean("employeeService");

        /*
         * Create Employee1
         */
        Employee employee1 = new Employee();
        employee1.setName("Han Yenn");
        employee1.setJoiningDate(new LocalDate(2010, 10, 10));
        employee1.setSalary(new BigDecimal(10000));
        employee1.setSsn("ssn00000001");

        /*
         * Create Employee2
         */
        Employee employee2 = new Employee();
        employee2.setName("Dan Thomas");
        employee2.setJoiningDate(new LocalDate(2012, 11, 11));
        employee2.setSalary(new BigDecimal(20000));
        employee2.setSsn("ssn00000002");

        /*
         * Persist both Employees
         */
        service.saveEmployee(employee1);
        service.saveEmployee(employee2);

        /*
         * Get all employees list from database
         */
        List<Employee> employees = service.findAllEmployees();
        for (Employee emp : employees) {
            System.out.println(emp);
        }

        /*
         * delete an employee
         */
        service.deleteEmployeeBySsn("ssn00000002");

        /*
         * update an employee
         */

        Employee employee = service.findBySsn("ssn00000001");
        employee.setSalary(new BigDecimal(50000));
        service.updateEmployee(employee);

        /*
         * Get all employees list from database
         */
        List<Employee> employeeList = service.findAllEmployees();
        for (Employee emp : employeeList) {
            System.out.println(emp);
        }

        context.close();
    }
}
注意,假如你想删除AppConfig文件,那么只需将
AbstractApplicationContext context = new AnnotationConfigApplicationContext(AppConfig.class);
替换为
AnnotationConfigApplicationContext context = new AnnotationConfigApplicationContext();context.scan("com.websystique.spring"); context.refresh();Employee [id=1, name=Han Yenn, joiningDate=2010-10-10, salary=10000, ssn=ssn00000001]
Employee [id=2, name=Dan Thomas, joiningDate=2012-11-11, salary=20000, ssn=ssn00000002]
Employee [id=1, name=Han Yenn, joiningDate=2010-10-10, salary=50000, ssn=ssn00000001]
工程代码
http://websystique.com/?smd_process_download=1&download_id=802
注:源码EmployeeDaoImpl类中有一处错误,将26行表名Employee改成EMPLOYEE即可。