lamp简介
所谓lamp,其实就是由Linux+Apache+Mysql/MariaDB+Php/Perl/Python的一组动态网站或者服务器的开源软件,除Linux外其它各部件本身都是各自独立的程序,但是因为经常被放在一起使用,拥有了越来越高的兼容度,共同组成了一个强大的Web应用程序平台。
LAMP指的是Linux(操作系统)、Apache(HTTP服务器)、MySQL(也指MariaDB,数据库软件)和PHP(有时也是指Perl或Python)的第一个字母,一般用来建立web应用平台。
web服务器工作流程
在说lamp架构平台的搭建前,我们先来了解下什么是CGI,什么是FastCGI,什么是......
web服务器的资源分为两种,静态资源和动态资源
- 静态资源就是指静态内容,客户端从服务器获得的资源的表现形式与原文件相同。可以简单的理解为就是直接存储于文件系统中的资源
- 动态资源则通常是程序文件,需要在服务器执行之后,将执行的结果返回给客户端
那么web服务器如何执行程序并将结果返回给客户端呢?下面通过一张图来说明一下web服务器如何处理客户端的请求
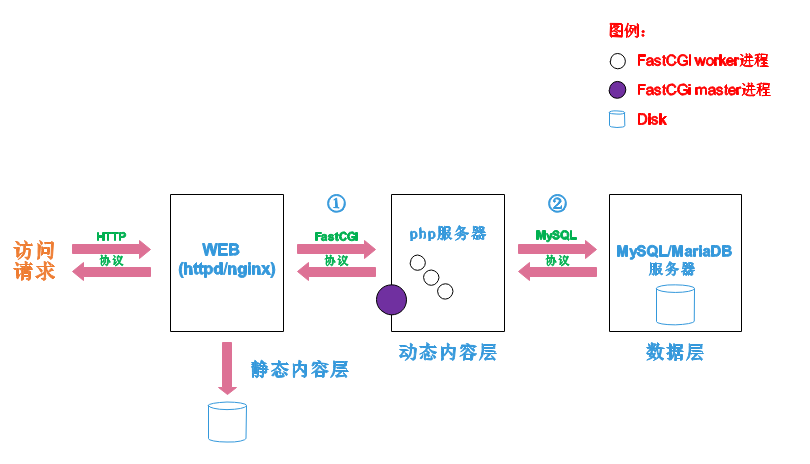
如上图所示
阶段①显示的是httpd服务器(即apache)和php服务器通过FastCGI协议进行通信,且php作为独立的服务进程运行
阶段②显示的是php程序和mysql数据库间通过mysql协议进行通信。php与mysql本没有什么联系,但是由Php语言写成的程序可以与mysql进行数据交互。同理perl和python写的程序也可以与mysql数据库进行交互
cgi与fastcgi
上图阶段①中提到了FastCGI,下面我们来了解下CGI与FastCGI。
CGI(Common Gateway Interface,通用网关接口),CGI是外部应用程序(CGI程序)与WEB服务器之间的接口标准,是在CGI程序和Web服务器之间传递信息的过程。CGI规范允许Web服务器执行外部程序,并将它们的输出发送给Web浏览器,CGI将web的一组简单的静态超媒体文档变成一个完整的新的交互式媒体。
FastCGI(Fast Common Gateway Interface)是CGI的改良版,CGI是通过启用一个解释器进程来处理每个请求,耗时且耗资源,而FastCGI则是通过master-worker形式来处理每个请求,即启动一个master主进程,然后根据配置启动几个worker进程,当请求进来时,master会从worker进程中选择一个去处理请求,这样就避免了重复的生成和杀死进程带来的频繁cpu上下文切换而导致耗时
httpd与php结合的方式
httpd与php结合的方式有以下三种:
- modules:php将以httpd的扩展模块形式存在,需要加载动态资源时,httpd可以直接通过php模块来加工资源并返回给客户端
- httpd prefork:libphp5.so(多进程模型的php)
- httpd event or worker:libphp5-zts.so(线程模型的php)
- CGI:httpd需要加载动态资源时,通过CGI与php解释器联系,获得php执行的结果,此时httpd负责与php连接的建立和断开等
- FastCGI:利用php-fpm机制,启动为服务进程,php自行运行为一个服务,https通过socket与php通信
web工作流程
通过上面的图说明一下web的工作流程:
客户端通过http协议请求web服务器资源
- web服务器收到请求后判断客户端请求的资源是静态资源或是动态资源
- 若是静态资源则直接从本地文件系统取之返回给客户端。
- 否则若为动态资源则通过FastCGI协议与php服务器联系,通过CGI程序的master进程调度worker进程来执行程序以获得客户端请求的动态资源,并将执行的结果通过FastCGI协议返回给httpd服务器,httpd服务器收到php的执行结果后将其封装为http响应报文响应给客户端。在执行程序获取动态资源时若需要获得数据库中的资源时,由Php服务器通过mysql协议与MySQL/MariaDB服务器交互,取之而后返回给httpd,httpd将从php服务器收到的执行结果封装成http响应报文响应给客户端。
lamp平台构建
环境说明:
| 系统平台 | IP | 需要安装的服务 |
|---|---|---|
| 192.168.44.128 | httpd-2.4 mysql-5.7.31 php php-mysql |
1.安装httpd
[root@localhost ~]# mount /dev/cdrom /mnt
[root@localhost ~]# wget -O /etc/yum.repos.d/CentOS-Base.repo https://mirrors.aliyun.com/repo/Centos-8.repo
[root@localhost ~]# cd /etc/yum.repos.d/
[root@localhost yum.repos.d]# vi CentOS-Base.repo
:%s/$releasever/8/g
[root@localhost yum.repos.d]# yum install -y https://mirrors.aliyun.com/epel/epel-release-latest-8.noarch.rpm
[root@localhost yum.repos.d]# sed -i 's|^#baseurl=https://download.fedoraproject.org/pub|baseurl=https://mirrors.aliyun.com|' /etc/yum.repos.d/epel*
[root@localhost yum.repos.d]# sed -i 's|^metalink|#metalink|' /etc/yum.repos.d/epel*
[root@localhost yum.repos.d]# sed -i 's|$releasever|8|' /etc/yum.repos.d/epel*
[root@localhost yum.repos.d]# yum clean all
[root@localhost yum.repos.d]# yum makeache

//准备环境并下载源码包
[root@localhost ~]# yum -y install wget bzip2 gcc gcc-c++ make pcre-devel expat-devel libxml2-devel openssl-devel
[root@localhost ~]# wget https://mirrors.tuna.tsinghua.edu.cn/apache/httpd/httpd-2.4.46.tar.bz2
[root@localhost ~]# wget https://mirrors.tuna.tsinghua.edu.cn/apache//apr/apr-1.7.0.tar.gz
[root@localhost ~]# wget https://mirrors.tuna.tsinghua.edu.cn/apache//apr/apr-util-1.6.1.tar.gz

//安装apr
[root@localhost ~]# tar xf apr-1.7.0.tar.gz
[root@localhost ~]# cd apr-1.7.0
[root@localhost apr-1.7.0]# vi configure
    $RM "$cfgfile"  //注释或删除这一行
[root@localhost apr-1.7.0]# ./configure --prefix=/usr/local/apr
[root@localhost apr-1.7.0]# make
[root@localhost apr-1.7.0]# make install

//安装apr-util
[root@localhost apr-1.7.0]# cd ~
[root@localhost ~]# tar xf apr-util-1.6.1.tar.gz
[root@localhost ~]# cd apr-util-1.6.1
[root@localhost apr-util-1.6.1]# ./configure --prefix=/usr/local/apr-util --with-apr=/usr/local/apr
[root@localhost apr-util-1.6.1]# make
[root@localhost apr-util-1.6.1]# make install

//安装httpd
[root@localhost apr-util-1.6.1]# cd
[root@localhost ~]# yum groups mark install "Development Tools"
[root@localhost ~]# useradd -r -M -s/sbin/nologin apache
[root@localhost ~]# tar xf httpd-2.4.46.tar.bz2
[root@localhost ~]# cd httpd-2.4.46
[root@localhost httpd-2.4.46]# ./configure --prefix=/usr/local/apache
--sysconfdir=/etc/httpd24
--enable-so
--enable-ssl
--enable-cgi
--enable-rewrite
--with-zlib
--with-pcre
--with-apr=/usr/local/apr
--with-apr-util=/usr/local/apr-util/
--enable-modules=most
--enable-mpms-shared=all
--with-mpm=prefork
[root@localhost httpd-2.4.46]# make
[root@localhost httpd-2.4.46]# make install

//设置环境变量
[root@localhost httpd-2.4.46]# vi /etc/profile.d/httpd.sh
export PATH=/usr/local/apache/bin:$PATH
[root@localhost httpd-2.4.46]# source /etc/profile.d/httpd.sh

//设置软链接
[root@localhost httpd-2.4.46]# cd ~
[root@localhost ~]# ln -s /usr/local/apache/include /usr/include/apache

//设置帮助文档
[root@localhost ~]# vi /etc/man_db.conf
# every automatically generated MANPATH includes these fields
#
#MANDATORY_MANPATH                      /usr/src/pvm3/man
#
MANDATORY_MANPATH                       /usr/man
MANDATORY_MANPATH                       /usr/share/man
MANDATORY_MANPATH                       /usr/local/share/man
MANDATORY_MANPATH                       /usr/local/apache/man     //加入这两行
MANDATORY_MANPATH                       /usr/local/apache/manual

//管理httpd
[root@localhost ~]# apachectl start
[root@localhost ~]# apachectl stop
[root@localhost ~]# apachectl restart

//关闭httpd警告
[root@localhost ~]# vi /etc/httpd24/httpd.conf
ServerName www.example.com:80 //把这行注释取消

[root@localhost ~]# systemctl stop firewalld
[root@localhost ~]# setenforce 0
2.安装mysql
[root@localhost ~]# wget https://downloads.mysql.com/archives/get/p/23/file/mysql-5.7.31-linux-glibc2.12-x86_64.tar.gz
[root@localhost ~]# useradd -r -M -s /sbin/nologin mysql
[root@localhost ~]# tar xf mysql-5.7.31-linux-glibc2.12-x86_64.tar.gz -C /usr/local/

//设置软连接
[root@localhost ~]# ln -s /usr/local/mysql-5.7.31-linux-glibc2.12-x86_64 /usr/local/mysql

//设置所有者和所有组
[root@localhost ~]# chown -R mysql.mysql /usr/local/mysql*

//设置环境变量
[root@localhost ~]# vi /etc/profile.d/mysql.sh
export PATH=/usr/local/mysql/bin:$PATH
[root@localhost ~]# source /etc/profile.d/mysql.sh

//映射include
[root@localhost mysql]# ln -s /usr/local/mysql/include /usr/include/mysql

//设置帮助文档
[root@localhost mysql]# vi /etc/man_db.conf
# every automatically generated MANPATH includes these fields
#
#MANDATORY_MANPATH                      /usr/src/pvm3/man
#
MANDATORY_MANPATH                       /usr/man
MANDATORY_MANPATH                       /usr/share/man
MANDATORY_MANPATH                       /usr/local/share/man
MANDATORY_MANPATH                       /usr/local/apache/man
MANDATORY_MANPATH                       /usr/local/apache/manual
MANDATORY_MANPATH                       /usr/local/mysql/man   //加上这一行


//设置lib库
[root@localhost mysql]# vi /etc/ld.so.conf.d/mysql.conf
/usr/local/mysql/lib
[root@localhost mysql]# ldconfig

//创建数据存放目录
[root@localhost ~]# mkdir /opt/data
[root@localhost ~]# chown -R mysql:mysql /opt/data

//初始化数据库
[root@localhost ~]# mysqld --initialize --user=mysql --datadir=/opt/data
2020-12-31T11:07:21.962073Z 0 [Warning] TIMESTAMP with implicit DEFAULT value is deprecated. Please use --explicit_defaults_for_timestamp server option (see documentation for more details).
2020-12-31T11:07:24.200037Z 0 [Warning] InnoDB: New log files created, LSN=45790
2020-12-31T11:07:25.153456Z 0 [Warning] InnoDB: Creating foreign key constraint system tables.
2020-12-31T11:07:25.234170Z 0 [Warning] No existing UUID has been found, so we assume that this is the first time that this server has been started. Generating a new UUID: 5ce04f70-4b58-11eb-96dc-000c29b5300b.
2020-12-31T11:07:25.234839Z 0 [Warning] Gtid table is not ready to be used. Table 'mysql.gtid_executed' cannot be opened.
2020-12-31T11:07:25.601752Z 0 [Warning] CA certificate ca.pem is self signed.
2020-12-31T11:07:25.887668Z 1 [Note] A temporary password is generated for root@localhost: mYf%.Ar/v0g,

//写配置文件
[root@localhost ~]# vi /etc/my.cnf
[mysqld]
basedir = /usr/local/mysql
datadir = /opt/data
socket = /tmp/mysql.sock
port = 3306
pid-file = /opt/data/mysql.pid
user = mysql
skip-name-resolve

//配置服务启动脚本
[root@localhost ~]# cp -a /usr/local/mysql/support-files/mysql.server /etc/init.d/mysqld
[root@localhost ~]# ll /etc/init.d/mysqld
-rwxr-xr-x. 1 mysql mysql 10576 Jun  2  2020 /etc/init.d/mysqld
[root@localhost ~]# vi /etc/init.d/mysqld
basedir=/usr/local/mysql    //加上路径
datadir=/opt/data

//启动mysql
[root@localhost ~]# service mysqld start
[root@localhost ~]# mysql -root -p'mYf%.Ar/v0g,'
mysql: error while loading shared libraries: libncurses.so.5: cannot open shared
object file: No such file or directory
[root@localhost ~]# yum whatprovides libncurses.so.5
[root@localhost ~]# yum -y install ncurses-compat-libs
[root@localhost ~]# mysql -uroot -p'mYf%.Ar/v0g,'
mysql> set password = password('csl123');

//设置开机自动启动
[root@localhost ~]# chkconfig --add mysqld
[root@localhost ~]# chkconfig mysqld on
[root@localhost ~]# chkconfig --list

Note: This output shows SysV services only and does not include native
      systemd services. SysV configuration data might be overridden by native
      systemd configuration.

      If you want to list systemd services use 'systemctl list-unit-files'.
      To see services enabled on particular target use
      'systemctl list-dependencies [target]'.

mysqld             0:off    1:off    2:on    3:on    4:on    5:on    6:off
3.安装php
[root@localhost ~]# yum -y install libxml2 libxml2-devel openssl openssl-devel bzip2 bzip2-devel libcurl libcurl-devel libicu-devel libjpeg libjpeg-devel libpng libpng-devel openldap-devel  pcre-devel freetype freetype-devel gmp gmp-devel libmcrypt libmcrypt-devel readline readline-devel libxslt libxslt-devel mhash mhash-devel
[root@localhost ~]# yum -y install php*
[root@localhost ~]# vi /etc/profile.d/php7.sh
export PATH=/usr/local/php7/bin:$PATH
[root@localhost ~]# source /etc/profile.d/php7.sh
[root@localhost ~]# vi /etc/php-fpm.d/www.conf
listen = /run/php-fpm/www.sock  //注释这一行
listen = 127.0.0.1:9000     //加入这一行

[root@localhost ~]# php -v
PHP 7.2.24 (cli) (built: Oct 22 2019 08:28:36) ( NTS )
Copyright (c) 1997-2018 The PHP Group
Zend Engine v3.2.0, Copyright (c) 1998-2018 Zend Technologies
    with Zend OPcache v7.2.24, Copyright (c) 1999-2018, by Zend Technologies

//配置php-fpm开机自启动
[root@localhost ~]# systemctl status php-fpm
● php-fpm.service - The PHP FastCGI Process Manager
   Loaded: loaded (/usr/lib/systemd/system/php-fpm.service; disabled; ven>
   Active: inactive (dead)
[root@localhost ~]# systemctl enable --now php-fpm


//以下步骤可以不做。且yum装的php配置文件位置不一样,如果使用yum安装,使用rpm -ql php-fpm 查看
//编辑php-fpm的配置文件(/usr/local/php7/etc/php-fpm.conf):
//配置fpm的相关选项为你所需要的值:
[root@localhost ~]# vi /usr/local/php7/etc/php-fpm.conf
pm.max_children = 50  #最多同时提供50个进程提供50个并发服务
pm.start_servers = 5  #启动时启动5个进程
pm.min_spare_servers = 2 #最小空闲进程数
pm.max_spare_servers = 8 #最大空闲进程数
4.配置apache
//启用httpd的相关模块
[root@localhost ~]# sed -i '/proxy_module/s/#//g' /etc/httpd24/httpd.conf
[root@localhost ~]# sed -i '/proxy_fcgi_module/s/#//g' /etc/httpd24/httpd.conf

//创建虚拟主机目录并生成php测试页面
[root@localhost ~]# mkdir /usr/local/apache/htdocs/csl.com
[root@localhost ~]# cat > /usr/local/apache/htdocs/csl.com/index.php <<EOF
<?php
    phpinfo();
?>
EOF
[root@localhost ~]# chown -R apache.apache /usr/local/apache/htdocs/
[root@localhost ~]# vi /etc/httpd24/httpd.conf
//在配置文件的最后加入以下内容
<VirtualHost *:80>
DocumentRoot "/usr/local/apache/htdocs/csl.com"
ServerName www.csl.com
ProxyRequests Off
ProxyPassMatch ^/(.*.php)$ fcgi://127.0.0.1:9000/usr/local/apache/htdocs/csl.com/$1
<Directory "/usr/local/apache/htdocs/csl.com">
Options none
AllowOverride none
Require all granted
</Directory>
</VirtualHost>

[root@localhost ~]# vi /etc/httpd24/httpd.conf
//搜索AddType,添加以下内容
# If the AddEncoding directives above are commented-out, then you
# probably should define those extensions to indicate media types:
#
AddType application/x-compress .Z
AddType application/x-gzip .gz .tgz
AddType application/x-httpd-php .php //添加此行
AddType application/x-httpd-php-source .phps //添加此行

[root@localhost ~]# sed -i '/    DirectoryIndex/s/index.html/index.php index.html/g' /etc/httpd24/httpd.conf

//重启apache服务
[root@localhost ~]# apachectl stop
[root@localhost ~]# apachectl start
5.验证

