用 Jest 测试单文件组件
1、安装 Jest 和 Vue Test Utils
npm install --save-dev jest @vue/test-utils
2、配置 package.json
// package.json
{
  "scripts": {
    "test": "jest"
  }
}
3、需要安装和配置 vue-jest 预处理器
npm install --save-dev vue-jest
4、在package.json 中创建一个 jest 块或在项目根目录创建 jest.config.js
module.exports = {
  moduleFileExtensions: ['js', 'jsx', 'json', 'vue'],
  transform: {
    '^.+\.vue$': 'vue-jest',
    '.+\.(css|styl|less|sass|scss|svg|png|jpg|ttf|woff|woff2)$':
      'jest-transform-stub',
     // 为 Jest 配置 Babel
    '^.+\.jsx?$': 'babel-jest'
  },
  transformIgnorePatterns: ['/node_modules/'],
  // 别名
  moduleNameMapper: {
    '^@/(.*)$': '<rootdir>/src/$1'
  },
  snapshotSerializers: ['jest-serializer-vue'],
  testMatch: [
    '**/tests/unit/**/*.spec.(js|jsx|ts|tsx)|**/__tests__/*.(js|jsx|ts|tsx)'
  ],
  testURL: 'http://localhost/',
  watchPlugins: [
    'jest-watch-typeahead/filename',
    'jest-watch-typeahead/testname'
  ]
};
错误信息处理
1、babel 解析 es6 出错,需要配置 babel 预设

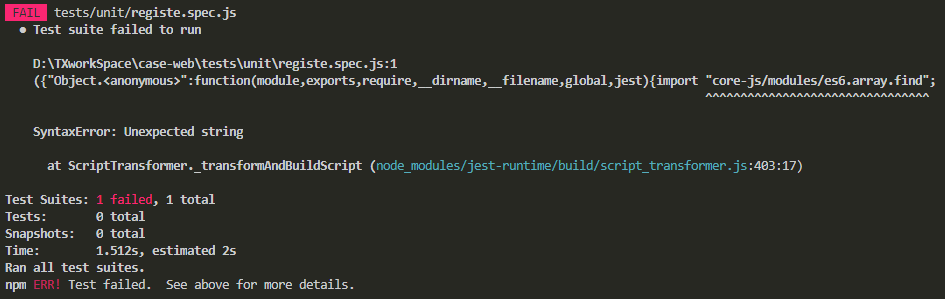
> 需要配置安装 @babel/preset-env [babel-preset-env 会有问题]
npm install --save-dev @babel/preset-env
> 配置 babel.config.js
module.exports = {
  presets: [
    // 使可以正常运行 vue 项目,
    '@vue/app',
    [
      '@babel/preset-env',
      {
        modules: false,
      }
    ]
  ],
  env: {
    test: {
      presets: [['@babel/preset-env', { targets: { node: 'current' } }]]
    }
  }
}
2、npm test

> 清除缓存,然后再执行测试参考链接
最后问题还是很多,比如 UI 包的引用,webpack require.context 的问题等
然后就决定重新创建一个项目,看看有没有问题(想着官网的例子不应该是有问题的)
1、创建项目
vue create jest-demo
2、选择插件包(前一个项目大致的插件【vue-router, vuex, dart-sass, babel, eslint, unit-jest】)安装
vue-router, vuex, dart-sass, babel, eslint, unit-jest
3、写一个简单的组件('@/components/HelloWorld.vue')用做测试,简单含有一些之前项目会遇到的情况(store【如 mapGetter】、element-ui标签)
<template>
  <div class="hello">
    <div>{{msg}}</div>
    <el-row type="flex" align="middle">
      <el-col :span="4">userName</el-col>
      <el-col :span="8"><el-input v-model="moduleUserName"></el-input></el-col>
    </el-row>
    <el-button type="primary" @click="changeUser">change user</el-button>
  </div>
</template>

<script>
import { mapGetters, mapMutations } from 'vuex'
export default {
  name: 'HelloWorld',
  props: {
    msg: String,
  },
  data() {
    return {
    }
  },
  computed: {
    ...mapGetters(['storeUserName']),
    moduleUserName: {
      set(name) {
        this.updateUserName(name)
      },
      get() {
        return this.storeUserName
      }
    }
  },
  methods: {
    ...mapMutations(['updateUserName']),
    changeUser() {

    },
  }
};
</script>
4、写一个对应的测试文件
import { createLocalVue, shallowMount } from '@vue/test-utils';
import Vuex from 'vuex'
import ElementUI from 'element-ui';
import HelloWorld from '@/components/HelloWorld.vue';
import store from '@/store'

describe('HelloWorld.vue', () => {
  it('renders props.msg when passed', () => {
    const localVue = createLocalVue()
    localVue.use(Vuex)
    localVue.use(ElementUI)
    const msg = 'new message';
    const wrapper = shallowMount(HelloWorld, {
      // 做一个数据的传
      propsData: { msg },
      // 使用 store
      store,
      // 避免混入和安装插件而污染全局 Vue
      localVue,
    });
    expect(wrapper.text()).toMatch(msg);
  });
});
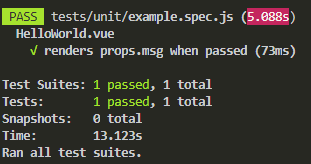
OK 没有问题了,把包的配置和各文件的配置写入老再试试
5、原项目中有自动引入固定前缀的组件的插件,需要用到 webpack 的 require.context 函数对文件做检索,然后 babel-jest 是没有的,所以需要引用一个三方的插件来提供这个功能
- 安装 babel-plugin-require-context-hook
cnpm install babel-plugin-require-context-hook
- 在测试文件夹内创建文件 tests/unit/lib/register-context.js
import registerRequireContextHook from 'babel-plugin-require-context-hook/register';
registerRequireContextHook();
- 在 jest.config.js 中配置 jest 预配置,使可以使用 require.context
setupFiles: ['<rootdir>/tests/unit/lib/register-context.js']
- 在 babel.config.js 中配置 test 环境插件 require-context-hook
env: {
    test: {
        plugins: ['require-context-hook']
    }
}
6、其他的一些设置
- 因为项目中有引用 element-ui 和 vue-awesome,需要被 babel 解析,排除掉这两个包,在 jest.config.js 中配置
transformIgnorePatterns: [
    'node_modules/(?!(element-ui|vue-awesome)/)'
 ],
- 因为很多测试组件的时候需要引入很多文件或包,所以就提出来 js 文件,类似 vue 的 main.js ,做入口的统一处理,
- 创建 tests/unit/lib/before-test.js 【基本的都是在 main.js 中引入的或添加】
// 为了方便 单元测试
// eslint-disable-next-line import/extensions
import element from '@/plugins/element'
import baseComponent from '@/plugins/base-component'
import registeSvgIcon from '@/plugins/registe-svg-icon'
import API from '@/request/api'
import axios from '@/request'
import utils from '@/utils'
jest.mock('axios')
export default (Vue) => {
  element(Vue)
  baseComponent(Vue)
  registeSvgIcon(Vue)
  Vue.prototype.$API = API
  Vue.prototype.axios = axios
  Vue.prototype.$util = utils
}
- 创建 Hello.vue 组件【@/views/pages/Hello】
<template>
  <div class="hello">hello</div>
</template>

<script>
export default {
  name: 'hello',
  created() {
    console.log('hello')
  }
}
</script>

<style lang="scss" scoped="">
.hello {}
</style>
- 创建测试文件 tests/unit/hello.spec.js
import { shallowMount, createLocalVue } from '@vue/test-utils'
import './lib/before-test'
import Hello from '@/views/pages/Hello'

describe('我是外层分组', () => {
  const localVue = createLocalVue()
  const wrapper = shallowMount(Hello, { localVue })
  it('wrapper 是一个 vue 组件实例', () => {
    expect(wrapper.isVueInstance()).toBeTruthy()
  })
})

7、然后就可以学习 jest ,并用 jest 具体的添加单元测试了【虽然没有按问题来解决,但是项目添加单元测试总算OK了,先学习jest吧,再遇到问题再解决问题,结果是好的就好了~~】
- 其他的一些问题

原因:jsdom不支持canvas,需要额外引入包
解决:安装jest-canvas-mock包,在jest的配置文件中添加 setupFiles: ['jest-canvas-mock']