react获取服务器APi接口的数据:
react中没有提供专门的请求数据的模块。但是我们可以使用任何第三方请求数据模块实现请求数据
一、axios 获取Api数据
使用文档:https://www.npmjs.com/package/axios
git项目地址:https://github.com/axios/axios
axios的作者觉得jsonp不太友好,推荐用CORS方式更为干净(后端运行跨域)
npm官网:https://www.npmjs.com,在其搜索:axios即可看到详细说明。接下来cmd运行:

1、安装axios模块 npm install axios  --save   /  cnpm install axios  --save
(--save必加,表示把模块写入配置文件,否则别人无法运行;建议用cnpm 前者容易失败)

2、在哪里使用就在哪里引入 import axios from 'axios'

3、看文档使用
【调用api关键代码】:
var api='http://www.phonegap100.com/appapi.php?a=getPortalList&catid=20';
axios.get(api)
.then(function (response) {
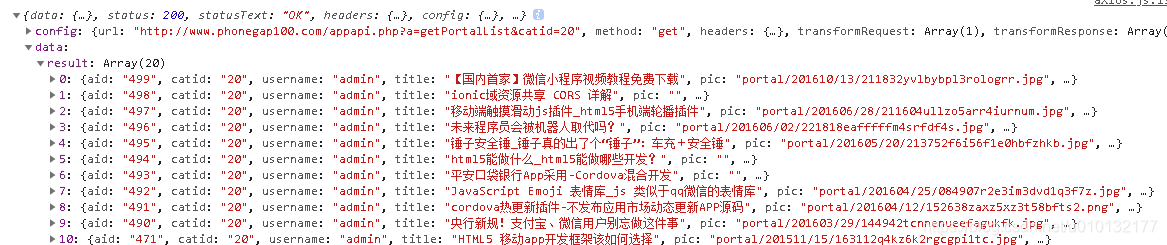
console.log(response);
})
.catch(function (error) {
console.log(error);
});
【axios完整示例】:
- 首先,在[ src/components/ ]目录下建两个文件:[home.js]、[axios.js];
- api示例地址:http://www.phonegap100.com/appapi.php?a=getPortalList&catid=20
//【 Api接口要在服务器上提前设置允许跨域,否则请求不到数据】
- 实现:从指定的Api接口获取数据展示出来
【home.js】
import React,{Component} from 'react';
import Axios from './axios.js';
class Home extends Component{
constructor(props){
super(props);
this.state={
title:'首页模块'
}
}
render(){
return(
<div>
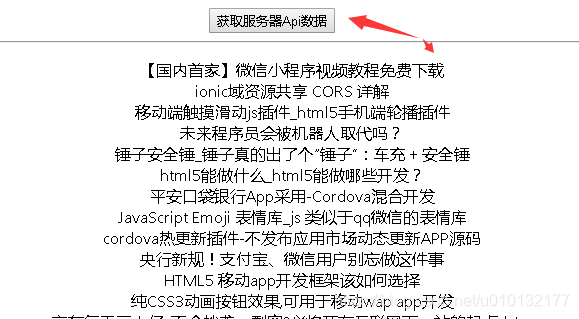
<h1 >从服务器Api接口获取数据示例</h1>
<Axios />
</div>
)
}
}
export default Home;
【axios.js】
import React, { Component } from 'react';
import axios from 'axios';  //【1】获取axios模块(从服务器获取数据模块)

class Axios extends Component {
    constructor(props){
        super(props);

        this.state={
          list:[]
        }
    }

    //【2】获取Api数据函数
    getApi=()=>{
        // Api接口要在服务器上提前设置允许跨域
        let api='http://www.phonegap100.com/appapi.php?a=getPortalList&catid=20';

            axios.get(api) //获取Api主函数
            .then((response)=>{ //获取到则执行:(其下要用到this,所以要用箭头函数)
                console.log(response);
                //把获取到的数据设置到state的list里
                this.setState({
                    list:response.data.result
                })
            })
            .catch((error)=>{//获取失败则执行 (其下要用this,所以用箭头函数)
                console.log(error);
            });
    }

    render() {
    //【3】视图部分:展示api数据
      return (
        <div>
            <button onClick={this.getApi}>获取服务器Api数据</button>
            <br/><hr/>
            <ul>
            {this.state.list.map((value,key)=>{
                    return <li key={key}>{value.title}</li>
                })
            }
            </ul>
        </div>
      );
    }
  }
  export default Axios;
【效果】:
二、fetch-jsonp 获取json数据
详细使用文档:https://www.npmjs.com/package/fetch-jsonp
git项目地址:https://github.com/camsong/fetch-jsonp
1、安装 npm install fetch-jsonp  --save /   cnpm install fetch-jsonp  --save
2、import fetchJsonp from 'fetch-jsonp'
3、看文档使用
4、与axios区别,它可以读取jsonp数据,此数据支付跨域,不需要在服务器设置
fetchJsonp('/users.jsonp')
.then(function(response) {
    return response.json()
}).then(function(json) {
	console.log('parsed json', json)
}).catch(function(ex) {
	console.log('parsing failed', ex)
})
fetch-jsonp项目实例
1、接口:http://www.phonegap100.com/appapi.php?a=getPortalList&catid=20&callback=myjsonp
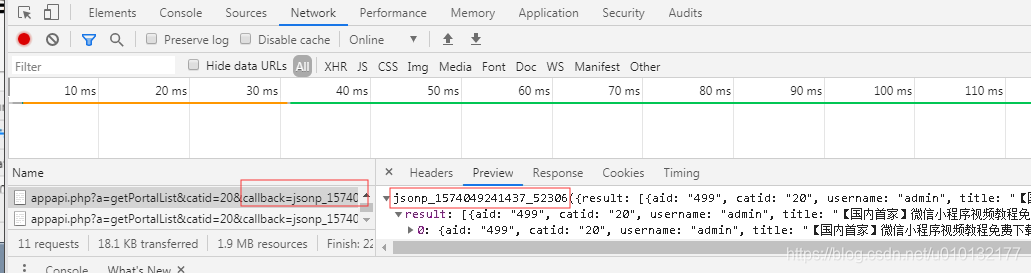
2、接口首先要支持jsonp,测试方法在最后加 &callback=myjsonp,返回结果会变成如下:

3、和第一种明显区别就是请求地址多了个&callback=xxx
4、在[ src/components/ ]目录下建两个文件:[home.js]、[fetchjson.js];
【home.js】
import React,{Component} from 'react';
import Fetchjson from './fetjson';
class Home extends Component{
constructor(props){
super(props);
this.state={
title:'首页模块'
}
}
render(){
return(
<div>
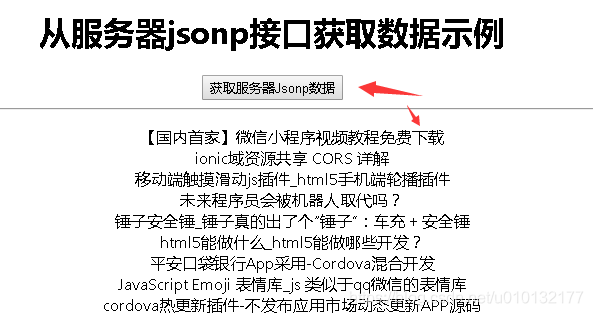
<h1 >从服务器jsonp接口获取数据示例</h1>
<Fetchjson />
</div>
)
}
}
export default Home;
【fetchjson.js】
import React, { Component } from 'react';
import fetchJsonp from 'fetch-jsonp';  //【1】获取jsonp模块(从服务器获取数据模块)

class Fetchjson extends Component {
    constructor(props){
        super(props);

        this.state={
          list:[]
        }
    }

    //【2】获取jsonp数据函数
    //api接口最后要有&callback=xxx。有些服务器会自动加,如不自动加就要手动在地址加上
    getJsonp=()=>{
        //获取数据
       var api="http://www.phonegap100.com/appapi.php?a=getPortalList&catid=20";
       fetchJsonp(api)
       .then(function(response) {//先转化成json格式;固定写法
           return response.json()
       }).then((json)=> { //此处要用到this.所以加箭头函数;
          console.log(json);
           this.setState({
               list:json.result
           })
       }).catch(function(ex) {// 获取失败报错
           console.log('未成成功获取', ex)
       })
   }

    render() {
    //【3】视图部分:展示数据
      return (
        <div>
            <button onClick={this.getJsonp}>获取服务器Jsonp数据</button>
            <br/><hr/>
            <ul>
            {this.state.list.map((value,key)=>{
                    return <li key={key}>{value.title}</li>
                })
            }
            </ul>
        </div>
      );
    }
  }
  export default Fetchjson;
【效果】:
【请求数据效果】可以看到虽然我们没加callback但服务器自己帮我们加上了:
三、其他请求数据的方法也可以...
- 自己封装模块用原生js实现数据请求. 也可以...
远程测试API接口:
get请求:
http://www.phonegap100.com/appapi.php?a=getPortalList&catid=20
jsonp请求地址:
http://www.phonegap100.com/appapi.php?a=getPortalList&catid=20&callback=?