一、模型概述
https://docs.djangoproject.com/zh-hans/3.0/intro/tutorial02/
https://www.runoob.com/django/django-model.html
Django 对各种数据库提供了很好的支持,包括:PostgreSQL、MySQL、SQLite、Oracle。
Django 为这些数据库提供了统一的调用API。 我们可以根据自己业务需求选择不同的数据库。
MySQL 是 Web 应用中最常用的数据库。本章节我们将以 Mysql 作为实例进行介绍。你可以通过本站的 MySQL 教程 了解更多Mysql的基础知识。
二、ORM框架简介
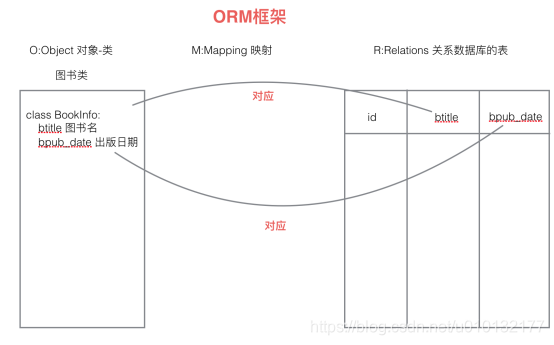
- django中内嵌了ORM框架,ORM框架可以将类和数据表进行对应起来,只需要通过类和对象就可以对数据表进行操作。
- 在Django中主要是设计类:模型类。
- ORM另外一个作用:根据设计的类生成数据库中的表。
Django的ORM框架

- O(objects):类和对象。
- R(Relation):关系,关系数据库中的表格。
- M(Mapping):映射。
Django ORM框架的功能:
- a)建立模型类和表之间的对应关系,允许我们通过面向对象的方式来操作数据库。
- b)根据设计的模型类生成数据库中的表格。
- c)通过方便的配置就可以进行数据库的切换。
三、定义模型类以实现数据库表的建立
接 https://blog.csdn.net/u010132177/article/details/103788677 创建的项目
目录结构如下:不重要部分已删除
D:adjango-appproject1>tree /f
│  db.sqlite3
│  manage.py
├─app1
│  │  admin.py
│  │  apps.py
│  │  models.py
│  │  tests.py
│  │  views.py
│  │  __init__.py
│  │
│  ├─migrations
│  │  │  __init__.py
└─project1
    │  asgi.py
    │  settings.py
    │  urls.py
    │  wsgi.py
    │  __init__.py
3.1定义模型类,并在数据库生成对应的表
第1步,在models.py定义类(pj1app-te1models.py)
from django.db import models
# 设计和表对应的类,模型类
# Create your models here.

# 一类
# 图书类
class BookInfo(models.Model):
    '''图书模型类'''
    # 图书名称,CharField说明是一个字符串,max_length指定字符串的最大长度
    btitle = models.CharField(max_length=20)
    # 出版日期,DateField说明是一个日期类型
    bpub_date = models.DateField()
第2步,生成迁移文件
命令:python manage.py makemigrations
- 迁移文件是根据模型类生成的。
- 会在生成一个迁移文件:app1migrations�001_initial.py
> py manage.py makemigrations
# Migrations for 'app1':
# app1migrations�001_initial.py
# - Create model BookInfo
0001_initial.py 详情:
from django.db import migrations, models

class Migration(migrations.Migration):
    initial = True
    dependencies = [
    ]

    operations = [
        migrations.CreateModel(
            name='BookInfo',
            fields=[
                ('id', models.AutoField(auto_created=True, primary_key=True, serialize=False, verbose_name='ID')),
                ('btitle', models.CharField(max_length=20)),
                ('bpub_date', models.DateField()),
            ],
        ),
    ]
第3步,执行迁移文件,在数据库生成表
命令:python mange.py migrate
- 根据迁移文件,在数据库生成表。(默认是sqlite数据库)
- 生成表名的默认格式:应用名_模型类名小写
执行详情:
D:adjango-appproject1>py manage.py migrate

Operations to perform:
  Apply all migrations: admin, app1, auth, contenttypes, sessions
Running migrations:
  Applying contenttypes.0001_initial... OK
  Applying auth.0001_initial... OK
  Applying admin.0001_initial... OK
  Applying admin.0002_logentry_remove_auto_add... OK
  Applying admin.0003_logentry_add_action_flag_choices... OK
  Applying app1.0001_initial... OK
  Applying contenttypes.0002_remove_content_type_name... OK
  Applying auth.0002_alter_permission_name_max_length... OK
  Applying auth.0003_alter_user_email_max_length... OK
  Applying auth.0004_alter_user_username_opts... OK
  Applying auth.0005_alter_user_last_login_null... OK
  Applying auth.0006_require_contenttypes_0002... OK
  Applying auth.0007_alter_validators_add_error_messages... OK
  Applying auth.0008_alter_user_username_max_length... OK
  Applying auth.0009_alter_user_last_name_max_length... OK
  Applying auth.0010_alter_group_name_max_length... OK
  Applying auth.0011_update_proxy_permissions... OK
  Applying sessions.0001_initial... OK
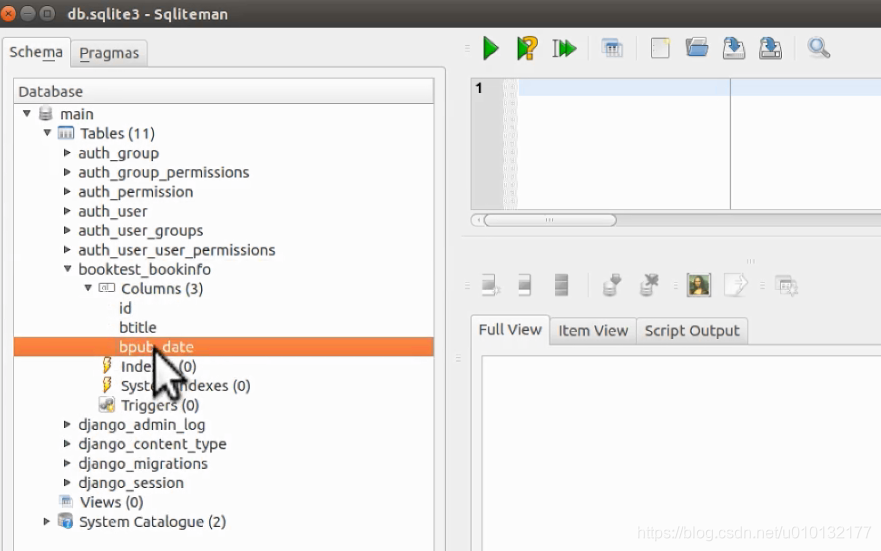
注:生成的表放在数据库 【db.sqlite3】 内,表详情如下(booktest_bookinfo应为app1_bookinfo)
第4步,通过模型类操作数据表:
进入项目shell的命令:
python manage.py shell
以下为在相互shell终端中演示的例子:
0)首先导入模型类:
from booktest.models import BookInfo,HeroInfo
1)向booktest_bookinfo表中插入一条数据。
b = BookInfo() #定义一个BookInfo类的对象
b.btitle ='天龙八部' #定义b对象的属性并赋值
b.bpub_date = date(1990,10,11)
b.save() #才会将数据保存进数据库
2) 查询出booktest_bookinfo表中id为1的数据。
b = BookInfo.objects.get(id=1)
3) 在上一步的基础上改变b对应图书的出版日期。
b.bpub_date = date(1989,10,21)
b.save() #才会更新表格中的数据
4) 紧接上一步,删除b对应的图书的数据。
b.delete() #才会删除
5) 向booktest_heroInfo表中插入一条数据。
h = HeroInfo()
h.hname = '郭靖'
h.hgender = False
h.hcomment = ‘降龙十八掌’
b2 = BookInfo.objects.get(id=2)
h.hbook = b2  #给关系属性赋值,英雄对象所属的图书对象
h.save()
6) 查询图书表里面的所有内容。
BookInfo.objects.all()
HeroInfo.objects.all()
第4步实操记录,增、删、改、查
D:adjango-appproject1>py manage.py shell
Python 3.7.1 (v3.7.1:260ec2c36a, Oct 20 2018, 14:57:15) [MSC v.1915 64 bit (AMD6
4)] on win32
Type "help", "copyright", "credits" or "license" for more information.
(InteractiveConsole)
>>> from app1.models import BookInfo
>>> b=BookInfo()
>>> b.btitle='天龙八部'
>>> from datetime import date
>>> b.bpub_date=date(1998,1,2)
>>> b.save()
>
#【★★★查寻所有数据】
>>> BookInfo.objects.all()
<QuerySet [<BookInfo: BookInfo object (1)>]>

#【★★★查询单条数据】获取id=1的BookInfo信息
>>> b2=BookInfo.objects.get(id=1)
>>> type(b2)
<class 'app1.models.BookInfo'>
>>> b2
<BookInfo: BookInfo object (1)>

#【查看对应数据】
>>> b2.btitle
'天龙八部'
>>> b2.bpub_date
datetime.date(1998, 1, 2)
>>> b2.id
1

#【更新对应数据】,要保存之后才会生效
>>> b2.bpub_date=date(1991,2,2)
>>> b2.save()
b2.delete() #也可删除对应数据
b.delete()# 删除刚刚插入的数据
第5步,再加一个models.py类,且加上关联
再加一个models.py类,定义一个新数据表,且与BookInfo类表建立关联
错误解决: https://blog.csdn.net/weixin_33991727/article/details/93075685

报错:
TypeError: init() missing 1 required positional argument: 'on_delete'

原因:
在django2.0后,定义外键和一对一关系的时候需要加on_delete选项,
此参数为了避免两个表里的数据不一致问题,不然会报错:

解决:把最后一句关联选项加一个on_delete参数。
hbook = models.ForeignKey('BookInfo', on_delete=models.CASCADE)
1)在project1/models.py
from django.db import models
# 设计和表对应的类,模型类
# Create your models here.

# 一类
# 图书类
class BookInfo(models.Model):
    '''图书模型类'''
    # 图书名称,CharField说明是一个字符串,max_length指定字符串的最大长度
    btitle = models.CharField(max_length=20)
    # 出版日期,DateField说明是一个日期类型
    bpub_date = models.DateField()

# 多类
# 英雄人物类
# 英雄名 hname
# 性别 hgender
# 年龄 hage
# 备注 hcomment
# 关系属性 hbook,建立图书类和英雄人物类之间的一对多关系
class HeroInfo(models.Model):
    '''英雄人物模型类'''
    hname = models.CharField(max_length=20) # 英雄名称
    # 性别,BooleanField说明是bool类型,default指定默认值,False代表男
    hgender = models.BooleanField(default=False)
    # 备注
    hcomment = models.CharField(max_length=128)
    # 关系属性 hbook,建立图书类和英雄人物类之间的一对多关系
    # 关系属性对应的表的字段名格式: 关系属性名_id
    hbook = models.ForeignKey('BookInfo', on_delete=models.CASCADE) #对应BookInfo表的主键ID
1.1建立迁移文件,并利用其创建对应的 HeroInfo表
project1>py manage.py makemigrations
'''
Migrations for app1:
app1migrations�002_heroinfo.py
- Create model HeroInfo
'''
project1>py manage.py migrate
'''
Operations to perform:
Apply all migrations: admin, app1, auth, contenttypes, sessions
Running migrations:
Applying app1.0002_heroinfo... OK
'''
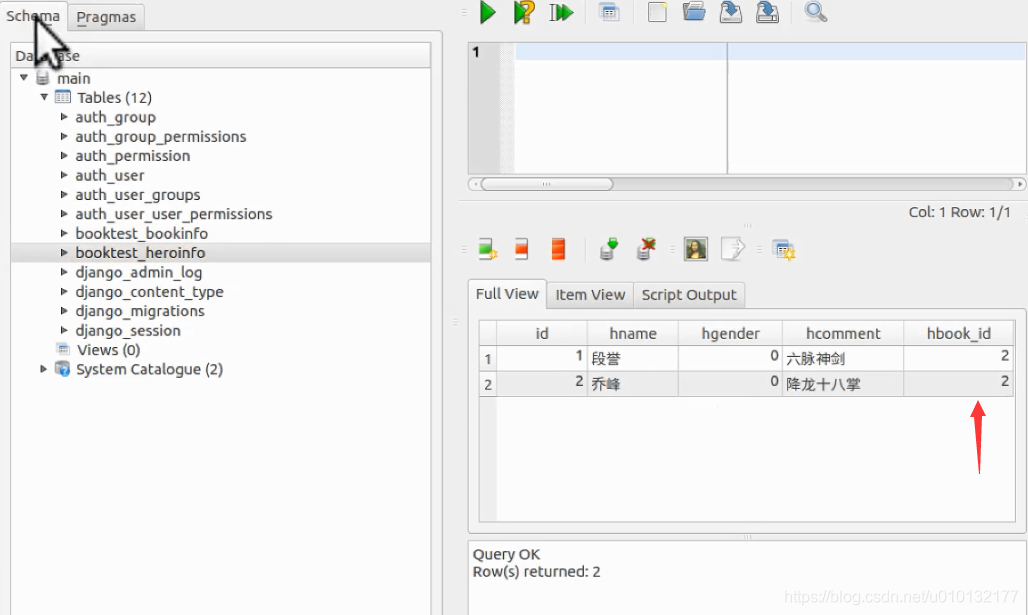
2)向HeroInfo插入数据
D:adjango-appproject1>py manage.py shell
Python 3.7.1 (v3.7.1:260ec2c36a, Oct 20 2018, 14:57:15) [MSC v.1915 64 bit (AMD6
4)] on win32
Type "help", "copyright", "credits" or "license" for more information.
(InteractiveConsole)
>>> from app1.models import BookInfo,HeroInfo
>>> from datetime import date
>>> b=BookInfo()
>>> b.title='天龙八部'
>>> b.bpub_date=date(1992,1,1)
>>> b.save()
>
>>> h=HeroInfo()
>>> h.hname='段誉'
>>> h.hgender=False #性别男
>>> h.comment='六脉神剑'
>>> h.hbook=b #关联键,要关联BookInfo,必须要关联到 对应表的对象,b=BookInfo()
>>> h.save()

>>> h2=HeroInfo()
>>> h2.hname='乔峰'
>>> h2.hgender=False #性别男
>>> h2.comment='降龙十八掌'
>>> h2.hbook=b #关联键,要关联BookInfo,必须要关联到 对应表的对象,b=BookInfo()
>>> h2.save()
6.关联操作
- 查询出id为2的图书中所有英雄人物的信息。
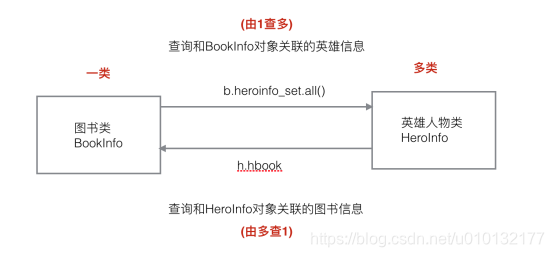
b = BookInfo.objects.get(id=2)
b.heroinfo_set.all() #查询出b图书中所有英雄人物的信息
知识点:如果加入了中文要在py文件头部加如下一行:
# -*- coding: UTF-8 -*-
四、Django的mysql数据库配置
【参考】:https://docs.djangoproject.com/zh-hans/3.0/ref/databases/#mysql-notes
https://www.w3cschool.cn/mysql/mysql-install.html
https://blog.csdn.net/zx_water/article/details/79015603
【可视管理数据库】最好用的支持各个:navicat premium
4.1安装mysql
安装完成后需要配置环境变量(注意是mysql server 8.0):
C:Program FilesMySQLMySQL Server 8.0in
4.2 启动Mysql服务
cmd中
启动服务:
net start mysql

结束服务:
net stop mysql
如果不能启动,则计算机(右键)——管理——服务,找mysql

可发现此处mysql名变成了mysql80因此正确命令应是:
启动服务:
net start mysql80

结束服务:
net stop mysql80
4.3 通过cmd连接mysql命令:
mysql命令cmd详情
登录mysql数据库:
mysql –uroot –p #之后输入密码p.2

查看有哪些数据库:
show databases; #此处必须有分号,否则不会显示数据库

创建数据库:
create database test2 charset=utf8; #切记:指定编码

使用数据库:
use test2;

查看数据库中的表:
show tables;
cmd连接mysql实战
C:UsersAdministrator>mysql -uroot -p
Enter password: ******
Welcome to the MySQL monitor.  Commands end with ; or g.
Your MySQL connection id is 16
Server version: 8.0.13 MySQL Community Server - GPL

Copyright (c) 2000, 2018, Oracle and/or its affiliates. All rights reserved.

Oracle is a registered trademark of Oracle Corporation and/or its
affiliates. Other names may be trademarks of their respective
owners.

Type 'help;' or 'h' for help. Type 'c' to clear the current input statement.

mysql> show databases;
+--------------------+
| Database           |
+--------------------+
| information_schema |
| mysql              |
| performance_schema |
| sakila             |
| spiders            |
| sys                |
| world              |
+--------------------+
7 rows in set (0.00 sec)

mysql> create database test888 charset=utf8;
Query OK, 1 row affected, 1 warning (0.21 sec)

mysql> use test888
Database changed
mysql> use test888;
Database changed
mysql> show tables;
Empty set (0.00 sec)

mysql>
4.4 Django配置使用mysql数据库
- 在此之前必须配置,安装好Mysql数据库,并新建一个数据库。(test888)
修改project1/settings.py中的DATABASES:
# Database
# https://docs.djangoproject.com/en/3.0/ref/settings/#databases
DATABASES = {
    'default': {
        # 'ENGINE': 'django.db.backends.sqlite3',
        # 'NAME': os.path.join(BASE_DIR, 'db.sqlite3'),

        'ENGINE': 'django.db.backends.mysql',#mysql连接
        'NAME': 'test888', # 使用的数据库的名字,数据库必须手动创建
        'USER': 'root', # 链接mysql的用户名
        'PASSWORD': 'p.2', # 用户对应的密码
        'HOST': 'localhost', # 指定mysql数据库所在电脑ip
        'PORT': 3306, # mysql服务的端口号
    }
}
4.5 退出cmd的server服务重启报错:
D:adjango-appproject1>py manage.py runserver
Watching for file changes with StatReloader
Exception in thread django-main-thread:
Traceback (most recent call last):
 .
 .
 .
django.core.exceptions.ImproperlyConfigured: Error loading MySQLdb module.
Did you install mysqlclient?
4.6安装驱动
如果你没安装 mysql 驱动,会有4.5步的报错,可以执行以下命令安装:
#windows:
pip install mysqlclient

# linux
sudo pip install mysqlclient
4.6重新创建移动model文件,并执行
#生成迁移文件,如果模型没变直接运行执行即可
py manage.py makemigrations

#执行迁移文件生成对应的表
py manage.py migrate
实战:
D:adjango-appproject1>py manage.py makemigrations
No changes detected

D:adjango-appproject1>py manage.py migrate
Operations to perform:
  Apply all migrations: admin, app1, auth, contenttypes, sessions
Running migrations:
  Applying contenttypes.0001_initial... OK
  Applying auth.0001_initial... OK
  Applying admin.0001_initial... OK
  Applying admin.0002_logentry_remove_auto_add... OK
  Applying admin.0003_logentry_add_action_flag_choices... OK
  Applying app1.0001_initial... OK
  Applying app1.0002_heroinfo... OK
  Applying contenttypes.0002_remove_content_type_name... OK
  Applying auth.0002_alter_permission_name_max_length... OK
  Applying auth.0003_alter_user_email_max_length... OK
  Applying auth.0004_alter_user_username_opts... OK
  Applying auth.0005_alter_user_last_login_null... OK
  Applying auth.0006_require_contenttypes_0002... OK
  Applying auth.0007_alter_validators_add_error_messages... OK
  Applying auth.0008_alter_user_username_max_length... OK
  Applying auth.0009_alter_user_last_name_max_length... OK
  Applying auth.0010_alter_group_name_max_length... OK
  Applying auth.0011_update_proxy_permissions... OK
  Applying sessions.0001_initial... OK
4.7 安装完成后,启动web服务即可:
py manage.py runserver