一、模板的基础配置及使用
【参考】https://docs.djangoproject.com/zh-hans/3.0/topics/templates/
- 作为Web框架,Django提供了模板,用于编写html代码,还可以嵌入模板代码更快更方便的完成页面开发,再通过在视图中渲染模板,将生成最终的html字符串返回给客户端浏览器。模版致力于表达外观,而不是程序逻辑。模板的设计实现了业务逻辑view与显示内容template的分离,一个视图可以使用任意一个模板,一个模板可以供多个视图使用。
1.1模板包含两部分:
- 静态部分,包含html、css、js。
- 动态部分,就是模板语言。
Django模板语言,简写DTL,定义在django.template包中。 创建项目后,在"项目名称/settings.py"文件中定义了关于模板的配置。
# Application definition
INSTALLED_APPS = [
    'django.contrib.admin',
    'django.contrib.auth',
    'django.contrib.contenttypes',
    'django.contrib.sessions',
    'django.contrib.messages',
    'django.contrib.staticfiles',
    'app1', #【2】注册项目的第1个应用
]

TEMPLATES = [
    {
        'BACKEND': 'django.template.backends.django.DjangoTemplates',
         #【4】设置模板目录 或 'DIRS': [BASE_DIR+'/templates'],
        'DIRS': [os.path.join(BASE_DIR,'templates')],
        'APP_DIRS': True,
        'OPTIONS': {
            'context_processors': [
                'django.template.context_processors.debug',
                'django.template.context_processors.request',
                'django.contrib.auth.context_processors.auth',
                'django.contrib.messages.context_processors.messages',
            ],
        },
    },
]
1.2模板目录
DIRS定义一个目录列表,模板引擎按列表顺序搜索这些目录以查找模板文件,通常是在项目的根目录下创建templates目录。
1.2.2模板文件的使用
通常是在视图函数中使用模板产生html内容返回给客户端。
a) 加载模板文件 loader.get_template
获取模板文件的内容,产生一个模板对象。
b) 定义模板上下文 RequeseContext
给模板文件传递数据。
c) 模板渲染产生html页面内容 render
用传递的数据替换相应的变量,产生一个替换后的标准的html内容。
'''渲染一个模板正常的流程'''
def my_render(request, template_path, context={}):
    # 1.加载模板文件,获取一个模板对象
    temp = loader.get_template(template_path)
    # 2.定义模板上下文,给模板文件传数据
    context = RequestContext(request, context)
    # 3.模板渲染,产生一个替换后的html内容
    res_html = temp.render(context)
    # 4.返回应答
    return HttpResponse(res_html)

'''使用刚自定义的渲染模板'''
def index(request):
    return my_render(request, 'booktest/index.html')
1.3Django处理模板分为两个阶段:
- 加载:根据给定的路径找到模板文件,编译后放在内存中。
- 渲染:使用上下文数据对模板插值并返回生成的字符串。
为了减少开发人员重复编写加载、渲染的代码,Django提供了简写函数render,用于调用模板。
'''但好在系统为我们提供了一个快捷函数渲染模板只需要一步即可:'''
from django.shortcuts import render

def index(request):
    return render(request, 'booktest/index.html')
1.4 Django模板加载顺序
- views.py定义一个函数渲染一个模板。
- 配置好urls.py
- 但不要设置templates里的html模板
- 先在1.1配置的路径找模板:
'DIRS': [os.path.join(BASE_DIR,'templates')] - 然后在注册的app里找,前提是它们目录下有templates这个文件夹
INSTALLED_APPS = [ 'django.contrib.admin', 'django.contrib.auth', 'django.contrib.contenttypes', 'django.contrib.sessions', 'django.contrib.messages', 'django.contrib.staticfiles', 'app1', #【2】注册项目的第1个应用 ]
'''3.但不要设置templates里的html模板,会有报错,将会展示模板寻找加载的顺序'''
Template-loader postmortem
Django tried loading these templates, in this order:
Using engine django:
django.template.loaders.filesystem.Loader: D:adjango-appproject2	emplatesapp2index2.html (Source does not exist)
django.template.loaders.app_directories.Loader: C:UsersAdministratorAppDataLocalProgramsPythonPython37libsite-packagesdjangocontribadmin	emplatesapp2index2.html (Source does not exist)
django.template.loaders.app_directories.Loader: C:UsersAdministratorAppDataLocalProgramsPythonPython37libsite-packagesdjangocontribauth	emplatesapp2index2.html (Source does not exist)
二、模板语言
模板语言简称为DTL。(Django Template Language)
1. 模板变量
模板变量名是由数字,字母,下划线和点组成的,不能以下划线开头。
使用模板变量:{{模板变量名}}
1.1 模板变量的解析顺序:
方式1:{{ book.btitle }}
- 首先把book当成一个字典,把btitle当成键名,进行取值book['btitle']
- 把book当成一个对象,把btitle当成属性,进行取值book.btitle
- 把book当成一个对象,把btitle当成对象的方法,进行取值book.btitle
方式2:{{book.0}}
- 首先把book当成一个字典,把0当成键名,进行取值book[0]
- 把book当成一个列表,把0当成下标,进行取值book[0]
如果解析失败,则产生内容时用空字符串填充模板变量。
使用模板变量时,.前面的可能是一个字典,可能是一个对象,还可能是一个列表。
模板变量实例
0)app1/models.py以后示例通用
from django.db import models

# Create your models here.
class BookInfo(models.Model):
    '''图书模型类'''
    btitle = models.CharField(max_length=20) #,db_column='title'自定义表的标题名为title而不是默认属性btitle
    bpub_date = models.DateField()
    bread = models.IntegerField(default=0)
    bcomment = models.IntegerField(default=0)
    isDelete = models.BooleanField(default=False)

    class Meta:#自定义表名为bookinfo(因为用的是之前示例的数据库表,它的名字是默认配置的app1_bookinfo)
        db_table = 'app1_bookinfo'
1)views.py
from django.shortcuts import render
from django.template import loader,RequestContext
from django.http import HttpResponse
from app2.models import BookInfo

# /temp_var
def temp_var(request):
    '''模板变量'''
    my_dict = {'title':'字典键值'}
    my_list = [1,2,3]
    book = BookInfo.objects.get(id=1)
    # 定义模板上下文
    context = {'my_dict':my_dict, 'my_list':my_list, 'book':book}
    return render(request, 'app2/temp_var.html', context)
2)templates/app2/tem_var.html
<!DOCTYPE html>
<html lang="en">
<head>
    <meta charset="UTF-8">
    <title>模板变量</title>
</head>
<body>
使用字典属性:{{ my_dict.title }}<br/>
使用列表元素:{{ my_list.1 }}<br/>
使用对象属性:{{ book.btitle }}
</body>
</html>
3)app1/urls.py
path('temp_var', views.temp_var),
效果:http://127.0.0.1:8000/temp_var
使用字典属性:字典键值
使用列表元素:2
使用对象属性:射雕英雄传
2. 模板标签
https://docs.djangoproject.com/zh-hans/3.0/ref/templates/builtins/#built-in-tag-reference
{% 代码段 %}
	for循环:
	{% for x in 列表 %}
	# 列表不为空时执行
	{% empty %}
	# 列表为空时执行
	{% endfor %}
- 可以通过
{{ forloop.counter }}得到for循环遍历到了第几次。
{% if 条件 %}
{% elif 条件 %}
{% else %}
{% endif %}
- 关系比较操作符:> < >= <= == !=
- 注意:进行比较操作时,比较操作符两边必须有空格。
- 逻辑运算:not and or
1)views.py
from django.shortcuts import render
from django.template import loader,RequestContext
from django.http import HttpResponse
from app2.models import BookInfo

# /temp_tags
def temp_tags(request):
    '''模板标签'''
    # 1. 查找所有图书的信息
    books = BookInfo.objects.all()
    return render(request,'app2/temp_tags.html', {'books':books})
2) templates/app2/temp_tags.html
<!DOCTYPE html>
<html lang="en">
<head>
    <meta charset="UTF-8">
    <title>模板标签</title>
    <style>
        .red {
            background-color: red;
        }
        .yellow {
            background-color: yellow;
        }
        .green {
            background-color: green;
        }
    </style>
</head>
<body>
<ul>
    {% for book in books %}
        {% if book.id <= 2 %}
            <li class="red">{{ forloop.counter }}--{{ book.btitle }}</li>
        {% elif book.id <= 5 %}
            <li class="yellow">{{ forloop.counter }}--{{ book.btitle }}</li>
        {% else %}
            <li class="green">{{ forloop.counter }}--{{ book.btitle }}</li>
        {% endif %}
    {% endfor %}
</ul>
</body>
</html>
3)app1/urls.py
path('temp_tags/', views.temp_tags),
效果:http://127.0.0.1:8000/temp_tags

三、过滤器
参考:
https://docs.djangoproject.com/zh-hans/3.0/howto/custom-template-tags/#howto-writing-custom-template-filters
参考:https://docs.djangoproject.com/zh-hans/3.0/ref/templates/builtins/#ref-templates-builtins-filters
3.1过滤器用于对模板变量进行操作。
- date:改变日期的显示格式。
- length:求长度。字符串,列表.
- default:如果模板变量不存在,则设置模板变量的显示默认值。
3.2格式:模板变量|过滤器:参数
- 自定义过滤器。
- 自定义的过滤器函数,至少有一个参数,最多两个
示例
改变日期显示过滤器、过滤求变量长度、设置默认显示
1)views.py
# /temp_filter
def temp_filter(request):
    '''模板过滤器'''
    # 1. 查找所有图书的信息
    books = BookInfo.objects.all()
    return render(request,'app2/temp_filter.html', {'books':books})
2)templates/app2/temp_filter.html
<!DOCTYPE html>
<html lang="en">
<head>
<meta charset="UTF-8">
<title>模板过滤器</title>
<style>
.red {
background-color: red;
}
.yellow {
background-color: yellow;
}
.green {
background-color: green;
}
</style>
</head>
<body>
<ul>
{% for book in books %}
{% if book.id <= 2 %}
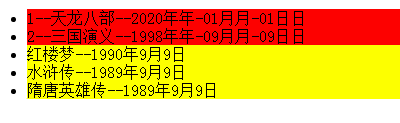
<li class="red">{{ book.id }}--{{ book.btitle }}--{{ book.bpub_date|date:'Y年年-m月月-d日日'}}</li>
{% else %}
<li class="yellow">{{ book.btitle }}--{{ book.bpub_date }}</li>
{% endif %}
{% endfor %}
</ul>
<!-- 【default】如果content不存在,则输出默认值hello -->
default过滤器:<br/>
{{ content|default:'hello' }}
</body>
</html>
3)app2/urls.py
from django.contrib import admin
from django.urls import path,re_path
from . import views

urlpatterns = [
    path('index/', views.index),
    path('index2/', views.index2),

    path('temp_tags/', views.temp_tags),
    re_path('temp_filter/', views.temp_filter),#[1]
]
效果:http://127.0.0.1:8000/temp_filter/
3.3自定义过滤器
- 自定义的过滤器函数,至少有一个参数,最多两个
1)在【项目根目录app2 emplatetags】创建文件夹(名固定)
其它代码接3.2示例
1.1在其中建立【__init__.py、filters.py(自定义过滤器处)】两个文件
filters.py内容:
# 自定义过滤器
# 【1】过滤器其实就是python函数
from django.template import Library

# 【2】创建一个Library类的对象
register = Library()

# 【3】自定义的过滤器函数,至少有一个参数,最多两个
@register.filter
def mod(num):
    '''判断num是否为偶数'''
    return num%2 == 0
2)在模板引用自定义过滤器templates/app2/temp_filter.html
【1】 模板里引入自定义过滤器
【2】自定义过滤器使用,如果bookid为偶数则:
<!DOCTYPE html>
<html lang="en">
<!--【1】 模板里引入自定义过滤器 -->
{% load filters %}
<head>
<meta charset="UTF-8">
<title>模板过滤器</title>
<style>
.red {
background-color: red;
}
.yellow {
background-color: yellow;
}
.green {
background-color: green;
}
</style>
</head>
<body>
<ul>
{% for book in books %}
<!-- 【2】自定义过滤器使用,如果bookid为偶数则: -->
{% if book.id|mod %}
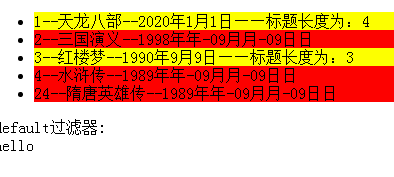
<li class="red">{{ book.id }}--{{ book.btitle }}--{{ book.bpub_date|date:'Y年年-m月月-d日日'}}</li>
{% else %}
<li class="yellow">{{ book.id }}--{{ book.btitle }}--{{ book.bpub_date }}——标题长度为:{{ book.btitle|length }}</li>
{% endif %}
{% endfor %}
<!-- <h1>html注释</h1> -->
</ul>
default过滤器:<br/>
{{ content|default:'hello' }}
</body>
</html>
3)必须重启py manage.py runserver才能生效
效果:http://127.0.0.1:8000/temp_filter/ bookid为偶数都标红
3.4 自定义多个参数过滤器
自定义的过滤器函数,至少有一个参数,最多两个
1)app2 emplatetagsfilters.py
# 自定义过滤器
# 过滤器其实就是python函数
from django.template import Library

# 创建一个Library类的对象
register = Library()


# 自定义的过滤器函数,至少有一个参数,最多两个
@register.filter
def mod(num):
    '''判断num是否为偶数'''
    return num%2 == 0

# 【1】自定义多个参数过滤器,作用是是否被某个数整除
@register.filter
def mod_val(num, val):
    '''判断num是否能被val整除'''
    return num%val == 0
2)在模板引用自定义过滤器templates/app2/temp_filter.html
【3】自定义过滤器使用,如果id能被3整除,3可以自定义任何数
<!DOCTYPE html>
<html lang="en">
    <!--【1】 模板里引入自定义过滤器 -->
    {% load filters %}
<head>
    <meta charset="UTF-8">
    <title>模板过滤器</title>
    <style>
        .red {
            background-color: red;
        }
        .yellow {
            background-color: yellow;
        }
        .green {
            background-color: green;
        }
    </style>
</head>
<body>
<ul>

    {% for book in books %}
    <!-- 【2】自定义过滤器使用,如果bookid为偶数则: -->
        {# {% if book.id|mod %} 注释掉此处#}
        <!-- 【3】自定义过滤器使用,如果id能被3整除,3可以自定义任何数: -->
        {% if book.id|mod_val:3 %}
            <li class="red">{{ book.id }}--{{ book.btitle }}--{{ book.bpub_date|date:'Y年年-m月月-d日日'}}</li>
        {% else %}
            <li class="yellow">{{ book.id }}--{{ book.btitle }}--{{ book.bpub_date }}——标题长度为:{{ book.btitle|length }}</li>
        {% endif %}
    {% endfor %}

    <!-- <h1>html注释</h1> -->
</ul>
default过滤器:<br/>
{{ content|default:'hello' }}
</body>
</html>
3)效果http://127.0.0.1:8000/temp_filter/ book.id被3整除都标红

四、模板注释
- 单行注释:
{# 注释内容 #} - 多行注释:
{% comment %}
注释内容
{% endcomment %}
3.和html注释区别:html查看源码可以看到,模板注释则不会留下任何痕迹
注释示例templates/app2/aa.html
在{% comment %}{% endcomment %}之间的内容不管是什么统统注释掉
{% comment %}
    {% for book in books %}
        {# {% if book.id <= 2 %} #}
        {# {% if book.id|mod %}#}
        {% if book.id|mod_val:3 %}
            <li class="red">{{ book.id }}--{{ book.btitle|length }}--{{ book.bpub_date|date:'Y年-m月-d日' }}</li>
        {% else %}
            <li class="green">{{ book.btitle }}--{{ book.bpub_date }}</li>
        {% endif %}
    {% endfor %}
{% endcomment %}
二—— 四 都属于模板语言知识点
五、模板继承
【模板继承作用】:也是为了重用html页面内容。和html的导航、底部拆分出来一样道理
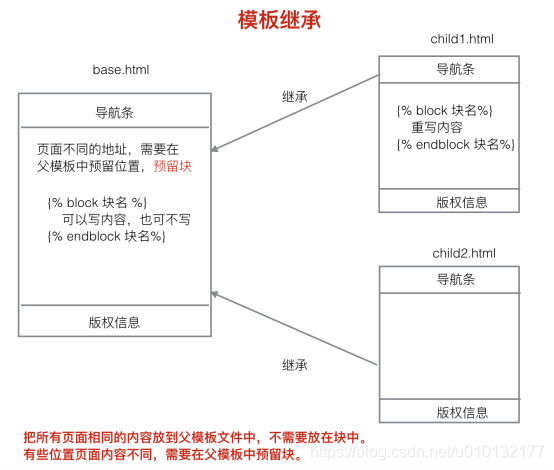
1.在父模板里可以定义块,使用标签:
{% block 块名 %}
块中间可以写内容,也可以不写
{% endblock 块名%}
子模板去继承父模板之后,可以重写父模板中的某一块的内容。
2.继承格式:{% extends 父模板文件路径%}
{% block 块名 %}
{{ block.super}} #获取父模板中块的默认内容
重写的内容
{% endblock 块名%}
模板硬编码中的字符串默认不会经过转义,如果需要转义,那需要手动进行转义。
3.模板继承实例
1)app2/urls.py
re_path('temp_inherit/', views.temp_inherit),
2)app2/views.py
# /temp_inherit
def temp_inherit(request):
    '''模板继承'''
    return render(request, 'app2/child.html')
3)头尾模板 templates/app2/base.html
<!DOCTYPE html>
<html lang="en">
<head>
    <meta charset="UTF-8">
    <!-- 【1】引用页面需不同的title,因此此处加一个block,后面title为块名(可不写,建议写)预留标题位置 -->
    <title>{% block title %}父模板文件{% endblock title %}</title>
</head>
<body>
<!-- 头部相同部分 -->
<h1>导航条</h1>

<!-- 【2】预留位置2 -->
{% block b1 %}
    <h1>这是父模板b1块中的内容</h1>
{% endblock b1 %}

<!-- 【3】预留位置3 -->
{% block b2 %}
    <h1>这是父模板b2块中的内容</h1>
{% endblock b2 %}

<!-- 底部相同部分 -->
<h1>版权信息</h1>
</body>
</html>
4)引用模板 templates/app2/child.html
<!-- 调用基础模板 -->
{% extends 'app2/base.html' %}

<!-- 重写预留位置1 -->
{% block title %}子模板文件{% endblock title %}

<!-- 重写预留位置2 -->
{% block b1 %}
    <!-- block.super:把父模板对应块中的内容拿过来 -->
    {{ block.super }}
    <h1>这是子模板b1块中的内容</h1>
{% endblock b1 %}

<!-- 重写预留位置3 -->
{% block b2 %}
    <!-- block.super:把父模板对应块中的内容拿过来 -->
    {{ block.super }}
    <h1>这是子模板b2块中的内容</h1>
{% endblock b2 %}
5)效果:http://127.0.0.1:8000/temp_inherit/
导航条
这是父模板b1块中的内容
这是子模板b1块中的内容
这是父模板b2块中的内容
这是子模板b2块中的内容
版权信息
六、html转义
编辑商品详情信息,数据表中保存的是html内容。
在模板上下文中的html标记默认是会被转义的。
小于号< 转换为<
大于号> 转换为>
单引号' 转换为'
双引号" 转换为 "
与符号& 转换为 &
要关闭模板上下文字符串的转义:可以使用 {{ 模板变量|safe}}
也可以使用:
{% autoescape off %}
	模板语言代码
{% endautoescape %}
html转义示例
1)app2/views.py
# /html_escape
def html_escape(request):
    '''html转义'''
    return render(request, 'app2/html_escape.html', {'content':'<h1>hello</h1>'})
2)templates/html_escape.html
<!DOCTYPE html>
<html lang="en">
<head>
<meta charset="UTF-8">
<title>html转义</title>
</head>
<body>
html转义:<br/>
{{ content }}<br/>
使用safe过滤器关闭转义:<br/>
{{ content|safe }}<br/>
使用autoescape关闭转义:<br/>
{% autoescape off %}
{{ content }}
{{ content }}
{% endautoescape %}<br/>
模板硬编码中的字符串默认不会经过转义:<br/>
{{ test|default:'<h1>hello</h1>' }}<br/>
手动进行转义:<br/>
{{ test|default:'<h1>hello</h1>' }}
</body>
</html>
效果:http://127.0.0.1:8000/html_escape/
html转义:
<h1>hello</h1>
使用safe过滤器关闭转义:
hello


使用autoescape关闭转义:
hello

hello


模板硬编码中的字符串默认不会经过转义:
hello


手动进行转义:
<h1>hello</h1>
7.csrf攻击
首先做一个登录页,让用户输入用户名和密码进行登录,登录成功之后跳转的修改密码页面。在修改密码页面输入新密码,点击确认按钮完成密码修改。
登录页需要一个模板文件login.html.修改密码页面也需要一个模板文件change_pwd.html.
显示登录页的视图login,验证登录的视图login_check,显示发帖页的视图change_pwd,处理修改密码的视图change_pwd_action.
加功能:
a)只有用户登录之后才可以进行修改密码操作。
登录装饰器函数。
django防止csrf的方式:
- 默认打开csrf中间件。
- 表单post提交数据时加上{% csrf_token %}标签。
防御原理:
1)渲染模板文件时在页面生成一个名字叫做csrfmiddlewaretoken的隐藏域。
2)服务器交给浏览器保存一个名字为csrftoken的cookie信息。
3)提交表单时,两个值都会发给服务器,服务器进行比对,如果一样,则csrf验证通过,否则失败。
8.验证码
在用户注册、登录页面,为了防止暴力请求,可以加入验证码功能,如果验证码错误,则不需要继续处理,可以减轻业务服务器、数据库服务器的压力。
9.反向解析
当某一个url配置的地址发生变化时,页面上使用反向解析生成地址的位置不需要发生变化。
根据url 正则表达式的配置动态的生成url。
在项目urls中包含具体应用的urls文件时指定namespace;