Spring MVC does special care to upload file to server. It makes file upload an easy work for web application developers. Spring MVC library jar provides CommonsMultipartResolver class that makes special care to form submitted using “multipart/form-data” encode type. We can also specify max file size in this resolver.Tools Used:
- Spring MVC 3.0.3
- Eclipse Indigo 3.7
- Tomcat 6
- Jdk 1.6
- Apache Common File Upload 1.2.0
- Apache Common IO 2.0.1
As you can see, we need two more jar files to upload file to server using Spring MVC. The name of the jar files are :
- commons-io-2.0.1.jar
- commons-fileupload-1.2.1.jar
Step1: Registering CommonsMultipartResolver in Spring MVC Configuration file
We must first register CommonsMultipartResolver class in Spring MVC configuration file so that Spring can handle multipart form data.
1 | <!-- Configure the multipart resolver --> |
2 | <bean id="multipartResolver" class="org.springframework.web.multipart.commons.CommonsMultipartResolver"> |
4 | <!-- one of the properties available; the maximum file size in bytes --> |
5 | <property name="maxUploadSize" value="100000"/> |
The property “maxUploadSize” can be used to specify the max size of the file that can be uploaded to server. If we try to upload a file that is greater that the size specified in the property then Spring will through MaxUploadSizeExceededException. Later we will also learn how to handle this exception to show user friendly message when file is larger.
Step2: Creating file upload form
01 | package com.raistudies.domain; |
03 | import org.springframework.web.multipart.commons.CommonsMultipartFile; |
05 | public class UploadForm { |
07 | private String name = null; |
08 | private CommonsMultipartFile file = null; |
10 | public String getName() { |
13 | public void setName(String name) { |
16 | public CommonsMultipartFile getFile() { |
19 | public void setFile(CommonsMultipartFile file) { |
21 | this.name = file.getOriginalFilename(); |
The file upload form contains two property one is name of type String, will contain name of the file to be upload, and the other is the file of type CommonsMultipartFile, will contain file itself. CommonsMultipartFile class is present in Apache Common Fileupload library and Spring MVC converts the form file to the instance of CommonsMultipartFile.
As our form will only contain file element, so we set the name of the file in the setter method of file attribute.
Step3: Creating controller class for file upload
01 | package com.raistudies.controllers; |
03 | //imports has been removed to make the code short. You can get full file by downloading it from bellow. |
06 | @RequestMapping(value="/FileUploadForm.htm") |
07 | public class UploadFormController implements HandlerExceptionResolver{ |
09 | @RequestMapping(method=RequestMethod.GET) |
10 | public String showForm(ModelMap model){ |
11 | UploadForm form = new UploadForm(); |
12 | model.addAttribute("FORM", form); |
13 | return "FileUploadForm"; |
16 | @RequestMapping(method=RequestMethod.POST) |
17 | public String processForm(@ModelAttribute(value="FORM") UploadForm form,BindingResult result){ |
18 | if(!result.hasErrors()){ |
19 | FileOutputStream outputStream = null; |
20 | String filePath = System.getProperty("java.io.tmpdir") + "/" + form.getFile().getOriginalFilename(); |
22 | outputStream = new FileOutputStream(new File(filePath)); |
23 | outputStream.write(form.getFile().getFileItem().get()); |
25 | } catch (Exception e) { |
26 | System.out.println("Error while saving file"); |
27 | return "FileUploadForm"; |
31 | return "FileUploadForm"; |
36 | public ModelAndView resolveException(HttpServletRequest arg0, |
37 | HttpServletResponse arg1, Object arg2, Exception exception) { |
38 | Map<Object, Object> model = new HashMap<Object, Object>(); |
39 | if (exception instanceof MaxUploadSizeExceededException){ |
40 | model.put("errors", "File size should be less then "+ |
41 | ((MaxUploadSizeExceededException)exception).getMaxUploadSize()+" byte."); |
43 | model.put("errors", "Unexpected error: " + exception.getMessage()); |
45 | model.put("FORM", new UploadForm()); |
46 | return new ModelAndView("/FileUploadForm", (Map) model); |
The UploadFormController adds the form bean on get method request and save the file included in the request form in temp directory of server in post method.
You can notice one more thing here i.e. the UploadFormController class also implements an interface HandlerExceptionResolver. It is necessary to implement this interface to handle the MaxUploadSizeExceededException that is thrown when form file is larger then the specified max file size. resolveException method shows form with error message in form while dealing with larger file size.
Step4: Creating jsp file for file upload
01 | <!DOCTYPE HTML PUBLIC "-//W3C//DTD XHTML 1.0 Transitional//EN" |
03 | <%@ page session="true" %> |
08 | <title>File Upload with Spring 3 MVC</title> |
10 | <meta http-equiv="Content-Type" content="text/html; charset=windows-1251" > |
13 | <h1>File Upload Form</h1><br /> |
15 | <form:form commandName="FORM" enctype="multipart/form-data" method="POST"> |
17 | <tr><td colspan="2" style="color: red;"><form:errors path="*" cssStyle="color : red;"/> |
21 | <tr><td>Name : </td><td><form:input type="file" path="file" /></td></tr> |
23 | <tr><td colspan="2"><input type="submit" value="Upload File" /></td></tr> |
The jsp file contains a form with file input. The enctype of the form must be “multipart/form-data” to send binary data like file to server.
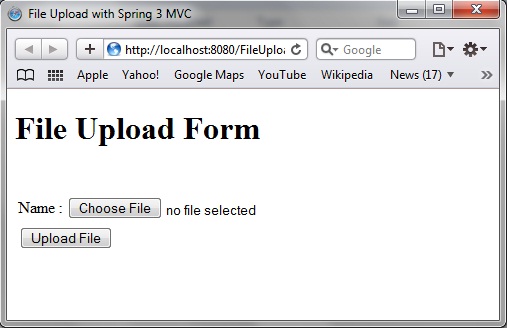
That is all. You can deploy the war file in Tomcat 6 and hit the url in browser, you will get following form:

File Upload Form using Spring MVC
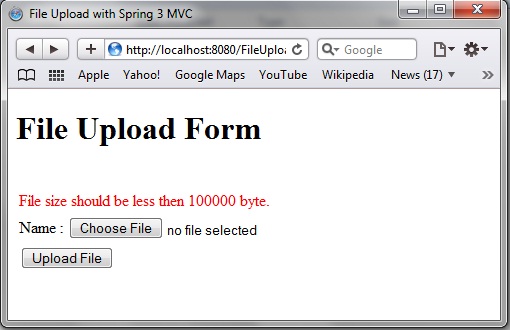
Select a very large file (more than 100KB) and click on “Upload File” button. You will get following error :

File Size Error in Upload Form Spring MVC
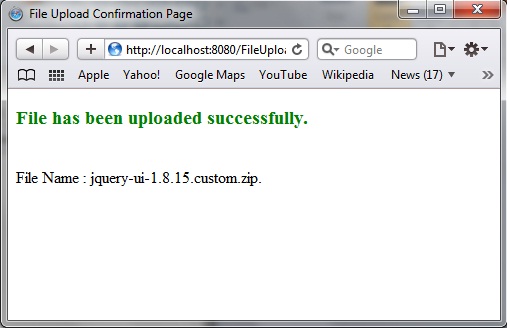
Now, select a file less than 100 kb and click on “Upload File” button. You will be forwarded to success page which will show you the name of the file uploaded.

File Upload Successful Page
You can download the source and war file of the example from following links:
Source: Download
War: Download


