在开发过程中,有时候会使用到公司内部的一些开发包,显然把这些包放在外部是不合适的。另外,由于项目一直在开发中,这些内部的依赖可能也在不断的更新。可以通过搭建公司内部的Maven服务器,将第三方和内部的依赖统一管理。
这里使用Nexus来搭建本地的Maven服务器,过程比较简单。
一、安装服务器
1、下载
我们可以在nexus的官网上找到它的相关介绍,下载地址是:http://nexus.sonatype.org/downloads/,在这里可以找到最新的版本,如果需要以前的版本,在官网上应该也可以找到下载地址。我下载的是:nexus-oss-webapp-1.8.0-bundle.tar.gz。关于Nexus的详细使用方法可以参照:Repository Management with Nexus.
2、安装
解压下载的文件:
# tar xzvf nexus-oss-webapp-1.8.0-bundle.tar.gz
解压后会在同级目录中,出现两个文件夹:nexus-oss-webapp-1.8.0和sonatype-work,前者包含了nexus的运行环境和应用程序,后者包含了你自己的配置和数据。
3、启动nexus
在上面的提到,nexus的运行环境在nexus-oss-webapp-1.8.0目录,下面就进入这个目录启动:
# cd nexus-oss-webapp-1.8.0/bin/jsw/linux-x86-64/
在这个目录下包含了一个文件夹和三个文件:lib、nexus、platform和wrapper,其中nexus就是启动命令。
# ./nexus
执行上面的命令,可以得到nexus命令的用法提示:start 命令启动,stop命令停止。下面启动nexus:
# ./nexus start
Starting Nexus OSS...
Started Nexus OSS
从控制台输出可以看到Nexus已经启动成功,我们可以通过log文件查看更详细的信息:
# cd ~/nexus-oss-webapp-1.8.0/log
# tail -f wrapper.log
在log中可以看到nexus默认监听的端口是8081。那么我们就可以在浏览器中访问:http://host:8081/nexus,

二、配置Nexus
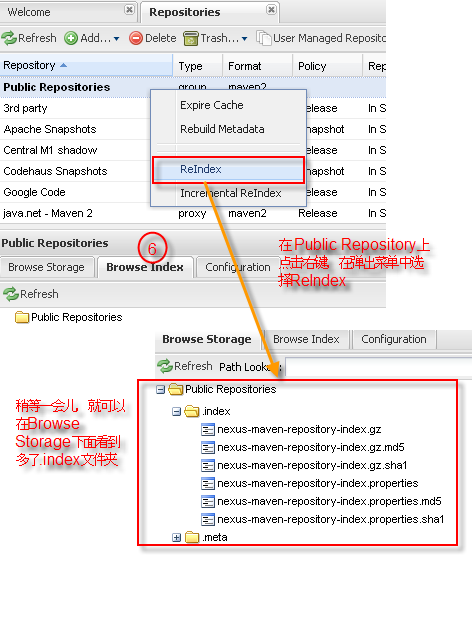
由于在新搭建的nexus环境中只是一个空的仓库,所以第一步就是要和远程的Maven中心仓库进行同步。

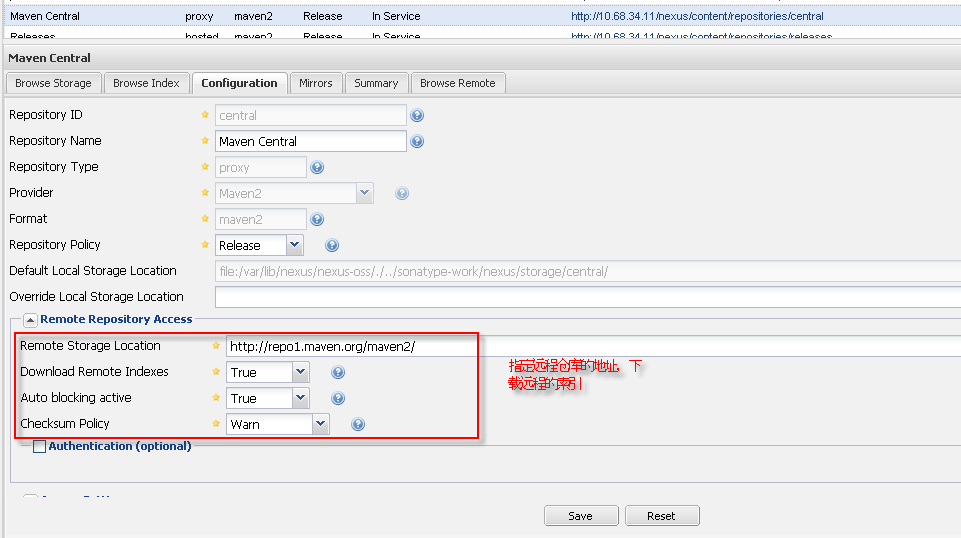
如果在Reindex之后,并没有同步到远程的仓库,可以检查每个仓库的设置。下面是Maven Central的设置:
三、在项目中使用私服
在完成了上面的配置后,就可以将项目中默认的Repository切换为本地的私服了,只需要在pom.xml中增加repositories就可以了:
- <project xmlns="http://maven.apache.org/POM/4.0.0" xmlns:xsi="http://www.w3.org/2001/XMLSchema-instance"
- xsi:schemaLocation="http://maven.apache.org/POM/4.0.0 http://maven.apache.org/xsd/maven-4.0.0.xsd">
- <modelVersion>4.0.0</modelVersion>
- <groupId>org.maven.demo</groupId>
- <artifactId>MavenDemo</artifactId>
- <version>0.0.1-SNAPSHOT</version>
- <packaging>jar</packaging>
- <name>MavenDemo</name>
- <url>http://maven.apache.org</url>
- <repositories>
- <repository>
- <snapshots>
- <enabled>true</enabled>
- </snapshots>
- <id>public</id>
- <name>Public Repositories</name>
- <url>http://172.28.189.138:8081/nexus/content/groups/public/</url>
- </repository>
- </repositories>
- <pluginRepositories>
- <pluginRepository>
- <id>public</id>
- <name>Public Repositories</name>
- <url>http://172.28.189.138:8081/nexus/content/groups/public/</url>
- </pluginRepository>
- </pluginRepositories>
- <dependencies>
- <dependency>
- <groupId>junit</groupId>
- <artifactId>junit</artifactId>
- <version>4.8.1</version>
- <type>jar</type>
- <scope>compile</scope>
- </dependency>
- </dependencies>
- <properties>
- <project.build.sourceEncoding>UTF-8</project.build.sourceEncoding>
- </properties>
- </project>
将pom.xml保存后,再回过头来了看去nexus管理界面看,就会发现junit已经被下载到本地的nexus服务器中了。