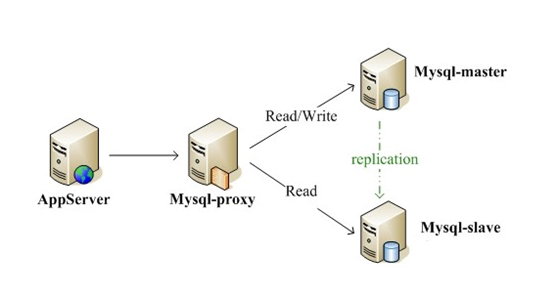
一.介绍Atlas及架构图
Atlas源代码用C语言编写,它对于Web Server相当于是DB,相对于DB相当于是Client,如果把Atlas的逻辑放到Web Server程序里去处理,这样会大大增加Web Server程序的复杂度,同时Web Server和DB之间的耦合度也相当高,因为只要DB增加/减少服务,Web Server就有可能要发生代码改变,若代码不改变,就得通过中间关系表与心跳机制来维护Server之间的关系,这样会带来性能的损耗,而Atlas是架设在Web Server与DB之间的一个中间件,Web Server与DB之间的耦合关系放到了Atlas来处理,既做到了灵活也保留了性能,这也是Atlas存在的价值。
Atlas支持表的水平切分,支持读写分离,对数据实时性要求较高的项目可以在select语句前增加/*master*/强制读主库

二.实施环境
mysql master:192.168.200.101
mysql slave :192.168.200.102
atlas :192.168.200.103
atlas有两个port,分别为
工作端口: proxy-address项配置,例如proxy-address = 0.0.0.0:1234代表客户端应该使用1234这个端口连接Atlas来发送SQL请求。
管理端口: admin-address项配置,例如admin-address = 0.0.0.0:2345代表DBA应该使用2345这个端口连接Atlas来执行运维管理操作。
二.安装Atlas
注意:只能安装在64位的Linux操作系统上,CentOS官方建议rpm安装方式
三.实施案例
1.目录结构
bin: 该目录存放atlas启动程序,还有加密脚本
conf: 该目录则存放atlas.conf配置档,可以有多个实例
lib: 该目录存放程序的一些库文件及依赖文件
log: 该目录则存放实例产生的日志
安装位置:
/usr/local/mysql-proxy
配置文件:
/usr/local/mysql-proxy/conf/test.cnf
2.配置Mysql主从
全部主机关闭防火墙和SElinux
[root@zha ~]# /etc/init.d/iptables stop

iptables: Setting chains to policy ACCEPT: filter    [  OK  ]

iptables: Flushing firewall rules:                         [  OK  ]

iptables: Unloading modules:                             [  OK  ]

[root@zha ~]# setenforce 0

setenforce: SELinux is disabled
修改主机名(200.101)
[root@zha ~]# hostname master

[root@zha ~]# bash

[root@master ~]# vim /etc/sysconfig/network

NETWORKING=yes

HOSTNAME=master

(200.102)

[root@zha ~]# hostname slave

[root@zha ~]# bash

[root@slave ~]# vim /etc/sysconfig/network

(200.103)

[root@zha ~]# hostname Atlas

[root@zha ~]# bash

[root@Atlas ~]# vim /etc/sysconfig/network

NETWORKING=yes

HOSTNAME=zha
主从分别用yum安装mysql
[root@master ~]# yum -y install mysql mysql-server

[root@slave ~]# yum -y install mysql mysql-server
主从分别修改配置文件并启动服务
[root@master ~]# vim /etc/my.cnf

[mysqld]

datadir=/var/lib/mysql

socket=/var/lib/mysql/mysql.sock

user=mysql

# Disabling symbolic-links is recommended to prevent assorted security risks

symbolic-links=0

log-error=/var/lib/mysql/mysql.err

log=/var/lib/mysql/mysql_log.log

log-slow-queries=/var/lib/mysql/mysql_slow_queris.log

default-character-set=utf8

log-bin=mysql-bin

server-id=1

log-slave-updates

sync_binlog=1

auto_increment_increment=2

auto_increment_offset=1

[client]

default-character-set=utf8

[mysqld_safe]

log-error=/var/log/mysqld.log

pid-file=/var/run/mysqld/mysqld.pid
#注意server-id不能相同
[root@master ~]# /etc/init.d/mysqld start
配置主从复制
master操作:
查看file和pos值
mysql> show master status;

+------------------+----------+--------------+------------------+

| File             | Position | Binlog_Do_DB | Binlog_Ignore_DB |

+------------------+----------+--------------+------------------+

| mysql-bin.000003 |      106 |              |                  |

+------------------+----------+--------------+------------------+

1 row in set (0.00 sec)

mysql>  grant replication slave on *.* to 'replication'@'192.168.200.%' identified by '123456';

Query OK, 0 rows affected (0.04 sec)

mysql> flush privileges;
slave操作:
mysql> change master to master_host='192.168.200.101',master_user='replication',master_password='123456',master_log_file='mysql-bin.000003',master_log_pos=106;

Query OK, 0 rows affected (0.09 sec)

mysql> slave start;

Query OK, 0 rows affected (0.00 sec)


mysql> show slave statusG

Slave_IO_Running: Yes

Slave_SQL_Running: Yes
(确保这俩线程为YES)
主从配置完成!
3.安装配置Atlas
下载地址:https://github.com/Qihoo360/Atlas/releases
[root@Atlas ~]# rpm -ivh Atlas-2.2.1.el5.x86_64.rpm

Preparing...                ########################################### [100%]

 1:Atlas                  ########################################### [100%]

[root@Atlas ~]# vim /usr/local/mysql-proxy/conf/test.cnf

#管理接口的用户名

admin-username = user


#管理接口的密码

admin-password = pwd


#Atlas后端连接的MySQL主库的IP和端口,可设置多项,用逗号分隔

proxy-backend-addresses = 192.168.200.101:3306


#Atlas后端连接的MySQL从库的IP和端口,@后面的数字代表权重,用来作负载均衡,若省略则默认为1,可设置多项,用逗号分隔

proxy-read-only-backend-addresses = 192.168.200.102:3305@1


#用户名与其对应的加密过的MySQL密码,密码使用PREFIX/bin目录下的加密程序encrypt加密,下行的user1和user2为示例,将其替换为你的MySQL的用户名和加密密码!

pwds = user1:+jKsgB3YAG8=, user2:GS+tr4TPgqc=


#设置Atlas的运行方式,设为true时为守护进程方式,设为false时为前台方式,一般开发调试时设为false,线上运行时设为true,true后面不能有空格。

daemon = true


#设置Atlas的运行方式,设为true时Atlas会启动两个进程,一个为monitor,一个为worker,monitor在worker意外退出后会自动将其重启,设为false时只有worker,没有monitor,一般开发调试时设为false,线上运行时设为true,true后面不能有空格。

keepalive = true


#工作线程数,对Atlas的性能有很大影响,可根据情况适当设置

event-threads = 8


#日志级别,分为message、warning、critical、error、debug五个级别

log-level = message


#日志存放的路径

log-path = /usr/local/mysql-proxy/log


#SQL日志的开关,可设置为OFF、ON、REALTIME,OFF代表不记录SQL日志,ON代表记录SQL日志,REALTIME代表记录SQL日志且实时写入磁盘,默认为OFF

#sql-log = OFF


#慢日志输出设置。当设置了该参数时,则日志只输出执行时间超过sql-log-slow(单位:ms)的日志记录。不设置该参数则输出全部日志。

#sql-log-slow = 10


#实例名称,用于同一台机器上多个Atlas实例间的区分

#instance = test


#Atlas监听的工作接口IP和端口

proxy-address = 0.0.0.0:1234


#Atlas监听的管理接口IP和端口

admin-address = 0.0.0.0:2345


#分表设置,此例中person为库名,mt为表名,id为分表字段,3为子表数量,可设置多项,以逗号分隔,若不分表则不需要设置该项

#tables = person.mt.id.3


#默认字符集,设置该项后客户端不再需要执行SET NAMES语句

charset = utf8


#允许连接Atlas的客户端的IP,可以是精确IP,也可以是IP段,以逗号分隔,若不设置该项则允许所有IP连接,否则只允许列表中的IP连接

#client-ips = 127.0.0.1, 192.168.1


#Atlas前面挂接的LVS的物理网卡的IP(注意不是虚IP),若有LVS且设置了client-ips则此项必须设置,否则可以不设置

#lvs-ips = 192.168.1.1

改工作端口和管理端口ip为masterip
4.启动Atlas
[root@Atlas ~]# /usr/local/mysql-proxy/bin/mysql-proxyd test start

OK: MySQL-Proxy of test is started

如果报错:

/usr/local/mysql-proxy/bin/mysql-proxy: error while loading shared libraries: libcrypto.so.6: cannot open shared object file: No such file or directory

error: failed to start MySQL-Proxy of test

那么[root@Atlas ~]# yum provides */libcrypto.so.6   #寻找包含 libcrypto.so.6 的安装包

发现缺少这个

openssl098e-0.9.8e-17.el6.centos.2.x86_64 : A

     ...: compatibility version of a general

     ...: cryptography and TLS library

Repo        : c6-media

Matched from:

Filename    : /usr/lib64/libcrypto.so.6

安装 [root@Atlas ~]# yum -y install openssl098e-0.9.8e-17.el6.centos.2.x86_64

[root@Atlas ~]# ln -s  libcrypto.so.0.9.8e libcrypto.so.6  #创建连接文件
给Atlas默认用户授权
master和slave操作:
mysql>  grant replication slave on *.* to 'user'@'192.168.200.%' identified by 'pwd';

Query OK, 0 rows affected (0.04 sec)


mysql> flush privileges;

Query OK, 0 rows affected (0.12 sec)
5.查看读写分离效果
[root@Atlas ~]# cat /usr/local/mysql-proxy/log/test.log

2018-05-04 16:40:53: (message) proxy listening on port 0.0.0.0:1234

2018-05-04 16:40:53: (message) added read/write backend: 192.168.200.101:3306

2018-05-04 16:40:53: (message) added read-only backend: 192.168.200.102:3305