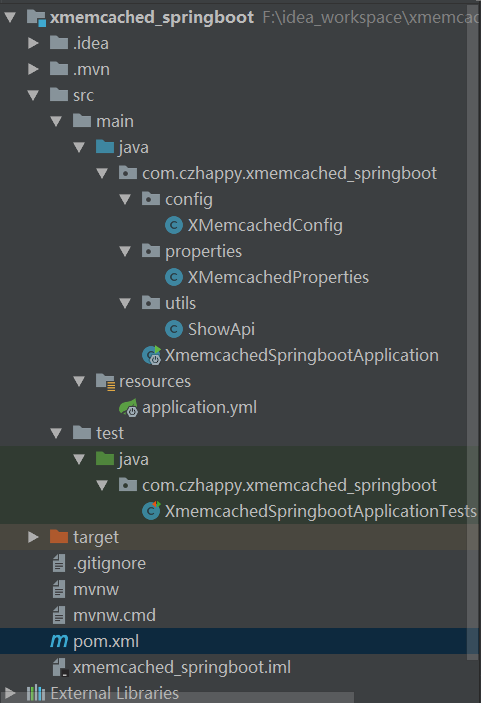
创建SpringBoot项目xmemcached_springboot,添加开发需要的包名和类名,项目的目录结构如下:
添加XMemcached依赖:
<dependency>
            <groupId>com.googlecode.xmemcached</groupId>
            <artifactId>xmemcached</artifactId>
            <version>2.4.0</version>
        </dependency>
添加XMemcached相关配置到属性文件application.yml
###################  memcached配置  ###################
memcached:
  servers: 192.168.84.128:2222 192.168.84.128:6666
  poolSize: 10
  sanitizeKeys: false
  openCache: true # true为启动缓存 false为标准实现
编写读取上述属性的读取类:XMemcachedProperties.java
package com.czhappy.xmemcached_springboot.properties;

import org.springframework.boot.context.properties.ConfigurationProperties;
import org.springframework.stereotype.Component;

@Component
@ConfigurationProperties(prefix = "memcached")
public class XMemcachedProperties {

    private String servers;
    private int poolSize;
    private boolean sanitizeKeys;
    private boolean openCache;

    public boolean isOpenCache() {
        return openCache;
    }

    public void setOpenCache(boolean openCache) {
        this.openCache = openCache;
    }

    public String getServers() {
        return servers;
    }

    public void setServers(String servers) {
        this.servers = servers;
    }

    public int getPoolSize() {
        return poolSize;
    }

    public void setPoolSize(int poolSize) {
        this.poolSize = poolSize;
    }

    public boolean isSanitizeKeys() {
        return sanitizeKeys;
    }

    public void setSanitizeKeys(boolean sanitizeKeys) {
        this.sanitizeKeys = sanitizeKeys;
    }
}
编写XMemcachedConfig.java,构建builder和client
package com.czhappy.xmemcached_springboot.config;

import com.czhappy.xmemcached_springboot.properties.XMemcachedProperties;
import net.rubyeye.xmemcached.MemcachedClient;
import net.rubyeye.xmemcached.MemcachedClientBuilder;
import net.rubyeye.xmemcached.XMemcachedClientBuilder;
import net.rubyeye.xmemcached.command.BinaryCommandFactory;
import net.rubyeye.xmemcached.impl.KetamaMemcachedSessionLocator;
import org.springframework.beans.factory.annotation.Autowired;
import org.springframework.context.annotation.Bean;
import org.springframework.context.annotation.Configuration;

@Configuration
public class XMemcachedConfig {

    @Autowired
    private XMemcachedProperties xMemcachedProperties;

    // 构建builder
    @Bean
    public MemcachedClientBuilder getXMBuilder(){
        MemcachedClientBuilder memcachedClientBuilder = null;
        try{
            String servers = xMemcachedProperties.getServers();
            System.out.println("servers="+servers);
            memcachedClientBuilder = new XMemcachedClientBuilder(servers);
            // 开启/关闭failure模式
            memcachedClientBuilder.setFailureMode(false);
            memcachedClientBuilder.setSanitizeKeys(xMemcachedProperties.isSanitizeKeys());
            memcachedClientBuilder.setConnectionPoolSize(xMemcachedProperties.getPoolSize());
            memcachedClientBuilder.setCommandFactory(new BinaryCommandFactory());
            memcachedClientBuilder.setOpTimeout(3000);
            memcachedClientBuilder.setSessionLocator(new KetamaMemcachedSessionLocator());

            // 诸多XMemcached配置
            return memcachedClientBuilder;
        }catch(Exception e){
            e.printStackTrace();
        }
        return null;
    }

    // client
    @Bean
    public MemcachedClient getXMClient(MemcachedClientBuilder memcachedClientBuilder){
        MemcachedClient memcachedClient = null;
        try{
            memcachedClient = memcachedClientBuilder.build();
            return memcachedClient;
        }catch(Exception e){
            e.printStackTrace();
        }
        return null;

    }
}
编写ShowApi.java文件,此处仅实现新增和查询方法,其他方法可参考添加
package com.czhappy.xmemcached_springboot.utils;

import net.rubyeye.xmemcached.MemcachedClient;
import org.springframework.beans.factory.annotation.Autowired;
import org.springframework.stereotype.Service;

@Service
public class ShowApi {

    @Autowired
    private MemcachedClient memcachedClient;

    /**
     * 新增
     * @param key
     * @param value
     */
    public void showAdd(String key, String value){
        try {
            memcachedClient.set(key, 0, value);
        }catch (Exception e){
            e.printStackTrace();
        }
    }

    public String showQuery(String key){
        try {
            return memcachedClient.get(key);
        }catch (Exception e){
            e.printStackTrace();
        }
        return "";
    }
}
编写测试类,添加数据并打印查询的结果:
package com.czhappy.xmemcached_springboot;

import com.czhappy.xmemcached_springboot.utils.ShowApi;
import org.junit.Test;
import org.junit.runner.RunWith;
import org.springframework.beans.factory.annotation.Autowired;
import org.springframework.boot.test.context.SpringBootTest;
import org.springframework.test.context.junit4.SpringRunner;

@RunWith(SpringRunner.class)
@SpringBootTest
public class XmemcachedSpringbootApplicationTests {

    @Autowired
    private ShowApi showApi;

    @Test
    public void contextLoads() {

        String key = "goods_name";
        String value = "apple";
        showApi.showAdd(key, value);
        System.out.println(showApi.showQuery(key));

    }

}
为了测试memcached集群和数据存储,我们分别启动端口为2222和6666的memcached服务端


运行测试类,可以看到后台打印出存储的结果

说明数据保存成功,我们也可以去服务端直接查询
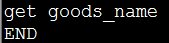
2222端口:
6666端口:
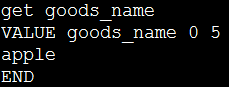
数据具体存储在哪个memcached上我们是无法预知的,它是由客户端XMemcached内部hash算法判断实现,此处我们可以知道数据是存储成功了,通过查询最终结果能知道存在端口为6666的服务端上。